2020 AUDI A3 change time
[x] Cancel search: change timePage 144 of 400
Parking aid
Parking space search
Applies to: vehicles with park assist
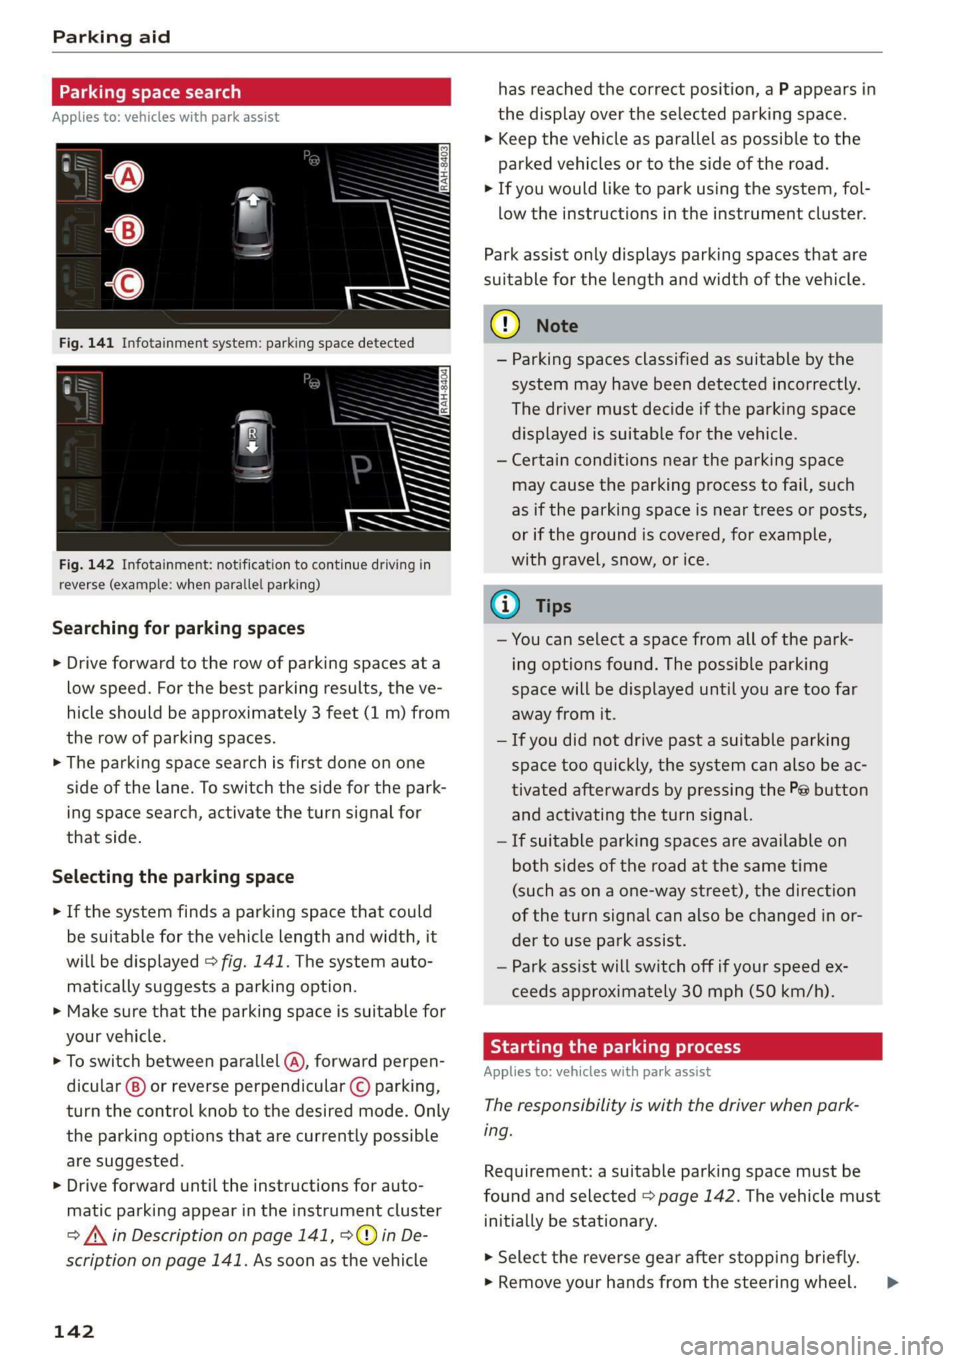
Fig. 142 Infotainment: notification to continue driving in
reverse (example: when parallel parking)
Searching for parking spaces
> Drive forward to the row of parking spaces ata
low speed. For the best parking results, the ve-
hicle should be approximately 3 feet (1 m) from
the row of parking spaces.
> The parking space search is first done on one
side of the lane. To switch the side for the park-
ing space search, activate the turn signal for
that side.
Selecting the parking space
> If the system finds a parking space that could
be suitable for the vehicle length and width, it
will be displayed > fig. 141. The system auto-
matically suggests a parking option.
> Make sure that the parking space is suitable for
your vehicle.
> To switch between parallel (@), forward perpen-
dicular @) or reverse perpendicular © parking,
turn the control knob to the desired mode. Only
the parking options that are currently possible
are suggested.
> Drive forward until the instructions for auto-
matic parking appear in the instrument cluster
> /\ in Description on page 141, >©@ in De-
scription on page 141. As soon as the vehicle
142
has reached the correct position, a P appears in
the display over the selected parking space.
> Keep the vehicle as parallel as possible to the
parked vehicles or to the side of the road.
> If you would like to park using the system, fol-
low the instructions in the instrument cluster.
Park assist only displays parking spaces that are
suitable for the length and width of the vehicle.
@) Note
— Parking spaces classified as suitable by the
system may have been detected incorrectly.
The driver must decide if the parking space
displayed is suitable for the vehicle.
— Certain conditions near the parking space
may cause the parking process to fail, such
as if the parking space is near trees or posts,
or if the ground is covered, for example,
with gravel, snow, or ice.
G) Tips
— You can select a space from all of the park-
ing options found. The possible parking
space will be displayed until you are too far
away from it.
— If you did not drive past a suitable parking
space too quickly, the system can also be ac-
tivated afterwards by pressing the Pe button
and activating the turn signal.
— If suitable parking spaces are available on
both sides of the road at the same time
(such as on a one-way street), the direction
of the turn signal can also be changed in or-
der to use park assist.
— Park assist will switch off if your speed ex-
ceeds approximately 30 mph (50 km/h).
Starting the parking process
Applies to: vehicles with park assist
The responsibility is with the driver when park-
ing.
Requirement: a suitable parking space must be
found and selected > page 142. The vehicle must
initially be stationary.
> Select the reverse gear after stopping briefly.
» Remove your hands from the steering wheel. >
Page 162 of 400

Multifunction steering wheel
@ Name of the street where you are currently
driving
elec MU Amel ame Ler Tiasei eT a ace)
Applies to: vehicles with navigation system and analog instru-
ment cluster
asta
(as EI
RAH-7513
@ New York Ave
3 pala
[RAH-7514]
Fig. 160 Instrument cluster: turning maneuver in street
view
Requirement: a destination must be entered
=> page 189, route guidance must be started and
the navigation tab must be displayed.
Depending on vehicle equipment, the following
information may be shown in the driver informa-
tion system.
Distance to the next maneuver
Distance to the destination or stopover
Calculated arrival time
®©0O Name of the current expressway, highway or
street. If the O symbol is displayed in front
of the street name, you should turn onto the
street shown.
Direction arrow for the upcoming maneuver
Lane recommendation
CO®@ A bar graph appears when a direction arrow is
displayed. The fewer the bars that are shown,
the shorter the distance is until the turn.
160
The following functions are also available when
route guidance is active:
— Repeating the last voice guidance message:
press the |4] button.
— Adjusting the voice guidance volume: turn the
right
thumbwheel up or down while a voice
guidance message is playing.
ZA\ WARNING
The route calculated by the navigation system
is a recommendation for reaching your desti-
nation. Obey traffic lights, stopping restric-
tions, one-way streets, lane change restric-
tions, etc.
G@) Tips
— Also see the chapter > page 8, Controls ata
glance.
— An exclamation point “!” in front of the
street name indicates that the information
about this street or this section of the route
is not complete in the navigation data con-
tained in the MMI. Obey traffic laws in one-
way streets and pedestrian zones.
Page 168 of 400

Voice recognition system
Function Say:
Navigating to a specific address for
a contact
Navigate to contact (XY) business / private,
for example “Navigate to John Smith private”
Navigating to favorites Navigation favorites > Line (XY) / Line contents > Start route
guidance when prompted
Starting route guidance with an ad-
dress card open
Navigate / Navigate to private address / Navigate to business
address
Entering a new destination/stop-
over when route guidance is active
Enter address > enter the desired address when prompted >
confirm the new destination/stopover if prompted
Starting route guidance after enter-
ing a destination
Start route guidance
Canceling current route guidance Cancel route guidance
Calculating alternative routes Calculate alternative routes
Entering a point of interest by se-
lecting a search area with guidance
from the system
Point of interest > Change search area > category or subcate-
gory when prompted, for example “restaurant”
Destination input categories Audi Service / Train station / Airport / Hotel / Hospital / Park-
ing area / Rest area / Restaurant / Gas station etc.
Search areas for entering points of
interest
Nearby / Along the route / Near destination / Near stopover /
In new city / In a new state/country
Entering an online destination* Online destination (XY), for example “Online destination
"Lakeview Hotel"”
Correcting data input No I meant (XY)
Closing the full-screen command
list
Close
Requirement: you must be in the Navigation or
Map menu.
Depending on the vehicle equipment and the se-
lected menu item, you can say the following com-
mands for additional settings in navigation:
Function Say:
General map options Map / Day map / Night map / Automatically change map color
Map type 2D heading-up map / 2D north-up map / 3D map / Destina-
tion map / Overview map / Standard map* / Satellite map*®)
Showing the route list Route list
Showing the remaining distance/
time when route guidance is active
Destination information
Speed limit prompt How fast can I drive here?
Setting voice guidance for active
route guidance
Voice guidance on / Voice guidance off / Voice guidance short-
ened / Voice guidance complete / Voice guidance traffic
Blocking a certain section on the
route
Block route for (XY) meters/kilometers/yards/miles / Block
next route / Avoid next section of route
) AUDI AG provides access to services from third party providers. Permanent availability cannot be guaranteed, because that
depends on the third party provider.
166
Page 171 of 400
8V2012721BK
Telephone
Telephone
Introduction
Applies to: vehicles with telephone
You can operate various telephone functions easi-
ly through the MMI in your vehicle.
Depending on the country and the vehicle equip-
ment, the following options may be available:
— Connecting a cell phone with Bluetooth
— Using two telephones
— Using the Audi phone box
ZA WARNING
— Medical experts warn that mobile devices
can interfere with the function of pacemak-
ers. Always maintain a minimum distance of
about 7.9 inches (20 cm) between the mo-
bile device antennas and the pacemaker.
— Do not carry the mobile device in a pocket
directly over the pacemaker when the
phone is switched on.
— Switch the mobile device off immediately
if you suspect it may be interfering with
the pacemaker.
— Do not use the voice recognition system*
= page 162 in emergencies because your
voice may change in stressful situations. The
system may take longer to dial the number
or may not be able to dial it at all. Dial the
emergency number manually.
— Switch your mobile device off in areas where
there is a risk of an explosion. These loca-
tions are not always clearly marked. This
may include gas stations, fuel and chemical
storage facilities or transport vehicles, or lo-
cations where fuel vapors (such as propane
or gasoline vapor in vehicles or buildings),
chemicals or large quantities of dust parti-
cles (such as flour, sawdust or metal) may
be present in the air. This also applies to all
other locations where you would normally
turn your vehicle engine off.
— The demands of traffic require your full at-
tention. Always read the chapter
=> page 146, Traffic safety information.
CG) Note
Read the information about Audi connect, and
be sure to note the connectivity costs section
=> page 182.
G@) Tips
— The Bluetooth connection range is limited
to inside the vehicle.
—Aselection of supported Bluetooth devices
can be found in the database for tested mo-
bile devices at www.audi.com/bluetooth.
Setup
Connecting a cell phone via Bluetooth
Applies to: vehicles with telephone
Requirement: the vehicle must be stationary and
the ignition must be switched on. The Bluetooth
settings must be open on your mobile device dur-
ing the connection setup. The mobile device to be
connected must not be actively connected to any
other Bluetooth device. The MMI must not be
connected to a mobile device.
> Enable the Bluetooth function and visibility on
the MMI => page 233 and the cell phone.
> Select: [MENU] button > Telephone > Connect
mobile device > Find new devices > Next. The
available
Bluetooth devices are shown in the In-
fotainment system display, or
> Select: [MENU] button > Settings > left control
button > MMI settings > Connection manager
> page 231.
> Select and confirm the desired cell phone from
the list of displayed Bluetooth devices.
A PIN for a secure Bluetooth connection will be
generated.
> Confirm the PIN on your cell phone and on the
MMI, or:
> Enter the PIN for establishing a connection on
your cell phone. The time allowed for entering
the PIN is limited to approximately 30 seconds.
> Follow the system instructions.
> Pay attention to any other system prompts on
the MMI and on your cell phone.
169
Page 172 of 400
Telephone
After connecting successfully
Information about the connected profiles will ap-
pear. You can also change the profiles later
=> page 233.
The cell phone contacts are automatically loaded
in the MMI. This process can take several mi-
nutes, depending on the number of contacts.
Depending on your cell phone and the connection
type, you can use the following functions:
Handsfree
Requirement: your cell phone must be connected
to the MMI via a Bluetooth Hands Free Profile
(Bluetooth HFP).
You can use the hands-free system. You can make
calls using the antenna on your mobile device.
Sending and receiving messages
See > page 175.
@) Note
Read the information about Audi connect, and
be sure to note the connectivity costs section
=> page 182.
@) Tips
— You can apply additional settings to con-
nected mobile devices using the Connection
manager > page 231.
— You can also search for the MMI on your mo-
bile device using the Bluetooth device
search.
— You only have to pair your device one time.
Bluetooth devices that are already paired
automatically connect to the MMI when the
Bluetooth function is switched on, when
they are within range, and when the ignition
is switched on. The last connected mobile
device is given first priority.
— Pay attention to any system prompts dis-
played on your cell phone, for example if
the system should connect automatically in
the future. Depending on the cell phone,
you may also need to download the directo-
ry and confirm access to your text messages
separately.
170
— When leaving the vehicle, the Bluetooth
connection to the mobile device will auto-
matically disconnect. Depending on your
mobile device, phone calls in progress may
be automatically redirected from the MMI
to your mobile device so that you can con-
tinue the call on your phone.
Using two telephones
Applies to: vehicles with telephone, and Audi phone box
You can connect two cell phones to the MMI, for
example your business cell phone as the primary
phone and your private cell phone as the secon-
dary phone. You can be reached in your vehicle
through both cell phones.
The first connected cell phone is displayed as the
primary phone in the MMI. The second cell phone
is connected as the secondary phone.
The directory from the connected primary phone
will always be displayed. If you would like to use
the directory from the secondary phone, you
must switch the primary and secondary phone
=>page 171.
Connecting a cell phone as the primary
phone
> Connect your cell phone to the MMI via Blue-
tooth. The first connected cell phone is dis-
played as the Primary phone in the MMI.
See > page 169, Connecting a cell phone via
Bluetooth.
Connecting a cell phone as the secondary
phone
Requirement: a cell phone must be connected to
the MMI as the primary phone.
> Select: [MENU] button > Telephone > right con-
trol button > Connect secondary telephone.
See > page 169, Connecting a cell phone via
Bluetooth.
Example: you have connected your business cell
phone to the MMI as the primary phone and your
private cell phone as the secondary phone. To be
able to call contacts from your private cell phone
directory, you must switch the primary and
Page 186 of 400
Audi connect
— Some Audi connect Infotainment services
must be activated at my.audi.com.
— To make logging in easier in the vehicle, you
will receive an 8-digit myAudi PIN as an al-
ternative to your myAudi password after you
have created a myAudi account.
— Depending on the country, you may be able
to use the myAudi app or my.audi.com.
— For detailed information on configuration,
visit my.audi.com.
Accessing Audi connect Infotainment
Applies to: vehicles with Audi connect Infotainment
> Select: the [MENU] button > Audi connect.
A list of all of the available Audi connect Infotain-
ment services is shown on the Infotainment sys-
tem display.
You can also filter the Audi connect Infotainment
services by category:
> Select: [MENU] button > Audi connect > left
control button > for example, Navigation for
the Audi connect Infotainment services in the
Navigation menu.
Applies to: vehicles with Audi connect Infotainment
> Select: [MENU] button > Audi connect > desired
Audi connect Infotainment service > right con-
trol button.
Depending on the equipment and the Audi con-
nect Infotainment service selected, the following
basic functions may be available:
Save as preview
You can also see a preview of the selected Audi
connect Infotainment services on the Audi con-
nect Infotainment home page.
Show on map
You can show selected contents on the map and
use them for route guidance.
D_ Not available in all languages.
184
Log in
See > page 183.
Read out)
You can allow the MMI to read out the selected
contents.
Call
If a phone number was assigned to an entry, you
can call the number, for example to reserve tick-
ets.
Refresh
The contents for the selected Audi connect Info-
tainment service are refreshed.
Start route guidance
If a location was saved with an entry, you can use
it as the navigation destination. Route guidance
starts immediately.
Change search area
The set search area can be changed at any time.
Additional information on search areas can be
found under > page 191.
Closing Audi connect Infotainment services
Regardless of the function selected, you can
close an Audi connect Infotainment service at
any time and return to the home screen.
Services
Applies
to: vehicles with Audi connect Infotainment
Depending on the country and the vehicle equip-
ment, the following services may be available:
Weather information
Information on current weather conditions as
well as weather forecasts for the selected search
area.
> Select and confirm Weather.
Online news
> Select: Online news > desired newsfeed > a
headline.
Page 191 of 400
8V2012721BK
Navigation
Navigation
Opening navigation
Applies to: vehicles with navigation system
(le iY n
(2) 7
Home address
RAH-8976)
©-o Gas station
2
east
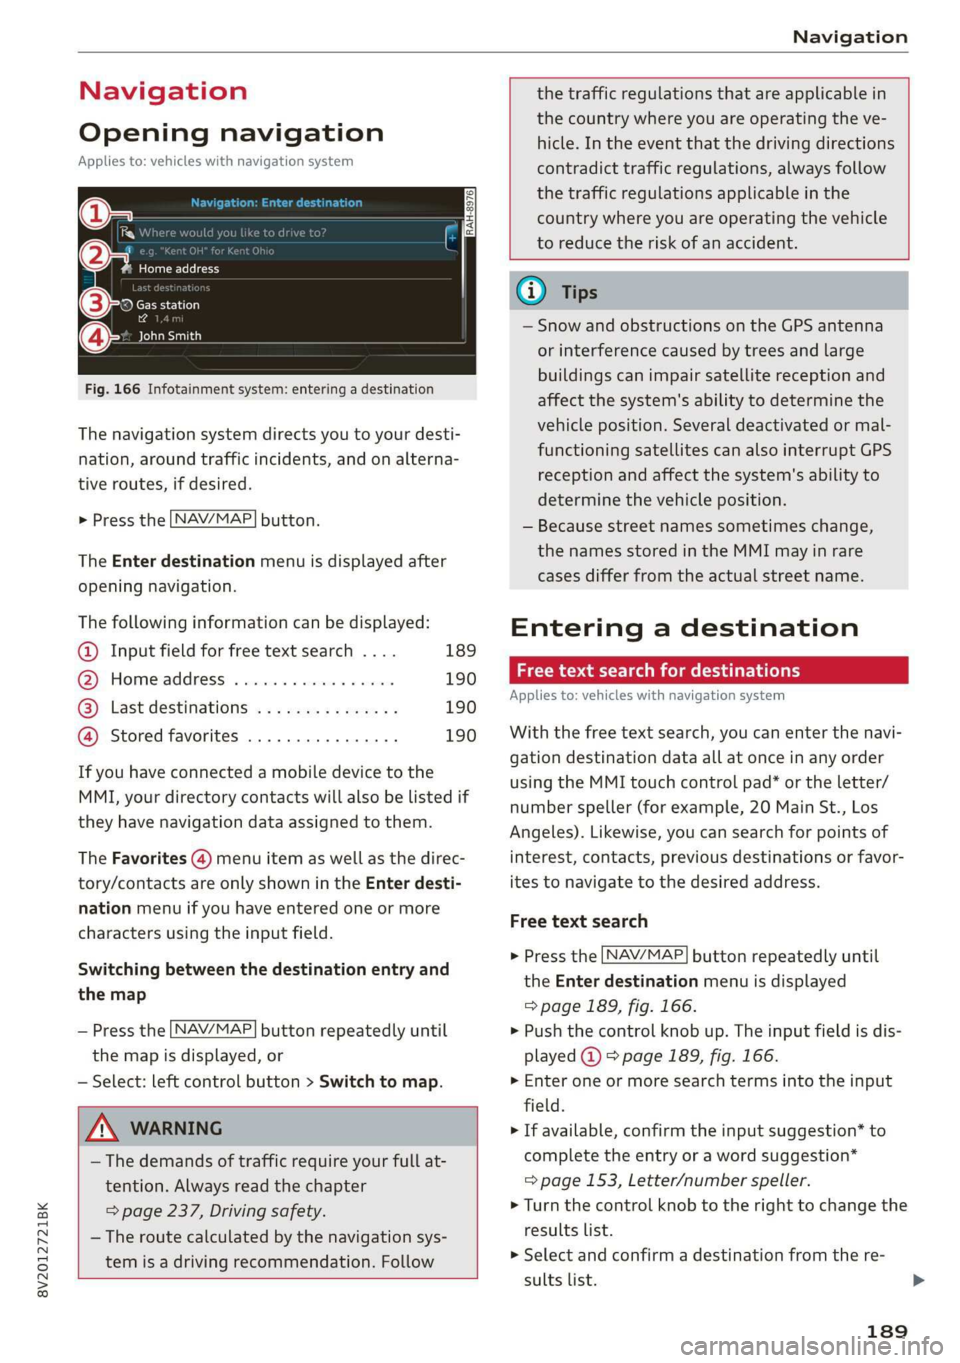
Fig. 166 Infotainment system: entering a destination
The navigation system directs you to your desti-
nation, around traffic incidents, and on alterna-
tive routes, if desired.
> Press the LNAV/MAP] button.
The Enter destination menu is displayed after
opening navigation.
The following information can be displayed:
@ Input field for free text search .... 189
@ Home address ...............-. 190
@® Last destinations ............... 190
@ Stored favorites ................ 190
If you have connected a mobile device to the
MMI, your directory contacts will also be listed if
they have navigation data assigned to them.
The Favorites (4) menu item as well as the direc-
tory/contacts are only shown in the Enter desti-
nation menu if you have entered one or more
characters using the input field.
Switching between the destination entry and
the map
— Press the [NAV/MAP] button repeatedly until
the map is displayed, or
— Select: left control button > Switch to map.
ZA WARNING
— The demands of traffic require your full at-
tention. Always read the chapter
= page 237, Driving safety.
— The route calculated by the navigation sys-
tem is a driving recommendation. Follow
the traffic regulations that are applicable in
the country where you are operating the ve-
hicle. In the event that the driving directions
contradict traffic regulations, always follow
the traffic regulations applicable in the
country where you are operating the vehicle
to reduce the risk of an accident.
Gi) Tips
— Snow and obstructions on the GPS antenna
or interference caused by trees and large
buildings can impair satellite reception and
affect the system's ability to determine the
vehicle position. Several deactivated or mal-
functioning satellites can also interrupt GPS
reception and affect the system's ability to
determine the vehicle position.
— Because street names sometimes change,
the names stored in the MMI may in rare
cases differ from the actual street name.
Entering a destination
act aeaee Tm (idler
Applies to: vehicles with navigation system
With the free text search, you can enter the navi-
gation destination data all at once in any order
using the MMI touch control pad* or the letter/
number speller (for example, 20 Main St., Los
Angeles). Likewise, you can search for points of
interest, contacts, previous destinations or favor-
ites to navigate to the desired address.
Free text search
> Press the [NAV/MAP] button repeatedly until
the Enter destination menu is displayed
=> page 189, fig. 166.
> Push the control knob up. The input field is dis-
played @) > page 1839, fig. 166.
> Enter one or more search terms into the input
field.
> If available, confirm the input suggestion* to
complete the entry or a word suggestion*
=> page 153, Letter/number speller.
> Turn the control knob to the right to change the
results list.
> Select and confirm a destination from the re-
sults list.
189
Page 195 of 400
8V2012721BK
Navigation
Online point of interest search (online Accessing destinations from myAudi
search) account
Applies to: vehicles with a navigation system and Audi con-
nect Infotainment
You can search for points of interest on the Inter-
net.
Requirement: the requirements for Audi connect
Infotainment must be met > page 182.
Opening the online search
> Press the [NAV/MAP] button repeatedly until
the Enter destination menu is displayed
=> page 189, fig. 166.
> Select: left control button > Online search. The
search area last set is displayed in the input
field.
Change search area
> Select: right control button > Select search
area.
Searching for an online destination in the
selected search area
> If necessary, enter a new city, state, or country.
> Enter the search term, such as hotel.
> Press the control knob.
> Select and confirm an online destination from
the list.
Searching for an online destination ina
specific category
> Select and confirm Select category.
> Select and confirm a category, such as Restau-
rants.
Find which search areas are available under
=>page 191.
You can search for online destinations using the
voice recognition system* > table on page 165.
@) Note
Read the information about Audi connect, and
be sure to note the connectivity costs section
=> page 182.
Applies to: vehicles with a navigation system and Audi con-
nect Infotainment
Import individual destinations from your myAudi
account into the MMI.
Requirement: the requirements for Audi connect
Infotainment must be met > page 182. You
must have a registered myAudi account at my.
audi.com. You must have a vehicle assigned to
your myAudi account and you must have stored
one or more destinations.
> Press the [NAV/MAP] button repeatedly until
the Enter destination menu is displayed
=> page 189, fig. 166.
> Select: left control button > myAudi contacts.
> If necessary, enter your myAudi user data or
your myAudi PIN > page 183. The contacts
stored in myAudi are displayed.
> Select and confirm a contact.
» Select and confirm a private or business desti-
nation.
> Select and confirm Start route guidance.
@) Tips
— You only need to enter the myAudi user data
one time.
— You can receive your myAudi PIN if you have
set up a myAudi account.
— For additional information, visit www.
audiusa.com.
Entering a destination using geo
coordinates
Applies to: vehicles with navigation system
> Press the [NAV/MAP] button repeatedly until
the Enter destination menu is displayed
> page 189, fig. 166.
> Select: left control button > Geographical coor-
dinates.
> Select Latitude/Longitude.
> Press the control knob to set the individual val-
ues.
> Turn the control knob to the left/right to
change the selected value.
> Select and confirm Start route guidance.
193