Page 25 of 124

Instrument and control functions
4-5
1
2
345
6
7
8
9
10
11
12
When TCS has been turned off,
the SCS, LCS, and LIF systems
are also turned off for all YRC
modes.
See “YRC Setting” on page 4-14
for more information on how to
customize YRC modes and adjustYRC item setting levels.
EAU66100
Wheel switch “ ”
When the main screen is set to
STREET MODE, use the wheel switch
to scroll and reset the information dis-
play items.
When the main screen is set to TRACK
MODE, use the wheel switch to scroll
and reset the information display items
and to activate the lap timer.
When the display has been changed to
the MENU screen, use the wheel
switch to navigate the setting modules
and make setting changes.
Operate the wheel switch as follows.
Rotate up - rotate the wheel upward to
scroll up/left or increase a setting value.
Rotate down - rotate the wheel down-
ward to scroll down/right or decrease a
setting value. Short push
- briefly press the switch in-
ward to make and confirm selections.
Long push - press the switch inward
for one second to reset an information
display item or to access and exit the
MENU screen.
TIP
See page 4-8 for more information
on the main screen and its func-
tions.
See page 4-13 for more informa-
tion on the MENU screen and howto make setting changes.
EAU4939G
Indicator ligh ts and warning
lights
EAU11022
Turn signal indicator light “ ”
This indicator light flashes when a turn1. Neutral indicator light “ ”
2. Immobilizer system indicator light “ ”
3. Fuel level warning light “ ”
4. Oil pressure and coolant temperature warning light “ ”
5. Auxiliary system warning light “ ”
6. Stability control indicator light “SC”
7. Left turn signal indicator light “ ”
8. Engine trouble warning light “ ”
9. Right turn signal indicator light “ ”
10.Shift indicator light
11.High beam indicator light “ ”
12.ABS warning light “ ”
19 8
2 3 4 610
11
12
7
5
ABS
BX4-9-E2.book 5 ページ 2018年9月6日 木曜日 午後4時39分
Page 26 of 124

Instrument and control functions
4-6
1
2
34
5
6
7
8
9
10
11
12 signal light is flashing.
EAU11061
Neutral indicator light “ ”
This indicator light comes on when the
transmission is in the neutral position.
EAU11081
High beam indicator light “ ”
This indicator light comes on when the
high beam of the headlight is switched
on.
EAU66891
Fuel level warning light “ ”
This warning light comes on when the
fuel level drops below approximately
3.0 L (0.79 US gal, 0.66 Imp.gal). When
this occurs, refuel
as soon as possible.
The electrical circuit of the warning light
can be checked by turning the vehicle
on. The warning light should come on
for a few seconds, and then go off.TIPIf the warning light does not come on at
all, remains on after refueling, or if the
warning light flashes repeatedly, havea Yamaha dealer check the vehicle.
EAU79310
Engine trouble warning light “ ”
This warning light comes on if a prob-
lem is detected in the engine. If this oc-
curs, have a Yamaha dealer check the
on-board diagnostic system.
The electrical circuit of the warning light
can be checked by turning the vehicle
power on. The warning light should
come on for a few seconds, and then
go off.
If the warning light does not come on at
all, or if the warning light remains on,
have a Yamaha dealer check the vehi-
cle.
EAU66503
ABS warning light “ ”
In normal operation, the ABS warning
light comes on when the vehicle is
turned on, and goes off after traveling
at a speed of 10 km/h (6 mi/h) or higher.TIPIf the warning light does not work as de-
scribed above, or if the warning light
comes on while riding, the ABS and
UBS may not work correctly. Have a
Yamaha dealer check the vehicle as
soon as possible.
WARNING
EWA16041
If the ABS warning light does not go
off after traveling at a speed of 10
km/h (6 mi/h) or higher, or if the
warning light comes on or flashes
while riding, the brake system re-
verts to conventional braking. If ei-
ther of the above occurs, or if the
warning light does not come on at
all, use extra caution to avoid possi-
ble wheel lock during emergency
braking. Have a Yamaha dealer
check the brake system and electri-cal circuits as soon as possible.
EAU67432
Shift indicator light
This indicator light comes on when it is
time to shift to the next higher gear. The
engine speeds at which it comes on or
goes off can be adjusted. (See
page 4-20.)
As a self-check, the light will come on
briefly when the vehicle is first powered
on.
ABS
BX4-9-E2.book 6 ページ 2018年9月6日 木曜日 午後4時39分
Page 27 of 124

Instrument and control functions
4-7
1
2
345
6
7
8
9
10
11
12
EAU73120
Immobilizer system indicator light
“”
When the key is turned to “OFF” and 30
seconds have passed, the indicator
light will flash steadily to indicate the im-
mobilizer system is enabled. After 24
hours have passed, the indicator light
will stop flashing, however the immobi-
lizer system is still enabled.
The electrical circuit of the indicator
light can be checked by turning the key
to “ON”. The indicator light should
come on for a few seconds, and then
go off.
If the indicator light does not come on
initially when the key is turned to “ON”,
if the indicator light remains on, or if the
indicator light flashes in a pattern (if a
problem is detected in the immobilizer
system, the immobili zer system indica-
tor light will flash in a pattern), have a
Yamaha dealer check the vehicle.TIPIf the immobilizer system indicator light
flashes in the pattern, slowly 5 times
then quickly 2 times, this could be
caused by transponder interference. If
this occurs, try the following.
1. Make sure there are no other im- mobilizer keys close to the main
switch. Other immobilizer system
keys may cause signal interfer-
ence and prevent the engine from
starting.
2. Use the code re-registering key to start the engine.
3. If the engine starts, turn it off, and try starting the engine with the
standard keys.
4. If one or both of the standard keys do not start the engine, take the
vehicle and all 3 keys to a Yamaha
dealer to have the standard keys
re-registered.
EAU65980
Stability control indicator light “SC”
This indicator light comes on when the
TCS, SCS, or LIF systems have en-
gaged. It will also come on if the TCS is
set to “OFF” or if the TCS system be-
comes disabled while riding.
The electrical circui t of the light can be
checked by turning the key to “ON”.
The light should come on for a few sec-
onds and then go off. If the light does not come on initially when the key is
turned to “ON”, or if the light remains
on, have a Yamaha dealer check the
vehicle.
EAU78410
Oil pressure and coolant tempera-
ture warning light “ ”
This warning light comes on if the en-
gine oil pressure is low or if the coolant
temperature is high. If this occurs, stop
the engine immediately.
The electrical circuit of the warning light
can be checked by turning the key to
“ON”. The warning light should come
on again after going off briefly, and then
remain on until the engine is started. If
the warning light does not come on ini-
tially when the key is turned to “ON”,
have a Yamaha dealer check the elec-
trical circuit.NOTICE
ECA22441
If the oil pressure and coolant warn-
ing light does not go off after start-
ing the engine or if it comes on while
the engine is running, stop the vehi-
cle and engine immediately.
If the engine is overheating, the
BX4-9-E2.book 7 ページ 2018年9月6日 木曜日 午後4時39分
Page 28 of 124
.
If the engine oil pres")
Instrument and control functions
4-8
1
2
34
5
6
7
8
9
10
11
12 coolant temperature warning
icon will come on. Let the en-
gine cool. Check the coolant
level (see page 7-39).
If the engine oil pressure is low,
the oil pressure warning icon
will come on. Check the oil level
(see page 7-12).
If the warning light remains on
after letting the engine cool and
confirming the proper oil level,
have a Yamaha dealer check the
vehicle. Do not continue to op-erate the vehicle!
EAU83700
Auxiliary system warning light “ ”
This warning light comes on if a prob-
lem is detected in a non-engine-related
system. TIPWhen the vehicle is turned on, this light
should come on for a few seconds and
then go off. Otherwise, have a Yamahadealer check the vehicle.
EAU85780
DisplayThe display has two different main
screen display modes, STREET
MODE and TRACK MODE. Most of the
functions are viewable in either mode,
but the layout differs slightly. The fol-
lowing items can be found on the dis-
play.
Speedometer
Tachometer
Information display
Transmission gear display
Front brake pressure indicator
Acceleration indicator
YRC setting display MODE/PWR/
TCS/SCS
YRC setting display LCS/QS/LIF
Clock
Revolution peak hold indicator
Lap timer
Various warning icons
Error mode warning “Err”
TIPThis model uses a thin-film-transistor
liquid-crystal display (TFT LCD) for
good contrast and readability in various
lighting conditions. However, due to the nature of this technology, it is normal
for a small number of pixels to be inac-
tive.
STREET MODE1. YRC items LCS/QS/LIF
2. Speedometer
3. Clock
4. Revolution peak hold indicator
5. Front brake pressure indicator
6. Acceleration indicator
7. Transmission gear display
8. YRC items MODE/PWR/TCS/SCS
9. Information display
10.Tachometer
1
�y2
GPS
N
LCS
QS
LIF
ODO
123456
km
TRIP-1
1234.5
km
km/h
�·1000 r/min
12 :
00
PWR
1
TCS
2
SCS
3
T -
1
MODE -
A
4
8 756
1
23
10
9
BX4-9-E2.book 8 ページ 2018年9月6日 木曜日 午後4時39分
Page 29 of 124

Instrument and control functions
4-9
1
2
345
6
7
8
9
10
11
12
TRACK MODE
WARNING
EWA18210
Stop the vehicle before making any
setting changes. Changing settings
while riding can distract the opera-
tor and increase the risk of an acci-dent.
Speedometer
The speedometer shows the vehicle’s
traveling speed.
TIPThe display can be switched between
kilometers and miles. See “Unit” onpage 4-19.
Tachometer
The tachometer shows the engine
speed, as measured by the rotational
velocity of the crankshaft, in revolutions
per minute (r/min).TIP
In TRACK MODE, the tachometer
starts at 8000 r/min.
In STREET MODE, the tachome-
ter can be color-adjusted and has
a revolution peak hold indicatorwhich can be turned on or off.
NOTICE
ECA10032
Do not operate the engine in the ta-
chometer red zone.Red zone: 14000 r/min and aboveInformation display
This section of the main screen is used
to show additional riding related infor-
mation such as air and coolant temper-
ature readings, tripmeters, and fuel
consumption statistics. The information
display items can be set into four
groups via the MENU screen.
The information display items are:
A.TEMP: air temperature
C.TEMP: coolant temperature
TRIP-1: tripmeter 1
TRIP-2: tripmeter 2
F-TRIP: fuel tripmeter
ODO: odometer
FUEL CON: the amount of fuel con-
sumed
FUEL AVG: average fuel consumption
CRNT FUEL: current fuel consumption
TIP
ODO will lock at 999999 and can-
not be reset.
TRIP-1 and TRIP-2 will reset to 0
and begin counting again after
9999.9 has been reached.
When the fuel tank reserve level
has been reached, F-TRIP ap-
pears automatically and begins re-
1. YRC items LCS/QS/LIF
2. Lap timer
3. Clock
4. Transmission gear display
5. Information display
6. YRC items MODE/PWR/TCS/SCS
7. Speedometer
8. Tachometer
QS
LIF
N
12GPS
12 34
LAP 01
ODO
km
123456
MODE
-
A
LCS
QS
LIF
LATEST
�·1000 r/min
12
:
00
km/h
123
PWR
1
TCS
2
SCS
3
T -
1
km/h
123
GEAR
7 8
6
1
2
4
5
3
BX4-9-E2.book 9 ページ 2018年9月6日 木曜日 午後4時39分
Page 30 of 124

Instrument and control functions
4-10
1
2
34
5
6
7
8
9
10
11
12 cording distance traveled from that
point.
After refueling and traveling some
distance, F-TRIP will automatically
disappear.
See “Unit” on page 4-19 to change
the fuel consumption units.
In TRACK MODE, information dis-
play items FASTEST (fastest lap
time) and AVERAGE (average laptime) are also available.
TRIP-1, TRIP-2, F-TRIP, FUEL CON,
and FUEL AVE items can be individual-
ly reset.
To reset information display items
1. Use the wheel switch to scroll through the display items until the
item you want to reset appears.
2. Short push the wheel switch and the item will flash for five seconds.
(For STREET MODE, if both items
are resettable items, the top item
will flash first. Scroll down to select
the bottom item.)
3. While the item is flashing, press and hold the wheel switch for one second.
Transmission gear display
This shows which gear the transmis-
sion is in. This model has 6 gears and a
neutral position. The neutral position is
indicated by the neutral indicator light
“ ” and by the transmission gear dis-
play “ ”.
Front brake pressure indicator
This shows how much braking power is
being applied to the front brakes.
Acceleration indicator
This shows the vehicle’s forward accel-
eration and deceleration forces.
Revolution peak hold indicator
This small bar momentarily appears
within the tachometer to mark the most
recent peak engine speed.
YRC items MODE/PWR/TCS/SCS
The current MODE (YRC mode) and its
related PWR, TCS and SCS settings
are shown here.
The individual settings for YRC items
PWR, TCS, SCS, LCS, QSS and LIF can be organized into four groups and
set independently for each group.
These groups of settings are the YRC
modes MODE-A, MODE-B, MODE-C,
and MODE-D. Use the mode switch to
change YRC modes or make YRC item
setting changes from the main screen.
TIPThe YRC modes come preset from the
factory for different riding conditions.
When using the factory presets, the
suggested YRC modes are as follows.
MODE-A: suitable for track riding
MODE-B: softer track-riding setting
MODE-C: suitable for road useMODE-D: street use or rainy weather
To change YRC modes or make settingchanges1. Push the mode switch center but-
ton to scroll left to right and high-
light the item you want to adjust.
BX4-9-E2.book 10 ページ 2018年9月6日 木曜日 午後4時39分
Page 31 of 124
.
TIP
Under ce")
Instrument and control functions
4-11
1
2
345
6
7
8
9
10
11
12
2. Use the mode switch up button or
down button to change the select-
ed item value (vertical scrolling is
not possible).
TIP
Under certain conditions, such as
when the vehicle is in motion, the
throttle grip is turned, excessive
wheel slip is detected, etc., certain
YRC items cannot be adjusted.
When a YRC item is highlighted
but cannot be adjusted, the YRCitem box will return to black. To turn off the traction control system
select TCS with the center button, then
push and hold the up button until TCS
OFF is displayed. To turn TCS back on,
select TCS OFF and then press the
down button (TCS will return to its pre-
vious setting).
TIPTurning off the traction control system
will turn off the SCS, LCS, and LIF sys-tems for all YRC modes.
YRC items LCS/QS/LIF
The on/off status of YRC items LCS,
QSS, and LIF is shown here. When any
of these systems are registered (not set
to OFF) for the currently selected YRC
mode, its respective icon will appear. When LCS is registered for the current-
ly selected YRC mode, its icon will be
grey. To activate the launch control
system, press and hold the center but-
ton until the LCS icon stops flashing
and turns white.
TIPLCS, QSS, and LIF system setting lev-
els can only be adjusted from theMENU screen.
Clock
The clock uses a 12-hour time system.
Lap timer
This stopwatch function measures and
records up to forty laps. On the main
screen, the lap timer shows the current
lap time and lap number (indicated by
the LAP mark). Use the Pass/LAP
switch to mark lap times. When a lap is
completed, the lap timer will show the
latest lap time (marked by the LATEST
indicator) for five seconds.
1. Mode switch “MODE”
2. Up button
3. Center button
4. Down button1
2
4 3
QS
LIF
N
12GPS
12 34
LAP 01
ODO
km
123456
MODE
-
A
LCS
QS
LIF
LATEST
�·1000 r/min
12
:
00
km/h
123
PWR
1
TCS
2
SCS
3
T -
1
km/h
123
GEARMODE -
A
MODE-
A
BX4-9-E2.book 11 ページ 2018年9月6日 木曜日 午後4時39分
Page 32 of 124

Instrument and control functions
4-12
1
2
34
5
6
7
8
9
10
11
12 To use the lap timer
1. Short push the wheel switch. The
information display item will flash
for five seconds.
2. While the information display item is flashing, rotate the wheel switch
upward. The lap timer will flash for
five seconds.
3. While the lap timer is flashing, long push the wheel switch to activate
the lap timer or stop the lap timer.
4. When the lap timer has been acti- vated, press the Pass/LAP switch
to start the lap timer.
TIP
The engine must be running to use
the lap timer.
Set the information display to
FASTEST or AVERAGE for addi-
tional lap time information.
Accessing the MENU screen will
automatically stop the lap timer.
Whenever the lap timer is stopped,
the current lap will not be record-
ed.
The lap time record can be viewedand reset from the MENU screen. Warning icons
When an error is detected, the following
error-related warning icons will then be
viewable.
Auxiliary system warning “ ”
This icon appears if a problem is de-
tected in a non-engine-related system.
Coolant temperature warning “ ”
This icon appears if the coolant temper-
ature reaches 117
C (242 F) or high-
er. Stop the vehicle and turn off the
engine. Allow the engine to cool.
1. Lap time
2. Latest lap time indicator “LATEST”
3. Information display item
4. Lap number
QS
LIF
N
12GPS
12 34
LAP 01
ODO
km
123456
MODE -
A
LCS
QS
LIF
LATEST
�·1000 r/min
12
:
00
km/h
123
PWR
1
TCS
2
SCS
3
T -
1
km/h
123
GEAR
4
3
12
1. Auxiliary system warning “ ”
2. Coolant temperature warning “ ”
3. Oil pressure warning “ ”
4. Error mode warning “Err”
QS
LIF
GPS
LCS
QS
LIF
�·1000 r/min
12:
00
31
4
2
Err
BX4-9-E2.book 12 ページ 2018年9月6日 木曜日 午後4時39分
 1
1 2
2 3
3 4
4 5
5 6
6 7
7 8
8 9
9 10
10 11
11 12
12 13
13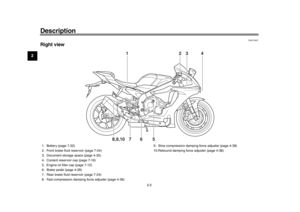 14
14 15
15 16
16 17
17 18
18 19
19 20
20 21
21 22
22 23
23 24
24 25
25 26
26 27
27 28
28 29
29 30
30 31
31 32
32 33
33 34
34 35
35 36
36 37
37 38
38 39
39 40
40 41
41 42
42 43
43 44
44 45
45 46
46 47
47 48
48 49
49 50
50 51
51 52
52 53
53 54
54 55
55 56
56 57
57 58
58 59
59 60
60 61
61 62
62 63
63 64
64 65
65 66
66 67
67 68
68 69
69 70
70 71
71 72
72 73
73 74
74 75
75 76
76 77
77 78
78 79
79 80
80 81
81 82
82 83
83 84
84 85
85 86
86 87
87 88
88 89
89 90
90 91
91 92
92 93
93 94
94 95
95 96
96 97
97 98
98 99
99 100
100 101
101 102
102 103
103 104
104 105
105 106
106 107
107 108
108 109
109 110
110 111
111 112
112 113
113 114
114 115
115 116
116 117
117 118
118 119
119 120
120 121
121 122
122 123
123