2019 VOLVO XC60 TWIN ENGINE ECU
[x] Cancel search: ECUPage 604 of 695

||
LOADING, STORAGE AND PASSENGER COMPARTMENT
* Option/accessory.602
CAUTION
When in the loading position, the cargo com-partment cover can obstruct visibility to therear. Make sure that the cargo compartmentcover is fully extended or fully retracted duringdriving.
Retracting the cover
1. From the fully opened position:
Lift the cover's handle and pull it rearward torelease the cover's attaching pins from thegrooves. Let the cover retract.
From the partially retracted position:
Grasp the handle and pull the cover out ofthe groves to the fully open position. Lift thehandle and pull it rearward to release thecover's attaching pins from the grooves. Letthe cover retract.
2. Let the cover retract with its attaching pinsabove the side panels until it stops in thefully retracted position.
Related information
Installing and removing the cargo compart-ment cover* (p. 598)
Installing and removing the steel
cargo grid*
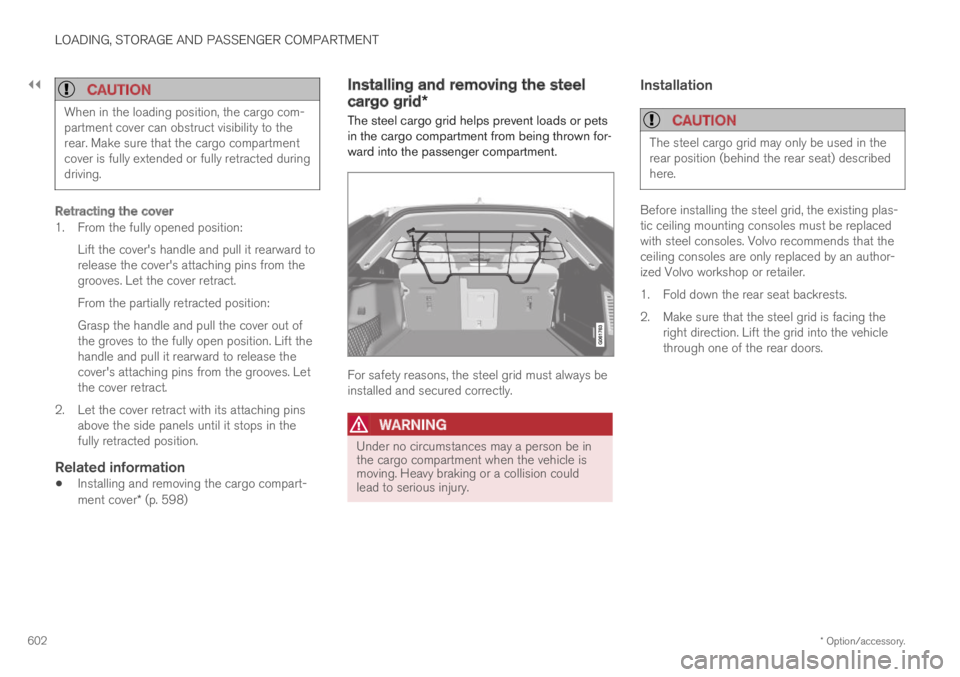
The steel cargo grid helps prevent loads or petsin the cargo compartment from being thrown for-ward into the passenger compartment.
For safety reasons, the steel grid must always beinstalled and secured correctly.
WARNING
Under no circumstances may a person be inthe cargo compartment when the vehicle ismoving. Heavy braking or a collision couldlead to serious injury.
Installation
CAUTION
The steel cargo grid may only be used in therear position (behind the rear seat) describedhere.
Before installing the steel grid, the existing plas-tic ceiling mounting consoles must be replacedwith steel consoles. Volvo recommends that theceiling consoles are only replaced by an author-ized Volvo workshop or retailer.
1.Fold down the rear seat backrests.
2. Make sure that the steel grid is facing theright direction. Lift the grid into the vehiclethrough one of the rear doors.
Page 605 of 695

LOADING, STORAGE AND PASSENGER COMPARTMENT
}}
* Option/accessory.603
3.
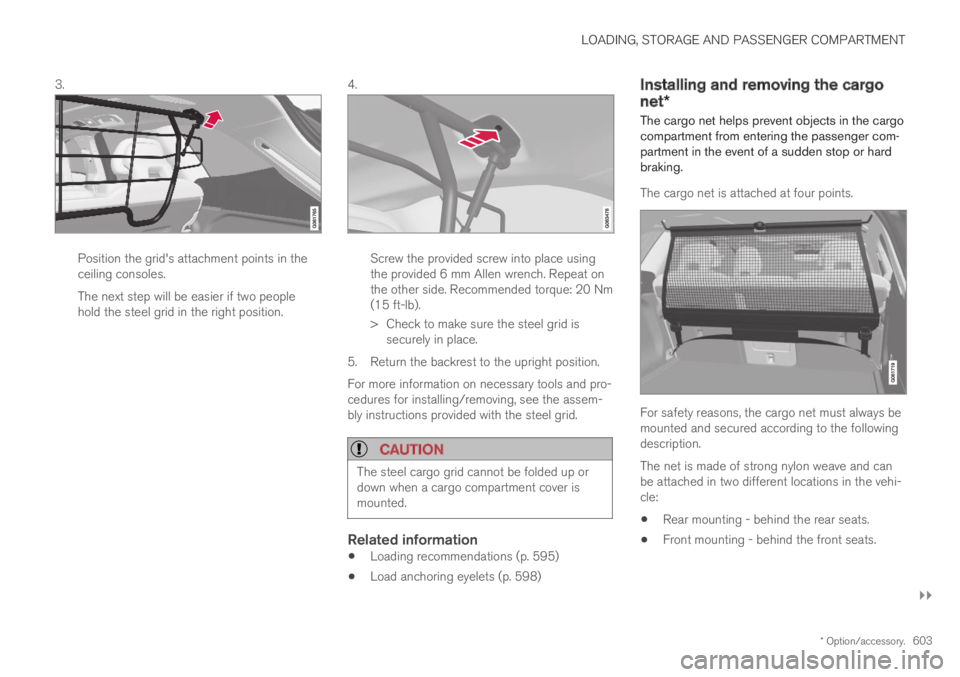
Position the grid's attachment points in theceiling consoles.
The next step will be easier if two peoplehold the steel grid in the right position.
4.
Screw the provided screw into place usingthe provided 6 mm Allen wrench. Repeat onthe other side. Recommended torque: 20 Nm(15 ft-lb).
>Check to make sure the steel grid issecurely in place.
5. Return the backrest to the upright position.
For more information on necessary tools and pro-cedures for installing/removing, see the assem-bly instructions provided with the steel grid.
CAUTION
The steel cargo grid cannot be folded up ordown when a cargo compartment cover ismounted.
Related information
Loading recommendations (p. 595)
Load anchoring eyelets (p. 598)
Installing and removing the cargo
net*
The cargo net helps prevent objects in the cargocompartment from entering the passenger com-partment in the event of a sudden stop or hardbraking.
The cargo net is attached at four points.
For safety reasons, the cargo net must always bemounted and secured according to the followingdescription.
The net is made of strong nylon weave and canbe attached in two different locations in the vehi-cle:
Rear mounting - behind the rear seats.
Front mounting - behind the front seats.
Page 606 of 695

||
LOADING, STORAGE AND PASSENGER COMPARTMENT
604
WARNING
Objects in the cargo compartment mustalways be securely anchored, even with a cor-rectly installed cargo net.
Installing the cargo net
WARNING
All of the cargo net's upper consoles, hooksand straps must be securely mounted andattached before the net is used.
Never use the net if it is damaged.
NOTE
With front mounting, the cargo net is mosteasily installed via a rear door.
1. Fold out the cargo net and make sure thatthe upper rod folds out and locks into posi-tion.
2.Insert one of the net's hooks into the front orrear ceiling mounting point with the straplock facing you.
3. Insert the net's other upper hook into theceiling mounting point on the opposite side.
The telescopic spring-loaded hooks makemounting easier.
Make sure that the net's hooks are pushedforward as far as possible into their respec-tive mounting points.
4.
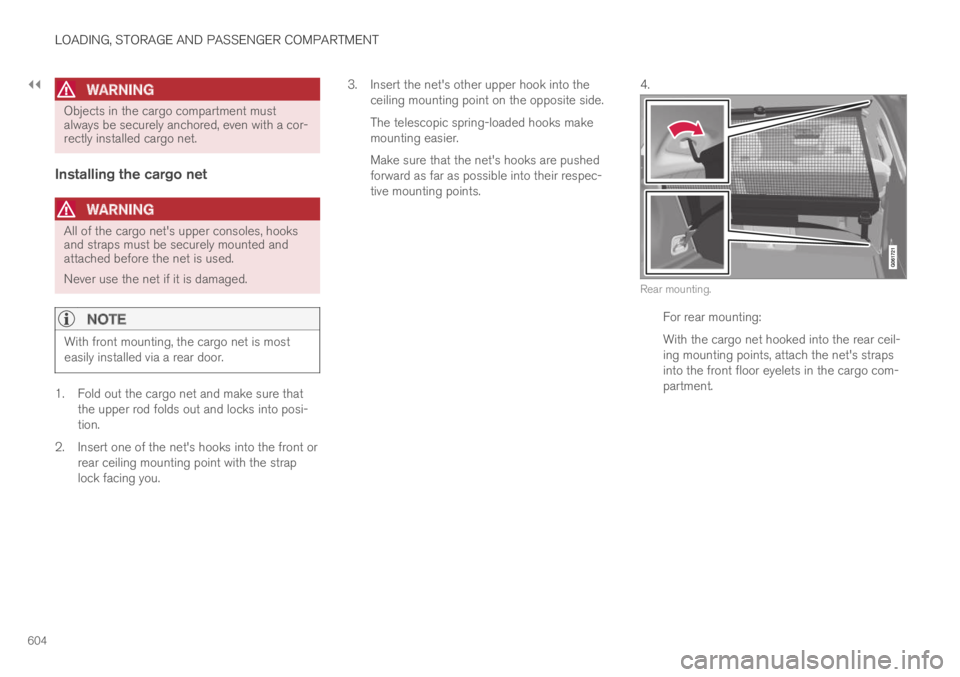
Rear mounting.
For rear mounting:
With the cargo net hooked into the rear ceil-ing mounting points, attach the net's strapsinto the front floor eyelets in the cargo com-partment.
Page 612 of 695

||
MAINTENANCE AND SERVICE
610
Monthly:
Check cold tire pressure in all tires. Inspectthe tires for wear.
Check that engine coolant and other fluidlevels are between the indicated "min" and"max" markings.
Clean interior glass surfaces with a glasscleaner and soft paper towels.
Wipe driver information displays with a softcloth.
Visually inspect battery terminals for corro-sion. Corrosion may indicate a loose terminalconnector, or a battery near the end of itsuseful service life. Consult your Volvo retailerfor additional information.
As needed:
Wash the car, including the undercarriage, toreduce wear that can be caused by a buildup ofdirt, and corrosion that can be caused by salt res-idues.
Clean leaves and twigs from air intake vents atthe base of the windshield, and from other placeswhere they may collect.
NOTE
Complete service information for qualifiedtechnicians is available online for purchase orsubscription at www.volvotechinfo.com.
Related information
Vehicle status (p. 612)
Scheduling service and repairs (p. 613)
Connecting equipment to the vehicle's datalink connector (p. 37)
Technician certification (p. 38)
Climate control system service (p. 619)
Maintenance of the brake system (p. 438)
Engine compartment overview (p. 620)
Data transfer between vehicle andworkshop over Wi-Fi
Volvo workshops have a designated Wi-Fi net-work for secure data transfer between your vehi-cle and the workshop. Your visit to the workshopwill be easier and more effective when diagnos-tics information and software can be transferredover the workshop's network.
When you arrive at the workshop, your servicetechnician can connect your vehicle to the work-shop's Wi-Fi network to perform troubleshootingand download software. For this type of commu-nication, the vehicle only connects to a work-shop's network. It is not possible to connect thevehicle to another Wi-Fi network (e.g. your homenetwork) in the same way as to a workshop's net-work.
Connecting with remote key
Connection is usually managed by the servicetechnician, who will use the remote key buttons. Itis therefore important to bring a key with buttonswith you when you visit the workshop. Pressingthe lock button on the remote key three times willconnect the vehicle to the workshop's Wi-Fi net-work.
When the car is connected to a Wi-Fi network,
the symbol appears in the center display.
Page 620 of 695

MAINTENANCE AND SERVICE
618
Opening and closing the hood
To open the hood, pull the lever in the passen-ger compartment and then turn the handle underthe hood.
Opening the hood
Pull the lever near the pedals to release thehood from its fully closed position.
Swipe your hand from left to right under thehood, grasp the handle and move it up and tothe side to release the catch and lift thehood.
Warning - hood not closed
When the hood is released, a warningsymbol and graphic will be displayed inthe instrument panel and an audiblesignal will sound. If the vehicle beginsto roll, the audible signal will be repeated severaltimes.
NOTE
If the warning symbol is illuminated or anaudible warning signal sounds even thoughthe hood is securely closed, consult a work-shop - an authorized Volvo workshop is rec-ommended.
Closing the hood
1. Press down the hood until it begins to closeunder its own weight.
2. When the hood reaches the catch at thehandle in the front edge of the vehicle, pressdown on the hood to close it completely.
WARNING
Risk of injury! When closing, make sure thatthe hood is completely unobstructed and thatno one can be injured.
WARNING
Make sure the hood locks securely after clos-ing. It must audibly lock on both sides.
Hood not completely closed. The illustration is generic -details may vary according to vehicle model.
Page 621 of 695

MAINTENANCE AND SERVICE
* Option/accessory.619
Hood completely closed. The illustration is generic -details may vary according to vehicle model.
WARNING
Never drive with the hood open!
If there are any indications while driving thatthe hood is not completely closed, stop imme-diately and close it securely.
Related information
Engine compartment overview (p. 620)
Door and seat belt reminders (p. 51)
Climate control system service
Service and repairs on the air conditioning sys-tem should only be done by an authorized work-shop.
Troubleshooting and repairs
The air conditioning system contains a fluores-cent tracer substance. Ultraviolet light is used tosearch for leaks in the system.
Volvo recommends contacting an authorizedVolvo workshop.
Vehicles with R134a refrigerant
WARNING
The air conditioning system contains therefrigerant R134a under pressure. Serviceand repairs to the system should only be doneby an authorized workshop.
Related information
Volvo's service program (p. 608)
Replacing a windshield with head-
up display*
Vehicles with a head-up display have a specialtype of windshield that meets the requirementsfor displaying projected information.
Volvo recommends contacting an authorizedVolvo workshop for assistance replacing thewindshield. The correct type of replacementwindshield must be used in order for the head-updisplay to function properly.
Related information
Head-up display* (p. 142)
Cleaning the head-up display* (p. 644)
Page 627 of 695

MAINTENANCE AND SERVICE
}}
625
Start battery
The vehicle has a single-pole electrical systemthat uses the chassis and engine mount as con-ductors.
The start battery is used to start the electricalsystem and power electrical equipment in thevehicle. The hybrid battery is used to start thecombustion engine.
The start battery should only be replaced by a
workshop15.
The start battery is a 12 V AGM (Absorbed GlassMat) battery, dimensioned for regenerative charg-ing and to support the function of the vehicle'svarious systems.
The service life and performance of the start bat-tery are affected by factors such as driving style,driving conditions, climate, battery discharges,number of starts, etc.
Never disconnect the start battery while theengine is running.
Make sure the cables to the start battery arecorrectly connected and the clamps aresecurely tightened.
WARNING
Batteries generate hydrogen gas, whichis flammable and explosive.
Do not connect the jumper cable to anypart of the fuel system or to any movingparts. Avoid touching hot manifolds.
Battery fluid contains sulfuric acid. Do notallow battery fluid to contact eyes, skin,fabrics or painted surfaces.
If contact occurs, flush the affected areaimmediately with water. Obtain medicalhelp immediately if eyes are affected.
Never expose the battery to open flameor electric spark. Do not smoke near thebattery. Failure to follow the instructionsfor jump starting can lead to injury.
Connection points
WARNING
PROPOSITION 65 WARNING
Battery posts, terminals, and related accesso-ries contain lead and lead compounds, chemi-cals known to the state of California to causecancer and reproductive harm. Wash handsafter handling.
Use the vehicle's connection points in the enginecompartment to connect an external start batteryor battery charger.
The battery terminals on the car's start battery inthe luggage/cargo area must not be used.
Positive connection point
Negative connection point
14LED (Light Emitting Diode)15An authorized Volvo workshop is recommended.
Page 647 of 695

MAINTENANCE AND SERVICE
}}
645
Cleaning fabric upholstery andceiling liner
Only use cleaning agents and car care productsrecommended by Volvo. Clean regularly andtreat stains immediately for best results. It isimportant to vacuum before using a cleaningagent.
Fabric upholstery and ceiling liner
Never scrape or rub a stain, as this could damagethe upholstery. Never use strong stain removers,as this could change the color of the upholstery.
Use soapy water or a similar detergent. For moredifficult stains caused by oil, ice cream, shoe pol-ish, etc., use a stain remover. Consult with yourVolvo retailer.
Related information
Cleaning the interior (p. 643)
Cleaning the center display (p. 643)
Cleaning the seat belt (p. 645)
Cleaning floor mats and inlay mats (p. 645)
Cleaning leather upholstery (p. 646)
Cleaning the leather steering wheel(p. 647)
Cleaning interior plastic, metal and wood sur-faces (p. 648)
Cleaning the seat belt
Only use cleaning agents and car care productsrecommended by Volvo. Clean regularly andtreat stains immediately for best results. It isimportant to vacuum before using a cleaningagent.
Seat belts
Use water and a synthetic soap solution. Spe-cially designed textile cleaning agents are availa-ble for purchase at Volvo retailers. Make sure thebelt is dry before it is retracted.
Related information
Cleaning the interior (p. 643)
Cleaning the center display (p. 643)
Cleaning fabric upholstery and ceiling liner(p. 645)
Cleaning floor mats and inlay mats (p. 645)
Cleaning leather upholstery (p. 646)
Cleaning the leather steering wheel(p. 647)
Cleaning interior plastic, metal and wood sur-faces (p. 648)
Cleaning floor mats and inlay mats
Only use cleaning agents and car care productsrecommended by Volvo. Clean regularly andtreat stains immediately for best results. It isimportant to vacuum before using a cleaningagent.
Inlay mats and floor mats
Remove the inlay mats to clean the floor matsand inlay mats separately. Use a vacuum toremove dust and dirt. Each inlay mat is securedinto place with pins.
Remove the inlay mat by grasping the inlay matat each pin and lifting the mat straight up.
Put the inlay mat back into place by pressing it inat each pin.