2019 VOLKSWAGEN T-ROC wheel
[x] Cancel search: wheelPage 280 of 502

wheels can spin even when brake support systems are active, and this can lead to a loss of control of
the vehicle.
WARNING
The effectiveness of ESC can be reduced considerably if other components and systems which affect
driving dynamics are not serviced properly or are not functioning properly. This also applies, but not
exclusively, to the brakes, tyres and other named systems.
Please always bear in mind that modifications and changes to the vehicle can affect the way brake
support systems operate.
Alterations to the suspension or the use of non-approved wheel and tyre combinations can affect
the function of brake support systems and reduce their effectiveness.
Suitable tyres support the effectiveness of ESC.
WARNING
Driving without the brake servo can considerably increase the braking distance and thus cause
accidents and serious injuries.
Never switch the engine or ignition off while the vehicle is in motion.
If the brake servo does not function or the vehicle is being towed, the brake pedal will have to be
depressed more forcefully as the braking distance will be increased due to the lack of assistance for
the brake system.
Switching the TCS on and off
Switch off the traction control system (TCS) if the vehicle does not have sufficient traction:
When driving in deep snow or on loose surfaces.
When rocking the vehicle free if it is stuck.
Then switch on TCS again.
Switching TCS on and off
TCS can be switched off and on in the Infotainment system Infotainment system controls and
displays
When the TCS is switched off, the yellow indicator lamp lights up on the instrument cluster
display.
As soon as the TCS starts regulating, the indicator lamp flashes yellow.
Troubleshooting
Page 281 of 502

Warning lamp lights up red.
Seek expert assistance immediately.
ABS failure or fault.
Warning lamp lights up yellow.
Go to a qualified workshop. The vehicle can be braked without the anti-lock brake system.
TCS regulating to prevent the wheels from spinning.
Indicator lamp flashes yellow.
ESC switched off for system-related reasons.
Indicator lamp lights up yellow.
Switch the ignition on and off.
Drive a short distance at a speed of 15 20 km/h (9 12 mph) if necessary.
If is still lit up, seek expert assistance.
The brake support systems make noises
Noises may be heard when the brake support systems are performing control interventions.
Unexpected reduction in engine power
Faults can occur in the ESC and TCS systems if the four wheels have different types of tyres.
Any differences in the rolling radius of the tyres can cause the system to reduce engine power
unexpectedly.
WARNING
If the brake system warning lamp lights up together with the ABS indicator lamp , the ABS
control function may have failed. This can cause the rear wheels to lock quickly when you brake.
Locked rear wheels can lead to a loss of control of the vehicle. If possible, reduce your speed and
drive carefully at low speed to the nearest qualified workshop in order to have the brake system
tested. Avoid sudden braking and driving manoeuvres on the way.
If the ABS indicator lamp does not go out or comes on while the vehicle is in motion, ABS is not
working properly. The vehicle can be stopped using the normal brakes only (without the anti-lock
brake system). The protection provided by the anti-lock brake system is no longer available. Go to a
qualified workshop as soon as possible.
Practical equipment
Stowage areas
Page 291 of 502

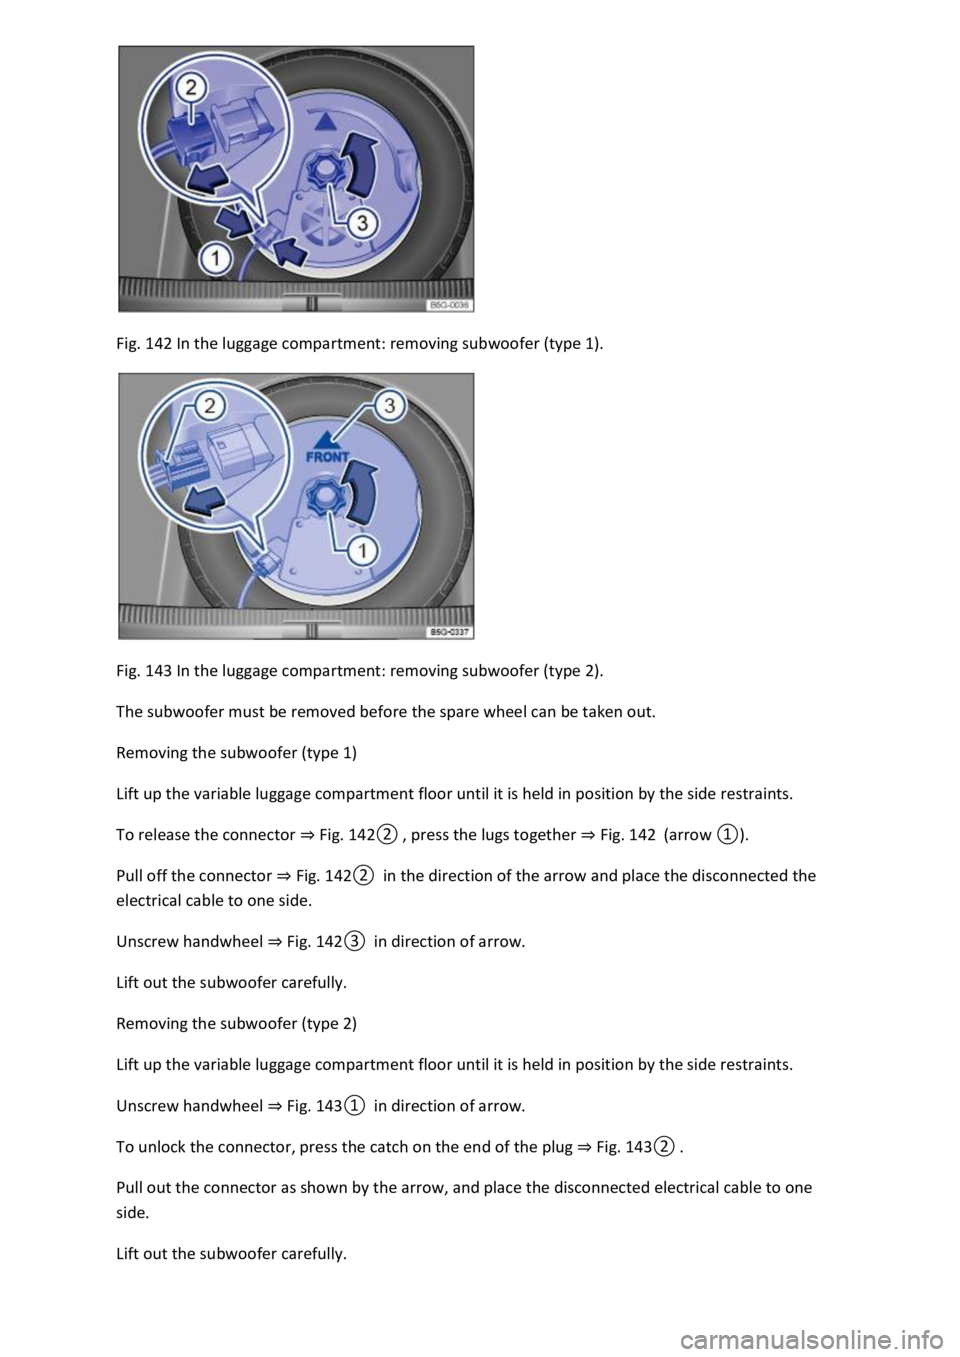
Fig. 142 In the luggage compartment: removing subwoofer (type 1).
Fig. 143 In the luggage compartment: removing subwoofer (type 2).
The subwoofer must be removed before the spare wheel can be taken out.
Removing the subwoofer (type 1)
Lift up the variable luggage compartment floor until it is held in position by the side restraints.
To release the connector Fig.
0Fig. 142
Pull off the connector Fig.
0in the direction of the arrow and place the disconnected the
electrical cable to one side.
Unscrew handwheel Fig.
0in direction of arrow.
Lift out the subwoofer carefully.
Removing the subwoofer (type 2)
Lift up the variable luggage compartment floor until it is held in position by the side restraints.
Unscrew handwheel Fig.
0in direction of arrow.
To unlock the connector, press the catch on the end of the plug Fig.
0
Pull out the connector as shown by the arrow, and place the disconnected electrical cable to one
side.
Lift out the subwoofer carefully.
Page 292 of 502

Place the subwoofer carefully in the rim base. The tip of the arrow symbol FRONT on the subwoofer
must face forwards.
Plug in connector Fig.
0until it audibly engages.
Screw the handwheel Fig.
0onto the threaded pin in the opposite direction to the arrow
until the subwoofer is properly secured.
Place the variable luggage compartment floor on the floor covering.
Installing the subwoofer (type 2)
Place the subwoofer carefully in the rim base. The tip of the arrow symbol FRONT Fig.
0on
the subwoofer must face forwards.
Plug in connector Fig. 1
0until the catch audibly engages.
Screw the handwheel Fig.
0onto the threaded pin in the opposite direction to the arrow
until the subwoofer is properly secured.
Place the variable luggage compartment floor on the floor covering.
Mobile online services
Volkswagen Car-Net
Introduction
This chapter contains information on the followingsubjects:
Legal requirements
Deactivating Car-Net services
Service impairment or interruption
Apps
Volkswagen Car-Net is not available in all countries and is subject to country-specific limitations on
duration of use.
Volkswagen Car-Net allows you to communicate with your vehicle in order to exchange data,
request information or control functions.
In order to be able to use Volkswagen Car-Net, the vehicle has to be ordered with Car-Net and
factory-fitted with the system. Depending on the service or service portfolio, Volkswagen Car-Net
can be operated via the factory-fitted Infotainment system, via a Car-Net portal on the Internet or
using a mobile device.
Information about the Volkswagen Car-Net services, applications, availability, compatible mobile
devices and service portfolio, as well as service descriptions, are available on the Volkswagen
website:
In Europe and Japan: www.volkswagen.com/car-net
Page 318 of 502

Tyre pressure
Follow the trailer manufacturer's recommendations concerning the tyre pressure for the trailer
tyres.
When towing a trailer, inflate the wheels on the towing vehicle with the maximum permitted tyre
pressure Tyre pressure
WARNING
Accidents and serious injuries can occur if you exceed the vehicle's maximum permitted gross axle
weight rating, drawbar load, gross vehicle weight rating or gross combination weight rating.
exceed the permissible gross vehicle weight for the vehicle with weight at the front and rear of the
vehicle.
WARNING
Loads that may slide can severely impair stability and driving safety, which can cause accidents and
severe injuries.
secure loads using suitable and undamaged lashing, retaining or securing straps.
Driving with a trailer
First read and observe the introductoryinformation and safety warnings
Headlight adjustment
Towing a trailer can raise the front end of the vehicle enough for the dipped beam to dazzle other
road users. Use the headlight range control to lower the light cone as required. Vehicles with
dynamic headlight range control are adjusted automatically.
Things to note when driving with a trailer
If the trailer has an overrun brake, apply the brakes gently at first and then firmly. This will
prevent the jerking that can be caused by the trailer wheels locking.
Page 333 of 502

The yellow catalytic converter lamp lights up or flashes.
Faults in the exhaust system caused by misfiring, which can damage the catalytic converter.
to the nearest qualified workshop immediately.
There may be engine faults and fuel consumption may be higher if the indicator lamps are lit up or
flashing.
If and when
Vehicle toolkit
Introduction
This chapter contains information on the followingsubjects:
Stowage
Vehicle toolkit contents
Observe any country-specific legislation when securing your vehicle in the event of a breakdown.
Vehicle toolkit in the vehicle
In vehicles that are factory-fitted with a spare wheel, emergency spare wheel or winter wheels,
additional vehicle tools may be located in the luggage compartment.
WARNING
In the event of a sudden driving or braking manoeuvre or accident, a loose vehicle toolkit,
breakdown set and spare wheel or temporary spare wheel could be flung though the vehicle and
cause severe injuries.
always secured in the luggage compartment.
WARNING
Unsuitable or damaged tools in the vehicle toolkit can lead to accidents and injuries.
Stowage
Page 335 of 502

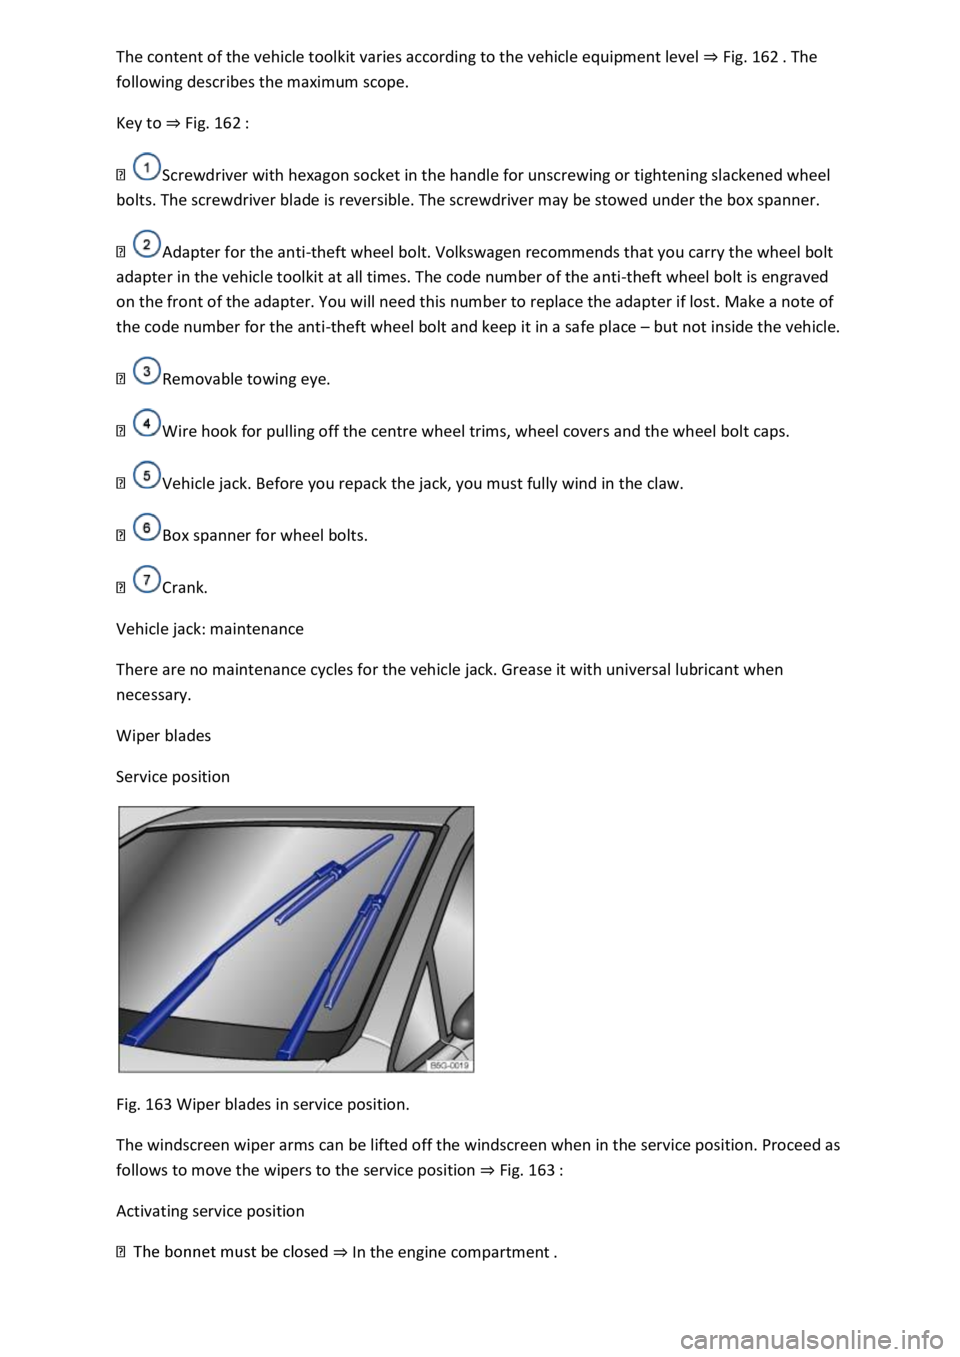
Fig. 162
following describes the maximum scope.
Key to Fig. 162
Screwdriver with hexagon socket in the handle for unscrewing or tightening slackened wheel
bolts. The screwdriver blade is reversible. The screwdriver may be stowed under the box spanner.
Adapter for the anti-theft wheel bolt. Volkswagen recommends that you carry the wheel bolt
adapter in the vehicle toolkit at all times. The code number of the anti-theft wheel bolt is engraved
on the front of the adapter. You will need this number to replace the adapter if lost. Make a note of
the code number for the anti-theft wheel bolt and keep it in a safe place but not inside the vehicle.
Removable towing eye.
Wire hook for pulling off the centre wheel trims, wheel covers and the wheel bolt caps.
Vehicle jack. Before you repack the jack, you must fully wind in the claw.
Box spanner for wheel bolts.
Crank.
Vehicle jack: maintenance
There are no maintenance cycles for the vehicle jack. Grease it with universal lubricant when
necessary.
Wiper blades
Service position
Fig. 163 Wiper blades in service position.
The windscreen wiper arms can be lifted off the windscreen when in the service position. Proceed as
follows to move the wipers to the service position Fig. 163
Activating service position
In the engine compartment
Page 343 of 502

t clockwise as far as it will go.
Close the bonnet In the engine compartment
Changing the bulbs in the headlights (lights with LED technology)
First read and observe the introductoryinformation and safety warnings
These lamps use LED technology. The LEDs cannot be replaced by customers. If some LEDs fail, this
may be an indication that more elements are on the point of failure. In this case, have the lights
checked and renewed if necessary at a qualified workshop.
Changing the front turn signal bulbs
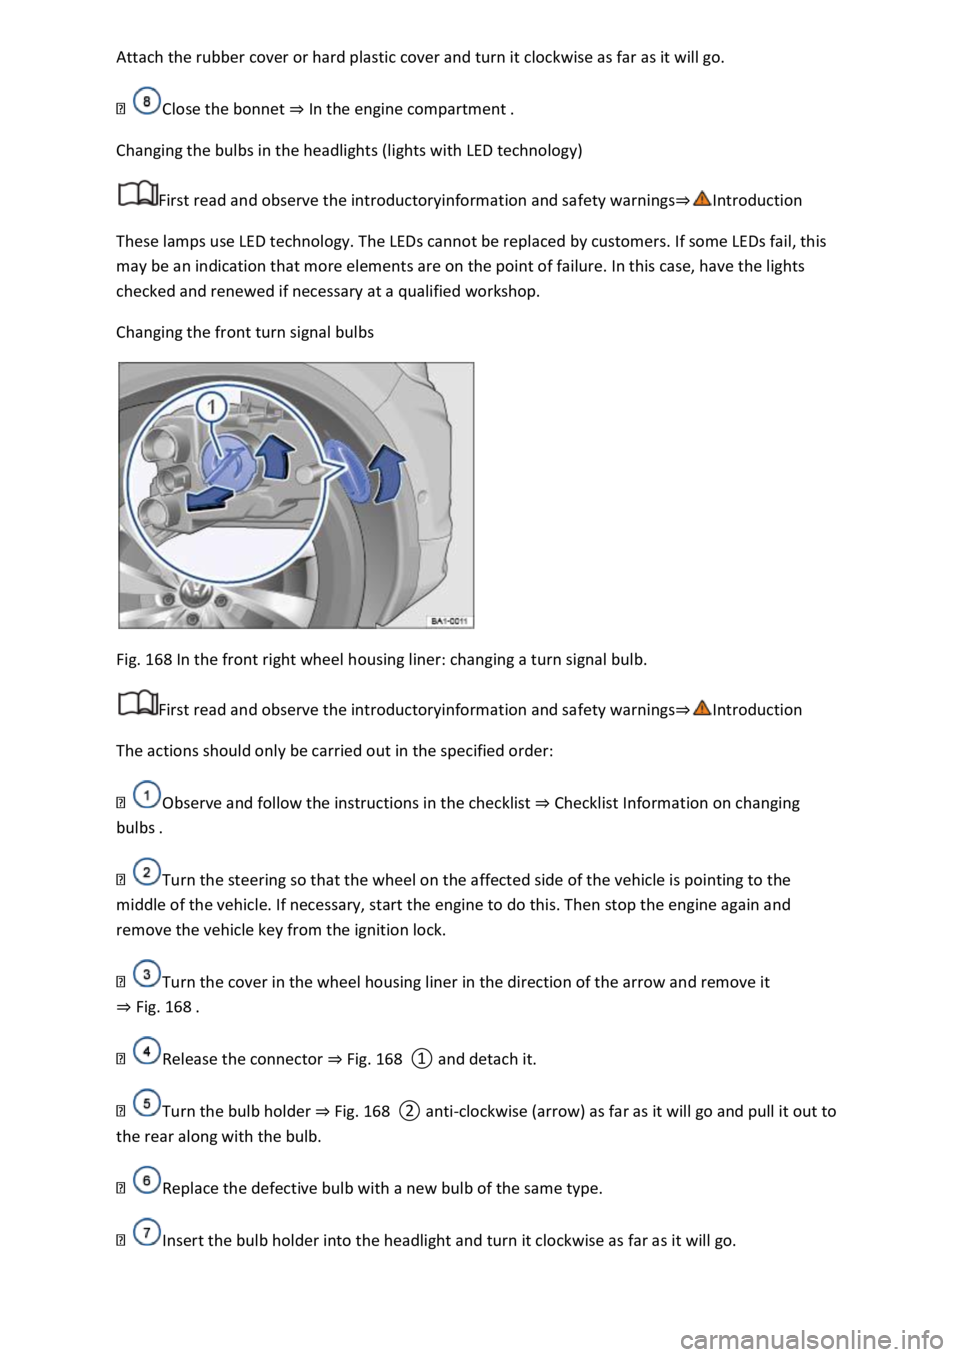
Fig. 168 In the front right wheel housing liner: changing a turn signal bulb.
First read and observe the introductoryinformation and safety warnings
The actions should only be carried out in the specified order:
Observe and follow the instructions in the checklist Checklist Information on changing
bulbs
Turn the steering so that the wheel on the affected side of the vehicle is pointing to the
middle of the vehicle. If necessary, start the engine to do this. Then stop the engine again and
remove the vehicle key from the ignition lock.
Turn the cover in the wheel housing liner in the direction of the arrow and remove it
Fig. 168
Release the connector Fig. 168
Turn the bulb holder Fig. 168clockwise (arrow) as far as it will go and pull it out to
the rear along with the bulb.
Replace the defective bulb with a new bulb of the same type.
Insert the bulb holder into the headlight and turn it clockwise as far as it will go.