2019 TOYOTA PROACE CITY VERSO key
[x] Cancel search: keyPage 49 of 272
49
Ease of use and comfort
3
NOTIC E
When the USB port is used, the portable device charges automatically.A message is displayed if the power drawn by the portable device exceeds the current supplied by the vehicle.For more information on how to use this equipment, refer to the Audio equipment and telematics section .
Port 1 also allows a smartphone to be connected by MirrorLinkTM, Android Auto® or CarPlay®, enabling certain smartphone applications to be used on the touch screen.For best results, use a cable made or approved by the device manufacturer.These applications can be managed using the steering mounted controls or the audio system controls.
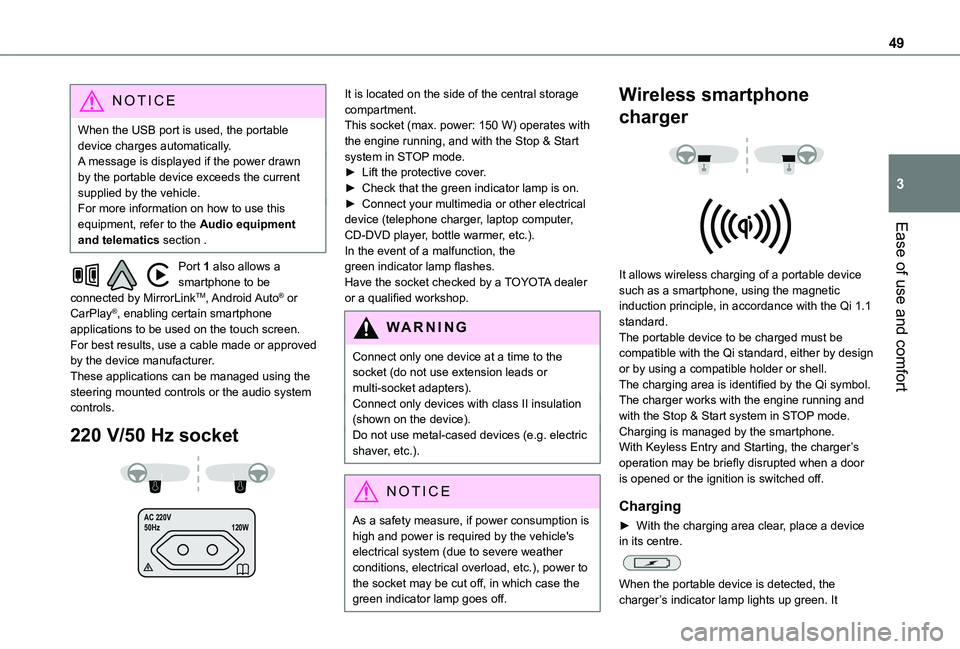
220 V/50 Hz socket
AC 220 V
50Hz 120W
It is located on the side of the central storage compartment.This socket (max. power: 150 W) operates with the engine running, and with the Stop & Start system in STOP mode.► Lift the protective cover.► Check that the green indicator lamp is on.► Connect your multimedia or other electrical device (telephone charger, laptop computer, CD-DVD player, bottle warmer, etc.).In the event of a malfunction, the green indicator lamp flashes.Have the socket checked by a TOYOTA dealer or a qualified workshop.
WARNI NG
Connect only one device at a time to the socket (do not use extension leads or multi-socket adapters).Connect only devices with class II insulation (shown on the device).Do not use metal-cased devices (e.g. electric shaver, etc.).
NOTIC E
As a safety measure, if power consumption is high and power is required by the vehicle's
electrical system (due to severe weather conditions, electrical overload, etc.), power to the socket may be cut off, in which case the green indicator lamp goes off.
Wireless smartphone
charger
It allows wireless charging of a portable device such as a smartphone, using the magnetic induction principle, in accordance with the Qi 1.1 standard.The portable device to be charged must be compatible with the Qi standard, either by design or by using a compatible holder or shell.The charging area is identified by the Qi symbol.The charger works with the engine running and with the Stop & Start system in STOP mode.Charging is managed by the smartphone.With Keyless Entry and Starting, the charger’s operation may be briefly disrupted when a door is opened or the ignition is switched off.
Charging
► With the charging area clear, place a device in its centre.
When the portable device is detected, the charger’s indicator lamp lights up green. It
Page 50 of 272
50
remains lit for the whole time that the battery is being charged.
WARNI NG
The system is not designed to charge multiple devices simultaneously.
WARNI NG
Do not leave any metal objects (coins, keys, vehicle remote control, etc.) in the charging area while a device is being charged, due to the risk of overheating or interrupting the charging process.
Operating check
The state of the indicator lamp allows the operation of the charger to be monitored.
State of the indicator lampMeaning
OffEngine switched off.No compatible devices detected.
Charging finished.
State of the indicator lampMeaning
Fixed greenCompatible device detected.Charging.
Flashing orangeForeign object detected in the charging zone.Device not well centred in the charging zone.
Fixed orangeFault with the device's battery meter.Device battery temperature too high.Charger malfunction.
If the indicator lamp is lit orange:– remove the device, then place it back in the centre of the charging zone.or– remove the device and try again in a quarter of an hour.If the problem persists, have the system checked by a TOYOTA dealer or a qualified workshop.
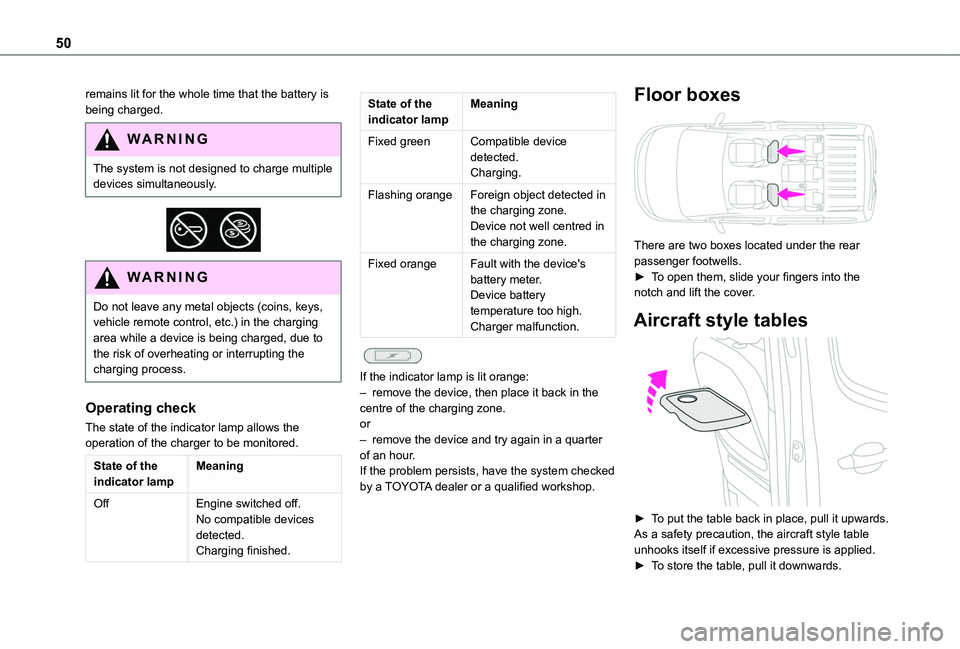
Floor boxes
There are two boxes located under the rear passenger footwells.► To open them, slide your fingers into the notch and lift the cover.
Aircraft style tables
► To put the table back in place, pull it upwards.As a safety precaution, the aircraft style table unhooks itself if excessive pressure is applied.► To store the table, pull it downwards.
Page 62 of 272
62
Courtesy lamp
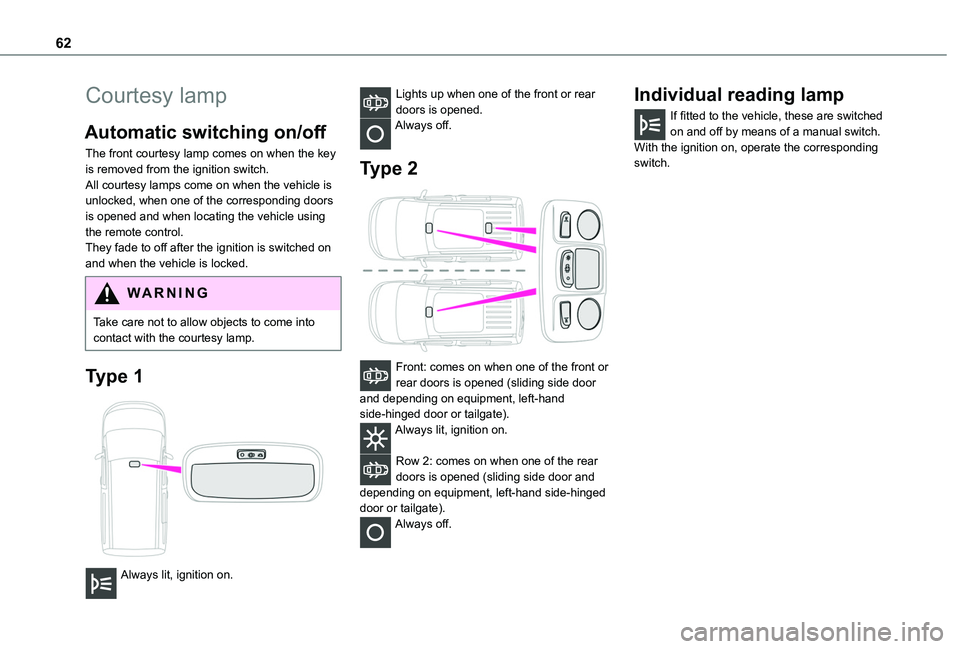
Automatic switching on/off
The front courtesy lamp comes on when the key is removed from the ignition switch.All courtesy lamps come on when the vehicle is unlocked, when one of the corresponding doors is opened and when locating the vehicle using the remote control. They fade to off after the ignition is switched on and when the vehicle is locked.
WARNI NG
Take care not to allow objects to come into contact with the courtesy lamp.
Type 1
Always lit, ignition on.
Lights up when one of the front or rear doors is opened.Always off.
Type 2
Front: comes on when one of the front or rear doors is opened (sliding side door and depending on equipment, left-hand side-hinged door or tailgate).Always lit, ignition on.
Row 2: comes on when one of the rear doors is opened (sliding side door and depending on equipment, left-hand side-hinged door or tailgate).Always off.
Individual reading lamp
If fitted to the vehicle, these are switched on and off by means of a manual switch.With the ignition on, operate the corresponding switch.
Page 85 of 272
85
Safety
5
NOTIC E
It is recommended that children travel on the rear seats of the vehicle:– ‘rear facing’ up to the age of 3,– ‘forward facing’ over the age of 3.
WARNI NG
Make sure that the seat belt is correctly positioned and tightened.For child seats with a support leg, ensure that the support leg is in firm and steady contact with the floor.
WARNI NG
Remove and stow the head restraint before installing a child seat with backrest on a passenger seat. Refit the head restraint once the child seat has been removed.
Advice
WARNI NG
An incorrectly installed child seat compromises the child's safety in the event of an accident.Ensure that there is no seat belt or seat belt buckle under the child seat, as this could destabilise it.
Remember to fasten the seat belts or the harness of child seats, keeping the slack relative to the child's body to a minimum, even for short journeys.When installing a child seat using the seat belt, ensure that the seat belt is tightened correctly on the child seat and that it secures the child seat firmly on the seat of the vehicle. If the passenger seat is adjustable, move it forwards if necessary.Remove the head restraint before installing a child seat with a backrest on a passenger seat.Ensure that the head restraint is stored or attached securely to prevent it from being thrown around the vehicle in the event of sharp braking. Refit the head restraint once the child seat has been removed.
WARNI NG
Installing a booster seatThe chest part of the seat belt must be positioned on the child's shoulder without touching the neck.Ensure that the lap part of the seat belt passes correctly over the child's thighs.Use a booster seat with backrest, equipped with a belt guide at shoulder level.
WARNI NG
Additional protectionsTo prevent accidental opening of the doors and rear windows, use the "Child lock".Take care not to open the rear windows by more than one third.To protect young children from the rays of the sun, fit side blinds on the rear windows.As a safety precaution, do not leave:– a child alone and unattended in a vehicle,– a child or an animal in a vehicle which is exposed to the sun, with the windows closed,– the keys within reach of children inside the vehicle.
Page 87 of 272
87
Safety
5
child seat. Otherwise, the child risks being seriously injured or killed if the airbag deploys.
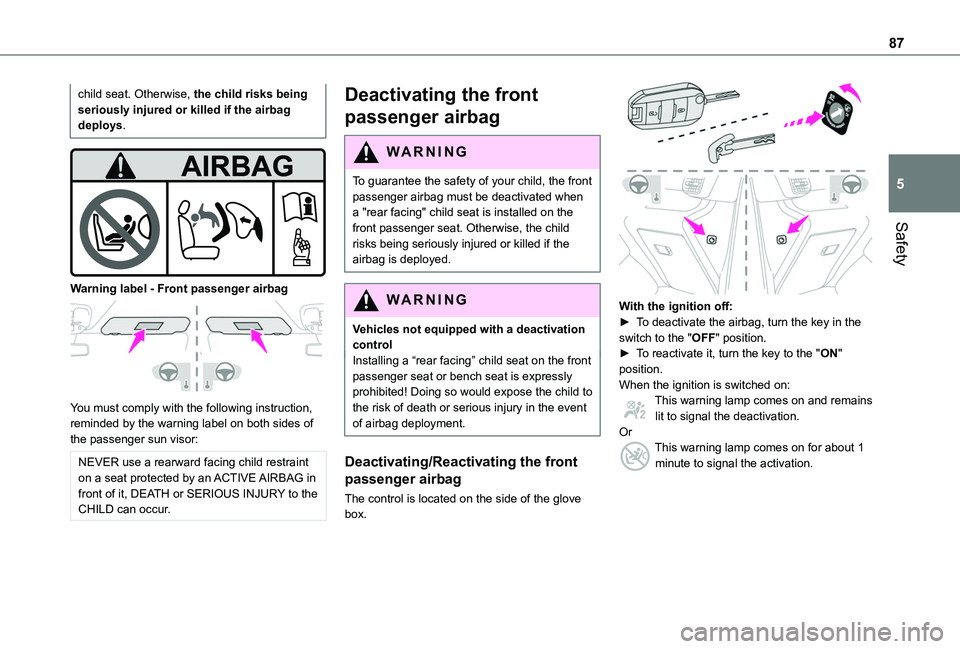
Warning label - Front passenger airbag
You must comply with the following instruction, reminded by the warning label on both sides of the passenger sun visor:
NEVER use a rearward facing child restraint on a seat protected by an ACTIVE AIRBAG in front of it, DEATH or SERIOUS INJURY to the CHILD can occur.
Deactivating the front
passenger airbag
WARNI NG
To guarantee the safety of your child, the front passenger airbag must be deactivated when a "rear facing" child seat is installed on the front passenger seat. Otherwise, the child
risks being seriously injured or killed if the airbag is deployed.
WARNI NG
Vehicles not equipped with a deactivation controlInstalling a “rear facing” child seat on the front passenger seat or bench seat is expressly prohibited! Doing so would expose the child to the risk of death or serious injury in the event of airbag deployment.
Deactivating/Reactivating the front
passenger airbag
The control is located on the side of the glove box.
With the ignition off:► To deactivate the airbag, turn the key in the switch to the "OFF" position. ► To reactivate it, turn the key to the "ON" position.When the ignition is switched on:This warning lamp comes on and remains lit to signal the deactivation.OrThis warning lamp comes on for about 1 minute to signal the activation.
Page 89 of 272
89
Safety
5
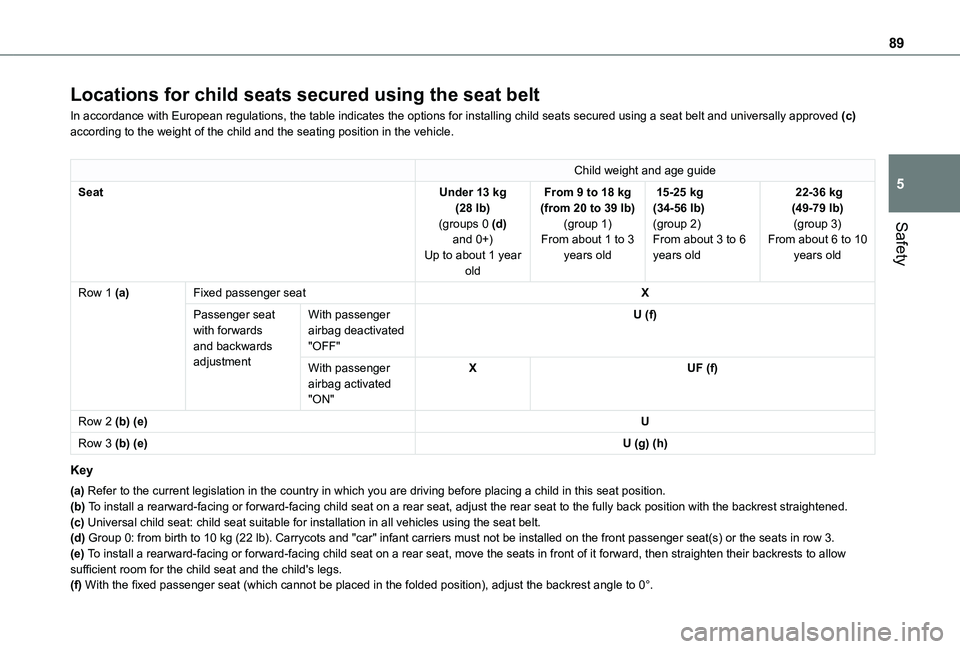
Locations for child seats secured using the seat belt
In accordance with European regulations, the table indicates the options\
for installing child seats secured using a seat belt and universally ap\
proved (c) according to the weight of the child and the seating position in the veh\
icle.
Child weight and age guide
SeatUnder 13 kg (28 lb)(groups 0 (d) and 0+)
Up to about 1 year old
From 9 to 18 kg (from 20 to 39 lb)(group 1)From about 1 to 3
years old
15-25 kg (34-56 lb)(group 2)From about 3 to 6
years old
22-36 kg (49-79 lb)(group 3)From about 6 to 10
years old
Row 1 (a)Fixed passenger seatX
Passenger seat with forwards and backwards adjustment
With passenger airbag deactivated "OFF"
U (f)
With passenger airbag activated "ON"
XUF (f)
Row 2 (b) (e)U
Row 3 (b) (e)U (g) (h)
Key
(a) Refer to the current legislation in the country in which you are drivin\
g before placing a child in this seat position.(b) To install a rearward-facing or forward-facing child seat on a rear seat,\
adjust the rear seat to the fully back position with the backrest strai\
ghtened.(c) Universal child seat: child seat suitable for installation in all vehic\
les using the seat belt.(d) Group 0: from birth to 10 kg (22 lb). Carrycots and "car" infant carriers must not be installed on the f\
ront passenger seat(s) or the seats in row 3.
(e) To install a rearward-facing or forward-facing child seat on a rear seat,\
move the seats in front of it forward, then straighten their backrests \
to allow sufficient room for the child seat and the child's legs.(f) With the fixed passenger seat (which cannot be placed in the folded position), adjust the backrest angle to 0°.
Page 92 of 272
92
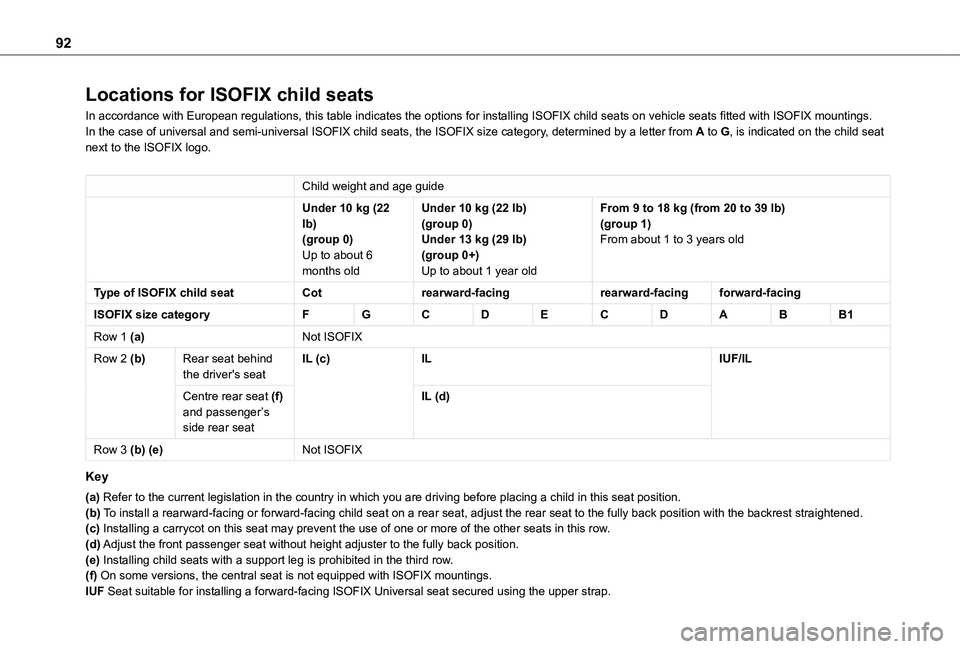
Locations for ISOFIX child seats
In accordance with European regulations, this table indicates the options for installing ISOFIX child seats on vehicle seats fitted with ISOFIX mountings.In the case of universal and semi-universal ISOFIX child seats, the ISOF\
IX size category, determined by a letter from A to G, is indicated on the child seat next to the ISOFIX logo.
Child weight and age guide
Under 10 kg (22 lb)(group 0)
Up to about 6 months old
Under 10 kg (22 lb)(group 0)Under 13 kg (29 lb)
(group 0+)Up to about 1 year old
From 9 to 18 kg (from 20 to 39 lb)(group 1)From about 1 to 3 years old
Type of ISOFIX child seatCotrearward-facingrearward-facingforward-facing
ISOFIX size categoryFGCDECDABB1
Row 1 (a)Not ISOFIX
Row 2 (b)Rear seat behind the driver's seatIL (c)ILIUF/IL
Centre rear seat (f) and passenger’s side rear seat
IL (d)
Row 3 (b) (e)Not ISOFIX
Key
(a) Refer to the current legislation in the country in which you are drivin\
g before placing a child in this seat position.(b) To install a rearward-facing or forward-facing child seat on a rear seat,\
adjust the rear seat to the fully back position with the backrest strai\
ghtened.(c) Installing a carrycot on this seat may prevent the use of one or more o\
f the other seats in this row.(d) Adjust the front passenger seat without height adjuster to the fully bac\
k position.(e) Installing child seats with a support leg is prohibited in the third ro\
w.(f) On some versions, the central seat is not equipped with ISOFIX mounting\
s.IUF Seat suitable for installing a forward-facing ISOFIX Universal seat sec\
ured using the upper strap.
Page 93 of 272
93
Safety
5
IL Seat suitable for an ISOFIX Semi-Universal child seat, which may be eit\
her:– rearward-facing, fitted with an upper strap or a support leg.– forward-facing, fitted with a support leg.– a carrycot fitted with an upper strap or a support leg.For more information on ISOFIX child seats and in particular on securing the upper strap, refer to the correspondi\
ng section.
i-Size child seats
i-Size child seats have two latches that engage on the two rings A.These i-Size child seats also have:– either an upper strap that is attached to ring B.– or a support leg that rests on the vehicle floor, compatible with the approved i-Size seat position.Their role is to prevent the child seat from tipping forward in the even\
t of a collision.For more information on the ISOFIX mountings, refer to the corresponding section.
Locations for i-Size child seats
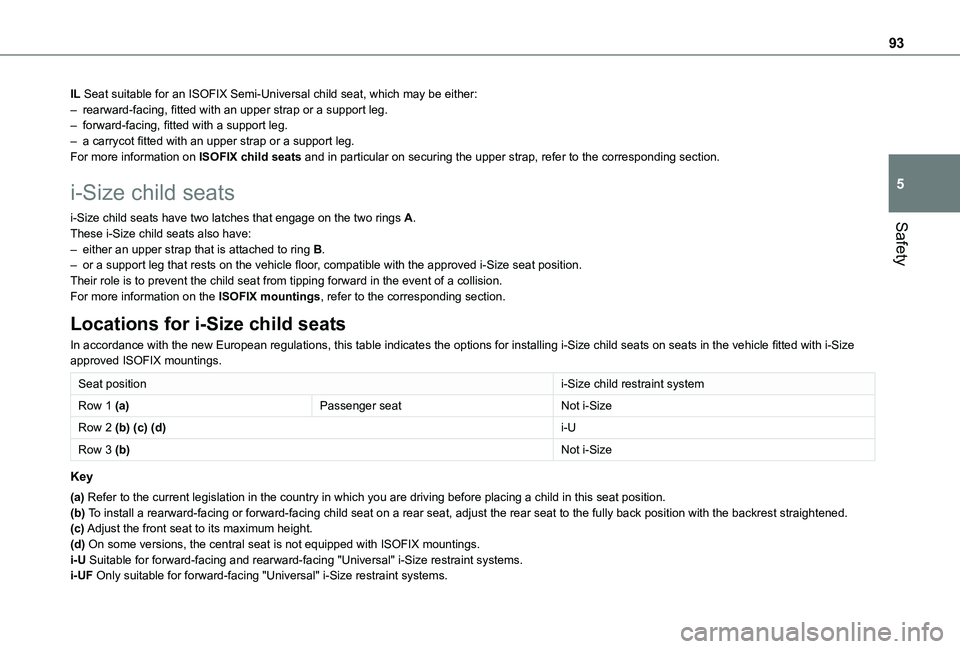
In accordance with the new European regulations, this table indicates the options for installing i-Size child seats on seats in the vehicle fitted with i-Size approved ISOFIX mountings.
Seat positioni-Size child restraint system
Row 1 (a)Passenger seatNot i-Size
Row 2 (b) (c) (d)i-U
Row 3 (b)Not i-Size
Key
(a) Refer to the current legislation in the country in which you are drivin\
g before placing a child in this seat position.(b) To install a rearward-facing or forward-facing child seat on a rear seat,\
adjust the rear seat to the fully back position with the backrest strai\
ghtened.(c) Adjust the front seat to its maximum height.(d) On some versions, the central seat is not equipped with ISOFIX mounting\
s.i-U Suitable for forward-facing and rearward-facing "Universal" i-Size rest\
raint systems.i-UF Only suitable for forward-facing "Universal" i-Size restraint systems.