Page 119 of 624
LC200_OM_OM60Q99U_(U)
1193-2. Opening, closing and locking the doors
3
Operation of each component
■Setting and canceling the functions
To switch between setting and canceling, follow the procedure
below: Close all the doors and turn the engine switch to IGNITION ON
mode. (Perform step within 20 seconds.)
Shift the shift lever to P or N,
and press and hold the door
lock switch ( or ) for
approximately 5 seconds and
then release.
The shift lever and switch posi-
tions corresponding to the
desired function to be set are
shown in the following table.
Use the same procedure to cancel the function.
When the setting or canceling operation is complete, all the do ors
are locked and then unlocked.
1
2
2
FunctionShift lever positionDoor lock switch position
Shift position linked door locking
function
PShift position linked door unlock-
ing function
Speed linked door locking func-
tion
NDriver’s door linked door unlocking
function
Page 126 of 624
126
LC200_OM_OM60Q99U_(U)
3-2. Opening, closing and locking the doors
■Power back door oper ating conditions (vehicles with power back door)
● When the engine switch is off or in accessory mode, the power b ack door
can be opened and closed if the power back door main switch is on and all
of the following conditions are met.
• The lower back door is closed (only when closing)
*1
● When the engine switch is in IGNITION ON mode, the power back d oor can
be opened and closed if the power back door main switch is on and all of the
following conditions are met.
*2
• The power back door is unlocked (except when closing)
• The lower back door is closed (only when closing)
*1
• The vehicle speed is below 1 mph (3 km/h) and the shift lever is in P
*1: If the lower back door is opened while the upper back door is in a closing
operation, it automatically opens again.
*2: The back door cannot be operated using the wireless remote con trol.
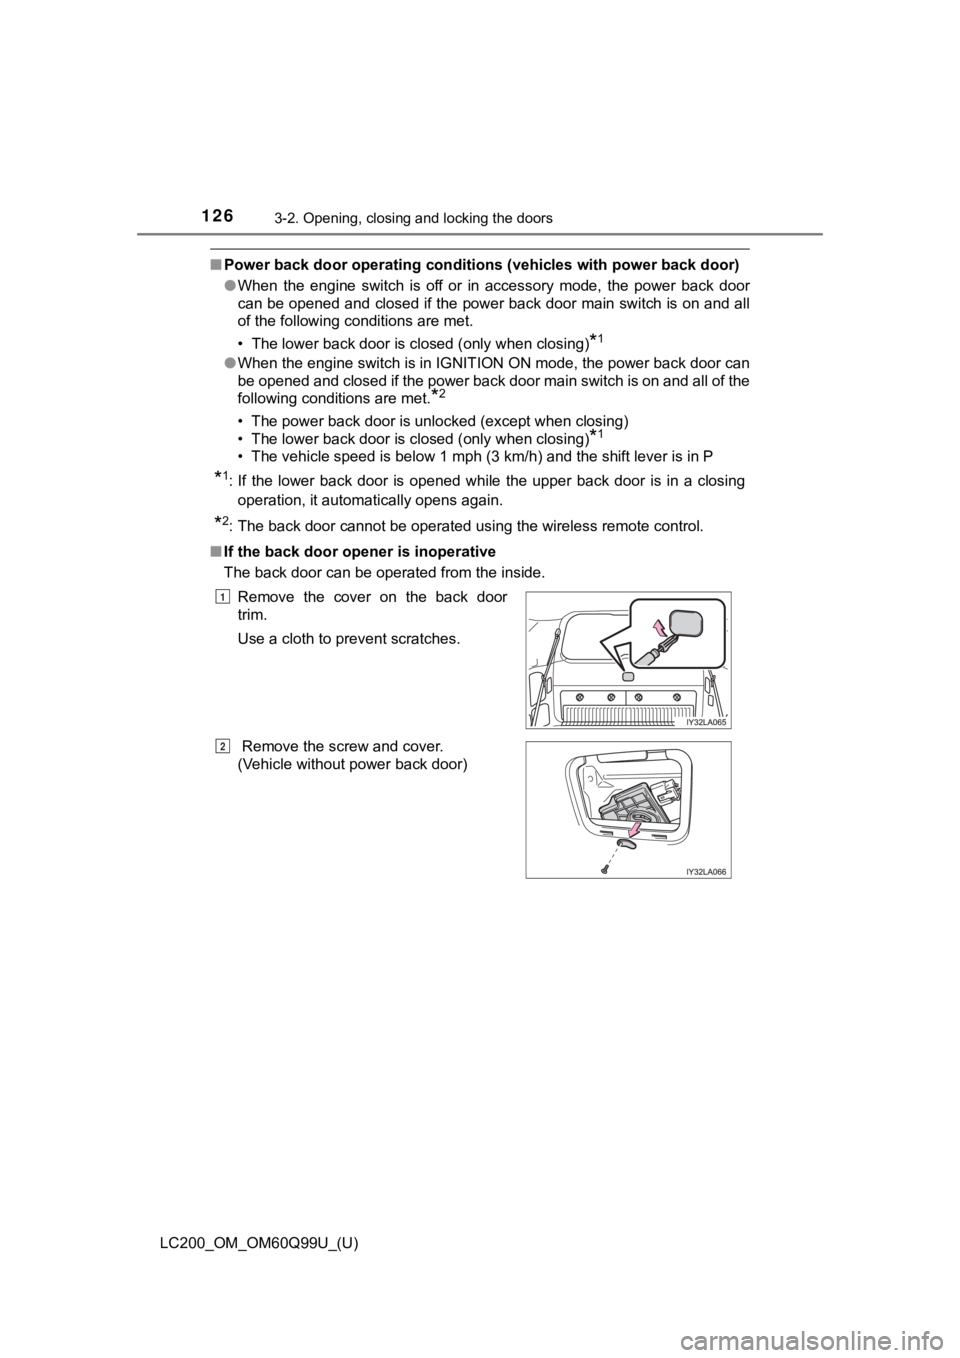
■ If the back door opener is inoperative
The back door can be operated from the inside.
Remove the cover on the back door
trim.
Use a cloth to prevent scratches.
Remove the screw and cover.
(Vehicle without power back door)
1
2
Page 132 of 624
132
LC200_OM_OM60Q99U_(U)
3-2. Opening, closing and locking the doors
WARNING
●In the following situations, the power back door may detect an abnormality
and automatic operation may be stopped. In this case, the back door has
to be operated manually. Take extra care when on an incline, as the back
door may open or close abruptly.
• When the back door contacts an obstacle
• When the battery voltage suddenly drops, such as when the engi ne
switch is turned to the IGNITION ON mode or the engine is start ed
during automatic operation
● If a bicycle carrier or similar heavy object is attached to the back door, the
power back door may not operate, causing itself to malfunction, or the
back door may suddenly shut again after being opened, causing s ome-
one’s hands, head or neck to be caught and injured. When instal ling an
accessory part to the back door, using a genuine Toyota part is recom-
mended.
■ Jam protection function (veh icles with power back door)
Observe the following precautions.
Failure to do so may cause death or serious injury.
● Never use any part of your body to intentionally activate the j am protection
function.
● The jam protection function may not work if something gets caught just
before the back door fully closes. Be careful not to catch fing ers or any-
thing else.
● The jam protection function may not work depending on the shape of the
object that is caught. Be careful not to catch fingers or anything else.
Page 150 of 624
150
LC200_OM_OM60Q99U_(U)
3-3. Adjusting the seats
Driving position memor y
Your preferred driving position (the position of the driver’s seat, steer-
ing wheel and outside rear view mirrors) can be recorded and re called
by pressing a button.
Three different driving positions can be recorded into memory.
■Recording procedure
Check that the shift lever is in P.
Turn the engine switch to IGNITION ON mode.
Adjust the driver’s seat, steerin g wheel, and outside rear view
mirrors to the desired positions.
While pressing the “SET”
button, or within 3 seconds
after the “SET” button is
pressed, press button “1”, “2”
or “3” until the buzzer
sounds.
If the selected button has
already been preset, the previ-
ously recorded position will be
overwritten.
This feature automatically adjus ts the driver’s seats, steering
wheel and outside rear view mi rrors to make entering and exit-
ing the vehicle easier or to suit your preferences.
Driving position memory
1
2
3
4
Page 151 of 624
LC200_OM_OM60Q99U_(U)
1513-3. Adjusting the seats
3
Operation of each component
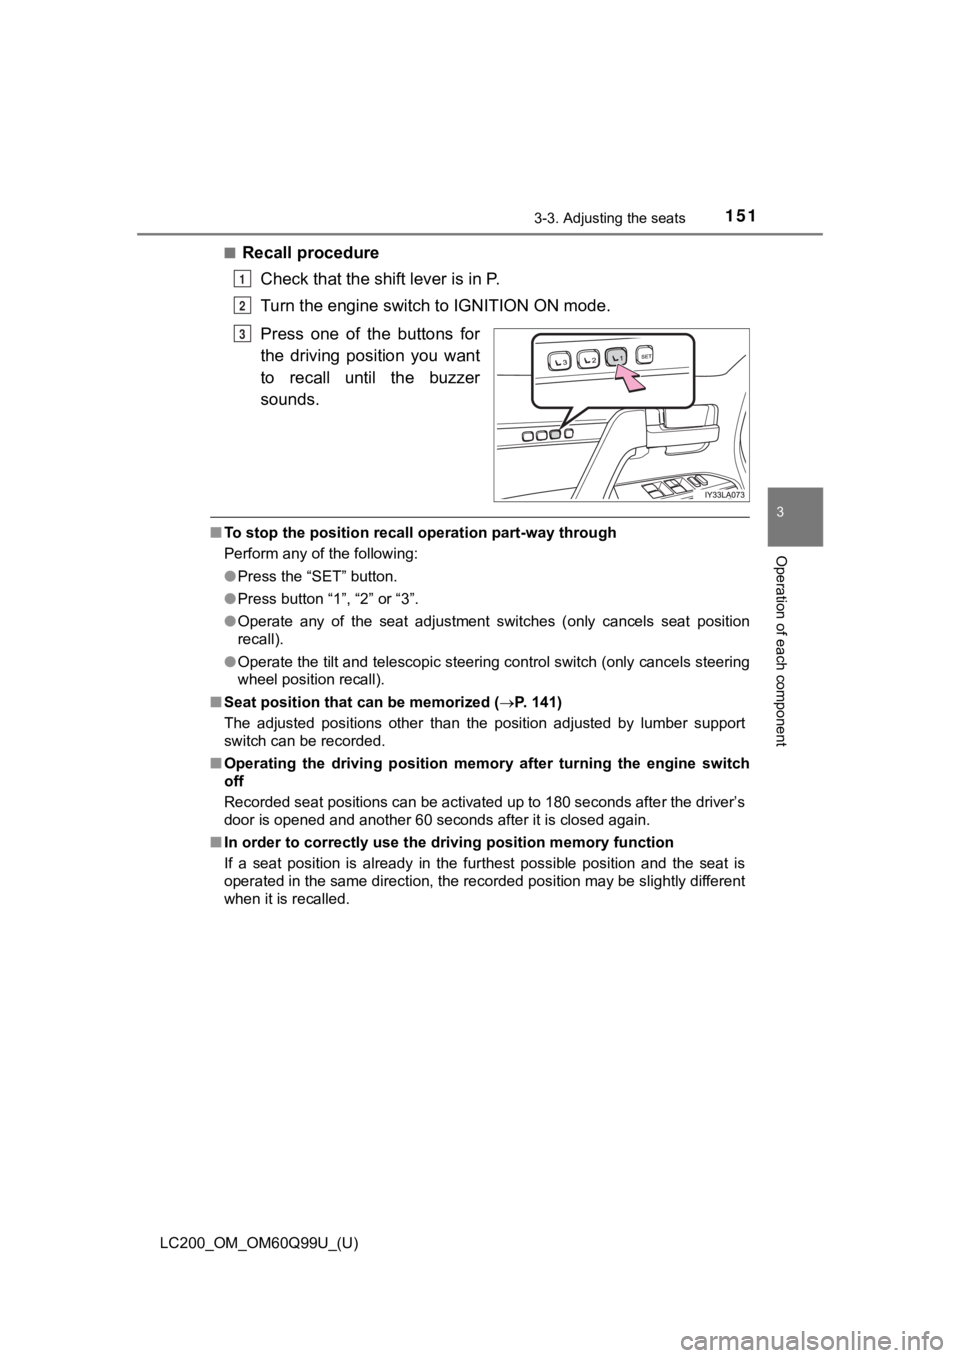
■Recall procedureCheck that the shift lever is in P.
Turn the engine switch to IGNITION ON mode.
Press one of the buttons for
the driving position you want
to recall until the buzzer
sounds.
■To stop the position recall operation part-way through
Perform any of the following:
●Press the “SET” button.
● Press button “1”, “2” or “3”.
● Operate any of the seat adjustment switches (only cancels seat position
recall).
● Operate the tilt and telescopic steering control switch (only cancels steering
wheel position recall).
■ Seat position that can be memorized ( P. 141)
The adjusted positions other than the position adjusted by lumb er support
switch can be recorded.
■ Operating the driving position m emory after turning the engine switch
off
Recorded seat positions can be activated up to 180 seconds afte r the driver’s
door is opened and another 60 seconds after it is closed again.
■ In order to correctly use the dr iving position memory function
If a seat position is already in the furthest possible position and the seat is
operated in the same direction, the recorded position may be sl ightly different
when it is recalled.
1
2
3
Page 152 of 624
152
LC200_OM_OM60Q99U_(U)
3-3. Adjusting the seats
Each electronic key can be registered to recall your preferred driving
position.
■Registering procedure
Record your driving position to button “1”, “2” or “3” before perform-
ing the following:
Carry only the key you want to register, and then close the dri ver’s
door.
If 2 or more keys are in the vehicle, the driving position cann ot be
recorded properly.
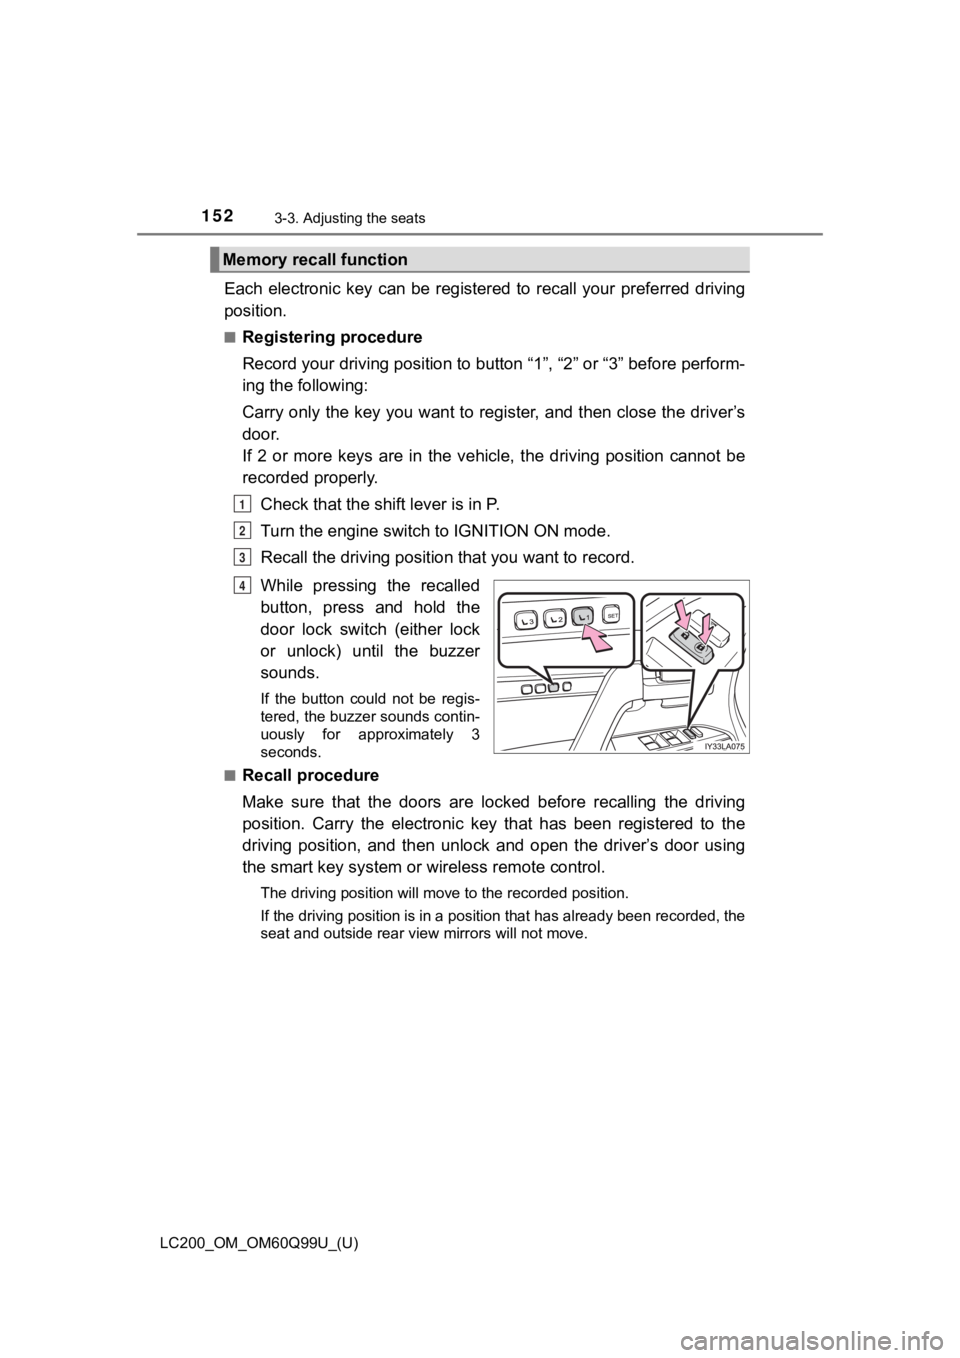
Check that the shift lever is in P.
Turn the engine switch to IGNITION ON mode.
Recall the driving position that you want to record.
While pressing the recalled
button, press and hold the
door lock switch (either lock
or unlock) until the buzzer
sounds.
If the button could not be regis-
tered, the buzzer sounds contin-
uously for approximately 3
seconds.
■
Recall procedure
Make sure that the doors are locked before recalling the drivin g
position. Carry the electronic k ey that has been registered to the
driving position, and then unlock and open the driver’s door us ing
the smart key system or wireless remote control.
The driving position will move to the recorded position.
If the driving position is in a position that has already been recorded, the
seat and outside rear view mirrors will not move.
Memory recall function
1
2
3
4
Page 153 of 624
LC200_OM_OM60Q99U_(U)
1533-3. Adjusting the seats
3
Operation of each component
■Cancelation procedure
Carry only the key you want to cancel and then close the driver’s
door.
If 2 or more keys are in the vehicle, the driving position cann ot be
canceled properly.
Turn the engine switch to IGNITION ON mode.
While pressing the “SET” button, press and hold the door lock
switch (either lock or unlock) until the buzzer sounds twice.
If the button could not be canceled, the buzzer sounds continuo usly for
approximately 3 seconds.
■ Recalling the driving position u sing the memory recall function
● Different driving positions can be registered for each electron ic key. There-
fore, the driving position that is recalled may be different de pending on the
key being carried.
● If a door other than the driver’s door is unlocked with the sma rt key system,
the driving position cannot be recalled. In this case, press the driving posi-
tion button which has been set.
■ Customization
The unlock door settings of the memory recall function can be customized.
(Customizable features: P. 586)
WARNING
■Seat adjustment caution
Take care during seat adjustment so that the seat does not stri ke the rear
passenger or squeeze your body against the steering wheel.
1
2
Page 157 of 624
1573-4. Adjusting the steering wheel and mirrors
3
Operation of each component
LC200_OM_OM60Q99U_(U)
Steering wheel
Operating the switch moves the steering wheel in the following direc-
tions:
Up
Down
Toward the driver
Away from the driver
When the engine switch is off, the
steering wheel returns to its
stowed position by moving up and
away to enable easier driver entry
and exit.
Switching to ACCESSORY or
IGNITION ON mode will return the
steering wheel to the original posi-
tion.
To sound the horn, press on or
close to the mark.
Adjustment procedure
1
2
3
4
Auto tilt away
Horn