2019 TESLA MODEL X warning
[x] Cancel search: warningPage 3 of 224
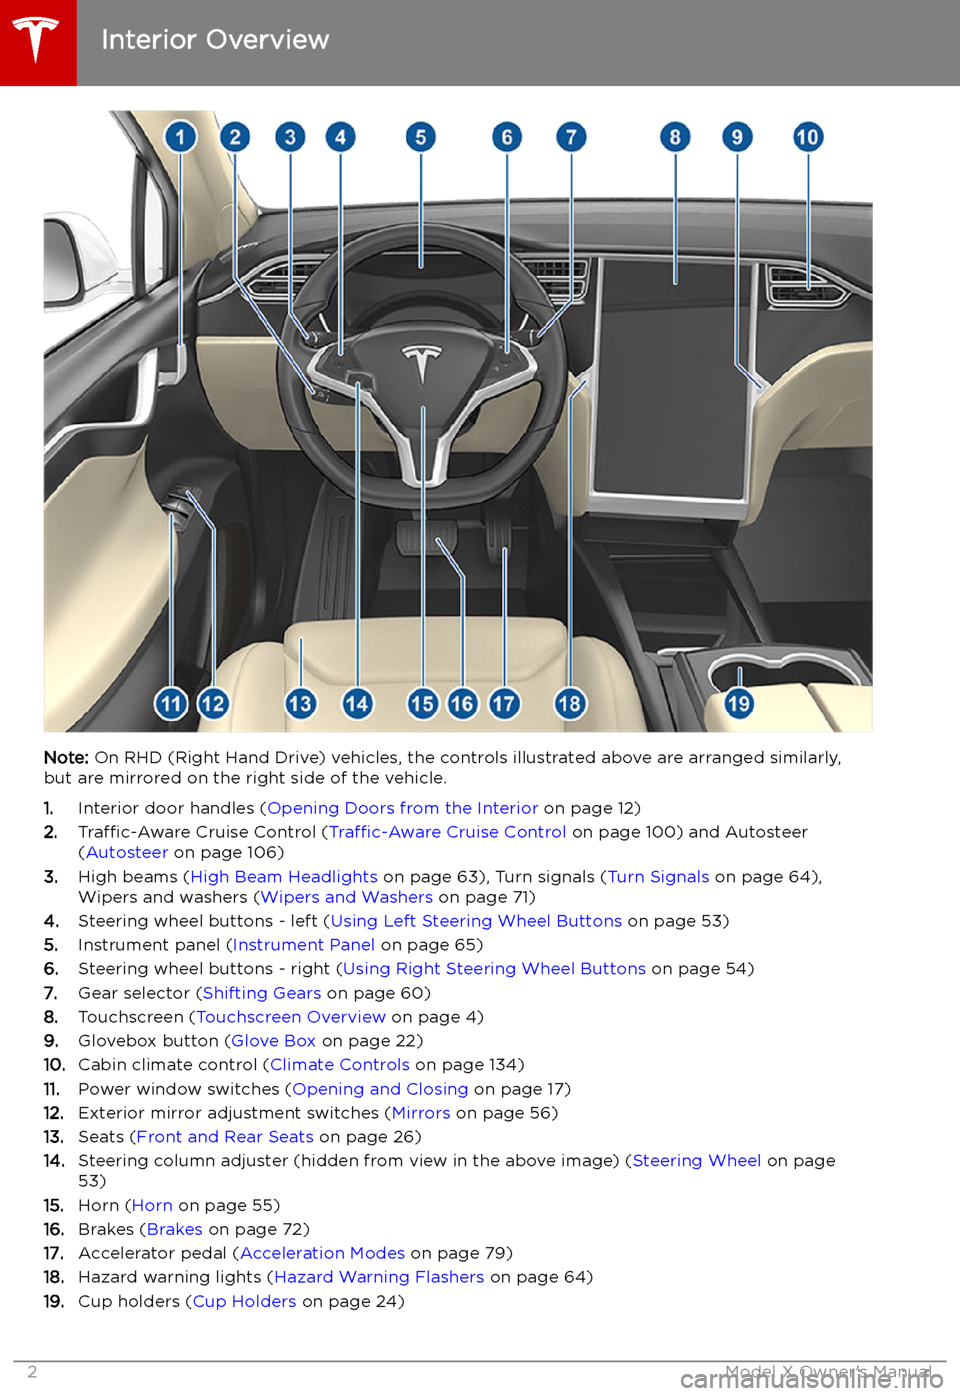
Overview
Interior Overview
Note: On RHD (Right Hand Drive) vehicles, the controls illustrated above are arranged similarly,
but are mirrored on the right side of the vehicle.
1. Interior door handles ( Opening Doors from the Interior on page 12)
2. Traffic-Aware Cruise Control ( Traffic-Aware Cruise Control on page 100) and Autosteer
( Autosteer on page 106)
3. High beams ( High Beam Headlights on page 63), Turn signals ( Turn Signals on page 64),
Wipers and washers ( Wipers and Washers on page 71)
4. Steering wheel buttons - left ( Using Left Steering Wheel Buttons on page 53)
5. Instrument panel ( Instrument Panel on page 65)
6. Steering wheel buttons - right ( Using Right Steering Wheel Buttons on page 54)
7. Gear selector ( Shifting Gears on page 60)
8. Touchscreen ( Touchscreen Overview on page 4)
9. Glovebox button ( Glove Box on page 22)
10. Cabin climate control ( Climate Controls on page 134)
11. Power window switches ( Opening and Closing on page 17)
12. Exterior mirror adjustment switches ( Mirrors on page 56)
13. Seats ( Front and Rear Seats on page 26)
14. Steering column adjuster (hidden from view in the above image) ( Steering Wheel on page
53)
15. Horn ( Horn on page 55)
16. Brakes ( Brakes on page 72)
17. Accelerator pedal ( Acceleration Modes on page 79)
18. Hazard warning lights ( Hazard Warning Flashers on page 64)
19. Cup holders ( Cup Holders on page 24)
Interior Overview
2Model X Owner
Page 5 of 224

Touchscreen Overview
The main components of the touchscreen are shown here. The touchscreen is used to control
many features that, in traditional cars, are controlled using physical buttons (for example,
adjusting the heating and air conditioning, headlights, etc.). You can also use the touchscreen to
customize Model X to suit your preferences.
Warning: Always pay attention to road and traffic conditions when driving. To minimize driver
distraction and ensure the safety of vehicle occupants as well as other road users, avoid using
the touchscreen to adjust settings while the vehicle is in motion.
Note: The image below is provided for demonstration purposes only. Depending on vehicle
options, software version and market region, your touchscreen may appear slightly different.
Touchscreen Overview
4Model X Owner
Page 7 of 224

1.This area on the top of the touchscreen displays the time and provides shortcut to lock/
unlock the vehicle, access vehicle information (the Tesla "T"), choose to set up a driver profile
(see Driver Profiles on page 50), control HomeLink devices (if equipped) (see HomeLink
Universal Transceiver on page 155), view network strength, and connect to Wi-Fi (see
Connecting to Wi-Fi on page 157) and Bluetooth devices (see Pairing a Bluetooth Phone on
page 148). If you see an exclamation mark, touch it to see warning messages that are in effect. If you see a yellow clock icon, a software update is available (see Software Updates on
page 158).
Note: An airbag status symbol displays in the top corner of the touchscreen only when
Model X is powered on, ready to drive, and the airbag is turned off (see Airbags on page 45).
2. Controls. Touch to control features and customize Model X to suit your preferences (see
Controls on page 124).
3. Media Player. (see Media and Audio on page 145).
Touchscreen Overview
6Model X Owner
Page 15 of 224
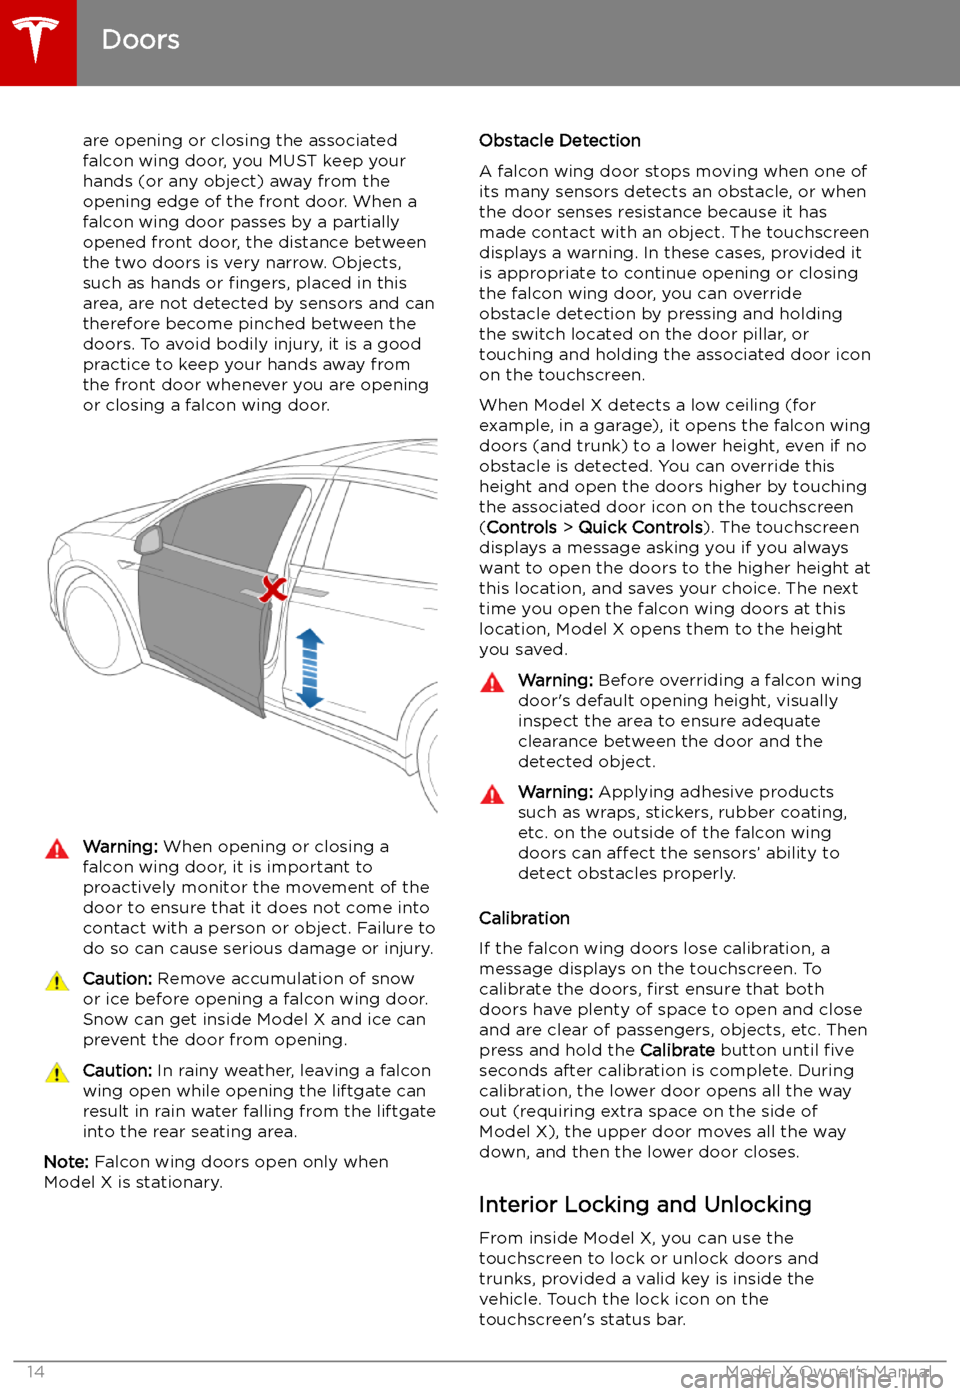
are opening or closing the associatedfalcon wing door, you MUST keep your
hands (or any object) away from the opening edge of the front door. When a falcon wing door passes by a partially
opened front door, the distance between
the two doors is very narrow. Objects,
such as hands or fingers, placed in this
area, are not detected by sensors and can
therefore become pinched between the
doors. To avoid bodily injury, it is a good practice to keep your hands away from
the front door whenever you are opening
or closing a falcon wing door.Warning: When opening or closing a
falcon wing door, it is important to
proactively monitor the movement of the door to ensure that it does not come into
contact with a person or object. Failure to
do so can cause serious damage or injury.Caution: Remove accumulation of snow
or ice before opening a falcon wing door.
Snow can get inside Model X and ice can
prevent the door from opening.Caution: In rainy weather, leaving a falcon
wing open while opening the liftgate can
result in rain water falling from the liftgate
into the rear seating area.
Note: Falcon wing doors open only when
Model X is stationary.
Obstacle Detection
A falcon wing door stops moving when one of
its many sensors detects an obstacle, or when
the door senses resistance because it has made contact with an object. The touchscreen
displays a warning. In these cases, provided it
is appropriate to continue opening or closing
the falcon wing door, you can override obstacle detection by pressing and holding
the switch located on the door pillar, or
touching and holding the associated door icon on the touchscreen.
When Model X detects a low ceiling (for
example, in a garage), it opens the falcon wing
doors (and trunk) to a lower height, even if no
obstacle is detected. You can override this height and open the doors higher by touching
the associated door icon on the touchscreen
( Controls > Quick Controls ). The touchscreen
displays a message asking you if you always
want to open the doors to the higher height at
this location, and saves your choice. The next
time you open the falcon wing doors at this
location, Model X opens them to the height you saved.Warning: Before overriding a falcon wing
door
Page 21 of 224
Front Trunk
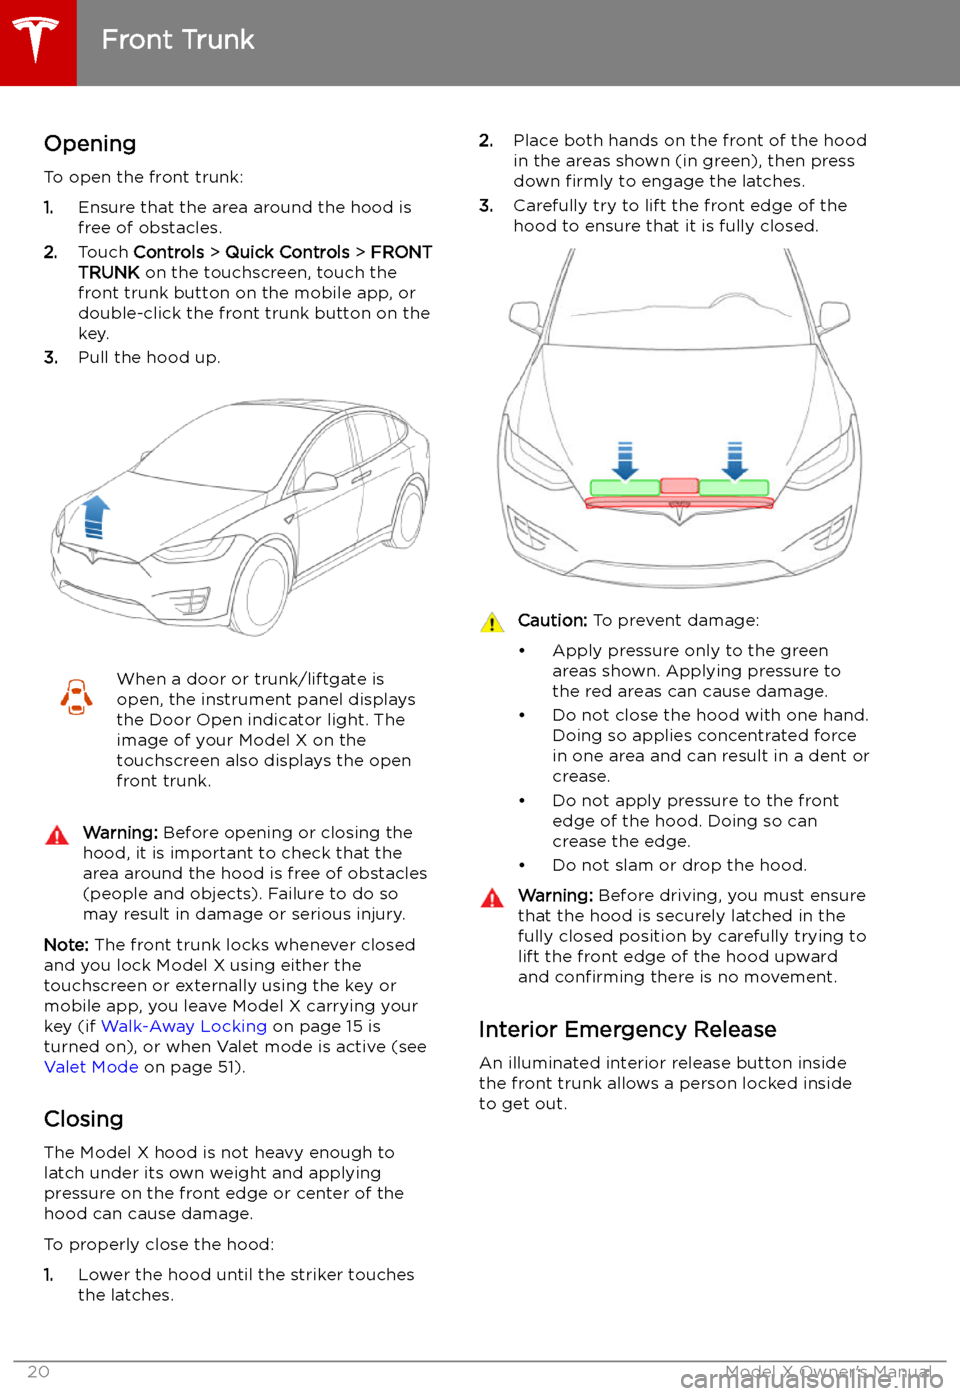
Opening
To open the front trunk:
1. Ensure that the area around the hood is
free of obstacles.
2. Touch Controls > Quick Controls > FRONT
TRUNK on the touchscreen, touch the
front trunk button on the mobile app, or
double-click the front trunk button on the key.
3. Pull the hood up.
When a door or trunk/liftgate is
open, the instrument panel displays
the Door Open indicator light. The
image of your Model X on the
touchscreen also displays the open front trunk.Warning: Before opening or closing the
hood, it is important to check that the area around the hood is free of obstacles
(people and objects). Failure to do so
may result in damage or serious injury.
Note: The front trunk locks whenever closed
and you lock Model X using either the
touchscreen or externally using the key or
mobile app, you leave Model X carrying your key (if Walk-Away Locking on page 15 is
turned on), or when Valet mode is active (see Valet Mode on page 51).
Closing
The Model X hood is not heavy enough to
latch under its own weight and applying
pressure on the front edge or center of the
hood can cause damage.
To properly close the hood:
1. Lower the hood until the striker touches
the latches.
2. Place both hands on the front of the hood
in the areas shown (in green), then press
down firmly to engage the latches.
3. Carefully try to lift the front edge of the
hood to ensure that it is fully closed.Caution: To prevent damage:
Page 22 of 224

Press the interior release button to open the
front trunk, then push up on the hood.
Note: The interior release button glows
following a brief exposure to ambient light.
Warning: People should never climb
inside the front trunk. Never shut the
front trunk when a person is inside.Warning: Care should be taken to ensure
that objects inside the front trunk do not
bump against the release button, causing the trunk to accidentally open.
Front Trunk
Opening and Closing21
Page 23 of 224
Interior Storage and Electronics
Glove Box
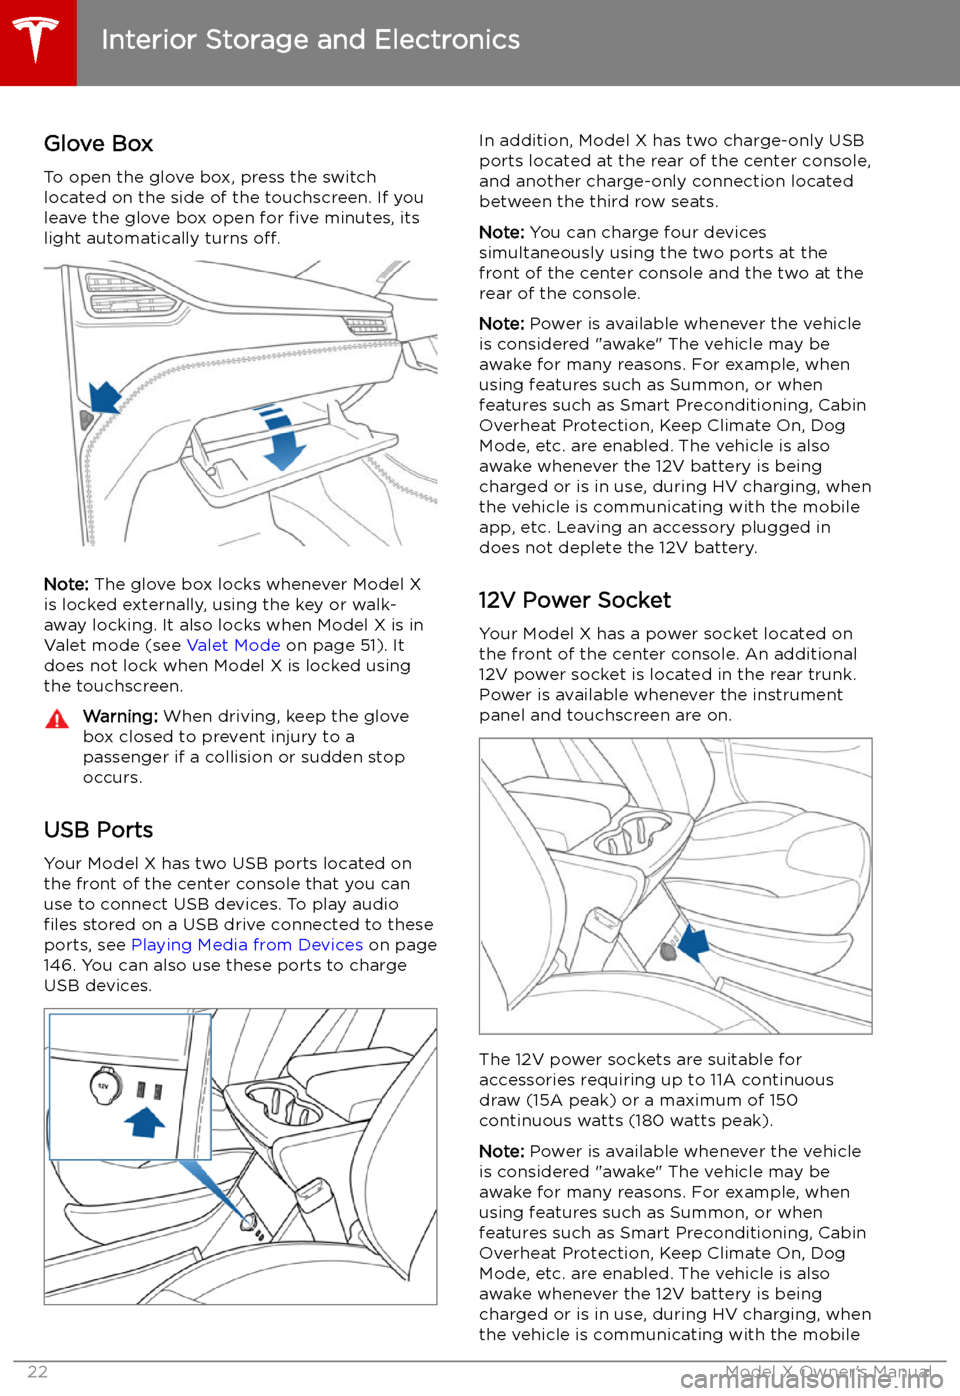
To open the glove box, press the switch located on the side of the touchscreen. If you
leave the glove box open for five minutes, its
light automatically turns off.
Note: The glove box locks whenever Model X
is locked externally, using the key or walk-
away locking. It also locks when Model X is in Valet mode (see Valet Mode on page 51). It
does not lock when Model X is locked using
the touchscreen.
Warning: When driving, keep the glove
box closed to prevent injury to a
passenger if a collision or sudden stop
occurs.
USB Ports
Your Model X has two USB ports located onthe front of the center console that you can
use to connect USB devices. To play audio files stored on a USB drive connected to these
ports, see Playing Media from Devices on page
146. You can also use these ports to charge
USB devices.
In addition, Model X has two charge-only USB
ports located at the rear of the center console,
and another charge-only connection located
between the third row seats.
Note: You can charge four devices
simultaneously using the two ports at the
front of the center console and the two at the
rear of the console.
Note: Power is available whenever the vehicle
is considered "awake" The vehicle may be awake for many reasons. For example, when
using features such as Summon, or when
features such as Smart Preconditioning, Cabin Overheat Protection, Keep Climate On, Dog
Mode, etc. are enabled. The vehicle is alsoawake whenever the 12V battery is beingcharged or is in use, during HV charging, whenthe vehicle is communicating with the mobile
app, etc. Leaving an accessory plugged in
does not deplete the 12V battery.
12V Power Socket Your Model X has a power socket located on
the front of the center console. An additional
12V power socket is located in the rear trunk.
Power is available whenever the instrument
panel and touchscreen are on.
The 12V power sockets are suitable for
accessories requiring up to 11A continuous
draw (15A peak) or a maximum of 150
continuous watts (180 watts peak).
Note: Power is available whenever the vehicle
is considered "awake" The vehicle may be awake for many reasons. For example, when
using features such as Summon, or when features such as Smart Preconditioning, Cabin
Overheat Protection, Keep Climate On, Dog Mode, etc. are enabled. The vehicle is alsoawake whenever the 12V battery is beingcharged or is in use, during HV charging, when
the vehicle is communicating with the mobile
Interior Storage and Electronics
22Model X Owner
Page 24 of 224

app, etc. Leaving an accessory plugged in
does not deplete the 12V battery.
Note: In situations where Model X is unable to
detect the key (low battery, interference, etc.),
place it immediately below the 12V power
socket in the center console where Model X can best detect it.Warning: The power socket and an
accessory