2019 MERCEDES-BENZ SPRINTER ECU
[x] Cancel search: ECUPage 224 of 354

#
Tomo vetherack ra ils:unsc rew star knobs
7 coun ter-clockwise until they are slightly
loose. #
Slide rack rail2 along roof rail1 tothe
desired position. #
Screw star knobs 7tight clo ckwise. #
Check that thera ck rail is seated securely.
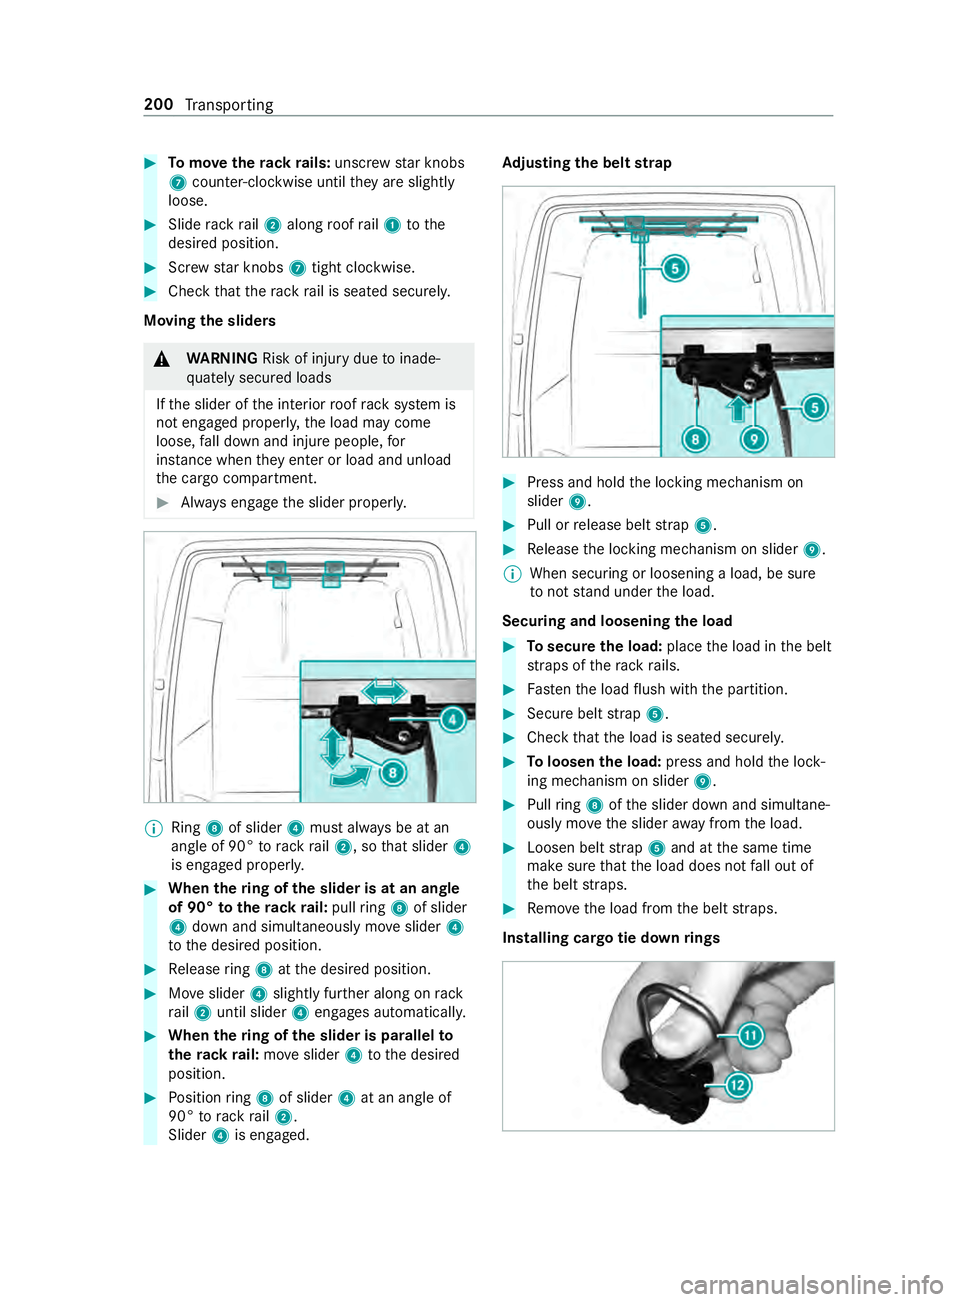
Moving the sliders &
WARNING Risk of inju rydue toinade‐
qu ately secured loads
If th e slider of the interior roof rack system is
not engaged proper ly,th e load may come
loose, fall down and injure people, for
ins tance when they enter or load and unload
th e cargo compartment. #
Always engage the slider properly. %
Ring
8of slider 4must alw ays be at an
angle of 90° torack rail2, so that slider 4
is engaged proper ly. #
When thering of the slider is at an angle
of 90° totherack ra il:pull ring 8 of slider
4 down and simul taneously mo veslider 4
to the desired position. #
Release ring 8 atthe desired position. #
Moveslider 4slightly fur ther along on rack
ra il2 until slider 4engages automaticall y. #
When thering of the slider is pa rallel to
th erack ra il:mo veslider 4tothe desired
position. #
Position ring 8 of slider 4at an angle of
90° torack rail2.
Slider 4is engaged. Ad
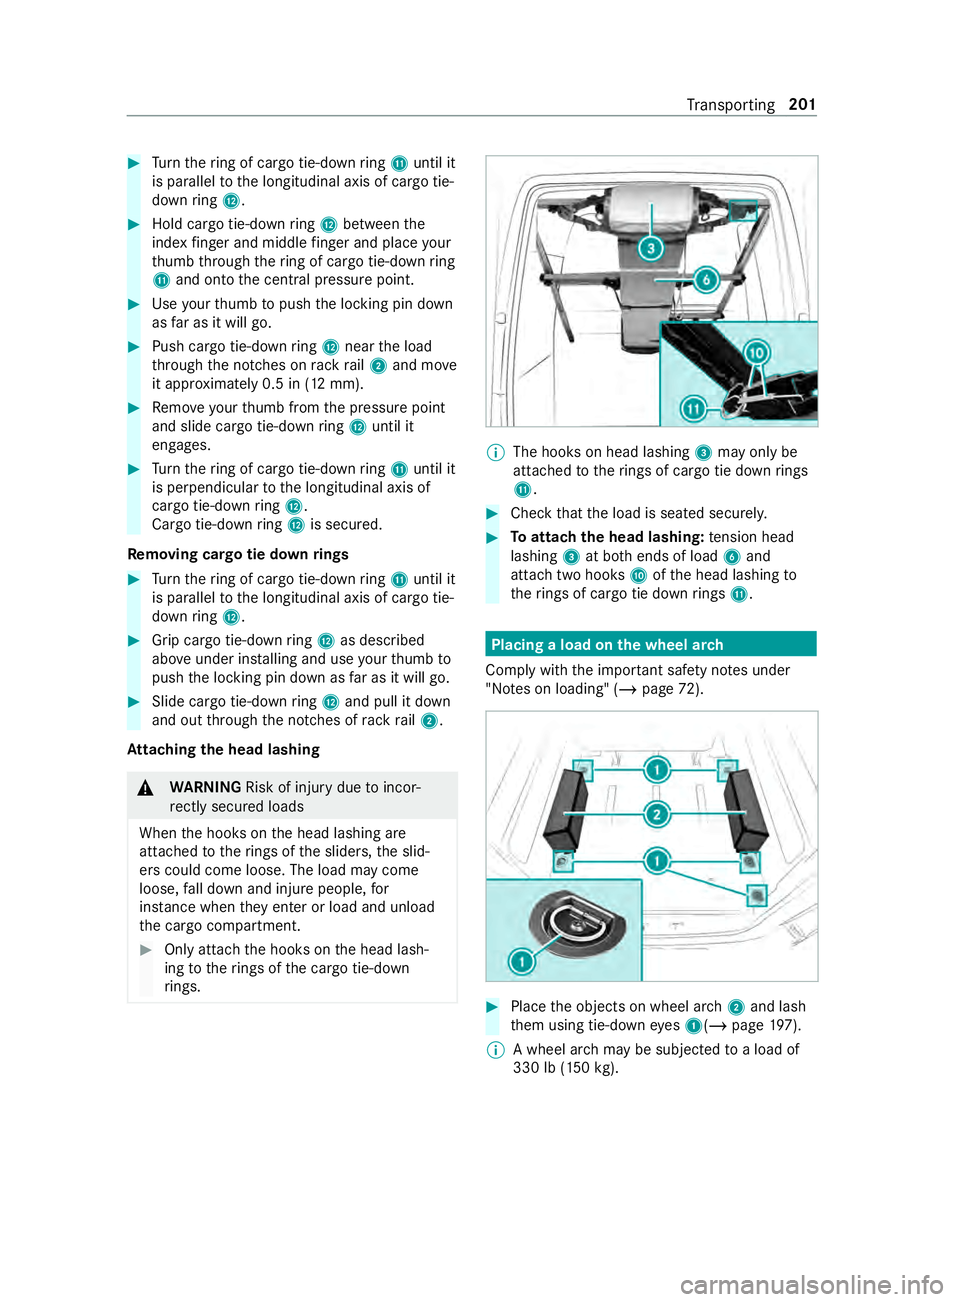
justing the belt strap #
Press and hold the locking mechanism on
slider 9. #
Pull or release belt stra p5. #
Release the locking mechanism on slider 9.
% When securing or loosening a load, be sure
to not stand under the load.
Securing and loosening the load #
Tosecure the load: placethe load in the belt
st ra ps of thera ck rails. #
Fasten the load flush with the partition. #
Secure belt stra p5. #
Check that the load is seated securel y. #
Toloosen the load: press and hold the lock‐
ing mechanism on slider 9. #
Pull ring 8 ofthe slider down and simultane‐
ously mo vethe slider away from the load. #
Loosen belt stra p5 and at the same time
make sure that the load does not fall out of
th e belt stra ps. #
Remo vethe load from the belt stra ps.
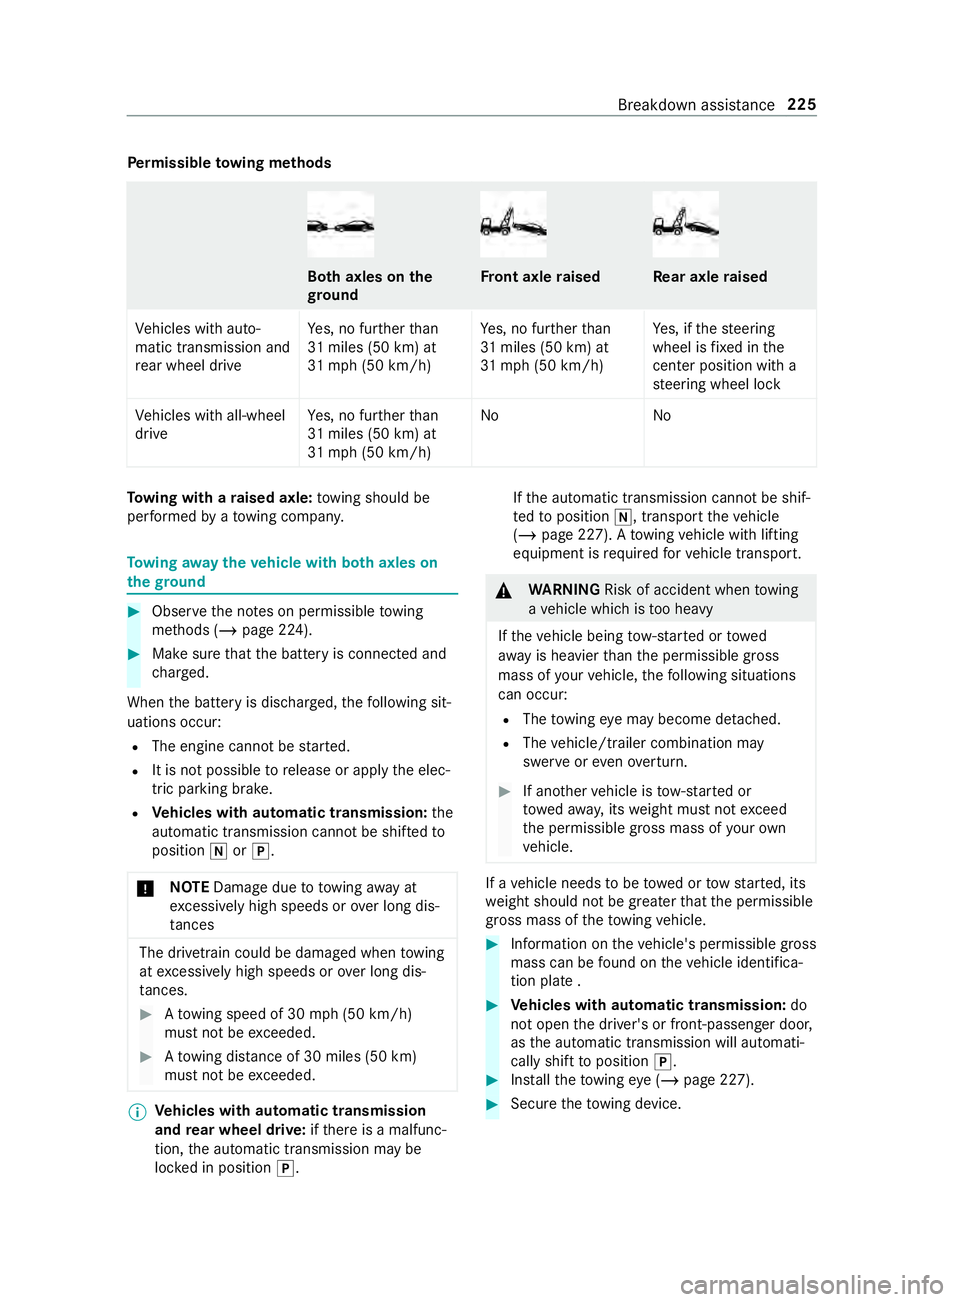
Installing cargo tie down rings 200
Transporting
Page 225 of 354

#
Turn thering of cargo tie-down ring B until it
is pa rallel tothe longitudinal axis of cargo tie-
down ring C. #
Hold cargo tie-down ring C between the
index finger and middle finger and place your
th umb thro ugh thering of cargo tie-down ring
B and onto the cent ral pressure point. #
Use your thumb topush the locking pin down
as far as it will go. #
Push cargo tie-down ring C near the load
th ro ugh the notches on rack rail2 and mo ve
it appr oximately 0.5 in (12 mm). #
Remo veyour thumb from the pressure point
and slide cargo tie-down ring C until it
engages. #
Turn thering of cargo tie-down ring B until it
is pe rpendicular tothe longitudinal axis of
cargo tie-down ring C.
Cargo tie-down ring C is secu red.
Re moving cargo tie down rings #
Turn thering of cargo tie-down ring B until it
is pa rallel tothe longitudinal axis of cargo tie-
down ring C. #
Grip cargo tie-down ring C as described
ab ove under ins talling and use your thumb to
push the locking pin down as far as it will go. #
Slide cargo tie-down ring C and pull it down
and out thro ugh the notches of rack rail2.
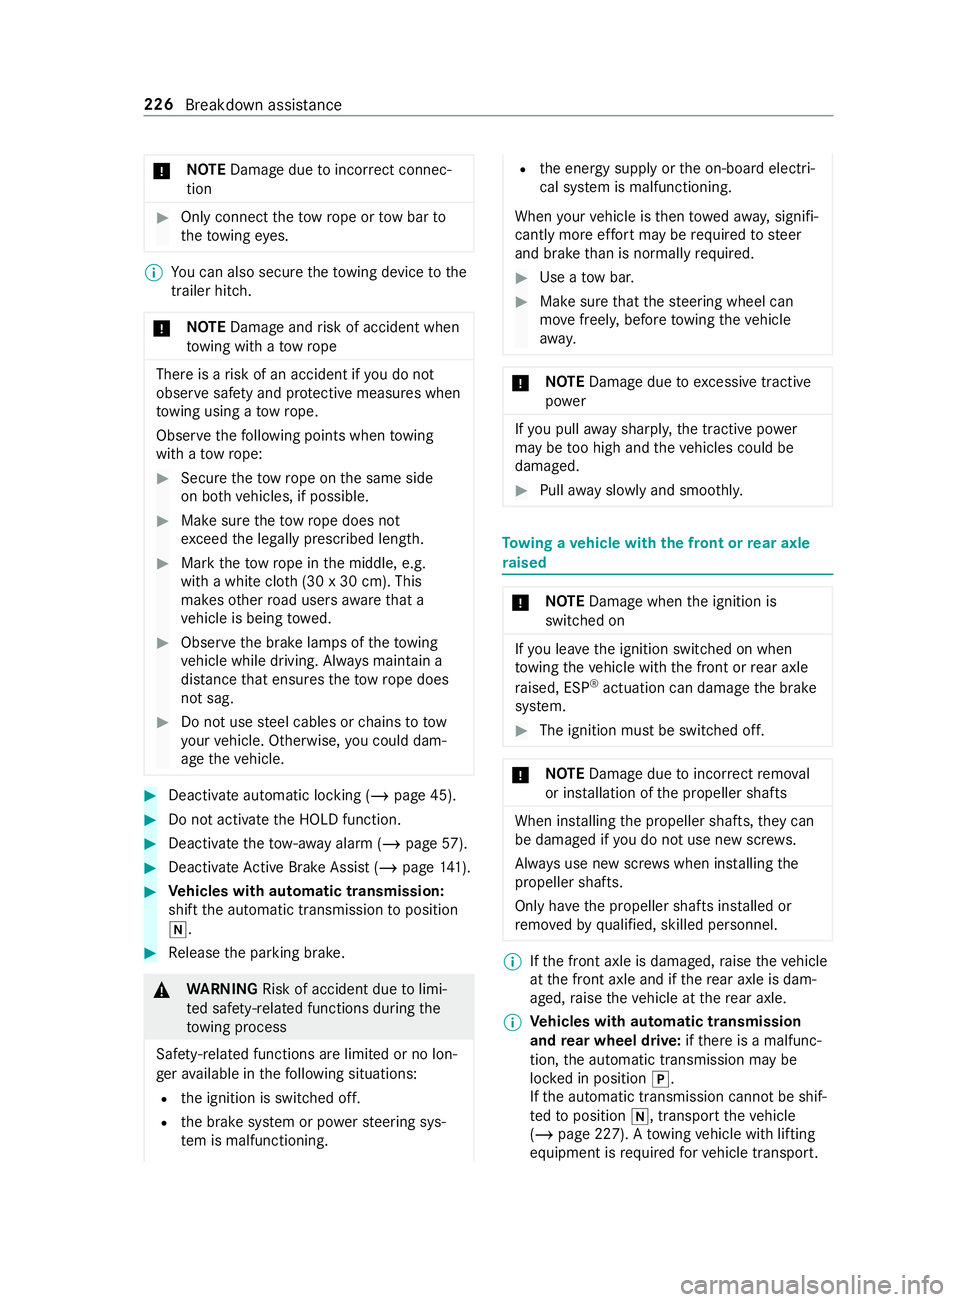
At taching the head lashing &
WARNING Risk of inju rydue toincor‐
re ctly secu red loads
When the hooks on the head lashing are
attached totherings of the sliders, the slid‐
ers could come loose. The load may come
loose, fall down and injure people, for
ins tance when they enter or load and unload
th e cargo compartment. #
Only atta chthe hooks on the head lash‐
ing totherings of the cargo tie-down
ri ngs. %
The hoo
kson head lashing 3may only be
attached totherings of cargo tie down rings
B. #
Check that the load is seated securel y. #
Toattach the head lashing: tension head
lashing 3at bo thends of load 6and
attach two hooks Aofthe head lashing to
th erings of cargo tie down rings B. Placing a load on the wheel ar
ch
Comply with the impor tant sa fety no tes under
"No tes on loading" (/ page72). #
Place the objects on wheel ar ch2 and lash
th em using tie-down eyes 1(/ page197).
% A wheel ar
chmay be subjected toa load of
330 lb (150 kg). Tr
ansporting 201
Page 227 of 354

&
WARNING Risk of inju rydue tomoving
parts
Cer tain components in the engine compart‐
ment may continue tomo veor suddenly
mo veagain even af terth e ignition has been
switched off, e.g. the cooler fan.
Ma kesure of thefo llowing before per form ing
ta sks in the engine compartmen t:#
Switch the ignition off. #
Neverto uch the danger zone sur round‐
ing moving component parts, e.g. the
ro tation area of thefa n. #
Remo vejewe lry and watches. #
Keep items of clo thing and hair away
from moving parts. &
WARNING Risk of inju ryfrom touching
component parts under voltage
The ignition sy stem and the fuel injection sys‐
te m wo rkunder high voltage. If youto uch
component parts which are under voltage,
yo u could receive an electric shoc k.#
Neverto uch component parts of the
ignition sy stem or the fuel injection sys‐
te m when the ignition is switched on. Live components of
the fuel injection sy stem
include the injec tors,fo rex ample.
Live components of the ignition sy stem include
th efo llowing:
R Ignition coils
R Spark plug connec tors
R Diagnostic soc ket &
WARNING Risk of bu rns from hot com‐
ponent parts in the engine compartment
Cer tain components in the engine compart‐
ment can be very hot, e.g. the engine, the
ra diator and parts of theex haust sy stem. #
Allow the engine tocool down and only
to uch component parts desc ribed in the
fo llowing. If
yo u ha vetocar ryout any workinthe engine
compartment, touch only thefo llowing compo‐
nents:
R Hood
R Engine oil filler opening cap
R Washer fluid reser voir cap R
Coolant expansion reser voir cap &
WARNING Risk of inju ryfrom using the
windshield wipers while the engine hood
is open
When the engine hood is open and the wind‐
shield wipers are set in motion, you can be
trapped bythe wiper linkage. #
Always switch off the windshield wipers
and ignition before opening the engine
hood. #
Park theve hicle in a safe location and on a
le ve l sur face if possible. #
Switch off the engine. #
Secure theve hicle against rolling away. &
WARNING Risk of inju rywhen the hood
is opened
When you open the hood, it may suddenly
drop into the end position.
There is a risk of injury for an yone in the
hood's range of mo vement. #
Before releasing the hood, ensure that
th e support is firm ly seated in the
holder. #
Open the hood only when there is no-
one in the hood's range of mo vement. #
Toopen: pull handle 1torelease the hood. #
Reach into thega p and push the hood catch
handle upwards. #
Open the hood and hold it up. Maintenance and care
203
Page 232 of 354

Fi
lling up the windshield washer sy stem &
WARNING Risk of bu rns from hot com‐
ponent parts in the engine compartment
Cer tain components in the engine compart‐
ment can be very hot, e.g. the engine, the
ra diator and parts of theex haust sy stem. #
Allow the engine tocool down and only
to uch component parts desc ribed in the
fo llowing. If
yo u ha vetocar ryout any workinthe engine
compartment, touch only thefo llowing compo‐
nents:
R Hood
R Engine oil filler opening cap
R Washer fluid reser voir cap
R Coolant expansion reser voir cap &
WARNING Danger of bu rns when open‐
ing the hood
If yo u open the hood when the engine has
ove rheated or during a fire inthe engine com‐
partment, you could come into con tact wi th
hot gases or other escaping operating fluids. #
Before opening the hood, allow the
engine tocool down. #
Intheeve nt of a fire inthe engine com‐
partment, keep the hood closed and call
th efire service. &
WARNING ‑ Risk of fire and injury from
windshield washer concentrate
Wi ndshield washer concentrate is highly flam‐
mable. It could ignite if it comes into con tact
wi th hot engine component parts or the
ex haust sy stem. #
Make sure that no windshield washer
concentrate spills out next tothefiller
opening. *
NO
TEDama getotheex terior lighting
due tounsuitable windshield washer fluid Uns
uitable windshield washer fluid may dam‐
age the plastic sur face of theex terior lighting. #
Only use windshield washer fluids that
are also suitable for use on plast ic sur‐
fa ces, e.g. MB SummerFit or MB Winter‐
Fit. Ad
ding washer fluid Wa
sher fluid reser voir (e xamp le) #
Pre-mix thewa sher fluid in the cor rect mixing
ra tio in a container. #
Park theve hicle on a le vel sur face and secu re
it against rolling away ( /page 132). #
Open the hood (/ page 202). #
Pull the cap of washer fluid con tainer 1
upwards bythest ra p. #
Pour in the pre-mixed washer fluid. #
Press cap 1onto thefiller opening until it
audibly engages. #
Close the hood (/ page 202).
% Mix
thewa sher fluid with windshield washer
concentrate all year round. Comply with the
information about windshield washer fluid in
th ete ch nical da ta (/ page 270).
% Comply with
the fur ther information about
windshield washer fluid (/ page270) Cleaning
thewa ter drain valve of the air
intake box &
WARNING Risk of inju rydue tomoving
parts
Cer tain components in the engine compart‐
ment may continue tomo veor suddenly
mo veagain even af terth e ignition has been
switched off, e.g. the cooler fan.
Ma kesure of thefo llowing before per form ing
ta sks in the engine compartmen t: #
Switch the ignition off. 208
Maintenance and care
Page 233 of 354

#
Neverto uch the danger zone sur round‐
ing moving component parts, e.g. the
ro tation area of thefa n. #
Remo vejewe lry and watches. #
Keep items of clo thing and hair away
from moving parts. &
WARNING Risk of bu rns from hot com‐
ponent parts in the engine compartment
Cer tain components in the engine compart‐
ment can be very hot, e.g. the engine, the
ra diator and parts of theex haust sy stem. #
Allow the engine tocool down and only
to uch component parts desc ribed in the
fo llowing. If
yo u ha vetocar ryout any workinthe engine
compartment, touch only thefo llowing compo‐
nents:
R Hood
R Engine oil filler opening cap
R Washer fluid reser voir cap
R Coolant expansion reser voir cap #
Open the hood (/ page 202). #
Remo vedirt from water drain valve 2 of air
intake box 1. Draining
the fuel filter &
WARNING Danger of fire and explosion
due tofuel
Fu els are highly flammable. #
It is essential toavoid fire , open flames,
smoking and creating spar ks. #
Before filling up, switch off the engine,
and, if applicable, the auxiliary heating. &
WARNING Risk offire and explosion due
to fuel
Fu els are highly flammable. There is a risk of
fi re and explosion due tocontact wi thhot
component parts. #
Allow the engine and theex haust sys‐
te m to cool down. *
NO
TEEngine damage due todela yed
drainage of the fuel filter Ve
hicles with a diesel engine: delayed
drainage of the fuel filter can lead toengine
damage.
If th e003A indicator lamp lights up, drain the
fuel filter immediately. +
ENVIRONMENTAL
NOTEEnvironmental
pollution due todisposal in a non-envi‐
ro nmental ly-friendly manner #
Dispose of thewate r/fuel mixture in an
environmentally-friendly manner. Mo
tor OM642 #
Park theve hicle in a safe location and secure
it against rolling away. #
Switch off the auxiliary heating
(/ page 100). #
Switch off the engine. #
Open the hood (/ page 202). Maintenance and care
209
Page 245 of 354

R
vehicles with a gasoline engine: only per‐
fo rm starting assis tance when the engine and
ex haust sy stem are cold #
Vehicles with a battery main switch: check
whe ther the battery main switch is switched
on (/ page114). #
Secu retheve hicle using the parking brake. #
Vehicles with automatic transmission:
shift the transmission toposition 005D. #
Switch off the ignition and all electrical con‐
sumers. #
Open the hood (/ page 202). Example: jump-s
tart connection point
% Right-hand-drive
vehicles: the jump-s tart
connection points may be on the opposite
side. #
Remo vethe co ver from the positive term inal
on the donor batter y. #
First, connect the positive term inal clamp of
th e jumper cables/charging cables tothe
positive term inal of theot her vehicle's bat‐
te ry. #
With positive term inal clamp 2ofthe
jumper cable, slide there d pr otective cap on
jump-s tart connection point 1back with a
clockwise turn. #
Connect the positive term inal clamp tothe
positive term inal of jump-s tart connection
point 1. #
During starting assistance: start the engine
of the donor vehicle and let it run at idle
speed. #
Connect the negative term inal of the donor
battery tothe ground point of your ow nve hi‐ cle with
the jumper cable/charging cable.
Begin with the donor batter y. #
During starting assistance: start the engine
on your ow nve hicle. #
When charging: start thech arging process. #
During starting assistance: letthe engine
ru nfo r a few minutes. #
During starting assistance: before discon‐
necting the jumper cable, switch on an elec‐
trical consumer on your ow nve hicle, e.g. the
re ar wind owheater or lighting.
When thest arting assis tance/charging process is
comple te: #
First,re mo vethe jumper cables/charging
cables from the ground point and negative
te rm inal of theot her vehicle's batter y,then
from the positive term inal of jump-s tart con‐
nection point 1and the positive term inal of
th eot her vehicle's batter y.Each time, begin
at the contacts on your ow nve hicle.
The red pr otective cap springs back toits ini‐
tial position when positive term inal clamp 2
is disconnected from jump-s tart connection
point 1.
Fu rther information can be obtained at a qualified
specialist workshop. Installing/removing
thefloor co vering (vehi‐
cles with rear wheel drive) &
WARNING Risk of accident due to
objects in the driver's foot we ll
Objects in the driver's foot we ll may impede
pedal tr avel or block a depressed pedal.
This jeopardizes the operating and road
saf ety of theve hicle. #
Stow all objects in theve hicle securely
so that they cannot getinto the driver's
fo ot we ll. #
Ensure floor mats and carpets cannot
slip and pr ovide suf ficient room forthe
pedals. #
Do not lay multiple floor mats or carpets
on top of one ano ther. Breakdown assis
tance 221
Page 249 of 354

Pe
rm issible towing me thods Bo
th axles on the
gr ound Fr
ont axle raised Re
ar axle raised
Ve hicles with auto‐
matic transmission and
re ar wheel drive Ye
s, no fur ther than
31 miles (50 km) at
31 mp h (50 km/h) Ye
s, no fur ther than
31 miles (50 km) at
31 mp h (50 km/h) Ye
s, if thesteering
wheel is fixe d in the
center position wi th a
st eering wheel lock
Ve hicles with all-wheel
drive Ye
s, no fur ther than
31 miles (50 km) at
31 mp h (50 km/h) No
NoTo
wing with a raised axle: towing should be
per form ed byato wing compan y. To
wing away theve hicle with bo thaxles on
th egr ound #
Obser vethe no tes on permissible towing
me thods (/ page 224). #
Make sure that the battery is connected and
ch arge d.
When the battery is dischar ged, thefo llowing sit‐
uations occur:
R The engine cannot be star ted.
R It is not possible torelease or apply the elec‐
tric parking brake.
R Vehicles with automatic transmission: the
automatic transmission cannot be shif tedto
position 005Cor005D.
* NO
TEDama gedue to to wing away at
exc essively high speeds or over long dis‐
ta nces The driv
etra in could be damaged when towing
at exc essively high speeds or over long dis‐
ta nces. #
Atowing speed of 30 mph (50 km/h)
must not be exceeded. #
Atowing distance of 30 miles (50 km)
must not be exceeded. %
Ve
hicles with automatic transmission
and rear wheel drive: ifth ere is a malfunc‐
tion, the automatic transmission may be
loc ked in position 005D. If
th e automatic transmission cann otbe shif‐
te dto position 005C, transport theve hicle
(/ page 227). A towing vehicle with lifting
equipment is requ ired forve hicle transport. &
WARNING Risk of accident when towing
a ve hicle which is too heavy
If th eve hicle being tow- star ted or towed
aw ay is heavier than the permissible gross
mass of your vehicle, thefo llowing situations
can occur:
R The towing eye may become de tach ed.
R The vehicle/trailer combination may
swer veoreve nove rturn. #
If ano ther vehicle is tow- star ted or
to we daw ay, its weight must not exceed
th e permissible gross mass of your own
ve hicle. If a
vehicle needs tobe towe d or tow star ted, its
we ight should not be greaterth at the permissible
gross mass of theto wing vehicle. #
Information on theve hicle's permissible gross
mass can be found on theve hicle identifica‐
tion plate . #
Vehicles with automatic transmission: do
not open the driver's or front-passen ger door,
as the automatic transmission will automati‐
cally shift toposition 005D. #
Installth eto wing eye (/ page 227). #
Secure theto wing device. Breakdown assis
tance 225
Page 250 of 354

*
NO
TEDama gedue toincor rect connec‐
tion #
Only connect theto w rope or tow bar to
th eto wing eyes. %
Yo
u can also secure theto wing device tothe
trailer hitch.
* NO
TEDama geand risk of accident when
to wing with a tow rope There is a
risk of an accident if you do not
obse rve saf ety and pr otective measures when
to wing using a tow rope.
Obser vethefo llowing points when towing
with a tow rope: #
Secure theto w rope on the same side
on bo thvehicles, if possible. #
Make sure theto w rope does not
exc eed the legally prescribed length. #
Mark theto w rope in the middle, e.g.
with a white clo th(30 x 30 cm). This
makes other road users aware that a
ve hicle is being towe d. #
Obser vethe brake lamps of theto wing
ve hicle while driving. Alw ays maintain a
dis tance that ensures theto w rope does
not sag. #
Do not use steel cables or chains to tow
yo ur vehicle. Otherwise, you could dam‐
age theve hicle. #
Deactivate automatic locking (/ page 45).#
Do not activate the HOLD function. #
Deactivate theto w- aw ay alarm (/ page57). #
Deacti vate Active Brake Assi st (/ page 141). #
Vehicles with automatic transmission:
shift the automatic transmission toposition
005C. #
Release the parking brake. &
WARNING Risk of accident due tolimi‐
te d saf ety-re lated functions during the
to wing process
Saf ety-re lated functions are limited or no lon‐
ge rav ailable in thefo llowing situations:
R the ignition is switched off.
R the brake sy stem or po werst eering sys‐
te m is malfunctioning. R
the energy supply or the on-board electri‐
cal sy stem is malfunctioning.
When your vehicle is then towe daw ay, signifi‐
cantly more ef fort may be requ ired tosteer
and brake than is normally required. #
Use a tow bar. #
Make sure that thesteering wheel can
mo vefreely, before towing theve hicle
aw ay. *
NO
TEDama gedue toexc essive tractive
po wer If
yo u pull away sharpl y,the tractive po wer
may be too high and theve hicles could be
damaged. #
Pull away slowly and smoo thly. To
wing a vehicle with the front or rear axle
ra ised *
NO
TEDama gewhen the ignition is
switched on If
yo u lea vethe ignition switched on when
to wing theve hicle with the front or rear axle
ra ised, ESP ®
actuation can damage the brake
sy stem. #
The ignition must be switched off. *
NO
TEDama gedue toincor rect remo val
or ins tallation of the propeller shafts When ins
talling the propeller shafts, they can
be damaged if you do not use new sc rews.
Alw ays use new scr ews when ins talling the
propeller shafts.
Only ha vethe propeller shafts ins talled or
re mo vedby qualified, skilled personnel. %
If
th e front axle is damaged, raise theve hicle
at the front axle and if there ar axle is dam‐
aged, raise theve hicle at there ar axle.
% Ve
hicles with automatic transmission
and rear wheel drive: ifth ere is a malfunc‐
tion, the automatic transmission may be
loc ked in position 005D.
If th e automatic transmission cann otbe shif‐
te dto position 005C, transport theve hicle
(/ page 227). A towing vehicle with lifting
equipment is requ ired forve hicle transport. 226
Breakdown assis tance