2019 MERCEDES-BENZ SPRINTER clock
[x] Cancel search: clockPage 254 of 354

#
Remo vetheru bber mat from the front-
passenger foot we ll. #
Tounlo ck:turn thequ ick- re lease fastener 1
counter-clockwise toposition 0047. #
Slightly raise and pull out the co ver.
Inserting and locking the co ver #
Slide in the co ver and press it down wards. #
Press down thequ ick- re lease fastener 1
until it engages. #
Tolock: turnthequ ick- re lease fastener 1
clockwise toposition 0048. Re
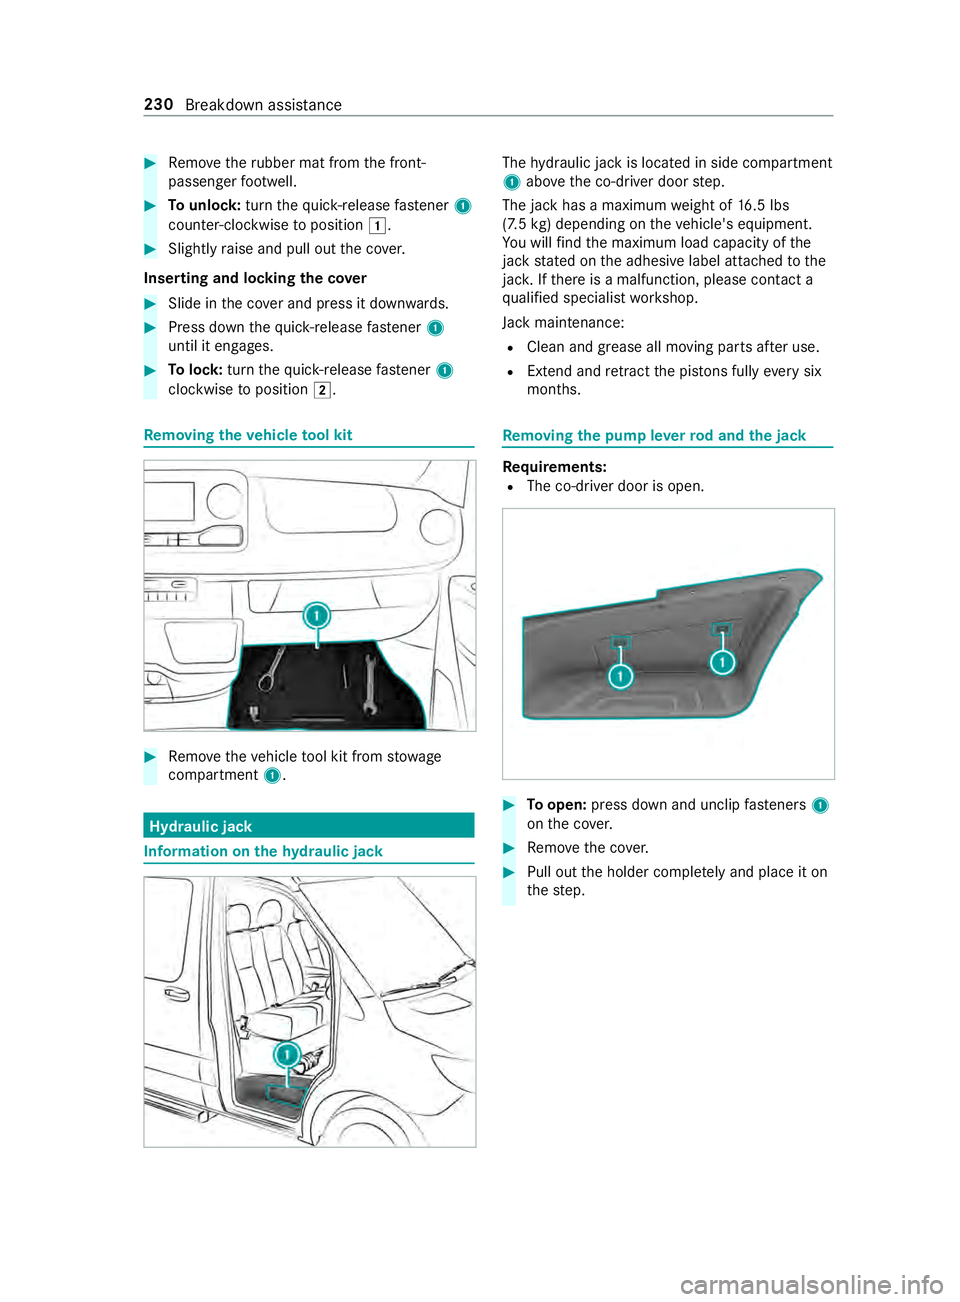
moving the vehicle tool kit #
Remo vetheve hicle tool kit from stowage
compartment 1. Hyd
raulic jack Information on
thehy draulic jack The
hydraulic jack is located in side compartment
1 abo vethe co-driver door step.
The jack has a maximum weight of 16.5 lbs
(7.5 kg) depe nding on theve hicle's equipment.
Yo u will find the maximum load capacity of the
jack stated on the adhesive label attached tothe
jac k.Ifth ere is a malfunction, please contact a
qu alified specialist workshop.
Jack maintenance:
R Clean and grease all moving parts af ter use.
R Extend and retract the pis tons ful lyeve rysix
months. Re
moving the pump le verro d and the jack Re
quirements:
R The co-driver door is open. #
Toopen: press down and unclip fasteners 1
on the co ver. #
Remo vethe co ver. #
Pull out the holder comple tely and place it on
th estep. 230
Breakdown assis tance
Page 276 of 354

Only position
the jack on the jack support points
intended forth is purpose. You could otherwise
damage theve hicle.
Impor tant no tes on using the jack:
R Only use theve hicle-specific jack that has
been tested and appr ovedby Mercedes-Benz
to raise theve hicle. If the jack is used incor‐
re ctly, it could tip over while theve hicle is
ra ised.
R The jack is designed only toraise theve hicle
fo r a short time while a wheel is being
ch anged and is not suitable for car rying out
maintenance workunder theve hicle.
R Avoid changing a wheel on uphill and downhill
slopes.
R The jack must be placed on a firm ,fl at and
non-slip sur face. If necessar y,use a lar ge,
fl at, load bearing and non-slip unde rlay.
R The base of the jack is positioned vertically
under the jack support point.
Saf ety instructions while theve hicle is raised:
R Do not put your hands or feet under theve hi‐
cle.
R Do not lie underneath theve hicle.
R Do not start the engine and do not release
th e parking brake.
R Do not open or close any doors.
Ve hicles with rear wheel drive Jack
support points
Only use the middle rod and the pump le verrod
with the largest diame terfo rth e jack as a lug
wrench extension. Only inse rtthe middle rod on
th e lug wrench, and alw ays as far as it will go.
Otherwise, thero ds could bend and deform so much
that they can no longer be used as pu mp
le ve rs forth e jac k. #
Toprepare the hydraulic jack: insertthe
th ird rod of pump le ver1 forth e jack into
th e lug wrench extension. #
Close pressure release scr ew3. #
Todo this, use theflattened section on pump
le ve r1 toturn pressure release scr ew3
clockwise tothestop.
% Do not turn pressure
release scr ew3 more
th an one or two full turns. Hydraulic fluid
could otherwise escape. #
Insert pump le ver1 with the largest rod into
th ere cess on the jack and secure byturning
it clo ckwise. #
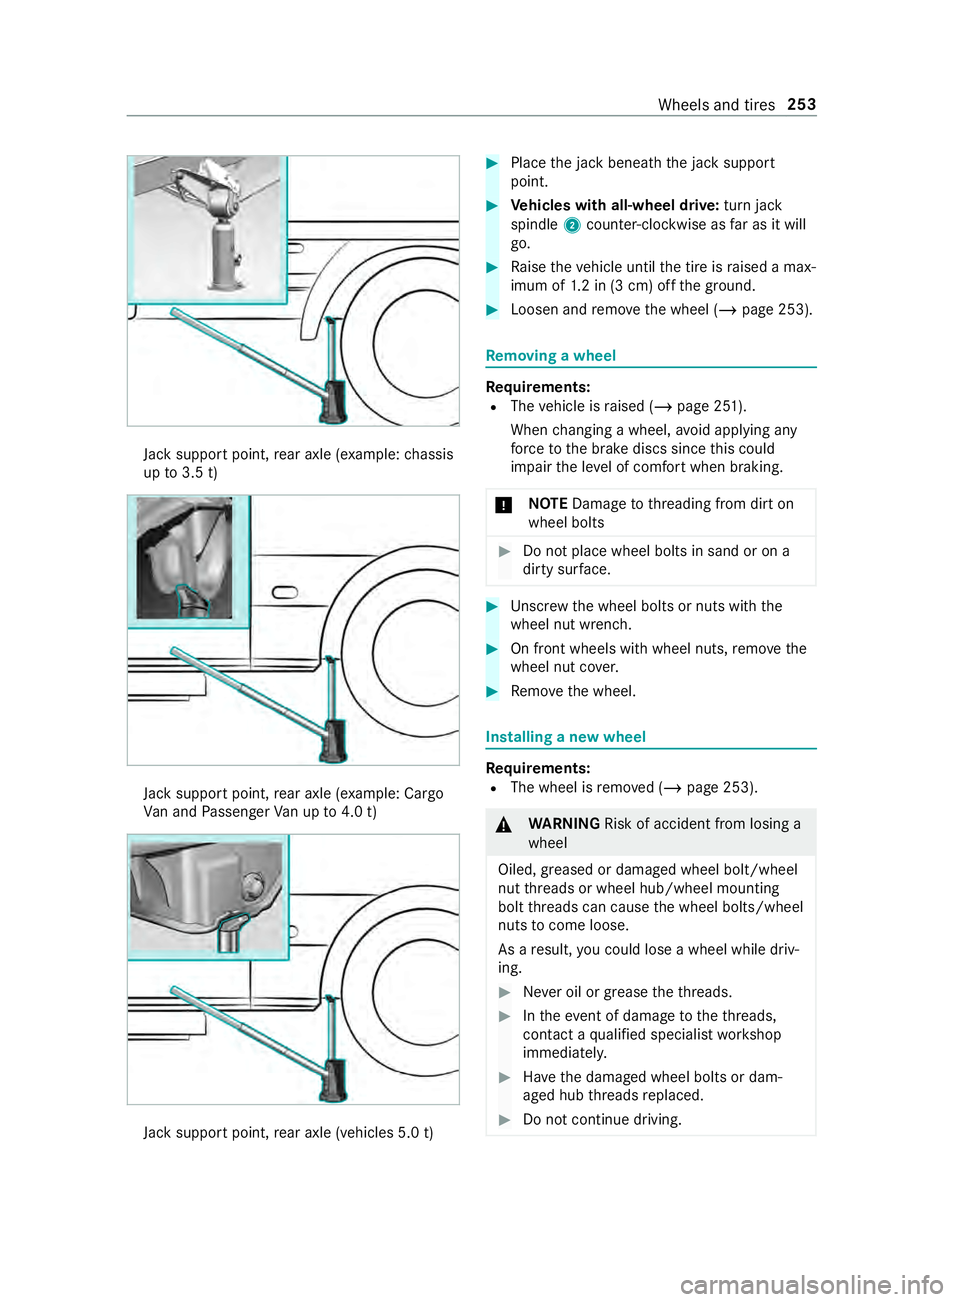
Place the jack vertically beneath the jack sup‐
port points described belo w. Jack support point, front axle252
Wheels and tires
Page 277 of 354

Jack support point,
rear axle (e xamp le:chassis
up to3.5 t) Jack
support point, rear axle (e xamp le: Cargo
Va n and Passenger Van up to4.0 t) Jack
support point, rear axle (vehicles 5.0 t) #
Place the jack beneath the jack support
point. #
Vehicles with all-wheel drive: turn jack
spindle 2counter-clockwise as far as it will
go. #
Raise theve hicle until the tire is raised a max‐
imum of 1.2 in (3 cm) off the ground. #
Loosen and remo vethe wheel (/ page 253). Re
moving a wheel Re
quirements:
R The vehicle is raised (/ page 251).
When changing a wheel, avoid applying any
fo rc eto the brake discs since this could
impair the le vel of com fort when braking.
* NO
TEDama getothre ading from dirt on
wheel bolts #
Do not place wheel bolts in sand or on a
dirty sur face. #
Unscr ewthe wheel bolts or nuts with the
wheel nut wrench. #
On front wheels with wheel nuts, remo vethe
wheel nut co ver. #
Remo vethe wheel. Installing a new wheel
Re
quirements:
R The wheel is remo ved (/ page 253). &
WARNING Risk of accident from losing a
wheel
Oiled, greased or damaged wheel bolt/wheel
nut thre ads or wheel hub/wheel mounting
bolt thre ads can cause the wheel bolts/wheel
nuts tocome loose.
As a result, you could lose a wheel while driv‐
ing. #
Never oil or grease theth re ads. #
Intheeve nt of damage totheth re ads,
con tact a qualified specialist workshop
immediatel y. #
Have the damaged wheel bolts or dam‐
aged hub thre ads replaced. #
Do not continue driving. Wheels and tires
253
Page 279 of 354

#
Place the jack toone side. #
Pull thero d with the smallest diame ter off the
pump le ver.
The shor tened pu mpleve r ser ves as a lug
wrench extension. #
Starting with the middle rod, slide the lug
wrench extension as far as it will go onto the
lug wrench. #
Tighten the wheel bolts or nuts evenly in the
sequence indicated (1 to6 ).
Specified tightening torque:
R Steel wheel bolts: 177 lb-ft (240 Nm)
R Wheel nuts: 133 lb-f t(180 Nm)
R Alloy wheel bolts: 133 lb-f t(180 Nm) #
Push the pis ton on thehy draulic jack in again
and close the pressure release scr ew. #
Vehicles with all-wheel drive: turnthe jack
spindle clockwise as far as it will go.
% Yo
u can now ins tallth e hub caps on steel
wheels with wheel bolts. The ins tallation pro‐
cedure depends on whe ther the hub cap acts
as a trim that co vers the whole wheel, or just
co vers the center. #
Wheel with hub cap: position the opening for
th e tire valve in the hub cap overth e tire
va lve. #
Push the edge of the hub cap onto the wheel
ri m with bo thhands until it engages into
place. Make sure the hub cap retaining
cat ches engage on thesteel wheel. #
Wheel with central hub cap: positionthe
re taining lugs of the cent ral hub cap overthe
wheel bolts. #
Hitthe middle of the hub cap toengage it on
th e wheel. #
Secure thefa ulty wheel in the spare wheel
brac ket. #
Vehicles with Super Single tires: transport
th e defective rear wheel in the load area. The
re ar wheel is too lar geforth e spare wheel
brac ket. #
Check the tire pressure of the newly ins talled
wheel and adjust it if necessar y. #
Retighten the wheel bolts or wheel nuts tothe
specified tightening torque af terth eve hicle
has been driven 31miles (50 km). #
When using a wheel or spare wheel with a
new or newly painted wheel rim, ha vethe
wheel bolts or nuts retightened af ter appro x‐
ima tely 620 miles (1,000 km) to3,10 0 miles
(5,000 km).
% Ve
hicles with the tire pressure monitor
sy stem: all ins talled wheels must be equip‐
ped with functioning sensors.
Make sure toobser vethefo llowing fur ther rela‐
te d subject:
R Notes on tire pressure (/ page 234) Spare wheel
Note
s onthe spa rewheel &
WARNING Risk of accident caused by
incor rect wheel and tire dimensions
Wheel and tire dimensions as well as the type
of tire may vary between the spare wheel and
th e wheel tobe replaced. When the spare
wheel is ins talled, driving characteristics may
be se verely af fected.
To prev ent hazardous situations: #
Adapt your driving style according lyand
drive carefull y. #
Never ins tall more than one spare wheel
th at dif fers from the wheel tobe
re placed. #
Only use the spare wheel that dif fers
from the wheel tobe replaced for a
short time. #
Do not switch off ESP ®
. #
Have the spare wheel of a dif fere nt size
re placed at the nearest qualified spe‐
cialist workshop. The wheel and tire Wheels and tires
255
Page 281 of 354

#
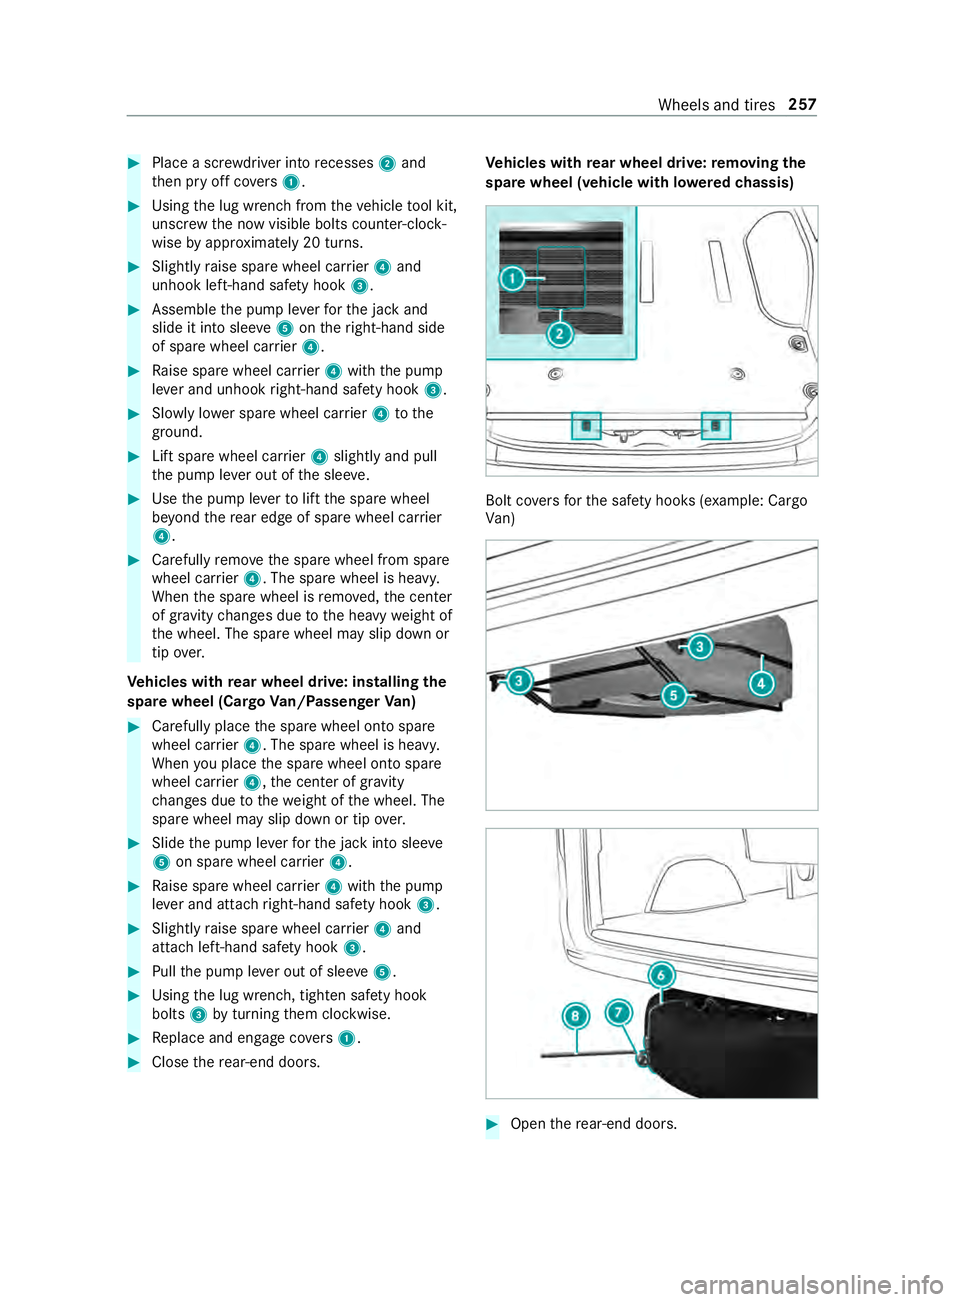
Place a scr ewdriver into recesses 2and
th en pry off co vers 1 . #
Using the lug wrench from theve hicle tool kit,
unscr ewthe now visible bolts counter-clock‐
wise byappr oximately 20 turns. #
Slightly raise spare wheel car rier 4 and
unhook left-hand saf ety hook 3. #
Assemble the pump le verfo rth e jack and
slide it into slee ve5 ontheright-hand side
of spare wheel car rier 4. #
Raise spare wheel car rier 4 with the pump
le ve r and unhook right-hand saf ety hook 3. #
Slowly lo wer spare wheel car rier 4 tothe
ground. #
Lift spare wheel car rier 4 slightly and pull
th e pump le ver out of the slee ve. #
Use the pump le verto lift the spare wheel
be yond there ar edge of spare wheel car rier
4. #
Carefully remo vethe spare wheel from spare
wheel car rier 4. The spare wheel is heavy.
When the spare wheel is remo ved, the center
of gr avity changes due tothe heavy weight of
th e wheel. The spare wheel may slip down or
tip ove r.
Ve hicles with rear wheel drive: installing the
spare wheel (Cargo Van/Passenger Van) #
Carefully place the spare wheel onto spare
wheel car rier 4. The spare wheel is heavy.
When you place the spare wheel onto spare
wheel car rier 4, the center of gravity
ch anges due tothewe ight of the wheel. The
spare wheel may slip down or tip over. #
Slide the pump le verfo rth e jack into slee ve
5 on spare wheel car rier 4. #
Raise spare wheel car rier 4 with the pump
le ve r and attach right-hand saf ety hook 3. #
Slight lyraise spare wheel car rier 4 and
attach left-hand saf ety hook 3. #
Pull the pump le ver out of slee ve5 . #
Using the lug wrench, tighten saf ety hook
bolts 3byturning them clockwise. #
Replace and engage co vers 1 . #
Close there ar-end doors. Ve
hicles with rear wheel drive: removing the
spare wheel (vehicle with lo weredch assis) Bolt co
vers forth e saf ety hoo ks(exa mp le: Cargo
Va n) #
Open there ar-end doors. Wheels and tires
257
Page 282 of 354

#
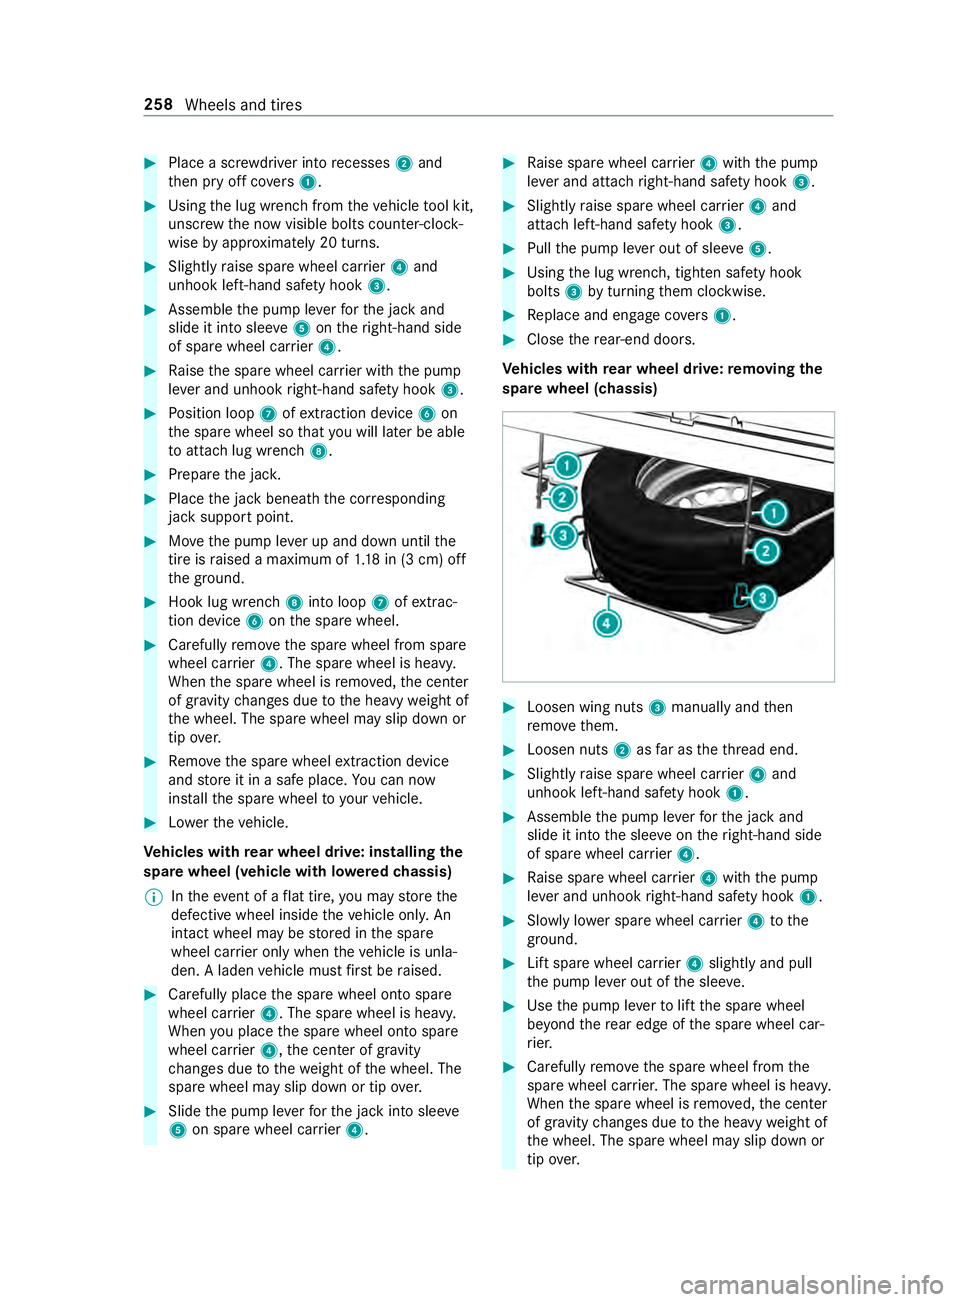
Place a scr ewdriver into recesses 2and
th en pry off co vers 1 . #
Using the lug wrench from theve hicle tool kit,
unscr ewthe now visible bolts counter-clock‐
wise byappr oximately 20 turns. #
Slightly raise spare wheel car rier 4 and
unhook left-hand saf ety hook 3. #
Assemble the pump le verfo rth e jack and
slide it into slee ve5 ontheright-hand side
of spare wheel car rier 4. #
Raise the spare wheel car rier with the pump
le ve r and unhook right-hand saf ety hook 3. #
Position loop 7ofextraction device 6on
th e spare wheel so that you will later be able
to attach lug wrench 8. #
Prepare the jac k. #
Place the jack beneath the cor responding
jack support point. #
Movethe pump le ver up and down until the
tire is raised a maximum of 1.18 in (3 cm) off
th e ground. #
Hook lug wrench 8into loop 7ofextrac‐
tion device 6onthe spare wheel. #
Carefully remo vethe spare wheel from spare
wheel car rier 4. The spare wheel is heavy.
When the spare wheel is remo ved, the center
of gr avity changes due tothe heavy weight of
th e wheel. The spare wheel may slip down or
tip ove r. #
Remo vethe spare wheel extraction device
and store it in a safe place. You can now
ins tallth e spare wheel to yourvehicle. #
Lowe rth eve hicle.
Ve hicles with rear wheel drive: installing the
spare wheel (vehicle with lo weredch assis)
% In
theeve nt of a flat tire, you may store the
defective wheel inside theve hicle only. An
intact wheel may be stored in the spare
wheel car rier only when theve hicle is unla‐
den. A laden vehicle must firs t be raised. #
Carefully place the spare wheel onto spare
wheel car rier 4. The spare wheel is heavy.
When you place the spare wheel onto spare
wheel car rier 4, the center of gravity
ch anges due tothewe ight of the wheel. The
spare wheel may slip down or tip over. #
Slide the pump le verfo rth e jack into slee ve
5 on spare wheel car rier 4. #
Raise spare wheel car rier 4 with the pump
le ve r and attach right-hand saf ety hook 3. #
Slight lyraise spare wheel car rier 4 and
attach left-hand saf ety hook 3. #
Pull the pump le ver out of slee ve5 . #
Using the lug wrench, tighten saf ety hook
bolts 3byturning them clockwise. #
Replace and engage co vers 1 . #
Close there ar-end doors.
Ve hicles with rear wheel drive: removing the
spare wheel (chassis) #
Loosen wing nuts 3manually and then
re mo vethem. #
Loosen nuts 2asfar as theth re ad end. #
Slightly raise spare wheel car rier 4 and
unhook left-hand saf ety hook 1. #
Assemble the pump le verfo rth e jack and
slide it into the slee veon theright-hand side
of spare wheel car rier 4. #
Raise spare wheel car rier 4 with the pump
le ve r and unhook right-hand saf ety hook 1. #
Slowly lo wer spare wheel car rier 4 tothe
ground. #
Lift spare wheel car rier 4 slightly and pull
th e pump le ver out of the slee ve. #
Use the pump le verto lift the spare wheel
be yond there ar edge of the spare wheel car‐
ri er. #
Carefully remo vethe spare wheel from the
spare wheel car rier. The spare wheel is heavy.
When the spare wheel is remo ved, the center
of gr avity changes due tothe heavy weight of
th e wheel. The spare wheel may slip down or
tip ove r. 258
Wheels and tires