2019 MERCEDES-BENZ SLC lock
[x] Cancel search: lockPage 270 of 306
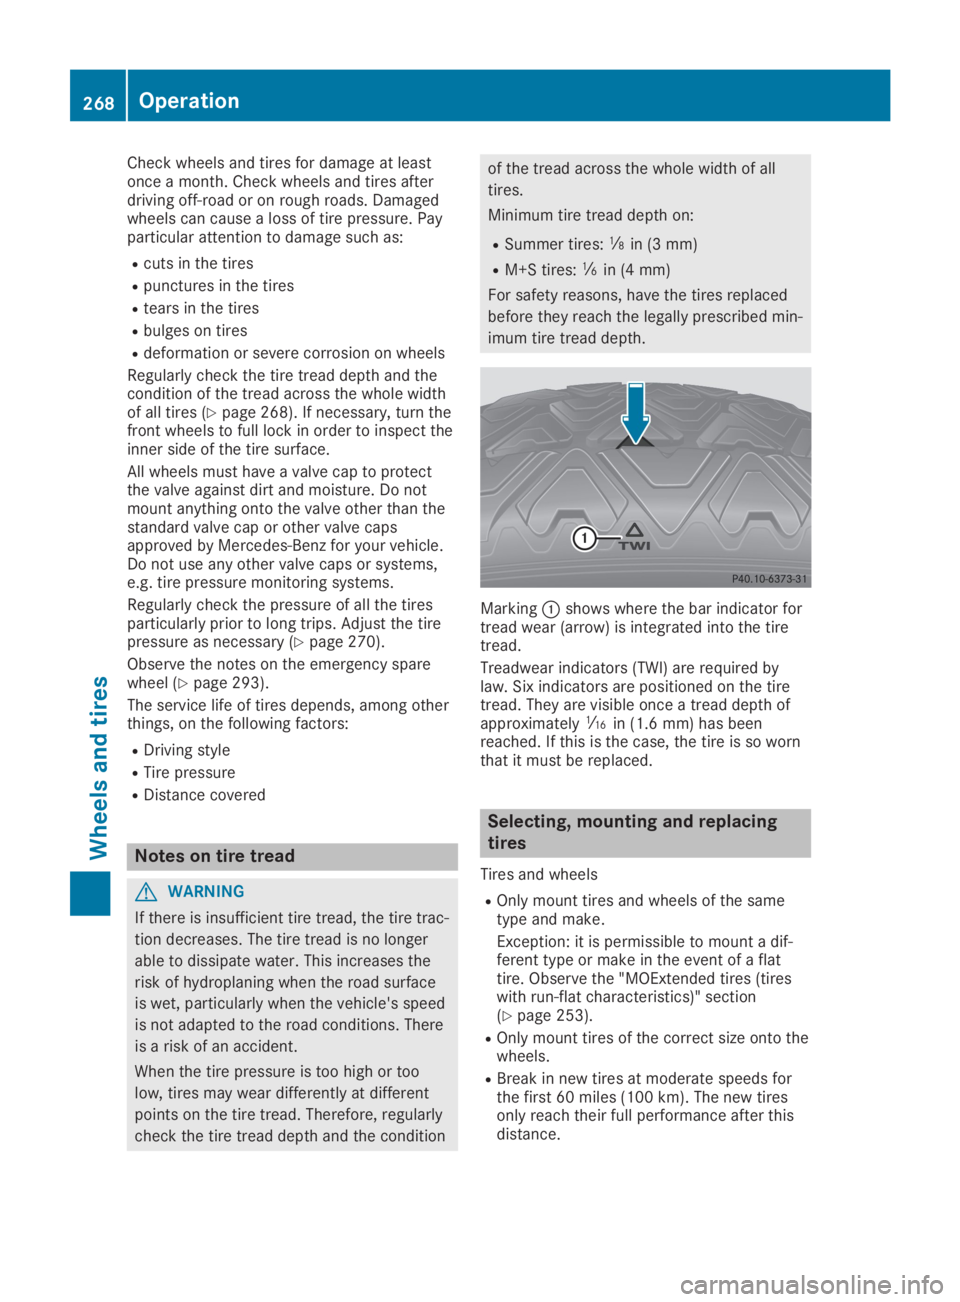
Check wheels and tires for damage at leastonce a month. Check wheels and tires afterdriving off-road or on rough roads. Damagedwheels can cause a loss of tire pressure. Payparticular attention to damage such as:
Rcuts in the tires
Rpunctures in the tires
Rtears in the tires
Rbulges on tires
Rdeformation or severe corrosion on wheels
Regularly check the tire tread depth and thecondition of the tread across the whole widthof all tires (Ypage 268). If necessary, turn thefront wheels to full lock in order to inspect theinner side of the tire surface.
All wheels must have a valve cap to protectthe valve against dirt and moisture. Do notmount anything onto the valve other than thestandard valve cap or other valve capsapproved by Mercedes-Benz for your vehicle.Do not use any other valve caps or systems,e.g. tire pressure monitoring systems.
Regularly check the pressure of all the tiresparticularly prior to long trips. Adjust the tirepressure as necessary (Ypage 270).
Observe the notes on the emergency sparewheel (Ypage 293).
The service life of tires depends, among otherthings, on the following factors:
RDriving style
RTire pressure
RDistance covered
Notes on tire tread
GWARNING
If there is insufficient tire tread, the tire trac-
tion decreases. The tire tread is no longer
able to dissipate water. This increases the
risk of hydroplaning when the road surface
is wet, particularly when the vehicle's speed
is not adapted to the road conditions. There
is a risk of an accident.
When the tire pressure is too high or too
low, tires may wear differently at different
points on the tire tread. Therefore, regularly
check the tire tread depth and the condition
of the tread across the whole width of all
tires.
Minimum tire tread depth on:
RSummer tires:�
Page 276 of 306
pressure loss warning system" section(Ypage 274).
Important safety notes
The tire pressure warning system does notwarn you of an incorrectly set tire pressure.Observe the notes on the recommended tirepressure (Ypage 270).
The tire pressure loss warning does notreplace the need to regularly check the tirepressure. An even loss of pressure on severaltires at the same time cannot be detected bythe tire pressure loss warning system.
The tire pressure monitor is not able to warnyou of a sudden loss of pressure, e.g. if thetire is penetrated by a foreign object. In theevent of a sudden loss of pressure, bring thevehicle to a halt by braking carefully. Avoidabrupt steering movements.
The function of the tire pressure loss warningsystem is limited or delayed if:
Rsnow chains are mounted on your vehicle'stires.
Rroad conditions are wintry.
Ryou are driving on sand or gravel.
Ryou adopt a very sporty driving style (corner-ing at high speeds or driving with high ratesof acceleration).
Ryou drive with a heavy load.
Restarting the tire pressure loss warn-
ing system
Restart the tire pressure loss warning systemif you have:
Rchanged the tire pressure
Rchanged the wheels or tires
Rmounted new wheels or tires
XBefore restarting, make sure that the tirepressures are set properly on all four tiresfor the respective operating conditions.
The recommended tire pressure can befound on the Tire and Loading Informationplacard on the B-pillar. Additionally, a tirepressure table is attached to the fuel fillerflap. The tire pressure loss warning systemcan only give reliable warnings if you haveset the correct tire pressure. If an incorrect
tire pressure is set, these incorrect valueswill be monitored.
XAlso observe the notes in the section on tirepressures (Ypage 270).
XMake sure that the SmartKey is in position�Hin the ignition lock (Ypage 118).
XPress the�Yor�ebutton on the steer-ing wheel to select theServ.Serv.menu.
XPress the�cor�dbutton to selectTire PressureTire Pressure.
XPress the�vbutton.TheRun Flat Indicator Active PressRun Flat Indicator Active Press'OK' to Restart'OK' to Restartmessage appears in themultifunction display.
If you wish to confirm the restart:
XPress the�vbutton.TheTire Pressure Now OK?Tire Pressure Now OK?messageappears in the multifunction display.
XPress the�cor�dbutton to selectYesYes.
XPress the�vbutton.TheRun Flat Indicator RestartedRun Flat Indicator Restartedmes-sage appears in the multifunction display.
After a teach-in period, the tire pressureloss warning system will monitor the set tirepressures of all four tires.
If you wish to cancel the restart:
XPress the�8button.
or
XIf theTire Pressure Now OK?Tire Pressure Now OK?messageappears, use the�cor�dbutton toselectCancelCancel.
XPress the�vbutton.The tire pressure values stored at the lastrestart will continue to be monitored.
Tire pressure monitor
General notes
If a tire pressure monitor is installed, the vehi-cle's wheels have sensors that monitor the tirepressures in all four tires. The tire pressuremonitor warns you if the pressure drops in oneor more of the tires. The tire pressure monitoronly functions if the corresponding sensorsare installed in all wheels.
Information on tire pressures is displayed inthe multifunction display. After a few minutesof driving, the current tire pressure of each tire
274Tire pressure
Wheels and tires
Page 278 of 306
vehicle to a halt by braking carefully. Avoidabrupt steering movements.
The tire pressure monitor has a yellow warninglamp in the instrument cluster for indicatingpressure loss or a malfunction. Whether thewarning lamp flashes or lights up indicateswhether a tire pressure is too low or the tirepressure monitor is malfunctioning:
Rif the warning lamp is lit continuously, thetire pressure on one or more tires is signifi-cantly too low. The tire pressure monitor isnot malfunctioning.
Rif the warning lamp flashes for approx-imately a minute and then remains lit con-stantly, the tire pressure monitor is malfunc-tioning.
In addition to the warning lamp, a messageappears in the multifunction display. Observethe information on display messages(Ypage 201).
It may take up to ten minutes for a malfunc-tion of the tire pressure monitor to be indica-ted. A malfunction will be indicated by the tirepressure warning lamp flashing for approx-imately one minute and then remaining lit.When the malfunction has been rectified, thetire pressure warning lamp goes out after afew minutes of driving.
The tire pressure values indicated by the on-board computer may differ from those meas-ured at a gas station with a pressure gage. Thetire pressures shown by the on-board com-puter refer to those measured at sea level. Athigh altitudes, the tire pressure values indica-ted by a pressure gage are higher than thoseshown by the on-board computer. In this case,do not reduce the tire pressures.
The operation of the tire pressure monitor canbe affected by interference from radio trans-mitting equipment (e.g. radio headphones,two-way radios) that may be being operated inor near the vehicle.
Checking the tire pressure electroni-
cally
XMake sure that the SmartKey is in position�H(Ypage 118) in the ignition lock.
XPress the�Yor�ebutton on the steer-ing wheel to select theServ.Serv.menu.
XPress the�cor�dbutton to selectTire PressureTire Pressure.
XPress�v.The current tire pressure of each tire isshown in the multifunction display.
If the vehicle has been parked for over20 minutes, theTire pressure will beTire pressure will bedisplayed after driving a few minutesdisplayed after driving a few minutesmessage appears.
After a teach-in process, the tire pressuremonitor automatically detects new wheels ornew sensors. As long as a clear allocation ofthe tire pressure value to the individual wheelsis not possible, theTire Pressure MonitorTire Pressure MonitorActiveActivedisplay message is shown instead ofthe tire pressure display. The tire pressuresare already being monitored.
If an emergency spare wheel is mounted, thesystem may continue to show the tire pressureof the wheel that has been removed for a fewminutes. Be aware that the value displayed forthe position where the emergency spare wheelis fitted is not the same as the current tirepressure of the emergency spare wheel.
Tire pressure monitor warning mes-
sages
The tire pressure monitor detects a pressureloss in one or more tires:
RIf the tire pressure monitor detects a pres-sure loss in one or more tires, a warningmessage is shown in the multifunction dis-play. The yellow tire pressure warning lampthen lights up.
RIf thePlease Correct Tire PressurePlease Correct Tire Pressuremessage appears in the multifunction dis-play, the tire pressure in at least one tire istoo low. The tire pressure must be correctedwhen the opportunity arises.
RIf theCheck TiresCheck Tiresmessage appears in themultifunction display, the tire pressure in atleast one tire has dropped significantly. Thetires must be checked.
RIf theWarning Tire MalfunctionWarning Tire Malfunctionmes-sage appears in the multifunction display,the tire pressure in at least one tire hasdropped suddenly. The tires must bechecked.
Observe the instructions and safety notes inthe display messages in the "Tires" section(Ypage 201).
276Tire pressure
Wheels and tires
Page 279 of 306
If the wheel positions on the vehicle are rota-ted, the tire pressures may be displayed forthe wrong positions for a short time. This isrectified after a few minutes of driving, and thetire pressures are displayed for the correctpositions.
Restarting the tire pressure monitor
When you restart the tire pressure monitor, allexisting warning messages are deleted and thewarning lamps go out. The monitor uses thecurrently set tire pressures as the referencevalues for monitoring. In most cases, the tirepressure monitor will automatically detect thenew reference values after you have changedthe tire pressure. However, you can also setreference values manually as described here.The tire pressure monitor then monitors thenew tire pressure values.
XSet the tire pressure to the value recom-mended for the corresponding driving situa-tion on the Tire and Loading Informationplacard on the driver's side B-pillar(Ypage 270).
Additional tire pressure values for differentloads can also be found on the tire pressuretable on the inside of the fuel filler flap(Ypage 270).
XMake sure that the tire pressure is correcton all four wheels.
XEnsure that the SmartKey is in position�Hin the ignition lock.
XPress the�Yor�ebutton on the steer-ing wheel to select theServ.Serv.menu.
XPress the�cor�dbutton to selectTire PressureTire Pressure.
XPress�v.The multifunction display shows the currenttire pressure for the individual tires or theTire pressure will be displayedTire pressure will be displayedafter driving a few minutesafter driving a few minutesmessage.
XPress the�dbutton.TheUse Current Pressures as NewUse Current Pressures as NewReference ValuesReference Valuesmessage appears in themultifunction display.
If you wish to confirm the restart:
XPress�v.TheTire Press. Monitor RestartedTire Press. Monitor Restartedmessage appears in the multifunction dis-play.
After driving for a few minutes, the systemchecks whether the current tire pressuresare within the specified range. The new tirepressures are then accepted as referencevalues and monitored.
If you wish to cancel the restart:
XPress�8.The tire pressure values stored at the lastrestart will continue to be monitored.
Tire pressure277
Wheels and tires
Z
Page 291 of 306
Clean the contact surfaces of the wheel andthe brake disc thoroughly every time a wheelis rotated. Check the tire pressure and, if nec-essary, restart the tire pressure loss warningsystem or the tire pressure monitor.
Direction of rotation
Tires with a specified direction of rotation haveadditional benefits, e.g. if there is a risk ofhydroplaning. These advantages can only begained if the tires are installed correspondingto the direction of rotation.
An arrow on the sidewall of the tire indicatesits correct direction of rotation.
Storing wheels
Store wheels that are not being used in a cool,dry and preferably dark place. Protect the tiresfrom oil, grease, gasoline and diesel.
Mounting a wheel
Preparing the vehicle
XStop the vehicle on solid, non-slippery andlevel ground.
XApply the electric parking brake manually.
XBring the front wheels into the straight-ahead position.
XShift the transmission to position�].
XSwitch off the engine.
XVehicles without KEYLESS-GO:removethe SmartKey from the ignition lock.
XVehicles with KEYLESS-GO:open the driv-er's door.The vehicle electronics now have status0.This is the same as the SmartKey havingbeen removed.
XVehicles with KEYLESS-GO:remove theStart/Stop button from the ignition lock(Ypage 118).
XIf included in the vehicle equipment, removethe tire-change tool kit from the vehicle.
XSafeguard the vehicle against rolling away.
iDue to differences in vehicle equipment,not all vehicles are equipped with a tire-change tool kit. For information on which
tools are required to perform a wheelchange on your vehicle, consult an author-ized Mercedes-Benz Center.
Necessary tire-changing tools can include,for example:
RJack
RWheel chock
RLug wrench
Securing the vehicle to prevent it from
rolling away
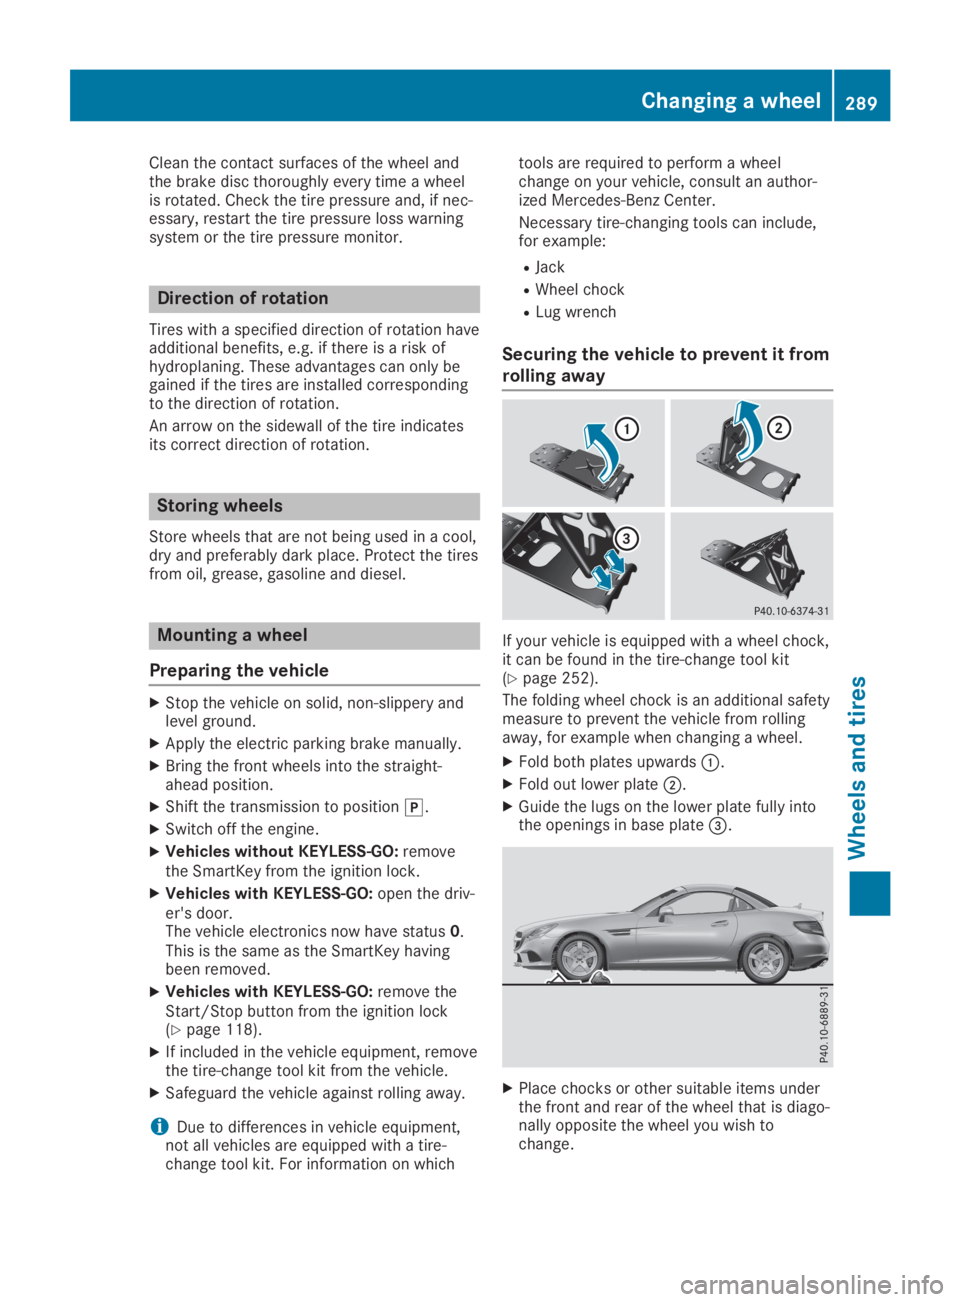
If your vehicle is equipped with a wheel chock,it can be found in the tire-change tool kit(Ypage 252).
The folding wheel chock is an additional safetymeasure to prevent the vehicle from rollingaway, for example when changing a wheel.
XFold both plates upwards�C.
XFold out lower plate�D.
XGuide the lugs on the lower plate fully intothe openings in base plate�
Page 292 of 306
Raising the vehicle
GWARNING
If you do not position the jack correctly at
the appropriate jacking point of the vehicle,
the jack could tip over with the vehicle
raised. There is a risk of injury.
Only position the jack at the appropriate
jacking point of the vehicle. The base of the
jack must be positioned vertically, directly
under the jacking point of the vehicle.
!Only position the jack at the appropriatejacking point of the vehicle. Otherwise, youcould damage the vehicle.
Observe the following when raising the vehi-cle:
RTo raise the vehicle, only use the vehicle-specific jack that has been tested andapproved by Mercedes-Benz. If used incor-rectly, the jack could tip over with the vehi-cle raised.
RThe jack is designed only to raise and holdthe vehicle for a short time while a wheelis being changed. It must not be used forperforming maintenance work under thevehicle.
RAvoid changing the wheel on uphill anddownhill slopes.
RBefore raising the vehicle, secure it fromrolling away by applying the parking brakeand inserting wheel chocks. Do not disen-gage the parking brake while the vehicle israised.
RThe jack must be placed on a firm, flat andnon-slip surface. On a loose surface, a large,flat, load-bearing underlay must be used. Ona slippery surface, a non-slip underlay mustbe used, e.g. rubber mats.
RDo not use wooden blocks or similar objectsas a jack underlay. Otherwise, the jack willnot be able to achieve its load-bearing capa-city due to the restricted height.
RMake sure that the distance between theunderside of the tires and the ground doesnot exceed 1.2 in (3 cm).
RNever place your hands and feet under theraised vehicle.
RDo not lie under the vehicle.
RDo not start the engine when the vehicle israised.
RDo not open or close a door or the trunk lidwhen the vehicle is raised.
RMake sure that no persons are present inthe vehicle when the vehicle is raised.
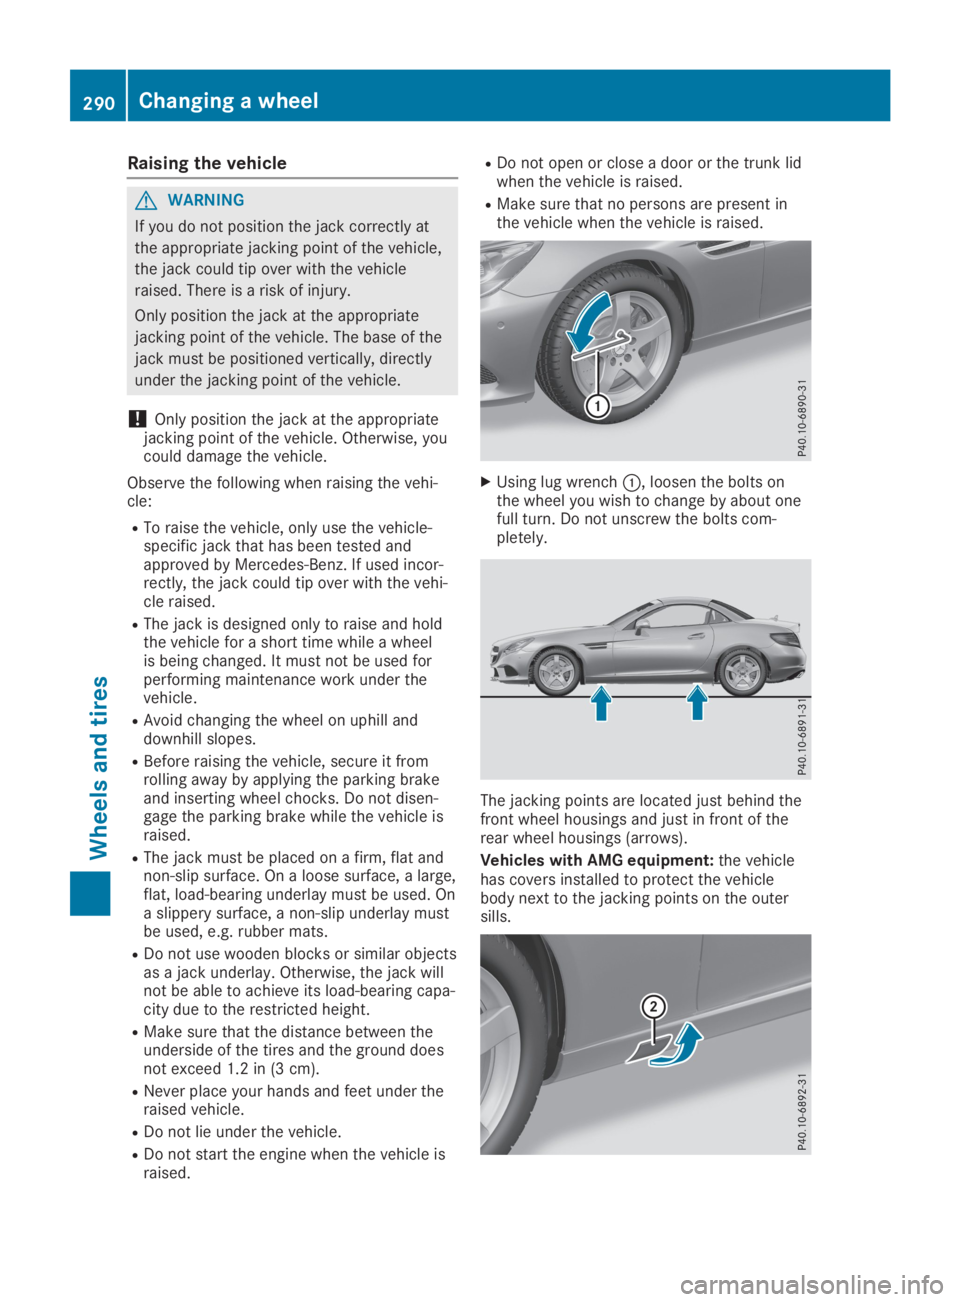
XUsing lug wrench�C, loosen the bolts onthe wheel you wish to change by about onefull turn. Do not unscrew the bolts com-pletely.
The jacking points are located just behind thefront wheel housings and just in front of therear wheel housings (arrows).
Vehicles with AMG equipment:the vehiclehas covers installed to protect the vehiclebody next to the jacking points on the outersills.
290Changing a wheel
Wheels and tires
Page 294 of 306
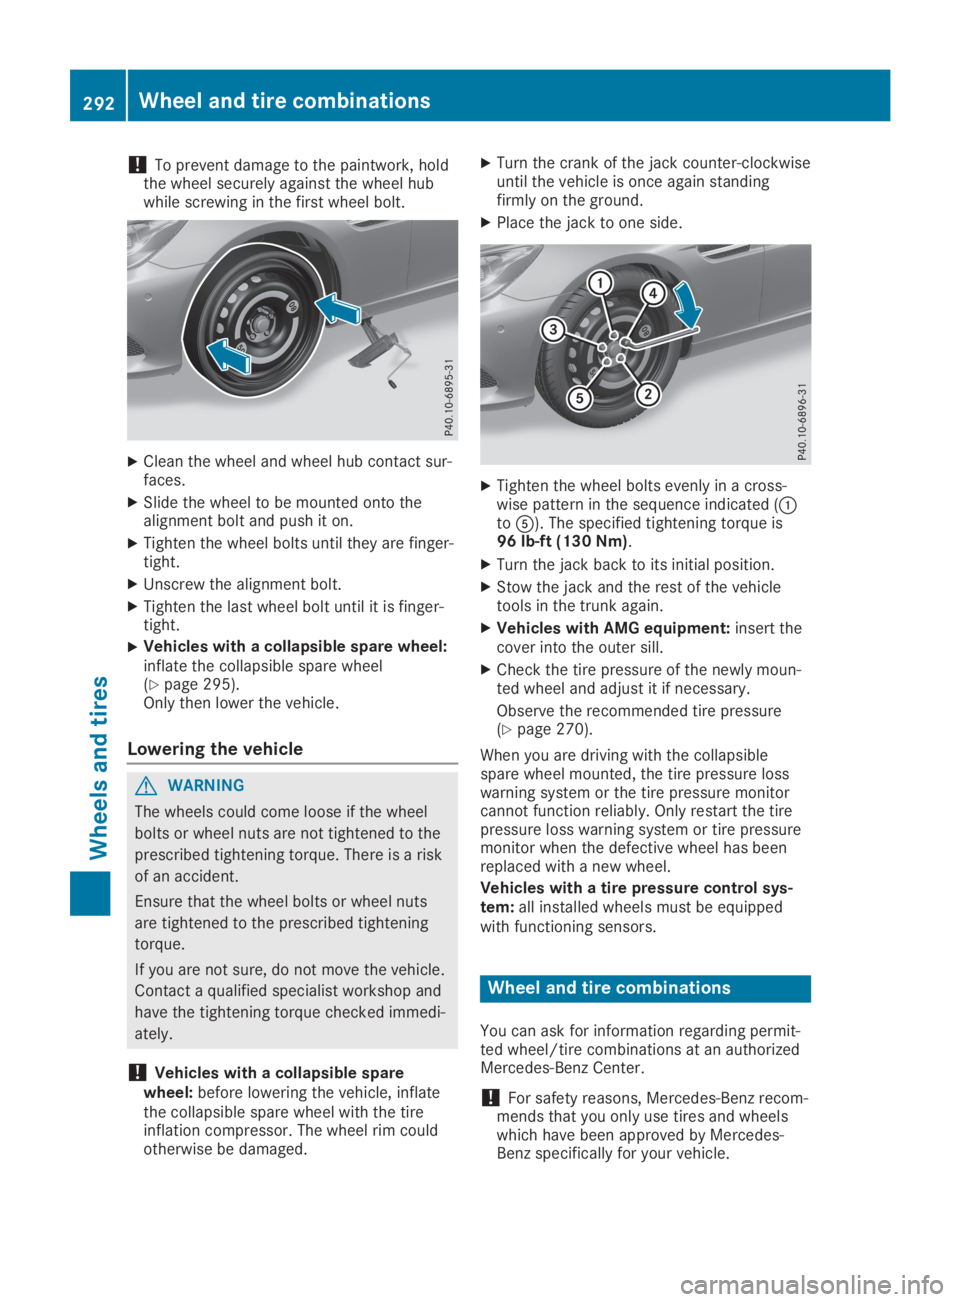
!To prevent damage to the paintwork, holdthe wheel securely against the wheel hubwhile screwing in the first wheel bolt.
XClean the wheel and wheel hub contact sur-faces.
XSlide the wheel to be mounted onto thealignment bolt and push it on.
XTighten the wheel bolts until they are finger-tight.
XUnscrew the alignment bolt.
XTighten the last wheel bolt until it is finger-tight.
XVehicles with a collapsible spare wheel:inflate the collapsible spare wheel(Ypage 295).Only then lower the vehicle.
Lowering the vehicle
GWARNING
The wheels could come loose if the wheel
bolts or wheel nuts are not tightened to the
prescribed tightening torque. There is a risk
of an accident.
Ensure that the wheel bolts or wheel nuts
are tightened to the prescribed tightening
torque.
If you are not sure, do not move the vehicle.
Contact a qualified specialist workshop and
have the tightening torque checked immedi-
ately.
!Vehicles with a collapsible sparewheel:before lowering the vehicle, inflatethe collapsible spare wheel with the tireinflation compressor. The wheel rim couldotherwise be damaged.
XTurn the crank of the jack counter-clockwiseuntil the vehicle is once again standingfirmly on the ground.
XPlace the jack to one side.
XTighten the wheel bolts evenly in a cross-wise pattern in the sequence indicated (�Cto�
Page 296 of 306
When using an emergency spare wheel orspare wheel of a different size, you must notexceed the maximum speed of 50 mph(80 km/h).
Snow chains must not be mounted on emer-gency spare wheels.
General notes
You can ask for information regarding permit-ted emergency spare wheels at an authorizedMercedes-Benz Center.
You should regularly check the pressure of theemergency spare wheel, particularly prior tolong trips, and correct the pressure as neces-sary (Ypage 270). The value on the wheel isvalid.
An emergency spare wheel may also be moun-ted against the direction of rotation. Observethe time restriction on use as well as thespeed limitation specified on the emergencyspare wheel.
Replace the tires after six years at the latest,regardless of wear. This also applies to theemergency spare wheel.
When you are driving with the collapsiblespare wheel mounted, the tire pressure losswarning system or the tire pressure monitorcannot function reliably. Only restart the tirepressure loss warning system or tire pressuremonitor when the defective wheel has beenreplaced with a new wheel.
Vehicles with tire pressure monitor:aftermounting an emergency spare wheel, the sys-tem may still display the tire pressure of theremoved wheel for a few minutes. The valuedisplayed for the mounted emergency sparewheel is not the same as the current tire pres-sure of the emergency spare wheel.
Removing the emergency spare
wheel
Vehicles with a collapsible spare
wheel
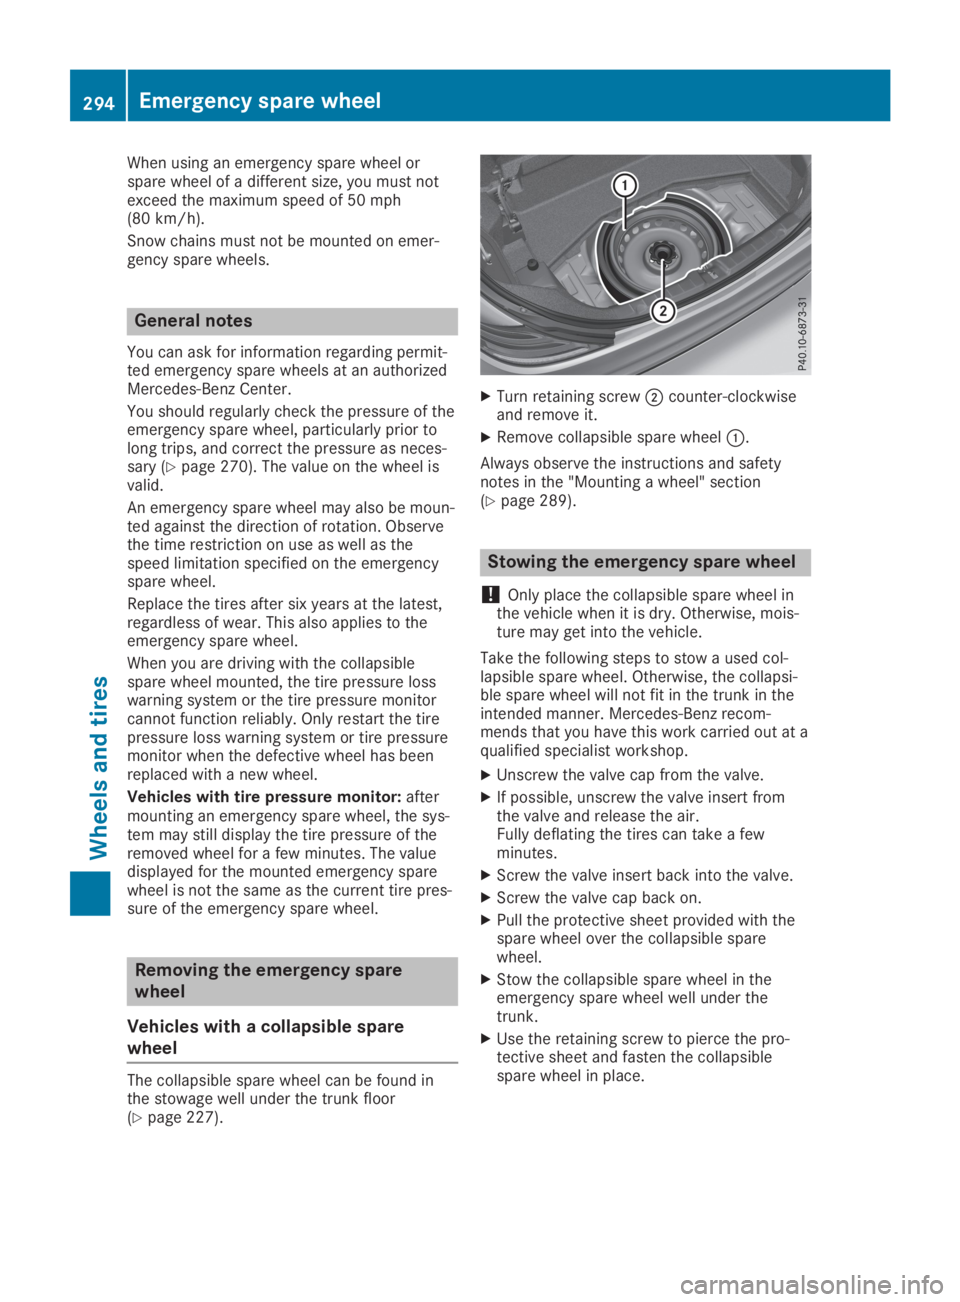
The collapsible spare wheel can be found inthe stowage well under the trunk floor(Ypage 227).
XTurn retaining screw�Dcounter-clockwiseand remove it.
XRemove collapsible spare wheel�C.
Always observe the instructions and safetynotes in the "Mounting a wheel" section(Ypage 289).
Stowing the emergency spare wheel
!Only place the collapsible spare wheel inthe vehicle when it is dry. Otherwise, mois-ture may get into the vehicle.
Take the following steps to stow a used col-lapsible spare wheel. Otherwise, the collapsi-ble spare wheel will not fit in the trunk in theintended manner. Mercedes-Benz recom-mends that you have this work carried out at aqualified specialist workshop.
XUnscrew the valve cap from the valve.
XIf possible, unscrew the valve insert fromthe valve and release the air.Fully deflating the tires can take a fewminutes.
XScrew the valve insert back into the valve.
XScrew the valve cap back on.
XPull the protective sheet provided with thespare wheel over the collapsible sparewheel.
XStow the collapsible spare wheel in theemergency spare wheel well under thetrunk.
XUse the retaining screw to pierce the pro-tective sheet and fasten the collapsiblespare wheel in place.
294Emergency spare wheel
Wheels and tires