2019 MERCEDES-BENZ GLE COUPE tailgate
[x] Cancel search: tailgatePage 85 of 370
X
Press the 0036button on the SmartKey.
X Press handle for the tailgate 0043.
The tailgate opens automatically.
Closing X
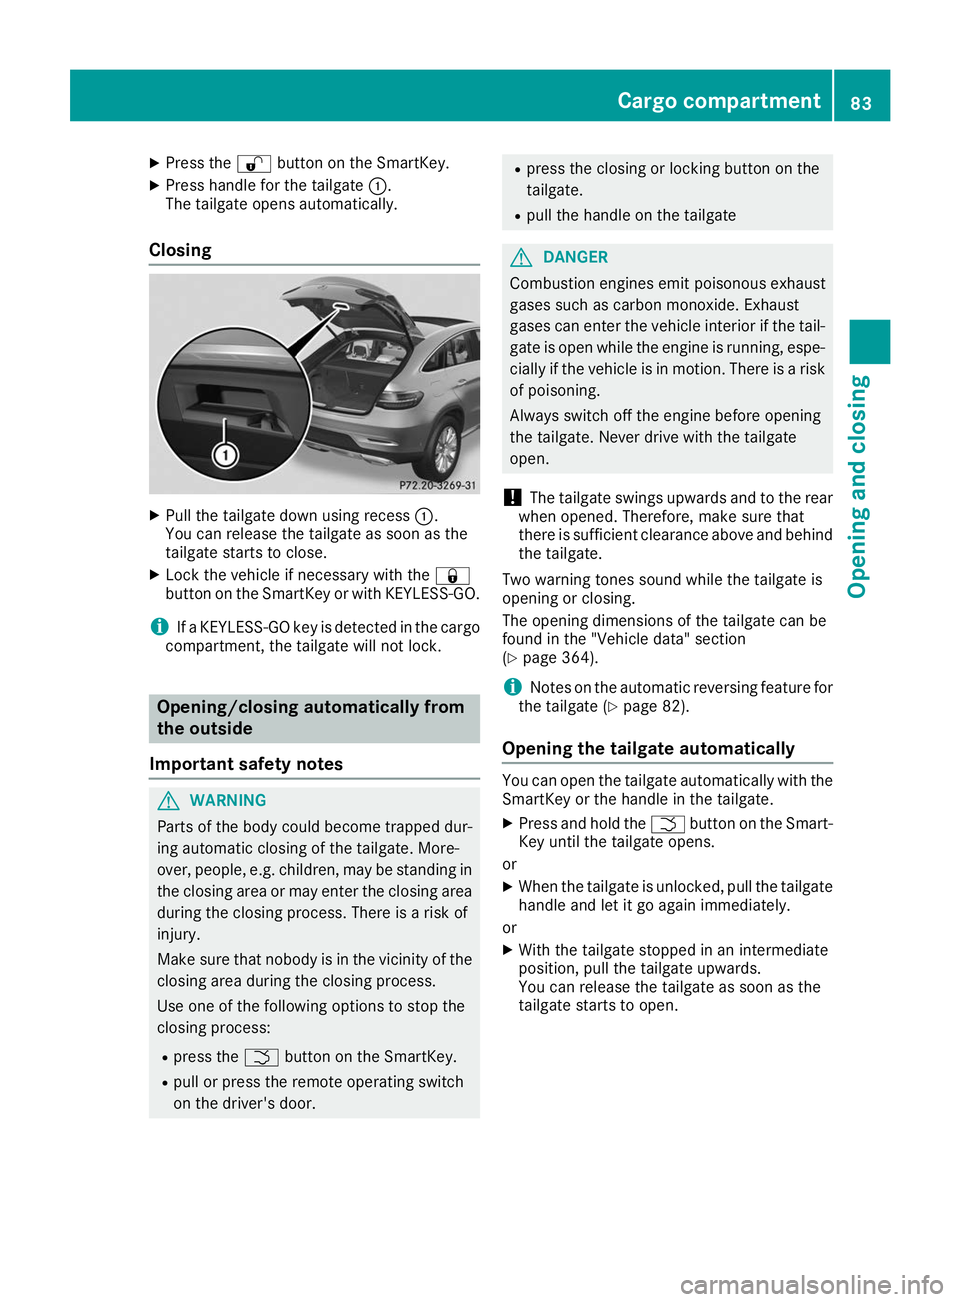
Pull the tailgate down using recess 0043.
You can release the tailgate as soon as the
tailgate starts to close.
X Lock the vehicle if necessary with the 0037
button on the SmartKey or with KEYLESS-GO.
i If a KEYLESS-GO key is detected in the cargo
compartment, the tailgate will not lock. Opening/closing automatically from
the outside
Important safety notes G
WARNING
Parts of the body could become trapped dur-
ing automatic closing of the tailgate. More-
over, people, e.g. children, may be standing in the closing area or may enter the closing area
during the closing process. There is a risk of
injury.
Make sure that nobody is in the vicinity of the closing area during the closing process.
Use one of the following options to stop the
closing process:
R press the 0054button on the SmartKey.
R pull or press the remote operating switch
on the driver's door. R
press the closing or locking button on the
tailgate.
R pull the handle on the tailgate G
DANGER
Combustion engines emit poisonous exhaust
gases such as carbon monoxide. Exhaust
gases can enter the vehicle interior if the tail- gate is open while the engine is running, espe-cially if the vehicle is in motion. There is a risk of poisoning.
Always switch off the engine before opening
the tailgate. Never drive with the tailgate
open.
! The tailgate swings upwards and to the rear
when opened. Therefore, make sure that
there is sufficient clearance above and behind
the tailgate.
Two warning tones sound while the tailgate is
opening or closing.
The opening dimensions of the tailgate can be
found in the "Vehicle data" section
(Y page 364).
i Notes on the automatic reversing feature for
the tailgate (Y page 82).
Opening the tailgate automatically You can open the tailgate automatically with the
SmartKey or the handle in the tailgate.
X Press and hold the 0054button on the Smart-
Key until the tailgate opens.
or X When the tailgate is unlocked, pull the tailgate
handle and let it go again immediately.
or
X With the tailgate stopped in an intermediate
position, pull the tailgate upwards.
You can release the tailgate as soon as the
tailgate starts to open. Cargo compartment
83Opening and closing Z
Page 86 of 370
Closing the tailgate automatically
X
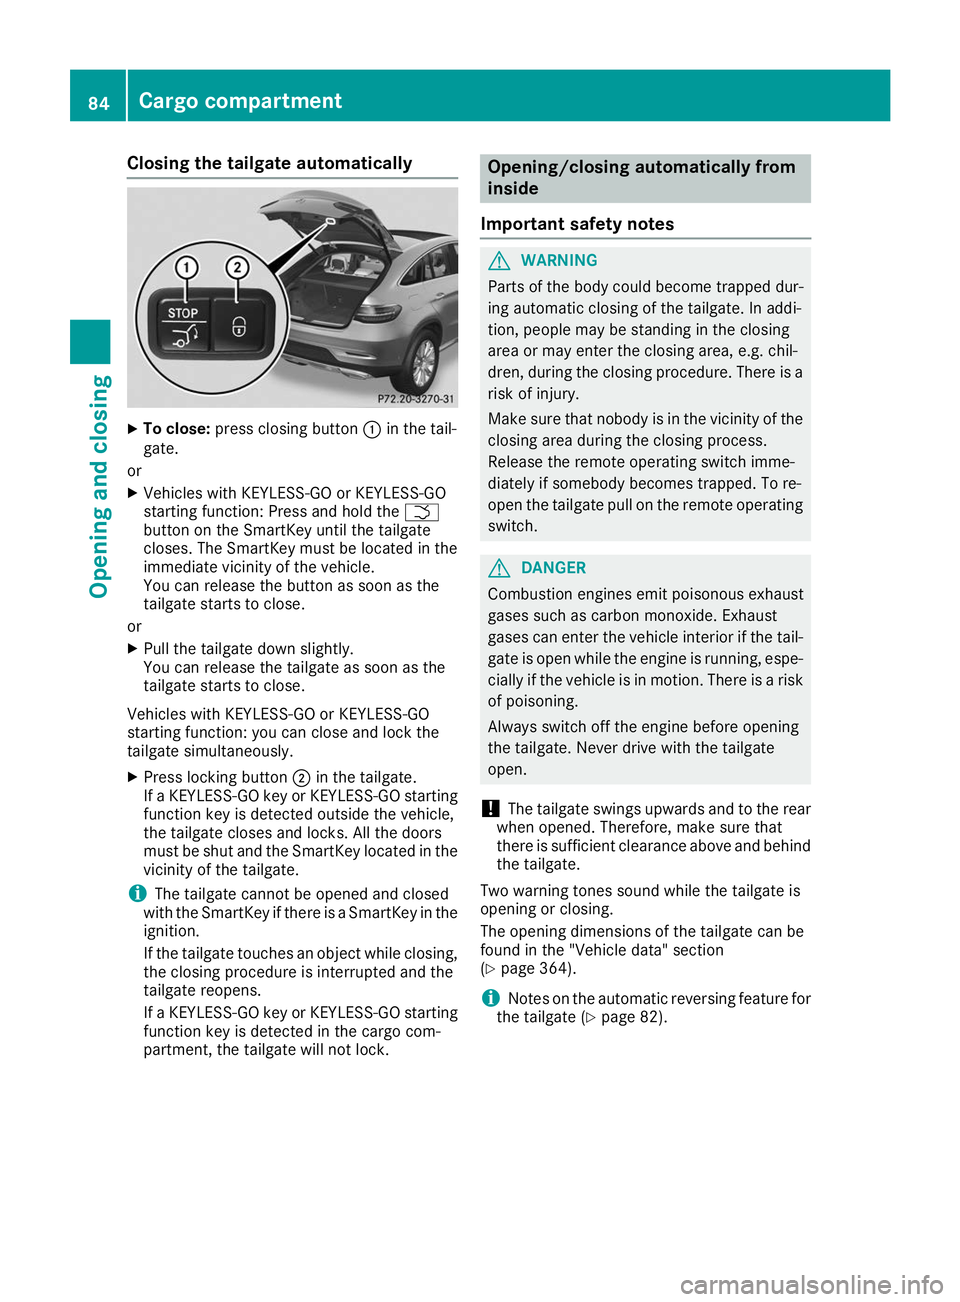
To close: press closing button 0043in the tail-
gate.
or
X Vehicles with KEYLESS-GO or KEYLESS-GO
starting function: Press and hold the 0054
button on the SmartKey until the tailgate
closes. The SmartKey must be located in the
immediate vicinity of the vehicle.
You can release the button as soon as the
tailgate starts to close.
or X Pull the tailgate down slightly.
You can release the tailgate as soon as the
tailgate starts to close.
Vehicles with KEYLESS-GO or KEYLESS-GO
starting function: you can close and lock the
tailgate simultaneously.
X Press locking button 0044in the tailgate.
If a KEYLESS-GO key or KEYLESS-GO starting
function key is detected outside the vehicle,
the tailgate closes and locks. All the doors
must be shut and the SmartKey located in the vicinity of the tailgate.
i The tailgate cannot be opened and closed
with the SmartKey if there is a SmartKey in the
ignition.
If the tailgate touches an object while closing, the closing procedure is interrupted and the
tailgate reopens.
If a KEYLESS-GO key or KEYLESS-GO starting
function key is detected in the cargo com-
partment, the tailgate will not lock. Opening/closing automatically from
inside
Important safety notes G
WARNING
Parts of the body could become trapped dur-
ing automatic closing of the tailgate. In addi-
tion, people may be standing in the closing
area or may enter the closing area, e.g. chil-
dren, during the closing procedure. There is a risk of injury.
Make sure that nobody is in the vicinity of theclosing area during the closing process.
Release the remote operating switch imme-
diately if somebody becomes trapped. To re-
open the tailgate pull on the remote operating
switch. G
DANGER
Combustion engines emit poisonous exhaust
gases such as carbon monoxide. Exhaust
gases can enter the vehicle interior if the tail- gate is open while the engine is running, espe-cially if the vehicle is in motion. There is a risk of poisoning.
Always switch off the engine before opening
the tailgate. Never drive with the tailgate
open.
! The tailgate swings upwards and to the rear
when opened. Therefore, make sure that
there is sufficient clearance above and behind
the tailgate.
Two warning tones sound while the tailgate is
opening or closing.
The opening dimensions of the tailgate can be
found in the "Vehicle data" section
(Y page 364).
i Notes on the automatic reversing feature for
the tailgate (Y page 82).84
Cargo compartmentOpening and closing
Page 87 of 370
Opening and closing
X
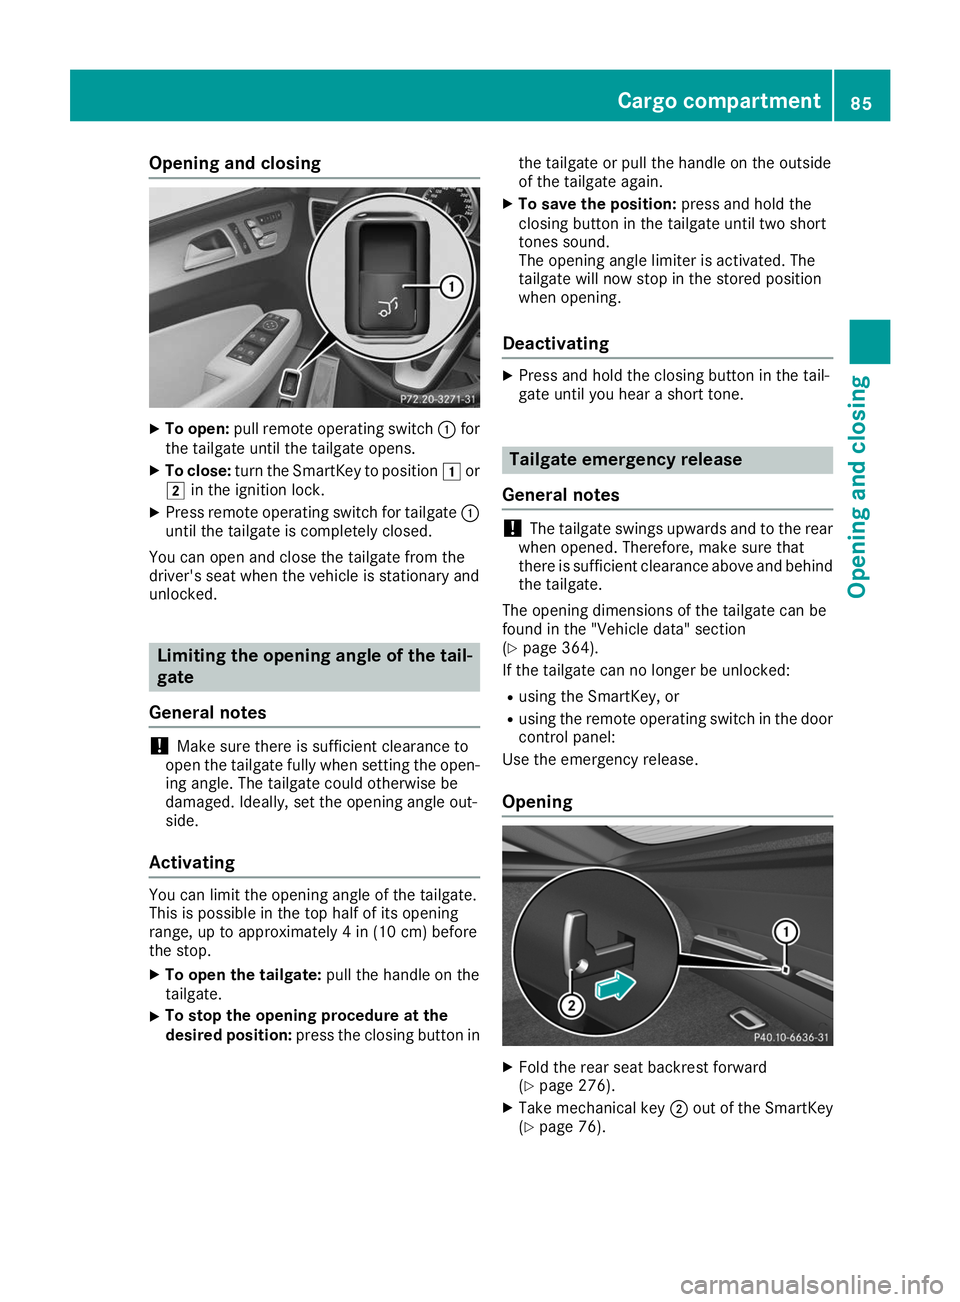
To open: pull remote operating switch 0043for
the tailgate until the tailgate opens.
X To close: turn the SmartKey to position 0047or
0048 in the ignition lock.
X Press remote operating switch for tailgate 0043
until the tailgate is completely closed.
You can open and close the tailgate from the
driver's seat when the vehicle is stationary and
unlocked. Limiting the opening angle of the tail-
gate
General notes !
Make sure there is sufficient clearance to
open the tailgate fully when setting the open-
ing angle. The tailgate could otherwise be
damaged. Ideally, set the opening angle out-
side.
Activating You can limit the opening angle of the tailgate.
This is possible in the top half of its opening
range, up to approximately 4 in (10 cm) before
the stop.
X To open the tailgate: pull the handle on the
tailgate.
X To stop the opening procedure at the
desired position: press the closing button in the tailgate or pull the handle on the outside
of the tailgate again.
X To save the position: press and hold the
closing button in the tailgate until two short
tones sound.
The opening angle limiter is activated. The
tailgate will now stop in the stored position
when opening.
Deactivating X
Press and hold the closing button in the tail-
gate until you hear a short tone. Tailgate emergency release
General notes !
The tailgate swings upwards and to the rear
when opened. Therefore, make sure that
there is sufficient clearance above and behind
the tailgate.
The opening dimensions of the tailgate can be
found in the "Vehicle data" section
(Y page 364).
If the tailgate can no longer be unlocked:
R using the SmartKey, or
R using the remote operating switch in the door
control panel:
Use the emergency release.
Opening X
Fold the rear seat backrest forward
(Y page 276).
X Take mechanical key 0044out of the SmartKey
(Y page 76). Cargo compartment
85Opening and closing Z
Page 88 of 370
X
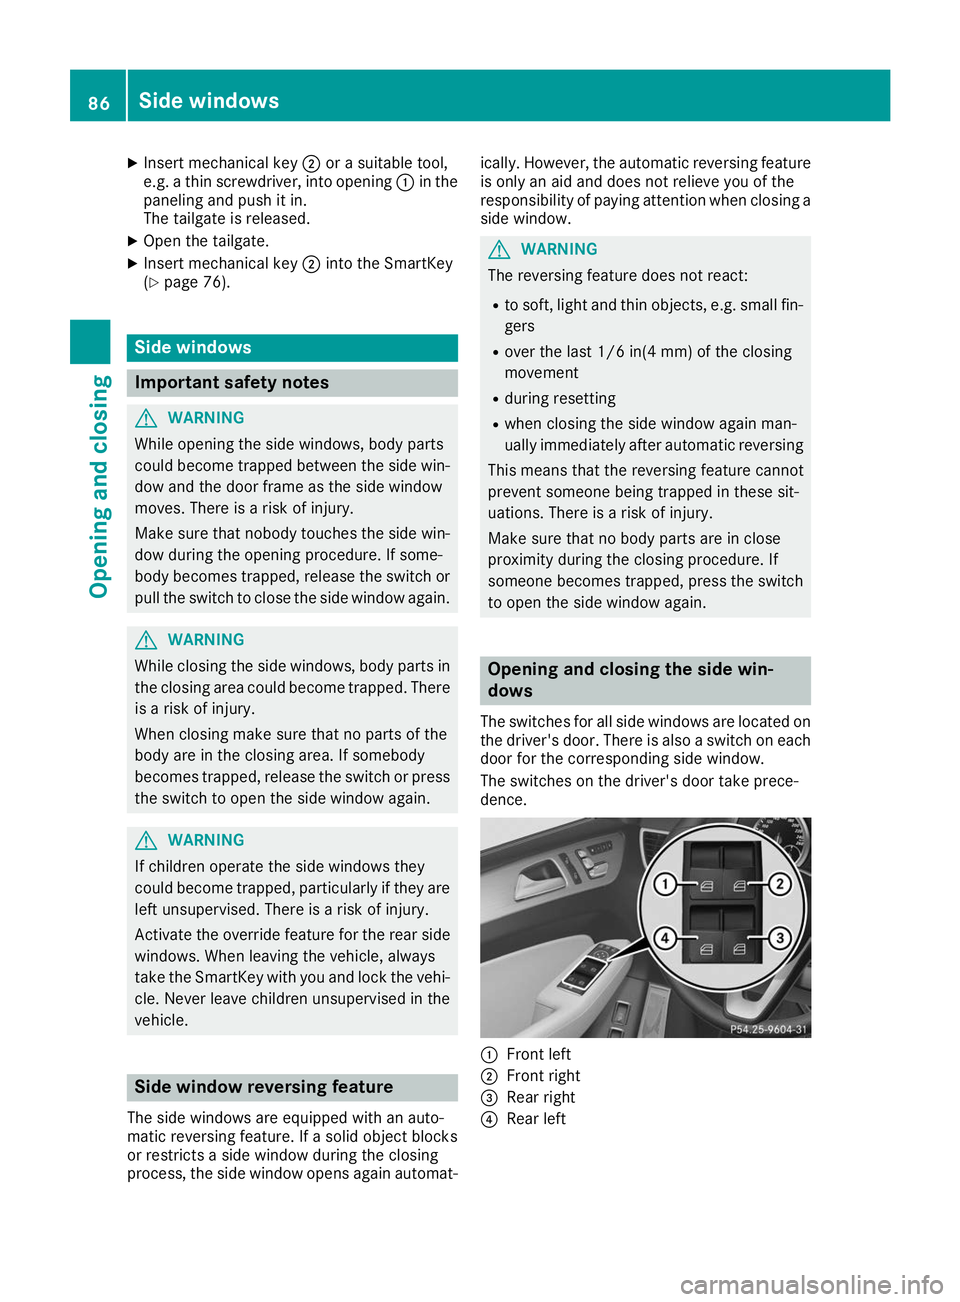
Insert mechanical key 0044or a suitable tool,
e.g. a thin screwdriver, into opening 0043in the
paneling and push it in.
The tailgate is released.
X Open the tailgate.
X Insert mechanical key 0044into the SmartKey
(Y page 76). Side windows
Important safety notes
G
WARNING
While opening the side windows, body parts
could become trapped between the side win- dow and the door frame as the side window
moves. There is a risk of injury.
Make sure that nobody touches the side win-
dow during the opening procedure. If some-
body becomes trapped, release the switch or pull the switch to close the side window again. G
WARNING
While closing the side windows, body parts in the closing area could become trapped. There is a risk of injury.
When closing make sure that no parts of the
body are in the closing area. If somebody
becomes trapped, release the switch or press
the switch to open the side window again. G
WARNING
If children operate the side windows they
could become trapped, particularly if they are left unsupervised. There is a risk of injury.
Activate the override feature for the rear side
windows. When leaving the vehicle, always
take the SmartKey with you and lock the vehi-
cle. Never leave children unsupervised in the
vehicle. Side window reversing feature
The side windows are equipped with an auto-
matic reversing feature. If a solid object blocks
or restricts a side window during the closing
process, the side window opens again automat- ically. However, the automatic reversing feature
is only an aid and does not relieve you of the
responsibility of paying attention when closing aside window. G
WARNING
The reversing feature does not react:
R to soft, light and thin objects, e.g. small fin-
gers
R over the last 1/6 in(4 mm) of the closing
movement
R during resetting
R when closing the side window again man-
ually immediately after automatic reversing
This means that the reversing feature cannot
prevent someone being trapped in these sit-
uations. There is a risk of injury.
Make sure that no body parts are in close
proximity during the closing procedure. If
someone becomes trapped, press the switch to open the side window again. Opening and closing the side win-
dows
The switches for all side windows are located on
the driver's door. There is also a switch on each door for the corresponding side window.
The switches on the driver's door take prece-
dence. 0043
Front left
0044 Front right
0087 Rear right
0085 Rear left 86
Side windowsOpening and closing
Page 155 of 370
vehicle rectified immediately at a qualified spe-
cialist workshop.
Do not shift into transmission position 005Cwhen
driving off-road. You could lose control of the
vehicle if you attempt to brake the vehicle using
the service brake. If the gradient is too steep for
your vehicle, drive back down in reverse gear.
General notes H
Environmental note
Protection of the environment is of primary
importance. Treat nature with respect.
Observe all prohibiting signs.
Read this section carefully before driving your
vehicle off-road. Practice by driving over more
gentle off-road terrain first.
Familiarize yourself with the characteristics of
your vehicle and the gear shift operation before
driving through difficult terrain.
The following driving systems are specially
adapted to off-road driving:
R AIRMATIC package (vehicle level)
(Y page 168)
R DSR (Downhill Speed Regulation)
(Y page 167)
Observe the following notes:
R Select a vehicle level that is suitable for the
terrain. To avoid damaging the vehicle, make
sure there is always sufficient ground clear-
ance.
R Check that items of luggage and loads are
stowed safely and are well secured
(Y page 276).
R Always keep the engine running and in gear
when driving on a downhill gradient. Activate
DSR (Y page 167).
R Always keep the engine running and in gear
when driving down an incline.
R Adapt your speed to the terrain. The rougher,
steeper or more ruts on the terrain, the slower
your speed should be.
R Do not jump with the vehicle as this will inter-
rupt the vehicle's propulsion.
R Drive with extreme care on unfamiliar off-road
routes where visibility is poor. For safety rea- sons, get out of the vehicle first and survey
the off-road route.
R Look out for obstacles, such as rocks, holes,
tree stumps and furrows. R
Take care when turning on an uphill or down-
hill slope or when driving across a slope. The
vehicle could otherwise tip over.
R Always keep the doors, the tailgate, the side
windows and the sliding sunroof closed while
the vehicle is in motion.
R Do not shift the automatic transmission to
position 005C.
R Observe the notes on off-road fording
(Y page 151).
i Information about retrofitting special all-ter-
rain tires is available from any qualified spe-
cialist workshop.
i Do not use the HOLD function when driving
off-road, on steep uphill or downhill gradients
or on slippery or loose surfaces. The HOLD
function cannot hold the vehicle on such sur- faces.
Checklist before driving off-road !
If the engine oil warning lamp lights up while
the vehicle is in motion, stop the vehicle in a
safe place as soon as possible. Check the
engine oil level. The engine oil warning lamp
warning must not be ignored. Continuing the
journey while the symbol is displayed could
lead to engine damage.
X Engine oil level: check the engine oil level
and add engine oil if necessary.
When you drive on steep gradients, the engine
oil level must be sufficiently high to ensure
that oil is supplied correctly in the vehicle.
X Tire-changing tool kit: check that the jack is
working and make sure you have the lug
wrench, a robust tow cable and a folding
spade in the vehicle.
X Wheels and tires: check the tread depth and
pressure of the tires.
X Check for damage and remove any foreign
objects, e.g. small stones, from the wheels/
tires.
X Replace any missing valve caps.
X Replace dented or damaged wheels.
X Rims: dented or bent rims can result in a loss
of tire pressure and damage the tire bead.
Before driving off-road, check the wheels and replace them if necessary. Driving tips
153Driving and parking Z
Page 183 of 370
R
if the camera lens is dirty or obstructed.
Observe the notes on cleaning
(Y page 305)
R if the rear of your vehicle is damaged. In this
event, have the camera position and setting
checked at a qualified specialist workshop
The field of vision and other functions of the rear
view camera may be restricted due to additional
accessories on the rear of the vehicle (e.g.
license plate holder, bicycle rack).
On vehicles with height-adjustable chassis,
leaving the standard height can result in inac-
curacies in the guide lines, depending on tech-
nical conditions.
i The contrast of the display may be affected
by the sudden presence of sunlight or other
light sources, e.g. when exiting a garage. Pay
particular attention in this situation.
i If usability is severely restricted, e.g. due to
pixel errors, have the display repaired or
replaced.
i The rear view camera is protected from rain-
drops and dust. When the rear view camera is
switched on, the Mercedes emblem opens
with the rear view camera in the cover on the tailgate.
The emblem closes again when:
R you have finished the maneuvering process
R you switch off the engine
R you open the trunk
Observe the notes on cleaning (Y page 305).
For technical reasons, the emblem may
remain open briefly after the rear view camera
has been deactivated.
Activating/deactivating the rear view
camera X
To activate: make sure that the SmartKey is
in position 0048in the ignition lock.
X Make sure that the Activation by R gear
Activation by R gear
function is selected on the multimedia system (see the Digital Operator's Manual).
X Engage reverse gear.
The rear view camera flap opens. The multi-
media system shows the area behind the vehi-
cle with guide lines.
The image from the rear view camera is avail- able throughout the maneuvering process. X
To switch the function mode for vehicles
with trailer tow hitch: using the controller,
select symbol 0043for the "Reverse parking"
function or symbol 0044for "Coupling up a
trailer".
The symbol of the selected function is high-
lighted.
To deactivate: shift the transmission to posi-
tion 005Dor drive forwards.
Displays in the multimedia system The rear view camera may show a distorted view
of obstacles, show them incorrectly or not at all.
The rear view camera does not show objects in
the following positions:
R very close to the rear bumper
R under the rear bumper
R in the area immediately above the tailgate
handle
! Objects not at ground level may appear to
be further away than they actually are, e.g.:
R the bumper of a parked vehicle
R the drawbar of a trailer
R the ball coupling of a trailer tow hitch
R the rear section of an HGV
R a slanted post
Use the guidelines only for orientation.
Approach objects no further than the bottom-
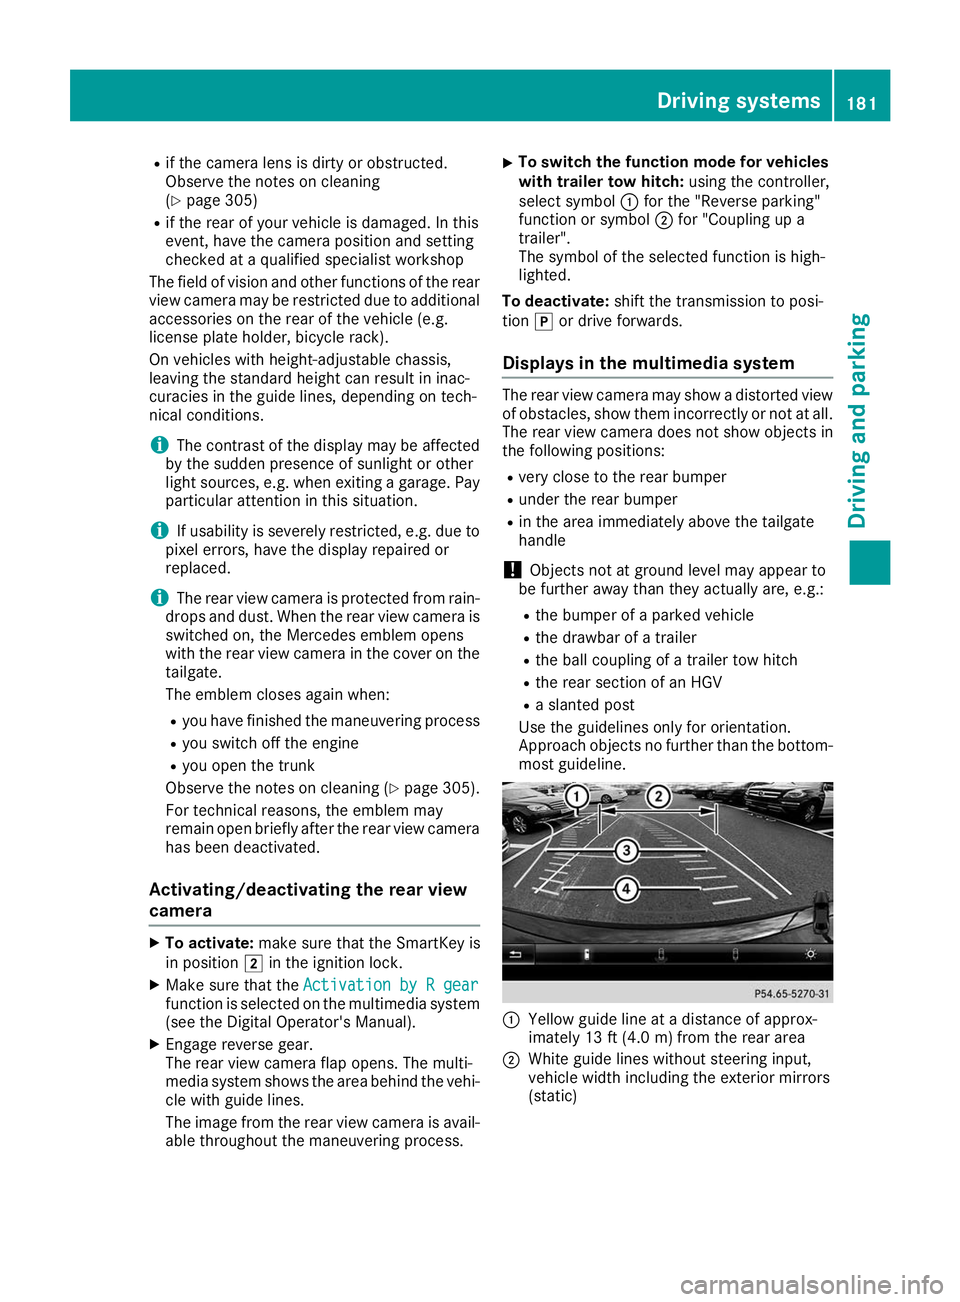
most guideline. 0043
Yellow guide line at a distance of approx-
imately 13 ft (4.0 m) from the rear area
0044 White guide lines without steering input,
vehicle width including the exterior mirrors
(static) Driving systems
181Driving and parking Z
Page 187 of 370
The cameras cover the immediate surroundings
of the vehicle. The 360° camera assists you, for
instance when parking or at exits with reduced
visibility.
You can show pictures from the 360° camera in full-screen mode or in seven different split-
screen views on the multimedia system display.
A split-screen view also includes a top view of
the vehicle. This view is calculated from the data supplied by the installed cameras (virtual cam-
era).
The six split-screen views are:
R Top view and picture from the rear view cam-
era (130° viewing angle)
R Top view and image from the front camera
(130° viewing angle without displaying the
maximum steering wheel angle)
R Top view and enlarged rear view
R Top view and enlarged front view
R Top view and trailer view (vehicles with trailer
tow hitch)
R Top view and rear-view images from the exte-
rior mirror cameras (rear wheel view)
R Top view and forward-view images from the
exterior mirror cameras (front wheel view)
When the function is active and you shift the
transmission from 005Bor005E to005C, the dynamic
guide lines are hidden.
When you shift between transmission positions 005B and 005E, you see the previously selected front
or rear view.
Distances measured by Parking Assist
PARKTRONIC will also be optically displayed:
R in split screen view as red or yellow brackets
around the vehicle icon in the top view, or
R at the bottom right as red or yellow brackets
around the vehicle symbol in full-screen mode
The line thickness and color of the brackets
show how far the vehicle is away from an object:
R yellow brackets with thin lines: Parking Assist
PARKTRONIC is active
R yellow brackets with normal lines: an object is
present in close range of the vehicle
R red line: an object is present in the immediate
close range of the vehicle i
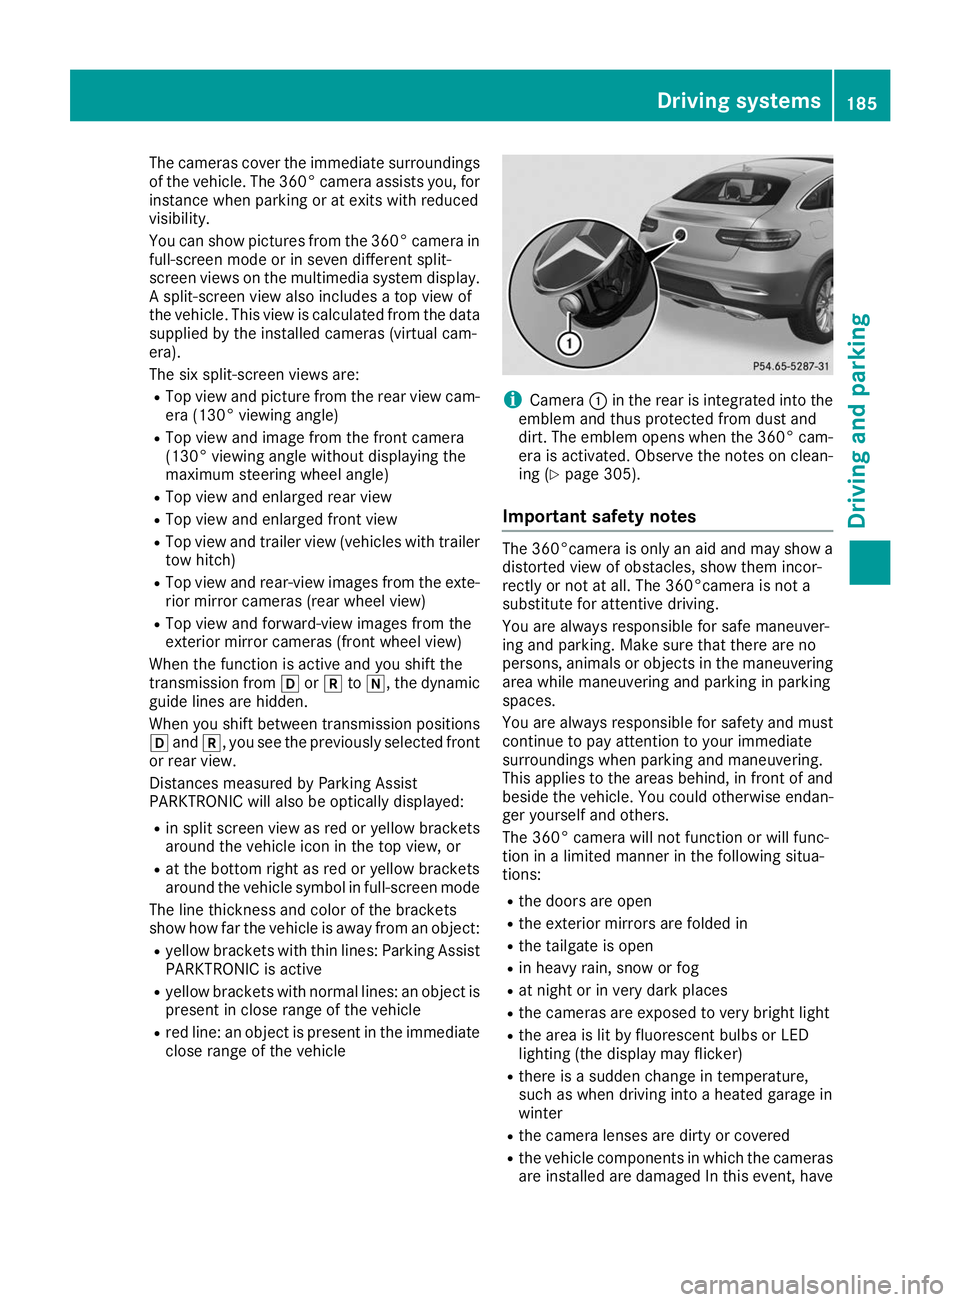
Camera
0043in the rear is integrated into the
emblem and thus protected from dust and
dirt. The emblem opens when the 360° cam-
era is activated. Observe the notes on clean-
ing (Y page 305).
Important safety notes The 360°camera is only an aid and may show a
distorted view of obstacles, show them incor-
rectly or not at all. The 360°camera is not a
substitute for attentive driving.
You are always responsible for safe maneuver-
ing and parking. Make sure that there are no
persons, animals or objects in the maneuvering area while maneuvering and parking in parking
spaces.
You are always responsible for safety and must
continue to pay attention to your immediate
surroundings when parking and maneuvering.
This applies to the areas behind, in front of and
beside the vehicle. You could otherwise endan-
ger yourself and others.
The 360° camera will not function or will func-
tion in a limited manner in the following situa-
tions:
R the doors are open
R the exterior mirrors are folded in
R the tailgate is open
R in heavy rain, snow or fog
R at night or in very dark places
R the cameras are exposed to very bright light
R the area is lit by fluorescent bulbs or LED
lighting (the display may flicker)
R there is a sudden change in temperature,
such as when driving into a heated garage in
winter
R the camera lenses are dirty or covered
R the vehicle components in which the cameras
are installed are damaged In this event, have Driving systems
185Driving and parking Z
Page 188 of 370
the camera position and setting checked at a
qualified specialist workshop
Do not use the 360° camera under such cir-
cumstances. You can otherwise injure others or cause damage to objects or the vehicle.
Guide lines are always shown at road level. In
trailer mode, the guide lines are shown at the
level of the trailer coupling.
The field of vision and other functions of the
camera system may be restricted due to addi-
tional accessories on the rear of the vehicle (e.g.
license plate holder, bicycle rack).
On vehicles with height-adjustable chassis,
depending on technical conditions, leaving the
standard height can result in:
R inaccuracies in the guide lines
R inaccuracies in the display of generated
images (top view)
Activation conditions The 360° camera image can be displayed in the
following situations:
R your vehicle is equipped with a 360° camera
R the SmartKey is in key position 0048in the igni-
tion lock
R the multimedia system is switched on
Switching on the 360° camera X
Press the 00D4button in the center console
for longer than two seconds.
Depending on whether transmission position
005B or005E is selected, the following appears:
R a split screen with top view and the image
from the front camera or
R a split screen with top view and the image
from the rear view camera
or X Press the 00D4button in the center console.
The vehicle menu is displayed.
X Select 360°
360° Camera Camera and press 7to confirm.
Depending on whether transmission position
005B or005E is selected, the following appears:
R a split screen with top view and the image
from the front camera or
R a split screen with top view and the image
from the rear view camera Activating the 360° camera using
reverse gear The 360° camera images can be automatically
displayed by engaging reverse gear.
X Make sure that the SmartKey is in position 0048
in the ignition lock.
X Make sure that the Activation by R gear Activation by R gear
function is selected on the multimedia system (see the Digital Operator's Manual).
X To show the 360° camera image: engage
reverse gear.
The multimedia system shows the area
behind the vehicle in split-screen mode. You
see the top view of the vehicle and the image from the rear view camera.
Selecting the split-screens or 180° view Selecting split-screen view
X To switch to the line with the vehicle icons:
slide 5the controller.
X To select one of the vehicle icons: turn 3
the controller.
X To switch to 180° View
180° View :turn 3 the con-
troller to select 180° View
180° View and press7to
confirm.
i The
180° 180° View
Viewoption is only available in the
following views:
R Top view with picture from the rear view
camera
R Top view with picture from the front camera
Displays in the multimedia system Important safety notes
The camera system may show a distorted view
of obstacles, show them incorrectly or not at all. Obstacles are not shown by the system in the
following locations:
R under the front and rear bumpers
R very close to the front and rear bumpers
R in the area immediately above the tailgate
handle
R very close to the exterior mirrors
R in the transitional areas between the various
cameras in the virtual top view 186
Driving systemsDriving an
d parking