2019 MERCEDES-BENZ GLB SUV spare wheel
[x] Cancel search: spare wheelPage 197 of 689
#
Ifth ere is damage, consult a qualified
specialist workshop immediately. When driving off-road, subs
tances su chas sand,
mud and water orwate r mixed with oil may get
into the brakes. This may lead toare duction in
braking ef fect or total brake failure as a result of
increased wear. The braking characteristics will
va ry depending on the material that has entered
th e sy stem. Clean the brakes af ter driving off-
ro ad. If youth en notice reduced braking ef fect
or hear scraping noises, ha vethe brake sy stem
ch ecked at a qualified specialist workshop.
Ad just your driving style to thech anged braking
ch aracteristics.
* NO
TEDama gecaused bydriving over
obs tacles The
vehicle can be damaged by:
R driving up on high kerbs or unpa ved
ro ads.
R quickly driving over obs tacles su chas
ke rbs, speed bumps or po tholes. R
heavy objects hitting the underbody or
ch assis components. #
Do not drive over obs tacles that could
damage theve hicle. #
Check theve hicle regular lyfor dama ge
during off-road driving. #
Adjust theve hicle speed tosuit the
ro ad sur face conditions. #
Ifth ere is damage, consult a qualified
specialist workshop immediately. +
ENVIRONMENTAL
NOTEEnvironmental
dama gedue tonon-obser vance of pro‐
hibition signs Environmental pr
otection has priority. Treat
nature with respect. #
Be sure toobser veprohibition signs. %
The vehicle is designed for easily negotiable
and medium off-road terrain. With off-road
use, make sure there is the necessary
ground clearance. Checklist before driving off-road
Check
thefo llowing points before driving off-
ro ad:
R Fuel le vel
R Vehicles with a diesel engine: AdBlue ®
le vel
R Engine oil le vel:fill engine oil up tothe maxi‐
mum le velto ensure full gradeability
(/ page 488).
R Tyre-change tool kit and spare wheel
R Tyres and wheels
Off-road driving
Re ad this section before driving your vehicle off-
ro ad. Practise bydriving over more gentle off-
ro ad terrain firs t.
R Obse rveth e no tes on the cross-country ABS
(/ page 226).
R If necessar y,select theF (/page 199)
drive program before driving off-road.
R Alw ayske ep the engine running and in gear
when driving on downhill gradients and 194
Driving and pa rking
Page 506 of 689
#
Right-hand drive vehicle: pulltab1 down‐
wa rds. #
Remo vefire extinguisher 2. Flat tyre
Note
s onflat tyres &
WARNING Risk of accident due toaflat
tyre
A flat tyre se verely affects the driving charac‐
te rist ics as well as thesteering and braking
of theve hicle.
Ty res without run-flat characteristics: #
Do not drive on with a flat tyre. #
Chan getheflat tyre immediately with
an emer gency spa rewheel or spare
wheel. Alternativel y,consult a qualified
specialist workshop.
Ty res with run-flat characteristics: #
Obse rveth e information and warning
no tes on MOExtended tyres (run-flat
tyres). In
theeve nt of a flat tyre, thefo llowing options
are available depending on your vehicle's equip‐
ment:
R Vehicles with MOExtended tyres: it is pos‐
sible tocontinue the journey for a short
period of time. Make sure you obse rvethe
no tes on MOExtended tyres (run-flat tyres)
(/ page 503).
R Vehicles with a TIREFIT kit: you can repair
th e tyre so that it is possible tocontinue the
jou rney for a short period of time. Todo this,
use the TIREFIT kit (/ page 505).
R Vehicles with Mercedes me connect: you
can make a call for breakdown assi stance via
th eov erhead control panel in the case of a
breakdown (/ page447).
R Allvehicles: change the wheel
(/ page 539). %
The emer gency spa rewheel is only available
in cer tain countries. Note
s on MOExtended tyres (run-flat tyres) &
WARNING Risk of accident when driving
in eme rgency mode
When driving in emer gency mode, the han‐
dling characteristics are impaired. e.g. when
cornering, when accelerating stronglyand
when braking. #
Do not exceed the permissible maxi‐
mum speed. #
Avoid any abrupt steering and driving
maneuvers as well as driving over
obs tacles (curbs, pot holes, off-road).
This applies, in pa rticular, toa loaded
ve hicle. #
Stop driving in the emer gency mode if
yo u notice:
R banging noise
R vehicle vibration Breakdown assis
tance 503
Page 529 of 689
#
Comply with there commended tyre
pressure and check the tyre pressure of
all tyres including the spare wheel regu‐
larly:
R at least once a month
R when the load changes
R before embarking on a lon ger journey
R if operating conditions change, e.g. off-
ro ad driving #
Adjust the tyre pressure as necessar y.Ty
re pressure which is too high or too low can:
R Shor tenth e service life of the tyres.
R Cause increased tyre damage.
R Adversely af fect driving characteristics and
th us driving saf ety, e.g. due toaquaplaning. &
WARNING Risk of accident from repea‐
te d tyre pressure drop
If th e tyre pressure drops repeatedly, the
wheel, valve or tyre may be damaged. Insuf
ficient tyre pressure can cause the tyres
to bur st. #
Inspect the tyre for signs of fore ign
objects. #
Check whe ther the wheel or valve has a
leak. #
Ifyo u are unable torectify the damage,
conta ct aqualified specialist workshop. Information on
there commended tyre pressure
fo rth eve hicle's factor y-fitted tyres can be found
on the tyre pressure table on the inside of the
fuel filler flap (/ page 526).
Use a suitable pressure gauge tocheck the tyre
pressure. The outer appearance of a tyre does
not permit any reliable conclusion about the tyre
pressure.
Ve hicles with a tyre pressure monitoring sys‐
te m: you can also check the tyre pressure using
th e on-board computer. Only cor
rect tyre pressures when the tyres are
cold. Conditions for cold tyres:
R The vehicle has been par ked with the tyres
out of direct sunlight for at least thre e hours.
R The vehicle has tr avelled less than 1.6 km.
A rise in the tyre temp erature of 10°C increases
th e tyre pressure byappr ox.10 kPa (0.1 bar/
1. 5 psi). Take this into account when checking
th e tyre pressure of warm tyres.
Note s on trailer operation
Alw ays inflate there ar axle tyres tothere com‐
mended tyre pressures on the tyre pressure
ta ble for increased load. Ty
re pressure table The tyre pressure
table is on the inside of the
fuel filler flap. 526
Wheels and tyres
Page 546 of 689
#
Slide the wheel tobe mounted onto the cen‐
tring pin and push it on. #
Notes on fitting an eme rgency spare wheel
(/ page 544). &
WARNING Risk of inju ryfrom tightening
wheel bolts and nuts
If yo u tighten the wheel bolts or wheel nuts
when theve hicle is raised, the jack could tip. #
Only tighten wheel bolts or wheel nuts
when theve hicle is on the ground. #
Be sure toobser vethe instructions and
saf ety no tes on "Changing a wheel"
(/ page 534). #
For saf etyre asons, on lyuse wheel bolts
which ha vebeen appr ovedby Mercedes-
Benz and forth e wheel in question. #
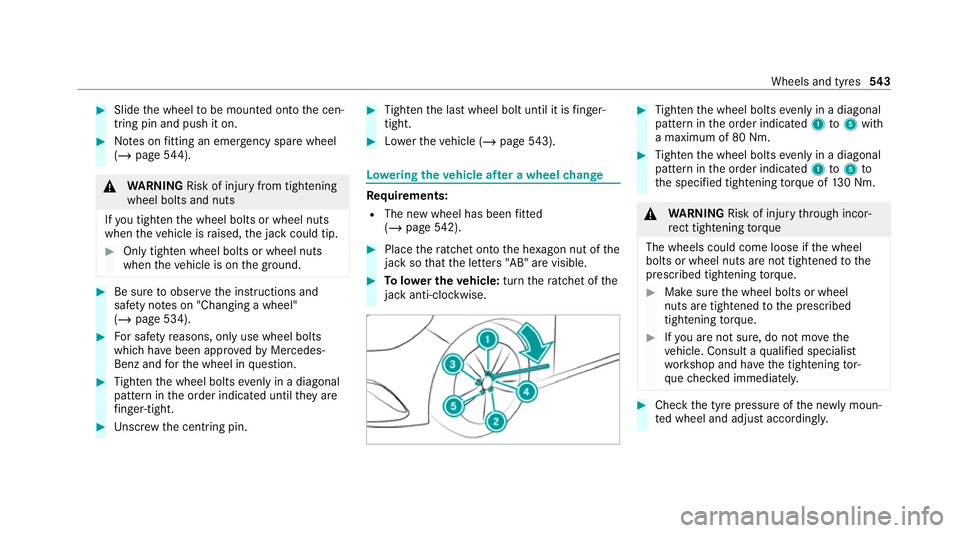
Tighten the wheel bolts evenly in a diagonal
pattern in the order indicated until they are
fi nger-tight. #
Unscr ew the cent ring pin. #
Tighten the last wheel bolt until it is finger-
tight. #
Lowe rth eve hicle (/ page543). Lo
weri ngtheve hicle af ter a wheel change Re
quirements:
R The new wheel has been fitted
(/ page 542). #
Place thera tchet onto the he xagon nut of the
jack so that the letters "AB" are visible. #
Tolowe r the vehicle: turnthera tchet of the
jack anti-clo ckwise. #
Tighten the wheel bolts evenly in a diagonal
pattern in the order indicated 1to5 with
a maximum of 80 Nm. #
Tighten the wheel bolts evenly in a diagonal
pattern in the order indicated 1to5 to
th e specified tightening torque of 130 Nm. &
WARNING Risk of inju rythro ugh incor‐
re ct tigh tening torque
The wheels could come loose if the wheel
bolts or wheel nuts are not tightened tothe
prescribed tightening torque. #
Makesure the wheel bolts or wheel
nuts are tightened tothe prescribed
tightening torque. #
Ifyo u are not sure, do not mo vethe
ve hicle. Consult a qualified specialist
wo rkshop and ha vethe tightening tor‐
qu ech ecked immediately. #
Check the tyre pressure of the newly moun‐
te d wheel and adjust according ly. Wheels and tyres
543
Page 547 of 689
#
Vehicles with tyre pressure loss warning
sy stem: restart the tyre pressure loss warn‐
ing sy stem (/ page 533).
Exception: the new wheel is an emer gency
spa rewheel. #
Vehicles with a tyre pressure monitoring
sy stem: restart the tyre pressure monitoring
sy stem (/ page 528).
Exception: the new wheel is an emer gency
spa rewheel.
Make sure toobser vethefo llowing fur ther rela‐
te d subjec t:
R Notes on tyre pressure (/ page 525)Emer
gency spare wheel Note
s on the emer gency spare wheel &
WARNING Risk of accident caused by
incor rect wheel and tyre dimensions
The wheel or tyre size and the tyre type of
th e emer gency spa rewheel or spare wheel
and the wheel tobe replaced may dif fer. Mounting an emer
gency spa rewheel/spare
wheel may se verely impair the driving char‐
acteristics.
To preve nt hazardous situations: #
Adapt your driving style according lyand
drive carefull y. #
Neverfit more than one emer gency
spa rewheel or spare wheel that dif fers
in size. #
Only use an emer gency spa rewheel or
spare wheel of a dif fere nt size brie fly. #
Do not switch off ESP ®
. #
Have the emer gency spa rewheel or
spare wheel of a dif fere nt size replaced
at the nearest qualified specialist work‐
shop. The new wheel must ha vethe
cor rect dimensions. Obser
vethefo llowing no tes on removing an
emergency spare wheel:
R Before stowingthe emer gency spa rewheel,
make sure there is no air left in the tyre.
If necessar y,allow the air toescape. R
Torelease air from the ty re:re mo vethe
va lve cap of the tyre.
R Press down the me tal inse rtin theva lve
using a pointed object, e.g. a pen.
R Screw theva lve cap onto theva lve.
R Stow the deflated emer gency spa rewheel in
th e emer gency spa rewheel bag in the lug‐
ga ge compa rtment (/ page545).
% Ve
hicles with adjustable load comp art‐
ment floor: alwaysstow the deflated emer‐
ge ncy spa rewheel in the lo wer position on
th e adjus table load compartment floor.
Obser vethefo llowing no tes on fitting an emer‐
ge ncy spa rewheel:
R Fitthe emer gency spa rewheel when it is
deflated (/ page542).
R Inflate the emer gency spa rewheel af terfit‐
ting it (/ page 545).
The ma ximum pe rmissible speed with an emer‐
ge ncy spa rewheel fitted is 80 km/h.
Do not fit th e emer gency spa rewheel with snow
ch ains. 544
Wheels and tyres
Page 548 of 689
Re
place the emer gency spa rewheel af ter six
ye ars at the latest, rega rdless of wear.
% Ve
hicles with a tyre pressure loss warn‐
ing sy stem: if an emer gency spa rewheel is
fi tted the tyre pressure loss warning sy stem
cann otfunction reliabl y.Only restart the sys‐
te m again when the emer gency spa rewheel
has been replaced with a new wheel.
Ve hicles with a tyre pressure monitoring
sy stem: if an emer gency spa rewheel is fit‐
te dth e tyre pressure monitoring sy stem can‐
not function reliabl y.Fo r a few minutes af ter
an emer gency spa rewheel is fitted, the sys‐
te m may still display the tyre pressure of the
re mo ved wheel. Only restart the sy stem
again when the emer gency spa rewheel has
been replaced with a new wheel.
Be sure toalso obse rveth efo llowing fur ther
re lated subjects:
R Notes on tyre pressure (/ page 525)
R Tyre pressure table (/ page 526) Re
moving the eme rgency spa rewheel The deflated eme
rgency spare wheel is secured
in the emer gency spa rewheel bag in the load
compartment and is secured tothe adjus table
load compartment floor in the lo wer position. #
Obser vethe information on mounting tyres
(/ page 534). #
Open theta ilgate. #
Detach the securing stra ps. #
Unhook there taining spring hooks of the
securing stra ps from the brac kets. #
Remo vethe emer gency spa rewheel bag with
th e emer gency spa rewheel. #
Open the emer gency spa rewheel bag and
re mo vethe emer gency spa rewheel. Inflating
the emer gency spare wheel *
NO
TEOverheating due tothe tyre infla‐
tion compressor running too long #
Do not runth e tyre inflation compres‐
sor for longer than ten minu tes without
inter ruption. Re
quirements:
R Comply with the manufacturer's saf ety no tes
on thest icke r of the emer gency spa rewheel
and on the tyre inflation compressor.
R Remo vethe tyre inflation compressor from
th estow age space under the luggage com‐
partment floor (/ page 504). Wheels and tyres
545
Page 658 of 689
Saf
etyve st ........................................... 501
Setting up thewa rning triangle .......... .502
Emer gency braking ................................. 223
Emer gency braking
see BAS (Brake Assi stSystem)
Emer gency call sy stem
see Mercedes-Benz emer gency call sy stem
Emer gency engine start .......................... 519
Emer gency key
Inserting/removing ............................... 84
Locking a door ....................................... 91
Un locking a door .................................. .91
Un locking theta ilgate ............................ 97
Emer gency operation mode
St arting theve hicle ............................. 188
Emer gency spare wheel .........................5 44
Inflating ...............................................5 45
No tes .................................................. 544
Re moving ............................................ 545
ENERGIZING Coach Calling up ............................................ 377
Fu nction ............................................... 376ENERGIZING COMFORT
...........................373
Overview of programmes ..................... 374
St arting the programme ......................3 75
ENERGIZING seat kinetics Setting ................................................ .373
ENERGIZING seat kinetics see ENERGIZING COMFORT
Engine ECO start/ stop function ......................1 96
Engine number ................................... .550
St arting (Digital Vehicle Keyst icke r) .... 187
St arting (eme rgency operation
mode) .................................................. 188
St arting (mobile phone) ...................... .187
St arting (Remo teOnline) ..................... 189
St arting (s tart/s top button) ................ 186
St arting assis tance .............................. 513
Switching off (s tart/s top button) .........2 15
Engine bonnet Function (active bonnet) ...................... 485
Opening/closing ................................. 486
Engine data Displaying ............................................ 200 Engine electronics
Notes ................................................... 548
Engine number ........................................ 550
Engine oil ................................................ .489
Ad ditives .............................................5 57
Capacity .............................................. 558
Checking the oil le vel using the on-
board computer ................................... 488
MB-Fr eigabe or MB-Appr oval .............. .558
Quality ................................................. 558
To pping up ...........................................4 89
Entering characters ................................ 356
Fu nction/no tes ................................... 356
On theto uchpad .................................. 357
On theto uchsc reen (media display) ....3 60
Setting theke yboard .......................... .363
ERA-GLONASS test mode
St arting/ending .................................. .457
ESC (Electronic Stability Control)
see ESP ®
(Electronic Stability Prog ram)
ESP ®
Crosswind Assist ................................. 230
Off-road ............................................... 230
Tr ailer stabilisation .............................. 230 Index
655
Page 675 of 689
Setting a speed
see Cruise control
Setting the da teform at .......................... 364
Setting the distance unit ........................ 369
Setting the map scale
see Map
Shift paddles see Steering wheel gearshift paddles
Shifting gears
Gea rshift recommendation ......... 202, 206
Sho rtmessages
see Messa ges
Side impact airbag .....................................41
Side impact pr otection ............................ 261
Side windo ws............................................. 98
Au tomatic function ................................ 99
Child saf ety lock in there ar .................. .80
Closing .................................................. 98
Closing using theke y .......................... .100
Con venience closing ............................ 100
Con venience opening ......................... .100
Opening ................................................. 98
Opening with theke y .......................... .100 Problem ...............................................
101
Ra in-closing feature .............................. .99
Sliding sunroof ........................................1 02
Au tomatic functions ............................ 105
Closing ................................................ 102
Closing using theke y .......................... .100
Opening ............................................... 102
Opening with theke y .......................... .100
Problem ............................................... 105
Ra in closing function .......................... .105
Smartphone Locking theve hicle ................................ 88
Un locking theve hicle ............................88
Smartphone see Android Auto
see Apple CarPlay ®
see Mercedes-Benz Link
see Telephone
Snow chains ............................................ 525
Soc ket (12 V) ............................................ 147
Armrest ............................................... 14 8
Fr ont centre console ............................ 147
Load compartment .............................. 15 0Soc
ket (1 15V) .......................................... 14 8
Re ar .................................................... .148
Soc ket (230 V) ......................................... 14 9
Re ar .................................................... .149
Software update ...................................... 370
Information .......................................... 370
Pe rforming ...........................................3 71
Sy stem updates ................................... 372
Sound PRE-SAFE ®
Sound ................................. 49
Wheels and tyres ................................. 524
Sound see Burmes ter®
sur round sound sy stem
see Tone settings
Sound settings Adjusting the balance/fader ............... 480
Ad justing treble, mid-range and bass
settings ............................................... 480
Au tomatic volume adjustment ............ .480
Spare wheel see Emer gency spa rewheel
Speech dialogue sy stem
see LINGU ATRO NIC 672
Index