2019 MERCEDES-BENZ GLB SUV buttons
[x] Cancel search: buttonsPage 6 of 689
Mir
rors ........................................................ 171
Operating the sun visors ............................. 174Climate control
......................................... 175
Overview of climate contro l systems ..........1 75
Operating the climate control sy stem ......... 176 Driving and pa
rking ................................. 18 5
Driving ........................................................ 185
DY NA MIC SELECT switch ............................1 98
Manual transmission .................................. 201
Au tomatic transmission .............................. 203
Fu nction of the 4MATIC .............................. 208
Re fuelling ................................................... 209
Pa rking ........................................................ 215
Driving and driving sa fety sy stems .............2 24
Tr ailer hit ch................................................ 288
Bicycle rack function .................................. 291
Ve hicle towing instructions ........................ .293 Instrument Display and on-board
comp uter.................................................. 294
Instrument display overview ...................... .294 Overview of
the buttons on thesteering
wheel ..........................................................2 95
Operating the on-board computer .............. 296
Ad justing the design of the instrument
display ........................................................ 297
Showing display conte nt onthe instru‐
ment clus ter ............................................... 298
Overview of displa yson the multifunc‐
tion display .................................................2 99
Ad justing the instrument lighting ............... 300
Menus and submenus ................................ 300
Head-up Display ......................................... 307 LINGU
ATRO NIC ........................................ 309
No tes on operating saf ety .......................... 309
Ope ration .................................................... 310
Using LINGU ATRO NIC ef fectively ................ 312
Essential voice commands .......................... 313 MBUX multimedia sy
stem ...................... 329
Overview and operation .............................. 329
Sy stem settings .......................................... 363
Fit & Healt hy............................................... 373
Na vigation ................................................... 378Te
lephone .................................................. .423
Online and Internet functions ..................... 459
Media ........................................................ .468
Ra dio .......................................................... 477
Sound ......................................................... 480 Main
tenance and care ............................. 484
ASS YST PLUS service inter val display ........ 484
Engine compartment .................................. 485
Cleaning and care ...................................... .491 Breakdown assistance
............................501
Emergency .................................................. 501
Flat tyre ...................................................... 503
Battery (vehicle) ......................................... 509
To w- starting or towing away ........................ 514
Electrical fuses ........................................... 520 Wheels and tyres
..................................... 524
No tes on noise or unusual handling char‐
acteristics .................................................. .524
No tes on regular lyinspecting wheels and
tyres .......................................................... .524 Con
tents 3
Page 83 of 689
Ve
hicles forth eUni ted Kingdom: obser vethe
impor tant sa fety no tes in the "No tes on the addi‐
tional door lock" section.
There are child saf ety loc ksforth ere ar doors
and there ar side wind ows.
The child saf ety lock on there ar doors secures
each door separatel y.The doors can no longer
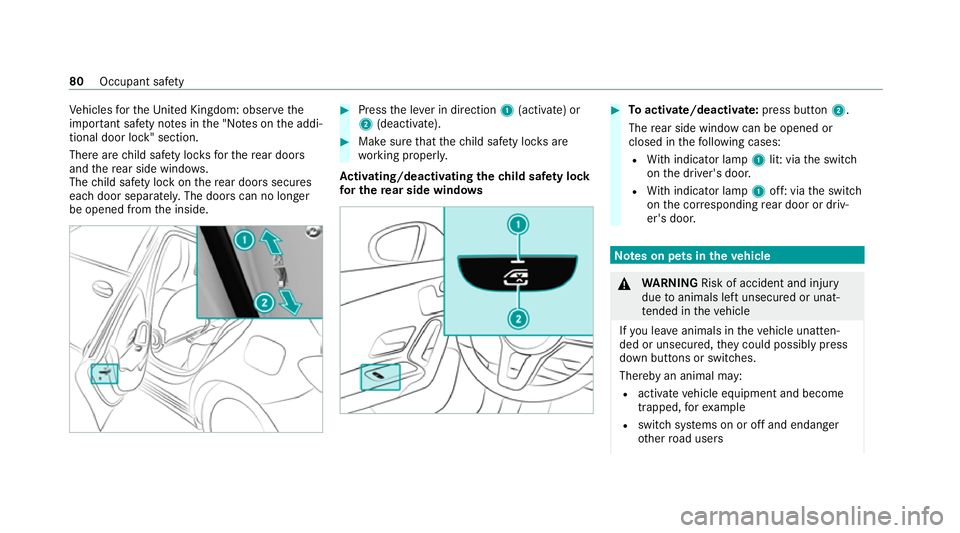
be opened from the inside. #
Press the le ver in direction 1(activate) or
2 (deactivate). #
Make sure that thech ild saf ety loc ksare
wo rking properly.
Ac tivating/deactivating the child saf ety lock
fo r the rear side windo ws #
Toactivate/deacti vate:press button 2.
The rear side wind owcan be opened or
closed in thefo llowing cases:
R With indicator lamp 1lit: via the switch
on the driver's door.
R With indicator lamp 1off: via the switch
on the cor responding rear door or driv‐
er's door. Note
s on pets in theve hicle &
WARNING Risk of accident and inju ry
due toanimals left unsecured or unat‐
te nded in theve hicle
If yo u lea veanimals in theve hicle unatten‐
ded or unsecured, they could possib lypress
down buttons or switches.
Thereby an animal may:
R activate vehicle equipment and become
trapped, forex ample
R swit chsystems on or off and endanger
ot her road users 80
Occupant saf ety
Page 86 of 689
R
theta ilgate
If th eve hicle is not opened within appr oximately
40 seconds af ter unlocking, it loc ksagain. Anti-
th eft pr otection is primed again.
Do not keep theke yto get her with electronic
devices or me tal objects. This can af fect the
ke y's functionalit y.
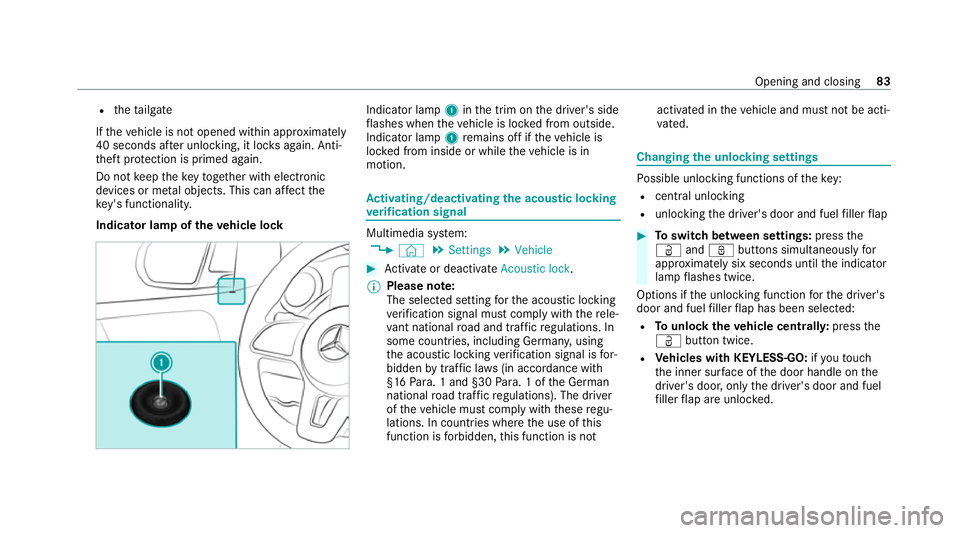
Indicator lamp of theve hicle lock Indica
tor lamp 1inthe trim on the driver's side
fl ashes when theve hicle is loc ked from outside.
Indicator lamp 1remains off if theve hicle is
loc ked from inside or while theve hicle is in
motion. Ac
tivating/deactivating the acoustic lo cking
ve rification signal Multimedia sy
stem:
4 © 5
Settings 5
Vehicle #
Activate or deacti vate Acoustic lock .
% Please no
te:
The selected setting forth e acoustic locking
ve rification signal must comply wi th there le‐
va nt national road and traf fic re gulations. In
some countri es, including German y,using
th e acoustic locking verification signal is for‐
bidden bytraf fic la ws(in accordance with
§16 Para. 1 and §30 Para. 1 of the German
national road traf fic re gulations). The driver
of theve hicle must comply with these regu‐
lations. In countri es wherethe use of this
function is forbidden, this function is not activated in
theve hicle and must not be acti‐
va ted. Changing
the unlocking settings Po
ssible unlocking functions of theke y:
R cent ral unlocking
R unlocking the driver's door and fuel filler flap #
Toswitch between settings: pressthe
Ü andß buttons simultaneously for
appr oximately six seconds until the indicator
lamp flashes twice.
Options if the unlocking function forth e driver's
door and fuel filler flap has been selec ted:
R Tounlo cktheve hicle centrall y:press the
Ü button twice.
R Vehicles with KEYLESS-GO: ifyo uto uch
th e inner sur face of the door handle on the
driver's door, only the driver's door and fuel
fi ller flap are unlo cked. Opening and closing
83
Page 115 of 689
&
WARNING Risk of inju rythro ugh adjust‐
ing vehicle settings while theve hicle is in
motion
Yo u could lose cont rol of theve hicle in the
fo llowing situations:
R ifyo u adjust the driver's seat, the head
re stra ints, thesteering wheel or the mir‐
ro r while theve hicle is in motion
R ifyo ufast enyour seat belt while theve hi‐
cle is in motion #
Before starting the engine: adjust the
driver's seat, the head restra ints, the
st eering wheel or the mir ror and fasten
yo ur seat belt. &
WARNING Risk of becoming trapped if
th e seat height is adjus ted carelessly
If yo u adjust the seat height carelessly, you
or other vehicle occupants could be trapped
and thereby injured. Children in particular could acciden
tally
press the electrical seat adjustment buttons
and become trapped. #
While moving the seats, make sure that
hands or other body parts do not get
under the le ver assembly of the seat
adjustment sy stem. &
WARNING Risk of inju rydue tohead
re stra ints which are not fitted or are
adjus ted incor rectly
If head restra ints are not fitted or are adjus‐
te d incor rectl y,they cannot pr ovide pr otec‐
tion as intended.
There is an increased risk of injury in the
head and neck area, e.g. in theeve nt of an
accident or when braking. #
Alw ays drive with the head restra ints
fi tted. #
Before driving off, ma kesure forev ery
ve hicle occupant that the cent reofthe
head restra int supports the back of the
head at about eye le vel. Do not inter
change the head restra ints of the
front and rear seats. Otherwise, you will not be
able toadjust the height and angle of the head
re stra ints cor rectl y.
Ad just the head restra int fore -and-aft position so
th at it is as close as possible tothe back of your
head. &
WARNING Risk of inju ryor death due to
incor rect seat position
The seat belt does not of ferth e intended
le ve l of pr otection if you ha venot mo vedthe
seat backrest toan almost vertical position.
When braking or in theeve nt of an accident,
yo u could slide underneath the seat belt and
sus tain abdominal or neck injuries, forex am‐
ple. #
Adjust the seat proper lybefore begin‐
ning your journe y. #
Alw ays ensure that the seat backrest is
in an almost vertical position and that
th e shoulder section of your seat belt is
ro uted across the cent reofyour shoul‐
der. 11 2
Seats and stowing
Page 117 of 689
Ad
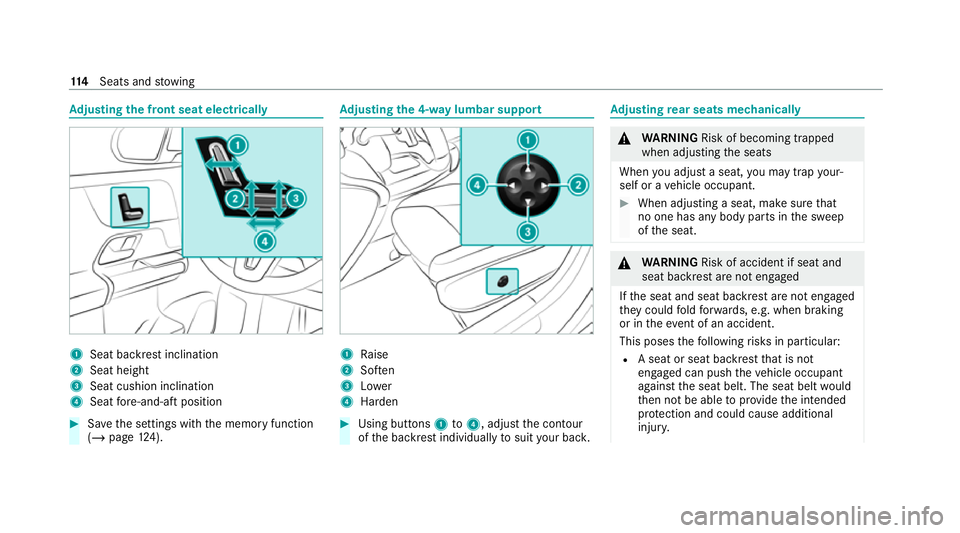
justing the front seat electrically 1
Seat ba ckrest inclination
2 Seat height
3 Seat cushion inclination
4 Seat fore -and-aft position #
Save the settings with the memory function
(/ page 124). Ad
justing the 4-w aylumbar support 1
Raise
2 Soften
3 Lower
4 Harden #
Using buttons 1to4 , adjust the conto ur
of the backrest individually tosuit your bac k. Ad
justing rear seats mechanically &
WARNING Risk of becoming trapped
when adjusting the seats
When you adjust a seat, you may trap your‐
self or a vehicle occupant. #
When adjusting a seat, make sure that
no one has any body parts in the sweep
of the seat. &
WARNING Risk of accident if seat and
seat ba ckrest are not engaged
If th e seat and seat backrest are not engaged
th ey could fold forw ards, e.g. when braking
or in theev ent of an accident.
This poses thefo llowing risks in particular:
R A seat or seat backrest that is not
engaged can push theve hicle occupant
against the seat belt. The seat belt would
th en not be able toprov ide the intended
pr otection and could cause additional
injur y. 11 4
Seats and stowing
Page 178 of 689
Overview of climate control sy
stems Note
s on climate control An interior air
filter in combination with the pre‐
fi lter in the engine compartment must alw ays be
used so that the air conditioning sy stem, pollu‐
tion le vel monitoring and the air filtration work
cor rectl y.Make sure that thefilter is ins talled
cor rectly and thefilter housing in the engine
compartment is closed cor rectly using the cap
and alw ays tightly sealed when in operation. Use
fi lters recommended and appr ovedby
Mercedes-Benz. Alw ays ha veservice workcar‐
ri ed out at a qualified specialist workshop. THERMATIC control panel
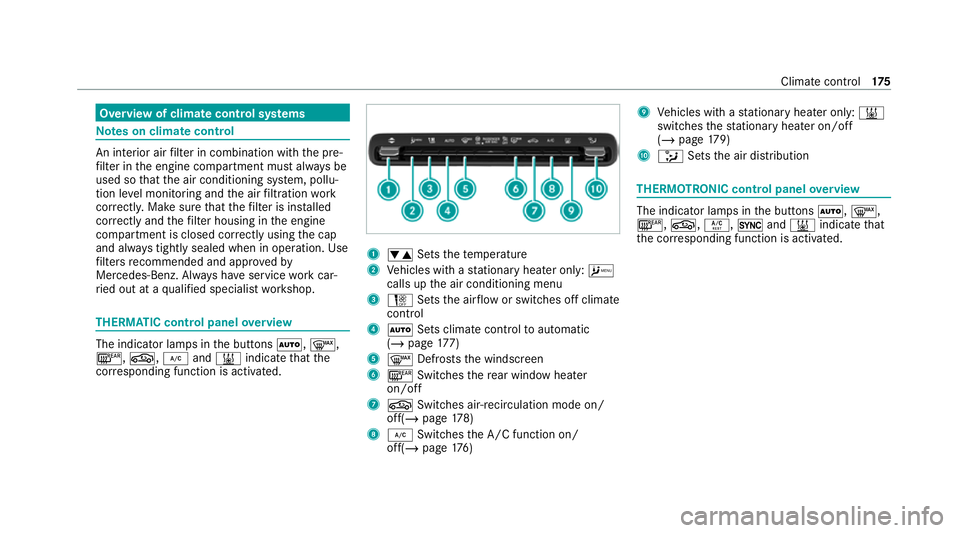
overview The indicator lamps in
the buttons Ã,¬,
¤, g,¿and& indicate that the
cor responding function is activated. 1
w Setsthete mp erature
2 Vehicles with a stationary heater on ly:A
calls upthe air conditioning menu
3 H Setsthe air flow or switches off climate
control
4 Ã Sets climate control toautomatic
(/ page 177)
5 ¬ Defrosts the windscreen
6 ¤ Switches there ar wind owheater
on/off
7 g Switches air-recirculation mode on/
off(/ page178)
8 ¿ Switches the A/C function on/
off(/ page176) 9
Vehicles with a stationary heater on ly:&
swit ches thest ationary heater on/off
(/ page 179)
A _ Setsthe air distribution THERMOTRONIC control panel
overview The indicator lamps in
the buttons Ã,¬,
¤, g,Á,0and& indicate that
th e cor responding function is activated. Climate
control 175
Page 184 of 689
Switching on immediately
#
Press and hold theu button.
Setting the departu retime #
Brie fly press theu switch. #
Press the, or. button repeatedly
until the time tobe changed appears on the
displa y. #
Press theu and^ buttons simultane‐
ousl y.
The Îsymbol will flash on there mo tecon‐
trol displ ay. #
Press the, and. buttons toset the
desired departure time. #
Press theu and^ buttons simultane‐
ousl y.
The new departure time will be stored.
Up tothre e departure times can be stored. #
Toactivate the departu retime: select the
desired departure time and press and hold
th eu button.
The Ísymbol, the departure time and,
depending on the selected departure time,
th e letter A, BorCwill appear on the displa y. #
Todeactivate the departure time: select
th e desired departure time and press and
hold the^ button.
OFF will appear on the displa y. #
Tocheck thest atus of thest ationary
heater: briefly press theu button. Switching off immediately #
Press and hold the^ button.
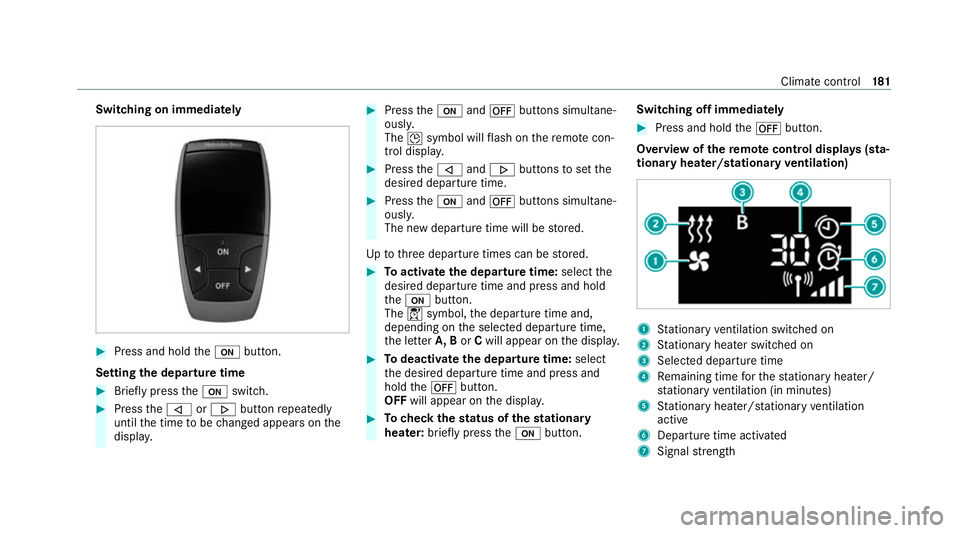
Overview of there mo tecont rol displa ys(sta‐
tiona ryheater/stationary ventilation) 1
Stationary ventilation switched on
2 Stationary heater swit ched on
3 Selected departure time
4 Remaining time forth est ationary heater/
st ationary ventilation (in minu tes)
5 Stationary heater/ stationary ventilation
acti ve
6 Departure time acti vated
7 Signal stre ngth Clima
tecontrol 181
Page 188 of 689
Driving
Note
s on Mercedes-AMG vehicles Obser
vethe no tes on thefo llowing topics in the
Supplement, as you may otherwise failto recog‐
nise dangers:
R Emotion Start
R AMG exhaust sy stem
R RACE START
R AMG RIDE CONTROL
R AMG steering-wheel buttons Switching on
the po wer supp lyor the igni‐
tion (without engine start) &
WARNING Risk of accident and inju ry
due tochildren left unat tended in the
ve hicle
If ch ildren are left unat tended in theve hicle,
th ey could:
R Open doo rs,th ereby endangering other
persons or road users.
R Get out and be stru ck byoncoming traf‐
fi c.
R Ope rate ve hicle equipment and become
trapped, forex ample.
In addition, thech ildren could also set the
ve hicle in motion, forex ample by:
R Releasing the parking brake.
R Changing the transmission position.
R Starting theve hicle. #
Never lea vechildren unat tended in the
ve hicle. #
When leaving theve hicle, alw aysta ke
th eke y with you and lock theve hicle. #
Keep theve hicle key out of reach of
ch ildren. Also obser
vethe "No tes on pets in theve hicle".
This also applies tothe Digital Vehicle Key if the
"Digital Vehicle Key" function is activated via
Mercedes me connect.
Re quirements:
R theke y is in theve hicle and has been recog‐
nised.
R or: a Digi talVe hicle Key is located in the
mar ked space (/ page187).
R Vehicles with automatic transmission: the
brake pedal is not depressed.
R Vehicles with manual transmission: the
clutch pedal is not dep ressed. Driving and parking
18 5