2019 MERCEDES-BENZ GLB SUV engine
[x] Cancel search: enginePage 118 of 689
R
Ach ild restra int sy stem would no lon ger
be suppor ted cor rectly or positioned cor‐
re ctly and would no lon ger per form its
intended function.
R The seat backrest cannot restra in objects
or goods in the luggage compartment.
Alw ays ensure that the seat and seat back‐
re st are engaged, especially:
R before passengers tra vel on a seat with
th e easy entry andexitfeature.
R afte r adju sting the seat.
R afte rth e easy entry andexitfeature is
used.
R afte rth e load compartment enlar gement
has been folded down. &
WARNING Risk of inju rywhen adjusting
th ere ar seats while driving
If yo u adjust there ar seats careless lywhile
driving, you or other vehicle occupants could
be trapped and po tentially inju red. #
Adjust there ar seats before starting the
engine. *
NO
TEDama gecaused byobjects in the
fo ot we ll or behind there ar seats When adjusting
thefo re -and-aft position, the
re ar seats and/or the object can be dam‐
aged. #
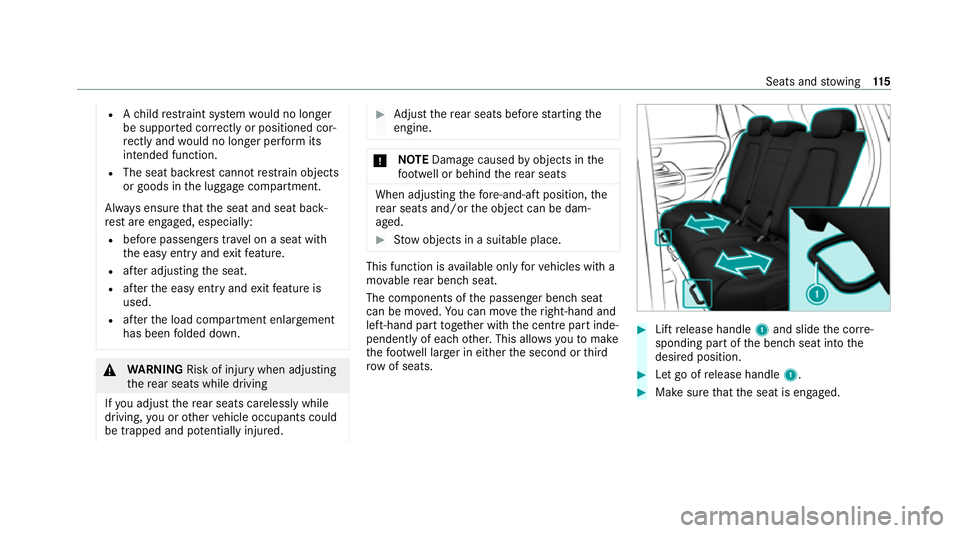
Stow objects in a suitable place. This function is
available on lyforve hicles with a
mo vable rear ben chseat.
The components of the passenger bench seat
can be mo ved. You can mo vetheright-hand and
left-hand part toge ther with the cent repart inde‐
pendently of each other. This allo wsyouto make
th efo ot we ll lar ger in either the second or third
row of seats. #
Lift release handle 1and slide the cor re‐
sponding part of the bench seat into the
desired position. #
Let go of release handle 1. #
Make sure that the seat is engaged. Seats and
stowing 11 5
Page 121 of 689
Head
restra ints Ad
justing the front seat head restra ints
mechanically &
WARNING Risk of inju rythro ugh adjust‐
ing vehicle settings while theve hicle is in
motion
Yo u could lose cont rol of theve hicle in the
fo llowing situations:
R ifyo u adjust the driver's seat, the head
re stra ints, thesteering wheel or the mir‐
ro r while theve hicle is in motion
R ifyo ufast enyour seat belt while theve hi‐
cle is in motion #
Before starting the engine: adjust the
driver's seat, the head restra ints, the
st eering wheel or the mir ror and fasten
yo ur seat belt. &
WARNING Risk of inju rydue tohead
re stra ints which are not fitted or are
adjus ted incor rectly
If head restra ints are not fitted or are adjus‐
te d incor rectl y,they cannot pr ovide pr otec‐
tion as intended.
There is an increased risk of injury in the
head and neck area, e.g. in theeve nt of an
accident or when braking. #
Alw ays drive with the head restra ints
fi tted. #
Before driving off, ma kesure forev ery
ve hicle occupant that the cent reofthe
head restra int supports the back of the
head at about eye le vel. Do not inter
change the head restra ints of the
front and rear seats. Otherwise, you will not be
able toadjust the height and angle of the head
re stra ints cor rectl y.
Ad just the head restra int fore -and-aft position so
th at it is as close as possible tothe back of your
head. #
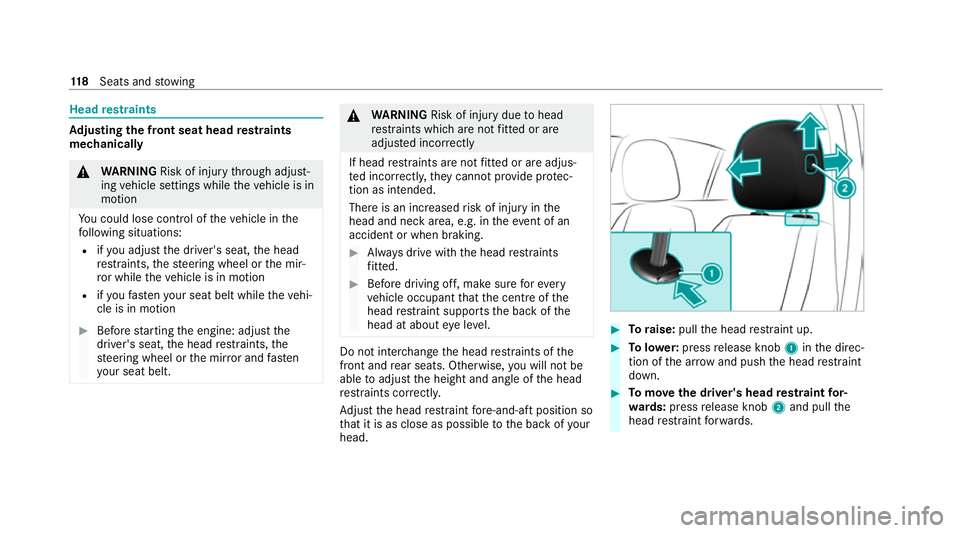
Toraise: pullthe head restra int up. #
Tolowe r:press release knob 1inthe direc‐
tion of the ar row and push the head restra int
down. #
Tomo vethe driver's head restra int for‐
wa rds: press release knob 2and pull the
head restra int forw ards. 11 8
Seats and stowing
Page 125 of 689
#
Toswitch off / reduce the le vel:press but‐
to n1 repeatedly until the desired ventila‐
tion le vel is set.
If all indicator lamps are off, the seat ventila‐
tion is switched off. Ste
ering wheel Ad
justing the steering wheel mechanically &
WARNING Risk of inju rythro ugh adjust‐
ing vehicle settings while theve hicle is in
motion
Yo u could lose cont rol of theve hicle in the
fo llowing situations:
R ifyo u adjust the driver's seat, the head
re stra ints, thesteering wheel or the mir‐
ro r while theve hicle is in motion
R ifyo ufast enyour seat belt while theve hi‐
cle is in motion #
Before starting the engine: adjust the
driver's seat, the head restra ints, the st
eering wheel or the mir ror and fasten
yo ur seat belt. &
WARNING Risk of entrapment forch il‐
dren when adjusting thesteering wheel
Children could injure themselves if they
adjust thesteering wheel. #
Never lea vechildren unat tended in the
ve hicle. #
When leaving theve hicle, alw aysta ke
th eke y with you and lock theve hicle.
This also applies tothe digital vehicle
ke y if the "Digital Vehicle Key" function
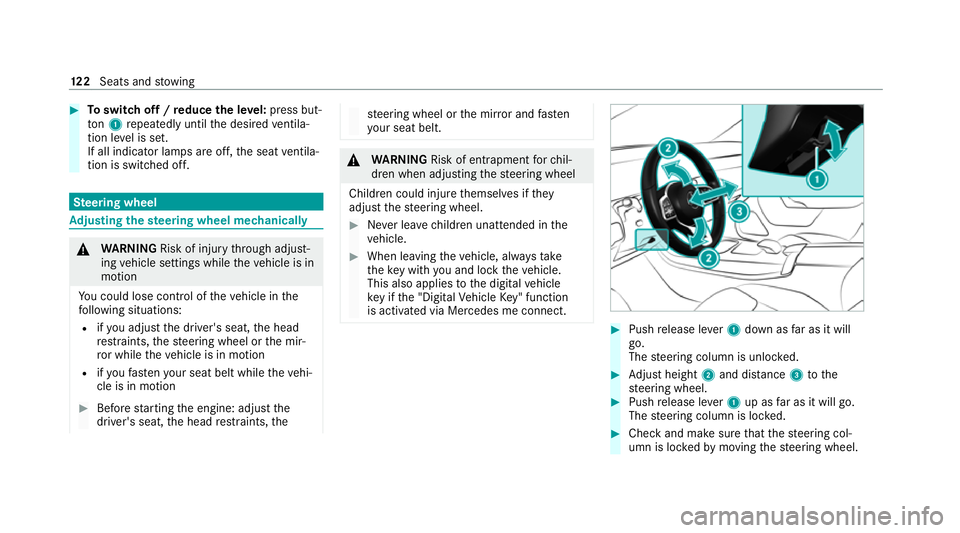
is activated via Mercedes me connect. #
Push release le ver1 down as far as it will
go.
The steering column is unloc ked. #
Adjust height 2and di stance 3tothe
st eering wheel. #
Push release le ver1 up as far as it will go.
The steering column is loc ked. #
Check and make sure that thesteering col‐
umn is loc kedby moving thesteering wheel. 12 2
Seats and stowing
Page 129 of 689
#
Tocall up: press and brief lyhold memory
position switch 1,2 or 3.
Af terre leasing the button, the front seat,
head-up displa y,outside mir rors and seat
con tour are mo ved into thestored position
automaticall y. St
ow age areas Note
s on loading theve hicle &
DANG ER Risk of exhaust gas poisoning
Combustion engines emit poisonous exhaust
ga ses such as carbon monoxide. Exhaust
ga ses can enter theve hicle interior if theta il‐
gate is open when the engine is running,
especially if theve hicle is in motion. #
Alw ays switch off the engine before
opening theta ilgate. #
Never drive with theta ilgate open. &
WARNING Risk of inju ryfrom unsecu red
items in theve hicle
If objects, luggage or loads are not secured
or not secured suf ficientl y,they could slip,
tip ove r or be throw n around and thereby hit
ve hicle occupants.
There is a risk of injur y,particularly in the
ev ent of sudden braking or a sudden change
in direction. #
Alw aysstow objects in such a wayth at
th ey cannot be thro wn around. #
Before the journe y,secure objects, lug‐
ga ge or loads against slipping or tipping
ove r. &
WARNING Risk of inju ryfrom inade‐
qu ate stow age of objects
If yo u do not adequately stowobjects in the
ve hicle interior, they could slip or be tossed
around and thereby strike vehicle occupants.
In addition, cup holders, open stowage
spaces and mobile phone brac kets cann ot alw
aysre stra in the objects they contain in
th eev ent of an accident.
There is a risk of injur y,particularly in the
ev ent of sudden braking or a sudden change
in direction. #
Alw aysstow objects in such a wayth at
th ey cannot be tossed around in these
or similar situations. #
Alw ays make sure that objects do not
project from stowage spaces, luggage
nets or stowage nets. #
Close all sealable stowage spaces
before youstart your journe y. #
Stow and secure objects that are heavy,
hard, poin ted, sharp-edged, fragile or
to o lar geinthe load compartment. &
WARNING Risk of bu rns from theta il‐
pipe and tailpipe trims
The exhaust tailpipe and tailpipe trims can
become very hot. If you come into contact
with these parts of theve hicle, you could
burn yourself. 12 6
Seats and stowing
Page 158 of 689
Exterior lighting
Note
s on adjusting the lights when driving
abroad It is not necessary
toadjust the headlamps. The
legal requirements are also met in countries in
which traf fic drives on theot her side of thero ad. Information about lighting sy
stems and your
re sponsibility The
various lighting sy stems of theve hicle are
only aids. The driver of theve hicle is responsible
fo r cor rect vehicle illumination in accordance
with the pr evailing light and visibility conditions,
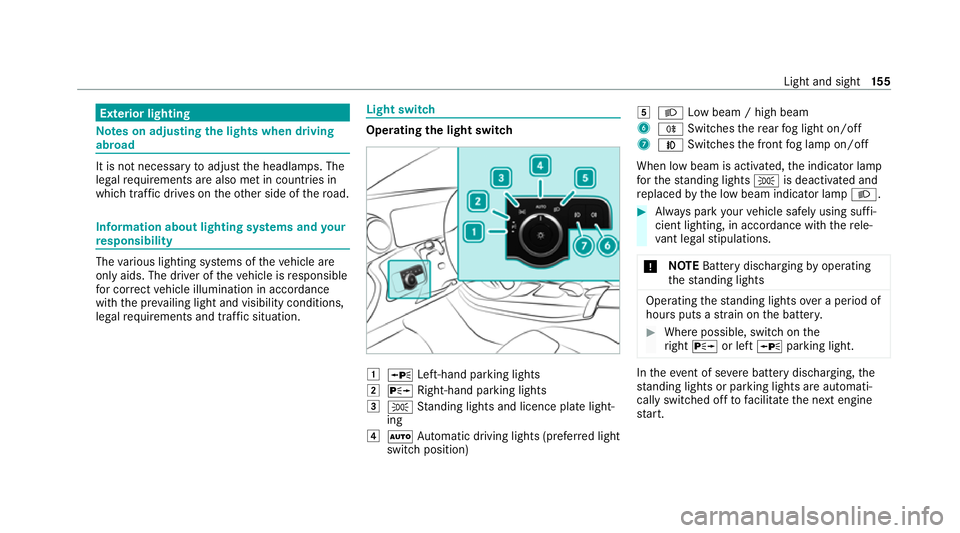
legal requirements and traf fic situation. Light switch
Ope
rating the light switch 1
W Left-hand pa rking lights
2 X Right-hand parking lights
3 T Standing lights and licence plate light‐
ing
4 Ã Automatic driving lights (prefer red light
switch position) 5
L Low beam / high beam
6 R Switches there ar fog light on/off
7 N Switches the front fog lamp on/off
When low beam is activated, the indicator lamp
fo rth est anding lights Tis deactivated and
re placed bythe low beam indicator lamp L. #
Alw ays park your vehicle safely using suf fi‐
cient lighting, in acco rdance with there le‐
va nt le galst ipulations.
* NO
TEBattery discharging byoperating
th est anding lights Operating
thest anding lights over a period of
hours puts a stra in on the batter y. #
Where possible, switch on the
ri ght X or left Wparking light. In
theeve nt of se vere battery discharging, the
st anding lights or parking lights are automati‐
cally swit ched off tofacilitate the next engine
st art. Light and sight
15 5
Page 174 of 689
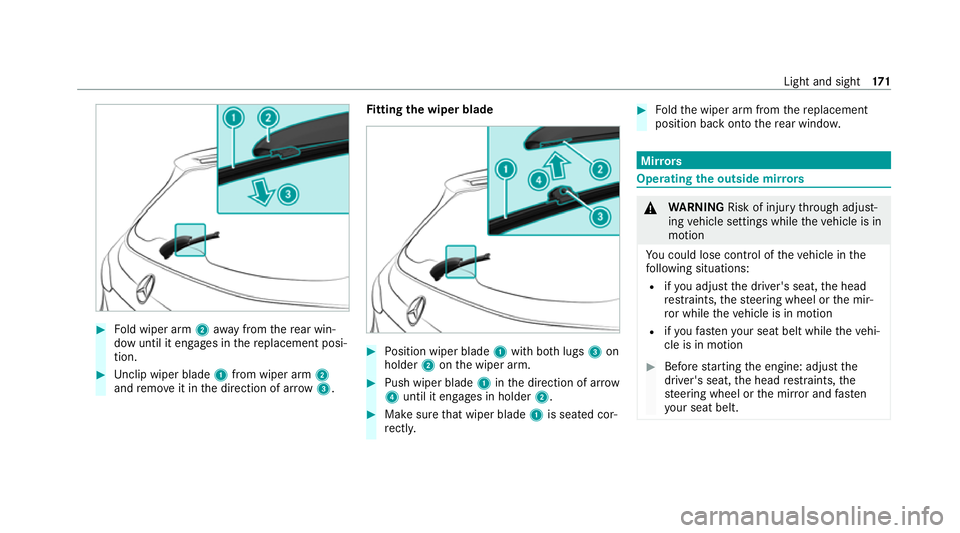
#
Fold wiper arm 2away from there ar win‐
dow until it engages in there placement posi‐
tion. #
Unclip wiper blade 1from wiper arm 2
and remo veit in the direction of ar row 3. Fi
tting the wiper blade #
Position wiper blade 1with bo thlugs 3on
holder 2onthe wiper arm. #
Push wiper blade 1inthe direction of ar row
4 until it en gage s in holder 2. #
Make sure that wiper blade 1is seated cor‐
re ctly. #
Foldthe wiper arm from there placement
position back onto there ar wind ow. Mir
rors Operating
the outside mir rors &
WARNING Risk of inju rythro ugh adjust‐
ing vehicle settings while theve hicle is in
motion
Yo u could lose cont rol of theve hicle in the
fo llowing situations:
R ifyo u adjust the driver's seat, the head
re stra ints, thesteering wheel or the mir‐
ro r while theve hicle is in motion
R ifyo ufast enyour seat belt while theve hi‐
cle is in motion #
Before starting the engine: adjust the
driver's seat, the head restra ints, the
st eering wheel or the mir ror and fasten
yo ur seat belt. Light and sight
171
Page 176 of 689
The electrolyte is hazardous
tohealth and
causes ir rita tion. It mu stnot come into con‐
ta ct wi thyour skin, eyes,respiratory or gans
or clo thing or be swallo wed. #
Ifyo u come into contact with electro‐
ly te , obser vethefo llowing:
R Immediately rinse the electrolyte
from your skin with water and seek
medical attention.
R If electrolyte comes into contact
with your eyes, immediately rinse
th em thoroughly with clean water
and seek medical attention.
R Ifth e electrolyte is swallo wed,
immediately rinse your mouth out
th oroughl y.Do not induce vomiting.
Seek medical attention immediately.
R Immedia tely ch ange out of clo thing
which has been con taminated with
electrolyte.
R If an allergic reaction occurs, seek
medical attention immediatel y. The inside
rearview mir ror and the outside mir‐
ro r on the driver's side will automatically go into
anti-dazzle mode if light from a headlamp hits
th e sensor on the inside rearview mir ror.
Sy stem limits
The sy stem will not go into anti-dazzle mode if:
R The engine is switched off.
R Reversege ar is engaged.
R The interior lighting is swit ched on. Fr
ont-passenger outside mir ror parking posi‐
tion function %
The pa rking position is available on ly invehi‐
cles with a memory function.
The parking position makes parking easier.
The front-passenger outside mir ror will swivel
down wards in the direction of there ar wheel on
th e front passenger's side when:
R the parking position is stored (/ page174).
R the front-passen ger mir ror is selected.
R reve rsege ar is engaged. The front-passenger outside mir
ror will mo ve
back toits original position when:
R you shift the transmission toano ther trans‐
mission position.
R you are tr avelling at a speed greater than
15 km/h.
R you press the button forth e outside mir ror
on the driver's side. Light and sight
17 3
Page 178 of 689
Overview of climate control sy
stems Note
s on climate control An interior air
filter in combination with the pre‐
fi lter in the engine compartment must alw ays be
used so that the air conditioning sy stem, pollu‐
tion le vel monitoring and the air filtration work
cor rectl y.Make sure that thefilter is ins talled
cor rectly and thefilter housing in the engine
compartment is closed cor rectly using the cap
and alw ays tightly sealed when in operation. Use
fi lters recommended and appr ovedby
Mercedes-Benz. Alw ays ha veservice workcar‐
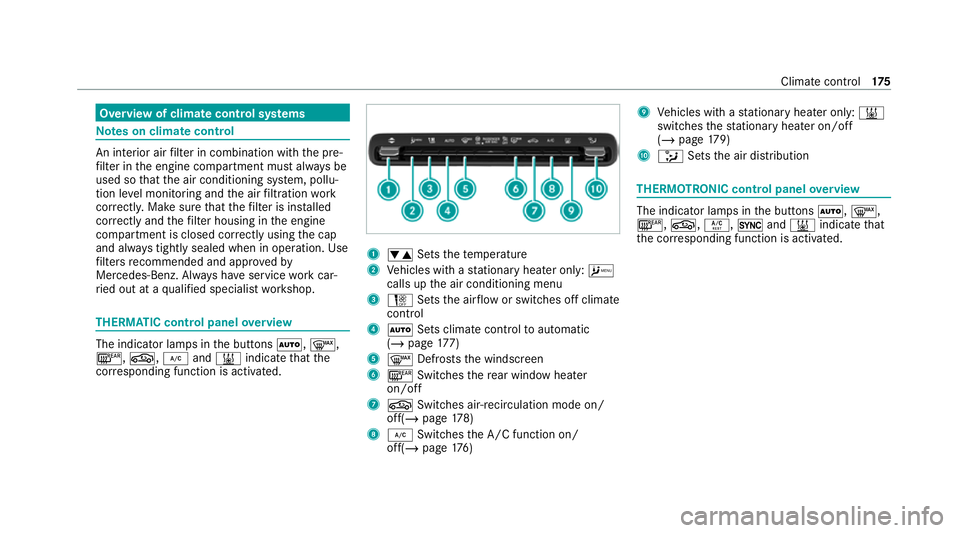
ri ed out at a qualified specialist workshop. THERMATIC control panel
overview The indicator lamps in
the buttons Ã,¬,
¤, g,¿and& indicate that the
cor responding function is activated. 1
w Setsthete mp erature
2 Vehicles with a stationary heater on ly:A
calls upthe air conditioning menu
3 H Setsthe air flow or switches off climate
control
4 Ã Sets climate control toautomatic
(/ page 177)
5 ¬ Defrosts the windscreen
6 ¤ Switches there ar wind owheater
on/off
7 g Switches air-recirculation mode on/
off(/ page178)
8 ¿ Switches the A/C function on/
off(/ page176) 9
Vehicles with a stationary heater on ly:&
swit ches thest ationary heater on/off
(/ page 179)
A _ Setsthe air distribution THERMOTRONIC control panel
overview The indicator lamps in
the buttons Ã,¬,
¤, g,Á,0and& indicate that
th e cor responding function is activated. Climate
control 175