2019 MERCEDES-BENZ GLB SUV USB port
[x] Cancel search: USB portPage 448 of 689
Yo
u must obse rveth e legal requirements forthe
country in whi chyou are cur rently driving when
operating the multimedia sy stem.
Mobile phone functions can be used with
Android Autousing the Android operating sys‐
te m on the multimedia sy stem. It is operated
using theto uchsc reen or thevo ice-opera ted
control sy stem. You can activate thevo ice-oper‐
ated control sy stem bypressing and holding the
£ button on the multifunction steering wheel.
When using Android Autovia thevo ice-opera ted
control sy stem, the multimedia sy stem can still
be opera ted via LINGU ATRO NIC (/ page310).
On lyone mobile phone at a time can be connec‐
te d via Android Autowith the multimedia sys‐
te m.
Also for use of Android Autowith two phone
mode, only one additional mobile phone can be
connec ted using Blue tooth®
with the multimedia
sy stem.
The availability of Android Autoand Android Auto
apps may vary according tothe count ry. The service pr
ovider is responsible forth is appli‐
cation and the services and conte nt connected
to it.
Information on Android Auto
If a mobile phone is used with Android Auto,
USB access using the media menu is not possi‐
ble forth is mobile phone.
Only one route guidance can be active at a time.
If ro ute guidance is active on the multimedia sys‐
te m, it is closed when route guidance is star ted
on the mobile phone.
Connecting a mobile phone via Android Auto
(wired)
Re quirements:
R The mobile phone supports Android Auto
from Android 5.0.
R The Android Autoapp is installed on the
mobile phone.
R In order touse thete lephone functions, the
mobile phone must be connected tothe mul‐
timedia sy stem via Blue tooth®
( / page 426). If
th ere was no prior Internet connection, this
is es tablished with the use of the mobile
phone with Android Auto.
R The mobile phone is connected tothe multi‐
media sy stem via the USB port çusing a
suitable cable (/ page472).
R There is an In tern et connection forth e full
ra nge of functions for Android Auto.
Multimedia sy stem:
4 © 5
Mercedes me & Apps
5 Smartphone 5
Android Auto
5 Start Android Auto #
Alternative: If an Android Autoapplication is
active (e.g. when music is being pla yed or
ro ute guidance is active), you can call up the
active application using the|, zor
% application buttons (/ page 342).
% Control using the application buttons can be
switched on or off (/ page446).
% The firs t acti vation of Android Autoon the
multimedia sy stem must be car ried out
when theve hicle is stationary for saf etyre a‐
sons. MBUX multimedia sy
stem 445
Page 472 of 689
The multimedia sy
stem supports thefo llow‐
ing form ats and data media:
Pe rm issible
fi le sy stems FA
T32, exFA T,NTFS
Pe rm issible
data car riers USB devices, iPod
®
/iPhone ®
,
MTP devices, Blue tooth®
audio equipment
Suppor ted
audio form ats MP3, WMA, AAC,
WAV,FLAC,
AL AC
Suppor ted
video form ats MPEG,
AVI, DivX, MKV, MP4,
M4V, WMV %
Obser vethefo llowing no tes:
R The multimedia sy stem supports a total
of up to50,000 files.
R Data storage media up to2 TB are sup‐
por ted (32‑bit address space).
R Due tothe large variet y of available
music and video files rega rding encod‐
ers, sampling rates and data transfer
ra tes, playback cannot be guaranteed. R
Due tothe wide range of USB devices
av ailable on the mar ket, pl ayback cann ot
be guaranteed for all USB devices.
R Videos up toFullHD (1920x1080) are
suppor ted.
R Cop y-pr otected music and video files or
DRM (Digital Rights Management)
enc rypte dfiles cannot be pla yed bac k.
R MP3 pla yers must support Media Trans‐
fe r Pr otocol (MTP).
In fo rm ation on copy right pr otection and
tradema rks
Au dio files which you create yourself (e.g. copies
of data storage media you make yourself) are
ge neral lysubject tocopyright pr otection. In
many count ries, reproductions are not permitted
without the prior consent of the copyright
holder, evenfo r private use. Make sure that you
know about the applicable copyright regulations
and that you co mply wi th th ese. Manufactured under licence from Dolby Labora‐
to
ries. Dolb y,Dol byAudio and the double-D sym‐
bol are trademar ksof Dolby Laboratories. MBUX multimedia sy
stem 469
Page 475 of 689
Connecting
the data storage medium tothe
mu ltimedia sy stem Connecting USB devices
* NO
TEDama gecaused byhigh temp era‐
tures High
temp eratures can damage USB devices. #
Remo vethe USB device af ter use and
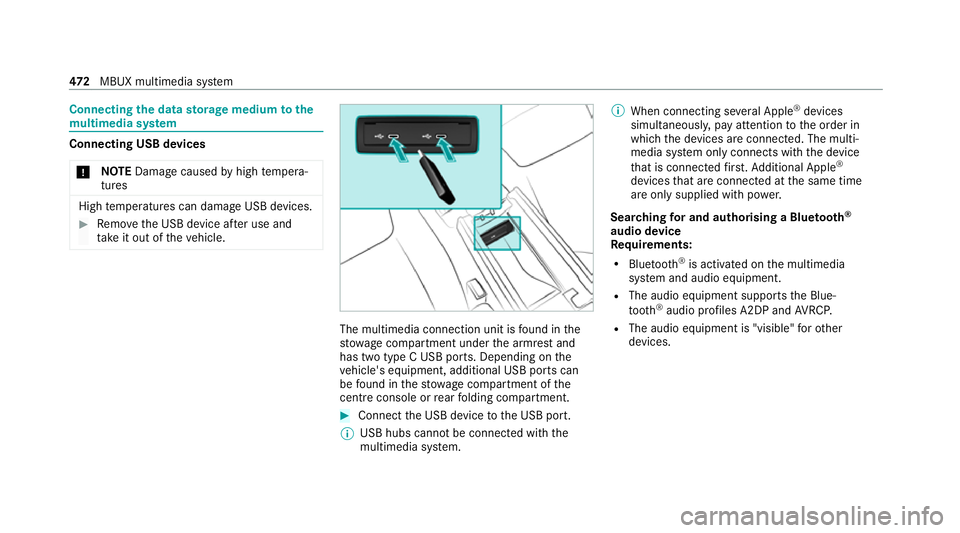
ta ke it out of theve hicle. The multimedia connection unit is
found in the
stow age compartment under the armrest and
has two type C USB ports. Depending on the
ve hicle's equipment, additional USB ports can
be found in thestow age compartment of the
centre console or rear folding compartment. #
Connect the USB device tothe USB port.
% USB hubs cann otbe connec ted with the
multimedia sy stem. %
When connecting se veral Apple ®
devices
simultaneousl y,pay attention tothe order in
which the devices are connected. The multi‐
media sy stem only connects with the device
th at is connec tedfirs t. Ad ditional Apple ®
devices that are connec ted at the same time
are only supplied with po wer.
Sear ching for and authorising a Blue tooth ®
audio device
Requ irements:
R Blue tooth ®
is activated on the multimedia
sy stem and audio equipment.
R The audio equipment supports the Blue‐
tooth ®
audio profiles A2DP and AVRC P.
R The audio equipment is "visible" forot her
devices. 472
MBUX multimedia sy stem
Page 648 of 689
Care
.......................................................... 499
Air-water duct ...................................... 491
Car wash ............................................. 491
Carpet .................................................4 99
Decorative foil .................................... .495
Displ ay................................................ 499
Exterior lighting ................................... 497
High-pressure cleaner ......................... 492
Matt finish ........................................... 494
Pa int wo rk ............................................ 494
Plastic trim .......................................... 499
Re alwo od/trim elements ...................4 99
Re versing camera ................................ 497
Re versing camera/360° Camera ........ 497
Ro of lining ...........................................4 99
Seat belt .............................................. 499
Seat co ver ........................................... 499
Sensors ............................................... 497
Ta ilpipes .............................................. 497
Tr ailer hit ch......................................... 497
Wa shing byhand ................................. 493
Wheels/rims ....................................... 497
Wi ndo ws .............................................. 497
Wi per blades .......................................4 97
Carpet (Care) .......................................... .499 Changing bulbs
........................................ 16 5
Dipped beam ....................................... 16 6
Fitting/removing co ver (front wheel
ar ch ) .................................................... 16 6
Main beam ...........................................1 66
No tes ................................................... 16 5
Overview ............................................. 16 5
Re versing lights .................................. .167
Tu rn signal lights (rear) ........................ 167
Changing gears ........................................ 205
Manually .............................................. 205
Changing hub caps ................................. 539
Changing the lights Driving ab road (symm etrical low
beam) .................................................. 15 5
Cha rging
Bat tery (vehicle) ...................................5 13
USB port ..............................................1 50
Child saf ety lock
Re ar door .............................................. 79
Re ar side wind ows................................. 80
Child seat Appr oval categories .............................. .58
At tach ing (no tes) ................................... 57Basic instructions .................................. 50
Fr
ont passenger seat (no tes) ................. 77
Fr ont passenger seat (without auto‐
matic airbag shutoff) ............................. 76
ISOFIX/i-Size (fitting) ............................ 67
No tes on risks and dangers ...................51
Re commended child restra int sys‐
te ms ...................................................... 55
Seats suita blefor belt-secu redch ild
re stra int sy stems ................................... 72
Seats suitable for i‑Size child
re stra int sy stems ................................... 65
Seats suitable for ISOFIX child
re stra int sy stems ................................... 61
Secu ring on the front passenger seat ....78
Secu ring on there ar seat ...................... 75
To pTe ther ..............................................70
Child ren
Av oiding dangers in theve hicle .............. 51
Basic instructions .................................. 50
Cho ck....................................................... 538
St orage location ..................................5 38
Cho ck
see Chock Index
645
Page 650 of 689
No
tes .................................................. 559
Cooling see Climate control
Co pyright ...................................................34
Cornering light ........................................ .159
Cross Traf fic Alert .................................... 276
Crosswind Assist Function/no tes ................................... 230
Cruise control .......................................... 237
Ac tivating ............................................ 239
Buttons ................................................ 239
Calling up a speed ............................... 239
Deactivating ........................................ 239
Fu nction .............................................. 237
Re quirements ...................................... 239
Selecting ............................................ .239
Setting a speed ................................... 239
St oring a speed ................................... 239
Sy stem limitations ...............................2 37
Cup holder ........................................ 142, 14 4
Fitting/removing (centre console)
...................................................... 142, 14 4
Re ar .................................................... .146 D
Damage de tection (pa rked vehicle) .......223
Damping adjustment .............................. 257
Dashboard see Cockpit
Dashboard lighting see Instrument lighting
Dashcam Configu ring the settings ......................4 23
Deleting a video recording ................... 422
No tes ................................................... 421
Selecting a USB device ........................ 421
St arting/s topping video recording ...... 422
Data acquisition Vehicle ................................................... 31
Data import/export ................................ 369
Fu nction/no tes ................................... 369
Importing/exporting ........................... 369
Data storage
Electronic control units .......................... 31
Online services ...................................... 33
Ve hicle ................................................... 31Date
Setting the time and date automati‐
cally ..................................................... 364
Deactivating the alarm (A TA).................. 108
Deale rship
see Qualified speciali stwo rkshop
Declaration of conformity Electromagnetic compatibility ............... 24
Jack ...................................................... .28
TIREFIT kit ............................................. 29
Wi reless vehicle components ..........2 4, 28
Decorative foil (cleaning instructions)
.................................................................. .495
DeNO x agent
see AdBlue ®
Designs Menu (on-board compu ter) .................. 297
Dest ination .............................................. 402
Editing intermediate destinations ........ 392
Editing the pr evious destinations ........ 403
Ex tern al .............................................. .403
Quic k-access todestination informa‐
tion ...................................................... 400 Index
647
Page 681 of 689
Ty
re pressure loss warning sy stem
(function) ............................................. 533
Ty re pressure monitoring sy stem
(function) ............................................. 527
Ty re pressure table .............................. 526
Ty re pressure loss warning sy stem
Fu nction .............................................. 533
Re starting ............................................ 533
Ty re pressure moni tor............................ 529
Fu nction .............................................. 527
Ty re pressure moni toring sy stem
Checking the tyre pressure ................. 528
Checking the tyre temp erature ............ 528
Re starting ............................................ 528
Ty re pressure table ................................. 526
Ty re temp erature
Checking (tyre pressure monitoring
sy stem) ............................................... 528
Ty re pressure monitoring sy stem
(function) ............................................. 527
Ty re tread ................................................. 524
Ty re-change tool kit
Overview ............................................ .538 Ty
res
Changing hub caps .............................. 539
Checking ............................................ .524
Checking the tyre pressure (tyre
pressure monitoring sy stem) ............... 528
Fitting .................................................. 542
Flat tyre ............................................... 503
Inter changing ...................................... 537
MOExtended tyres .............................. .503
Noise ................................................... 524
No tes on fitting ................................... 534
Re moving ............................................ 542
Re placing .................................... 534, 539
Re starting the tyre pressure loss
wa rning sy stem ................................... 533
Re starting the tyre pressure monitor‐
ing sy stem ...........................................5 28
Selection ............................................. 534
Snow chains ........................................ 525
St oring ................................................ 538
TIREFIT kit ...........................................5 05
Ty re pressure (N otes) .......................... 525
Ty re pressure loss warning sy stem
(function) ............................................. 533
Ty re pressure monitoring sy stem
(function) ............................................. 527 Ty
re pressure table .............................. 526
Un usual handling characteristics ........ .524 U
Un its of measurement
Setting ................................................ .369
Un locking setting ...................................... 83
USB port .................................................. .150
User profile see Profile V
Ve hicle ...................................................... 188
Ac tivating/deactivating standby
mode .................................................. .224
Ad ditional door lock .............................. 86
Cor rect use ........................................... 30
Dama gedetection (pa rking) ................ 223
Data acquisition .................................... .31
Data storage .......................................... 31
Diagno stics connection ........................ .29
Equipment ............................................. 23
Implied warranty .................................... 31
Locking (auto matically) ......................... 90678
Index