Page 141 of 629
Ro
undabout and intersection function: the
cornering light will be acti vated on bo thsides
based on an evaluation of the cur rent GPS posi‐
tion of theve hicle. It will remain active until af ter
th eve hicle has left thero undabout or the inter‐
section.
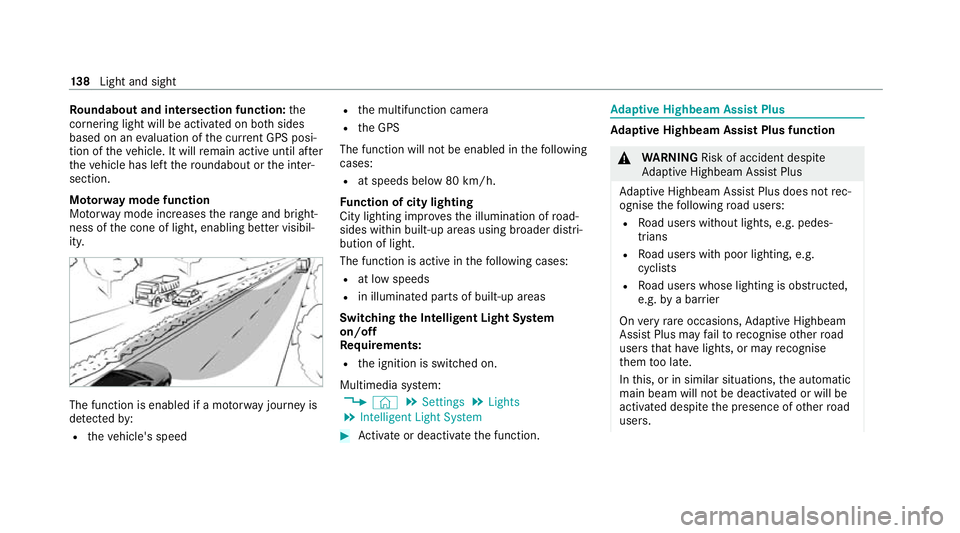
Mo torw ay mode function
Mo torw ay mode increases thera nge and bright‐
ness of the cone of light, enabling better visibil‐
ity. The function is enabled if a mo
torw ay jou rney is
de tected by:
R theve hicle's speed R
the multifunction camera
R the GPS
The function will not be enabled in thefo llowing
cases:
R at speeds below 80 km/h.
Fu nction of city lighting
City lighting impr ovesth e illumination of road‐
sides within built-up areas using broader distri‐
bution of light.
The function is active in thefo llowing cases:
R at low speeds
R in illuminated parts of built-up areas
Switching the Intelligent Light Sy stem
on/off
Re quirements:
R the ignition is switched on.
Multimedia sy stem:
4 © 5
Settings 5
Lights
5 Intelligent Light System #
Activate or deacti vate the function. Ad
aptive Highbeam Assist Plus Ad
aptive Highbeam Assist Plus function &
WARNING Risk of accident despi te
Ad aptive Highbeam Assist Plus
Ad aptive Highbeam Assist Plus does not rec‐
ognise thefo llowing road users:
R Road users without lights, e.g. pedes‐
trians
R Road users with poor lighting, e.g.
cyclists
R Road users whose lighting is obstructed,
e.g. bya bar rier
On very rare occasions, Adaptive Highbeam
Assist Plus may failto recognise other road
users that ha velights, or may recognise
th em too late.
In this, or in similar situations, the automatic
main beam will not be deactivated or will be
activated despite the presence of other road
users. 13 8
Light and sight
Page 146 of 629
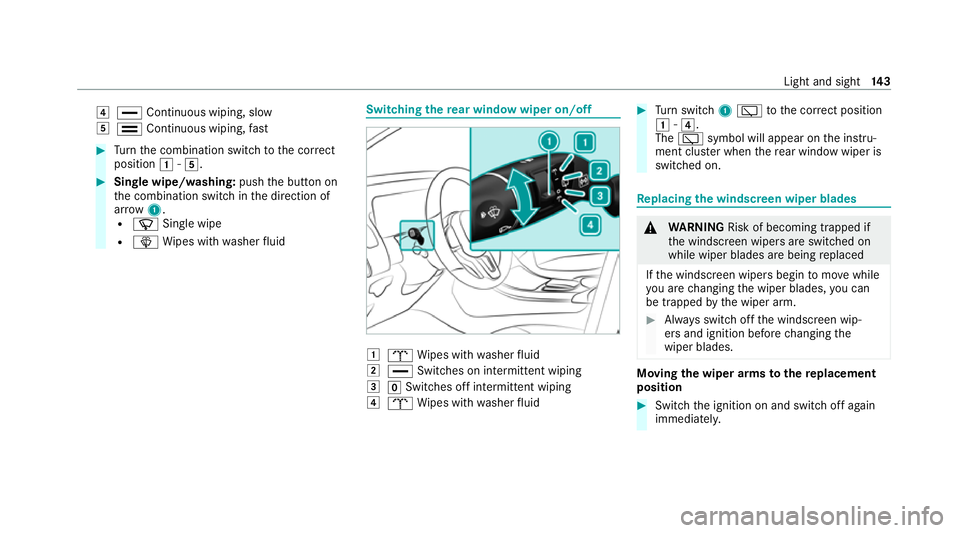
4
° Continuous wiping, slow
5 ¯ Continuous wiping, fast #
Turn the combination switch tothe cor rect
position 1-5. #
Single wipe/washing: pushthe button on
th e combination switch in the direction of
ar row 1.
R í Single wipe
R î Wipes with washer fluid Swit
ching there ar window wiper on/off 1
b Wipes with washer fluid
2 ° Switches on intermittent wiping
3 gSwitches off intermittent wiping
4 b Wipes with washer fluid #
Turn switch 1è tothe cor rect position
1 -4.
The è symbol will appear on the instru‐
ment clus ter when there ar wind owwiper is
swit ched on. Re
placing the windsc reen wiper blades &
WARNING Risk of becoming trapped if
th e windscreen wipers are switched on
while wiper blades are being replaced
If th e windscreen wipers begin tomo vewhile
yo u are changing the wiper blades, you can
be trapped bythe wiper arm. #
Alw ays switch off the windscreen wip‐
ers and ignition before changing the
wiper blades. Moving
the wiper arms tothere placement
position #
Switch the ignition on and switch off again
immediatel y. Light and sight
14 3
Page 148 of 629
#
Foldthe wiper arms back onto the wind‐
screen. #
Switch on the ignition. #
Press theî button on the combination
switch (/ page142).
The wiper arms will mo veinto the original
position.
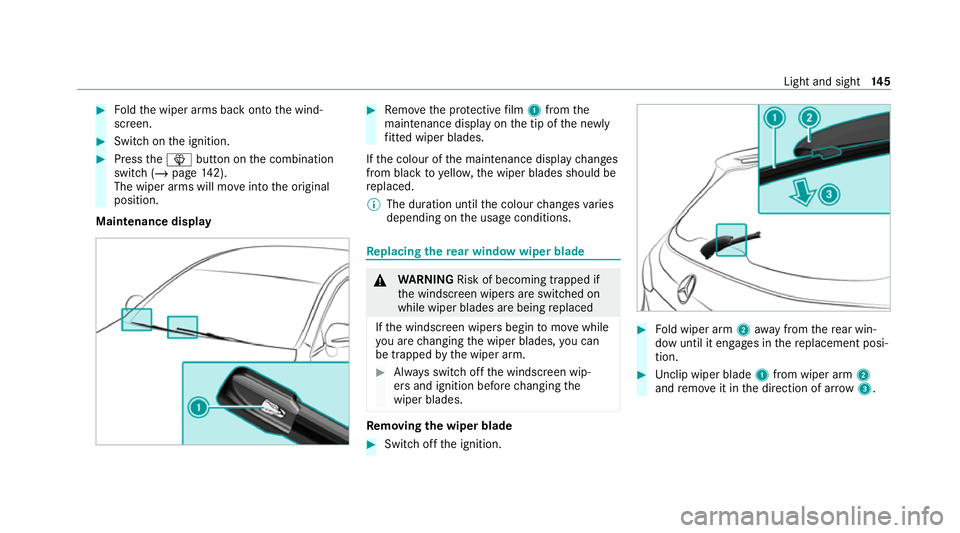
Maintenance display #
Remo vethe pr otective film 1 from the
maintenance display on the tip of the newly
fi tted wiper blades.
If th e colour of the maintenance display changes
from black to yellow, the wiper blades should be
re placed.
% The duration until the colour changes varies
depending on the usage conditions. Re
placing the rear window wiper blade &
WARNING Risk of becoming trapped if
th e windscreen wipers are switched on
while wiper blades are being replaced
If th e windscreen wipers begin tomo vewhile
yo u are changing the wiper blades, you can
be trapped bythe wiper arm. #
Alw ays switch off the windscreen wip‐
ers and ignition before changing the
wiper blades. Re
moving the wiper blade #
Switch off the ignition. #
Fold wiper arm 2away from there ar win‐
dow until it engages in there placement posi‐
tion. #
Unclip wiper blade 1from wiper arm 2
and remo veit in the direction of ar row 3. Light and sight
14 5
Page 149 of 629
Fi
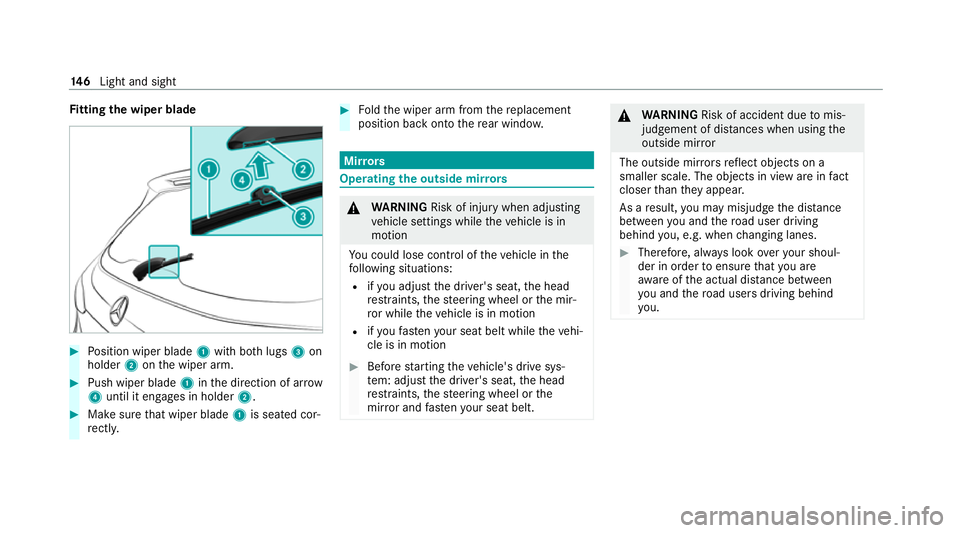
tting the wiper blade #
Position wiper blade 1with bo thlugs 3on
holder 2onthe wiper arm. #
Push wiper blade 1inthe direction of ar row
4 until it en gage s in holder 2. #
Make sure that wiper blade 1is seated cor‐
re ctly. #
Foldthe wiper arm from there placement
position back onto there ar wind ow. Mir
rors Operating
the outside mir rors &
WARNING Risk of inju rywhen adjusting
ve hicle settings while theve hicle is in
motion
Yo u could lose cont rol of theve hicle in the
fo llowing situations:
R ifyo u adjust the driver's seat, the head
re stra ints, thesteering wheel or the mir‐
ro r while theve hicle is in motion
R ifyo ufast enyour seat belt while theve hi‐
cle is in motion #
Before starting theve hicle's drive sys‐
te m: adju stthe driver's seat, the head
re stra ints, thesteering wheel or the
mir ror and fastenyour seat belt. &
WARNING Risk of accident due tomis‐
judgement of dis tances when using the
outside mir ror
The outside mir rors reflect objects on a
smaller scale. The objects in view are in fact
closer than they appear.
As a result, you may misjud gethe dis tance
between you and thero ad user driving
behind you, e.g. when changing lanes. #
Therefore, alw ays look over your shoul‐
der in order toensure that you are
aw are of the actual dis tance between
yo u and thero ad users driving behind
yo u. 14 6
Light and sight
Page 150 of 629
Fo
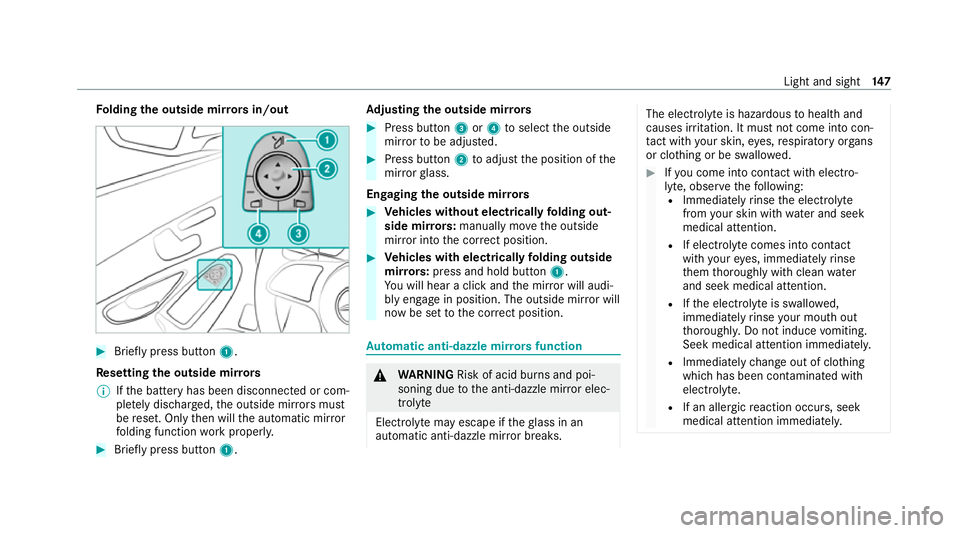
lding the outside mir rors in/out #
Brief lypress button 1.
Re setting the outside mir rors
% Ifth e battery has been disconnected or com‐
ple tely discharged, the outside mir rors must
be reset. Only then will the automatic mir ror
fo lding function workproperly. #
Brief lypress button 1. Ad
justing the outside mir rors #
Press button 3or4 toselect the outside
mir rorto be adjus ted. #
Press button 2toadjust the position of the
mir rorgl ass.
Engaging the outside mir rors #
Vehicles without electrical lyfolding out‐
side mir rors: manually mo vethe outside
mir ror into the cor rect position. #
Vehicles with electrical lyfolding outside
mir rors: press and hold button 1.
Yo u will hear a click and the mir ror will audi‐
bly engage in position. The outside mir ror will
now be set tothe cor rect position. Au
tomatic anti-dazzle mir rors function &
WARNING Risk of acid bu rns and poi‐
soning due tothe anti-dazzle mir ror elec‐
trolyte
Electrolyte may escape if theglass in an
automatic anti-dazzle mir ror breaks. The electrolyte is hazardous
tohealth and
causes ir rita tion. It mu stnot come into con‐
ta ct wi thyour skin, eyes,respiratory or gans
or clo thing or be swallo wed. #
Ifyo u come into contact with electro‐
ly te , obser vethefo llowing:
R Immediately rinse the electrolyte
from your skin with water and seek
medical attention.
R If electrolyte comes into contact
with your eyes, immediately rinse
th em thoroughly with clean water
and seek medical attention.
R Ifth e electrolyte is swallo wed,
immediately rinse your mouth out
th oroughl y.Do not induce vomiting.
Seek medical attention immediately.
R Immedia tely ch ange out of clo thing
which has been con taminated with
electrolyte.
R If an allergic reaction occurs, seek
medical attention immediatel y. Light and sight
147
Page 160 of 629
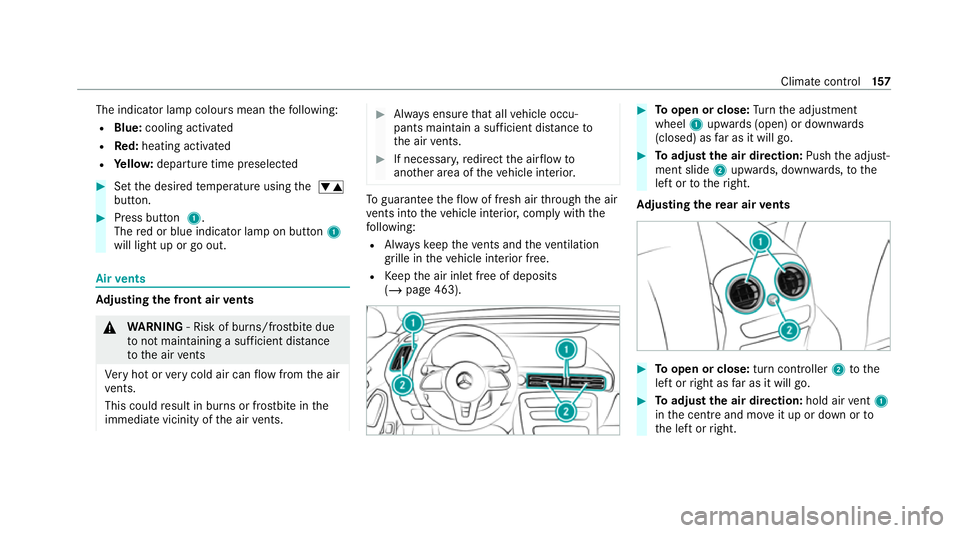
The indicator lamp colours mean
thefo llowing:
R Blue: cooling activated
R Red:heating acti vated
R Yello w: departure time preselected #
Set the desired temp erature using the w
button. #
Press button 1.
The red or blue indicator lamp on button 1
will light up or go out. Air
vents Ad
justing the front air vents &
WARNING ‑ Risk of bu rns/frostbite due
to not maintaining a su fficient dis tance
to the air vents
Ve ry hot or very cold air can flow from the air
ve nts.
This could result in burns or frostbite in the
immediate vicinity of the air vents. #
Alw ays ensure that all vehicle occu‐
pants maintain a suf ficient di stance to
th e air vents. #
If necessa ry,re direct the air flow to
ano ther area of theve hicle interior. To
guarantee theflow of fresh air thro ugh the air
ve nts into theve hicle interior, comply with the
fo llowing:
R Alw ayske ep theve nts and theve ntilation
grille in theve hicle interior free.
R Keep the air inlet free of deposits
(/ page 463). #
Toopen or close: Turn the adjustment
wheel 1upwards (open) or down wards
(closed) as far as it will go. #
Toadjust the air direction: Pushthe adjust‐
ment slide 2upwards, down wards, to the
left or totheright.
Ad justing the rear air vents #
Toopen or close: turn controller2tothe
left or right as far as it will go. #
Toadjust the air direction: hold airvent 1
in the cent reand mo veit up or down or to
th e left or right. Climate control
157
Page 162 of 629

The component parts in
theve hicle's high-
vo ltage on-board elect rical sy stem may be
damaged in an accident, although the dam‐
age is not visible. #
Never car ryout changes on the high-
vo ltage on-board elect rical sy stem. #
Neverto uch co mponent parts in the
high-voltage on-board electrical sy stem. #
After an accident, do not touch any
high-voltage co mponents. #
After an accident, ha vetheve hicle
transpor tedaw ay. #
Have the high-voltage on-board electri‐
cal sy stem checked at a qualified spe‐
cialist workshop. Re
quirements:
R The 6 restra int sy stem warning lamp
lights up in the instrument clus ter,e.g. af ter
an accident.
R The vehicle is badly damaged, e.g. af ter an
accident, and there stra int sy stem compo‐
nents ha venot been trig gered. Operating
the high-voltage disconnect
device
On lydisconnect the drive sy stem manually in
th e abo ve-mentioned situations. #
Switch off the ignition. #
Shift the transmission toposition j. #
Apply the electric parking brake. #
Secure theve hicle against rolling away. #
Open the bonn et. 1
High-voltage disconnect device label on the
engine compartment co ver #
Using bo thhands, reach into there cesses of
th e engine compartment co ver. #
Lift the engine compartment co ver and pull it
out of the engine compartment in the direc‐
tion of the ar row. #
Place the engine compartment co verto one
side. Driving and parking
15 9
Page 192 of 629
Pa
rking Pa
rking theve hicle &
WARNING Risk of accident and inju ry
caused byan insuf ficiently secu redve hi‐
cle rolling away.
If th eve hicle is not securely par ked suf fi‐
ciently, it can rollaw ay in an uncont rolled
wa yev en at a slight downhill gradient. #
Ensure that the par kedve hicle is alw ays
properly secured against rolling away as
fo llo ws:
R on uphill or downhill gradients, turn
the front wheels so that theve hicle
ro lls towa rdsth eke rb if it starts
moving.
R apply the parking brake.
R switch the transmission toposition
j. &
WARNING Risk of accident and inju ry
due tochildren left unat tended in the
ve hicle
If ch ildren are left unat tended in theve hicle,
th ey could:
R Open doo rs,th ereby endangering other
persons or road users.
R Get out and be stru ck byoncoming traf‐
fi c.
R Ope rate ve hicle equipment and become
trapped, forex ample.
In addition, thech ildren could also set the
ve hicle in motion, forex ample by:
R Releasing the parking brake.
R Changing the transmission position.
R Starting theve hicle. #
Never lea vechildren unat tended in the
ve hicle. #
When leaving theve hicle, alw aysta ke
th eke y with you and lock theve hicle. #
Keep theve hicle key out of reach of
ch ildren. This also applies
tothe Digital Vehicle Key if the
"Digital Vehicle Key" function is activated via
Mercedes me connect.
* NO
TEDama getotheve hicle due toit
ro lling away #
Alw ays secure theve hicle against roll‐
ing away. Driving and pa
rking 18 9