2019 MERCEDES-BENZ CLA oil
[x] Cancel search: oilPage 273 of 330
Cleaning the steering wheel and gear or
selector lever
XThoroughly wipe with a damp cloth or useleather care agents that have been recom-mended and approved by Mercedes-Benz.
Cleaning genuine wood and trim ele-
ments
!Do not use solvent-based cleaning agentssuch as tar remover, wheel cleaners, polishesor waxes. There is otherwise a risk of damag-ing the surface.
!Do not use chrome polish on trim pieces.The trim pieces have a chrome look but aremostly made of anodized aluminum and canlose their shine if chrome polish is used. Usea damp, lint-free cloth instead when cleaningthe trim pieces.
If the chrome-plated trim pieces are verydirty, you can use a chrome polish. If you areunsure as to whether the trim pieces arechrome-plated or not, consult an authorizedMercedes-Benz Center.
XWipe the wooden trim and trim pieces with adamp, lint-free cloth, e.g. a microfiber cloth.
XHeavy soiling:use care and cleaning prod-ucts recommended and approved byMercedes-Benz.
Cleaning the seat covers
General notes
!Do not use a microfiber cloth to clean coversmade out of real leather, artificial leather orDINAMICA. If used often, these can damagethe cover.
Note that regular care is essential to ensure thatthe appearance and comfort of the covers isretained over time.
Genuine leather seat covers
!To retain the natural appearance of theleather, observe the following cleaninginstructions:
RClean genuine leather covers carefully witha damp cloth and then wipe the coversdown with a dry cloth.
RMake sure that the leather does notbecome soaked. It may otherwise becomerough and cracked.
ROnly use leather care agents that havebeen tested and approved by Mercedes-Benz. You can obtain these from a qualifiedspecialist workshop.
Leather is a natural product.
It exhibits natural surface characteristics, forexample:
Rdifferences in the texture
Rmarks caused by growth and injury
Rslight nuances of color
These are characteristics of leather and notmaterial defects.
Seat covers of other materials
!Observe the following when cleaning:
Rclean artificial leather covers with a clothmoistened with a solution containing 1%detergent (e.g. dish washing liquid).
Rclean cloth covers with a microfiber clothmoistened with a solution containing 1%detergent (e.g. dish washing liquid). Rubcarefully and always wipe entire seat sec-tions to avoid leaving visible lines. Leavethe seat to dry afterwards. Cleaning resultsdepend on the type of dirt and how long ithas been there.
Rclean DINAMICA covers with a damp cloth.Make sure that you wipe entire seat sec-tions to avoid leaving visible lines.
Cleaning the seat belts
GWARNING
Seat belts can become severely weakened if
bleached or dyed. This could cause the seat
belts to tear or fail, for instance, in the event of
an accident. This poses an increased risk of
injury or fatal injury.
Never bleach or dye the seat belts.
Care271
Maintenance and care
Z
Page 311 of 330
Uniform Tire Quality Grading Standards
A uniform standard to grade the quality of tireswith regards to tread quality, tire traction andtemperature characteristics. The quality grad-ing assessment is made by the manufacturerfollowing specifications from the U.S. govern-ment. The ratings are molded into the sidewall ofthe tire.
Recommended tire pressures
The recommended tire pressure applies to thetires mounted at the factory.
The Tire and Loading Information placard con-tains the recommended tire pressures for coldtires on a fully loaded vehicle and for the maxi-mum permissible vehicle speed.
The tire pressure table contains the recommen-ded pressures for cold tires for various operat-ing conditions, i.e. differing load and speed con-ditions.
Increased vehicle weight due to optional
equipment
The combined weight of all standard andoptional equipment available for the vehicle,regardless of whether it is actually installed onthe vehicle or not.
Rim
This is the part of the wheel on which the tire ismounted.
GAWR (Gross Axle Weight Rating)
The GAWR is the maximum gross axle weightrating. The actual load on an axle must neverexceed the gross axle weight rating. The grossaxle weight rating can be found on the vehicleidentification plate on the B-pillar on the driver'sside.
Speed rating
The speed rating is part of the tire identification.It specifies the speed range for which the tire isapproved.
GVW (Gross Vehicle Weight)
The gross vehicle weight includes the weight ofthe vehicle including fuel, tools, the spare wheel,accessories installed, occupants, luggage andthe drawbar noseweight, if applicable. The grossvehicle weight must not exceed the gross vehi-cle weight rating GVWR as specified on the vehi-cle identification plate on the B-pillar on thedriver's side.
GVWR (Gross Vehicle Weight Rating)
The GVWR is the maximum permissible grossweight of a fully loaded vehicle (the weight of thevehicle including all accessories, occupants,fuel, luggage and the drawbar noseweight, ifapplicable). The gross vehicle weight rating isspecified on the vehicle identification plate onthe B-pillar on the driver's side.
Maximum loaded vehicle weight
The maximum weight is the sum of:
Rthe curb weight of the vehicle
Rthe weight of the accessories
Rthe load limit
Rthe weight of the factory installed optionalequipment
Kilopascal (kPa)
Metric unit for tire pressure. 6.9 kPa corre-sponds to 1 psi. Another unit for tire pressure isbar. 100 kilopascals (kPa) are the equivalent of1 bar.
Load index
In addition to the load-bearing index, the loadindex may also be imprinted on the sidewall ofthe tire. This specifies the load-bearing capacitymore precisely.
Curb weight
The weight of a vehicle with standard equipmentincluding the maximum capacity of fuel, oil andcoolant. It also includes the air-conditioning sys-tem and optional equipment if these are instal-led in the vehicle, but does not include passen-gers or luggage.
Maximum load rating
The maximum tire load is the maximum permis-sible weight in kilograms or lbs for which a tire isapproved.
Maximum permissible tire pressure
Maximum permissible tire pressure for one tire.
Maximum load on one tire
Maximum load on one tire. This is calculated bydividing the maximum axle load of one axle bytwo.
All about wheels and tires309
Wheels and tires
Z
Page 313 of 330
Tire-mounting tools should not be used nearthe valve. This could damage the electroniccomponents.
Only have tires changed at a qualified spe-cialist workshop.
Observe the instructions and safety notes in the"Changing a wheel" section (Ypage 310).
The wear patterns on the front and rear tiresdiffer, depending on the operating conditions.Rotate the wheels before a clear wear patternhas formed on the tires. Front tires typicallywear more on the shoulders and the rear tires inthe center.
On vehicles that have the same size front andrear wheels, you can rotate the wheels accord-ing to the intervals in the tire manufacturer'swarranty book in your vehicle documents. If nowarranty book is available, the tires should berotated every 3,000 to 6,000 miles (5,000 to10,000 km). Depending on tire wear, this maybe required earlier. Do not change the directionof wheel rotation.
Clean the contact surfaces of the wheel and thebrake disc thoroughly every time a wheel is rota-ted. Check the tire pressure and, if necessary,restart the tire pressure loss warning system(Canada only) or the tire pressure monitor (USAonly).
Direction of rotation
Tires with a specified direction of rotation haveadditional benefits, e.g. if there is a risk of hydro-planing. These advantages can only be gained ifthe tires are installed corresponding to thedirection of rotation.
An arrow on the sidewall of the tire indicates itscorrect direction of rotation.
Storing wheels
Store wheels that are not being used in a cool,dry and preferably dark place. Protect the tiresfrom oil, grease, gasoline and diesel.
Mounting a wheel
Preparing the vehicle
XStop the vehicle on solid, non-slippery andlevel ground.
XApply the electric parking brake manually.
XBring the front wheels into the straight-aheadposition.
XShift the transmission to position�].
XSwitch off the engine.
XVehicles without KEYLESS-GO:remove theSmartKey from the ignition lock.
XVehicles with KEYLESS-GO start-functionor KEYLESS-GO:open the driver's door.The vehicle electronics are now in position�
Page 316 of 330
bolts to come loose. As a result, you could
lose a wheel while driving. There is a risk of
accident.
Never oil or grease wheel bolts. In the event of
damage to the threads, contact a qualified
specialist workshop immediately. Have the
damaged wheel bolts or hub threads
replaced/renewed. Do not continue driving.
GWARNING
If you tighten the wheel bolts or wheel nuts
when the vehicle is raised, the jack could tip
over. There is a risk of injury.
Only tighten the wheel bolts or wheel nuts
when the vehicle is on the ground.
Always pay attention to the instructions andsafety notes in the "Changing a wheel" section(Ypage 310).
Only use wheel bolts that have been designedfor the wheel and the vehicle. For safety rea-sons, Mercedes-Benz recommends that youonly use wheel bolts which have been approvedfor Mercedes-Benz vehicles and the respectivewheel.
!To prevent damage to the paintwork, holdthe wheel securely against the wheel hubwhile screwing in the first wheel bolt.
XClean the wheel and wheel hub contact sur-faces.
XPlace the new wheel on the wheel hub andpush it on.
XTighten the wheel bolts until they are finger-tight.
Lowering the vehicle
GWARNING
The wheels could work loose if the wheel nuts
and bolts are not tightened to the specified
tightening torque. There is a risk of accident.
Have the tightening torque immediately
checked at a qualified specialist workshop
after a wheel is changed.
XPlace the ratchet wrench onto the hexagonnut of the jack so that the lettersABare visi-ble.
XTurn the ratchet wrench until the vehicle isonce again standing firmly on the ground.
XPlace the jack to one side.
XTighten the wheel bolts evenly in a crosswisepattern in the sequence indicated (�Cto�
Page 324 of 330

Engine oil
General notes
!Do not use engine oil or an oil filter withspecifications deviating from those expresslyrequired for the prescribed service intervals.Do not change the engine oil or oil filter inorder to set replacement intervals longer thanthose prescribed. This could otherwise causedamage to the engine or exhaust gas after-treatment.
Follow the instructions on the service intervaldisplay for changing the engine oil. This couldotherwise cause damage to the engine orexhaust gas aftertreatment.
When handling engine oil, observe the importantsafety notes on service products (Ypage 319).
The engine oils are matched to the performanceof Mercedes-Benz engines and service intervals.You should therefore only use engine oils and oilfilters that are approved for vehicles with main-tenance systems.
For a list of approved engine oils and oil filters,consult an authorized Mercedes-Benz Center.Or visit the websitehttp://bevo.mercedes-benz.com.
The table shows which engine oils have beenapproved for your vehicle.
ModelMB-Freigabe orMB-Approval
All models229.5
Use only SAE 0W-40 or SAE 5W-40 engine oilsfor Mercedes-AMG vehicles.
iMB approval is indicated on the oil contain-ers.
Filling capacities
The following values refer to an engine oilchange, including the oil filter.
ModelCapacity
Mercedes‑AMG vehicles5.8 US qt (5.5 l)
All other models5.9 US qt (5.6 l)
Additives
!Do not use any additives in the engine oil.This could damage the engine.
Brake fluid
GWARNING
The brake fluid constantly absorbs moisture
from the air. This lowers the boiling point of
the brake fluid. If the boiling point of the brake
fluid is too low, vapor pockets may form in the
brake system when the brakes are applied
hard. This would impair braking efficiency.
There is a risk of an accident.
You should have the brake fluid renewed at
the specified intervals.
When handling brake fluid, observe the impor-tant safety notes on service products(Ypage 319).
The brake fluid change intervals can be found inthe Maintenance Booklet.
Only use brake fluid approved by Mercedes-Benz in accordance with MB-Freigabe or MB-Approval 331.0.
Information about approved brake fluid can beobtained at any qualified specialist workshop oron the Internet athttp://bevo.mercedes-benz.com.
iHave the brake fluid regularly replaced at aqualified specialist workshop and the replace-ment confirmed in the Maintenance Booklet.
322Service products and filling capacities
Technical data
Page 325 of 330

Coolant
Important safety notes
GWARNING
If antifreeze comes into contact with hot com-
ponents in the engine compartment, it may
ignite. There is a risk of fire and injury.
Let the engine cool down before you add anti-
freeze. Make sure that antifreeze is not spilled
next to the filler neck. Thoroughly clean the
antifreeze from components before starting
the engine.
!Only add coolant that has been premixedwith the desired antifreeze protection. Youcould otherwise damage the engine.
You can find additional notes on the coolant inthe following places:
Rin the Mercedes-Benz Specifications forService Products, MB BeVo 310.1
-on the Internet athttp://bevo.mercedes-benz.com
-on the Mercedes-Benz BeVo app
Ra qualified specialized workshop
!Always use a suitable coolant mixture, evenin countries where high temperatures prevail.
Otherwise, the engine cooling system is notsufficiently protected from corrosion andoverheating.
iHave the coolant regularly replaced at aqualified specialist workshop and the replace-ment confirmed in the Maintenance Booklet.
Comply with the important safety notes for ser-vice products when handling coolant(Ypage 319).
The coolant is a mixture of water and corrosioninhibitor/antifreeze concentrate. It performsthe following tasks:
Ranti-corrosion protection
Rantifreeze protection
Rraising the boiling point
If the coolant has antifreeze protection down to-35 ‡ (-37 †), the boiling point of the coolantduring operation is approximately 266 ‡(130 †).
The antifreeze concentrate/corrosion inhibitorconcentration in the engine cooling systemshould:
Rbe at least 50%. This will protect the enginecooling system against freezing down toapproximately -35 ‡ (-37 †)
Rnot exceed 55% (antifreeze protection downto -49‡[-45 †]). Otherwise, heat will not bedissipated as effectively
Mercedes-Benz recommends a coolant or cor-rosion inhibitor/antifreeze concentrate inaccordance withMB Specifications for Service Products 310.1.
iWhen the vehicle is first delivered, it is filledwith a coolant mixture that ensures adequateantifreeze and anti-corrosion protection.
iThe coolant is checked with every mainte-nance interval at a qualified specialist work-shop.
Filling capacities
ModelCapacity
Mercedes‑AMGvehiclesApprox. 12.6 US qt(11.9l)
All other modelsApprox. 8.2 US qt(7.8 l)
Windshield washer system
Important safety notes
GWARNING
Windshield washer concentrate could ignite if
it comes into contact with hot engine compo-
nents or the exhaust system. There is a risk of
fire and injury.
Make sure that no windshield washer con-
centrate is spilled next to the filler neck.
!Only MB SummerFit and MB WinterFitwasher fluid should be mixed together. Thespray nozzles may otherwise becomeblocked.
Do not use distilled or de-ionized water. Other-wise, the level sensor may give a false reading.
Service products and filling capacities323
Technical data
Z
Page 326 of 330
When handling washer fluid, observe the impor-tant safety notes on service products(Ypage 319).
At temperatures above freezing:
XFill the washer fluid reservoir with a mixture ofwater and windshield washer fluid, e.g. MBSummerFit.
Add 1 part MB SummerFit to 100 parts water.
At temperatures below freezing:
XFill the washer fluid reservoir with a mixture ofwater and washer fluid, e.g. MB WinterFit.
For the correct mixing ratio refer to the infor-mation on the antifreeze reservoir.
iAdd windshield washer fluid, e.g. MB Sum-merFit or MB WinterFit, to the washer fluid allyear round.
Climate control system refrigerant
Important safety notes
The climate control system of your vehicle is fil-led with refrigerant R‑134a.
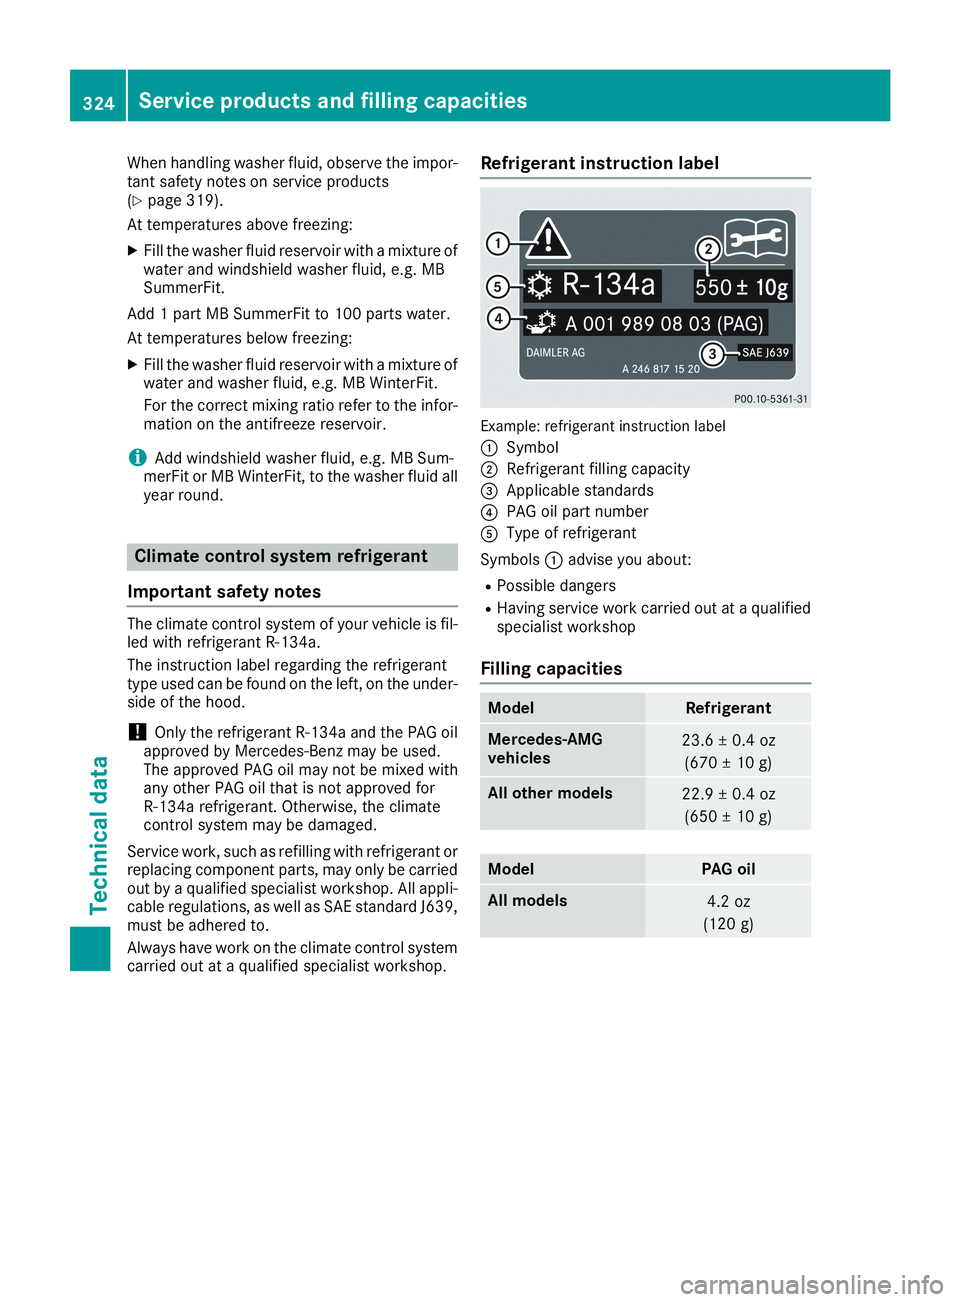
The instruction label regarding the refrigeranttype used can be found on the left, on the under-side of the hood.
!Only the refrigerant R‑134a and the PAG oilapproved by Mercedes-Benz may be used.The approved PAG oil may not be mixed withany other PAG oil that is not approved forR-134a refrigerant. Otherwise, the climatecontrol system may be damaged.
Service work, such as refilling with refrigerant orreplacing component parts, may only be carriedout by a qualified specialist workshop. All appli-cable regulations, as well as SAE standard J639,must be adhered to.
Always have work on the climate control systemcarried out at a qualified specialist workshop.
Refrigerant instruction label
Example: refrigerant instruction label
�CSymbol
�DRefrigerant filling capacity
�