2019 MERCEDES-BENZ AMG GT ROADSTER battery
[x] Cancel search: batteryPage 91 of 298
Problems with the seat heating or seat ventilation
Problem
Possible causes/consequences and
0050
0050Solutions The seat heating or seat
ventilation has switched
off prematurely or can-
not be switched on. The on-board voltage is too low because too many electrical consum-
ers are switched on.
X Switch off electrical consumers that you do not need, such as the
rear window defroster or interior lighting.
Once the battery is sufficiently charged, the seat heating or seat
ventilation will switch back on automatically. AIRSCARF (Roadster)
G
WARNING
When AIRSCARF is switched on, very hot air
can flow from the vents in the head restraints. This could result in burns in the immediate
vicinity of the air vents. There is a risk of injury.
Reduce the heater output before it becomes
too hot.
The AIRSCARF function warms the head and
neck area of vehicle occupants with warm air.
The warm air flows out of the holes in the head
restraints.
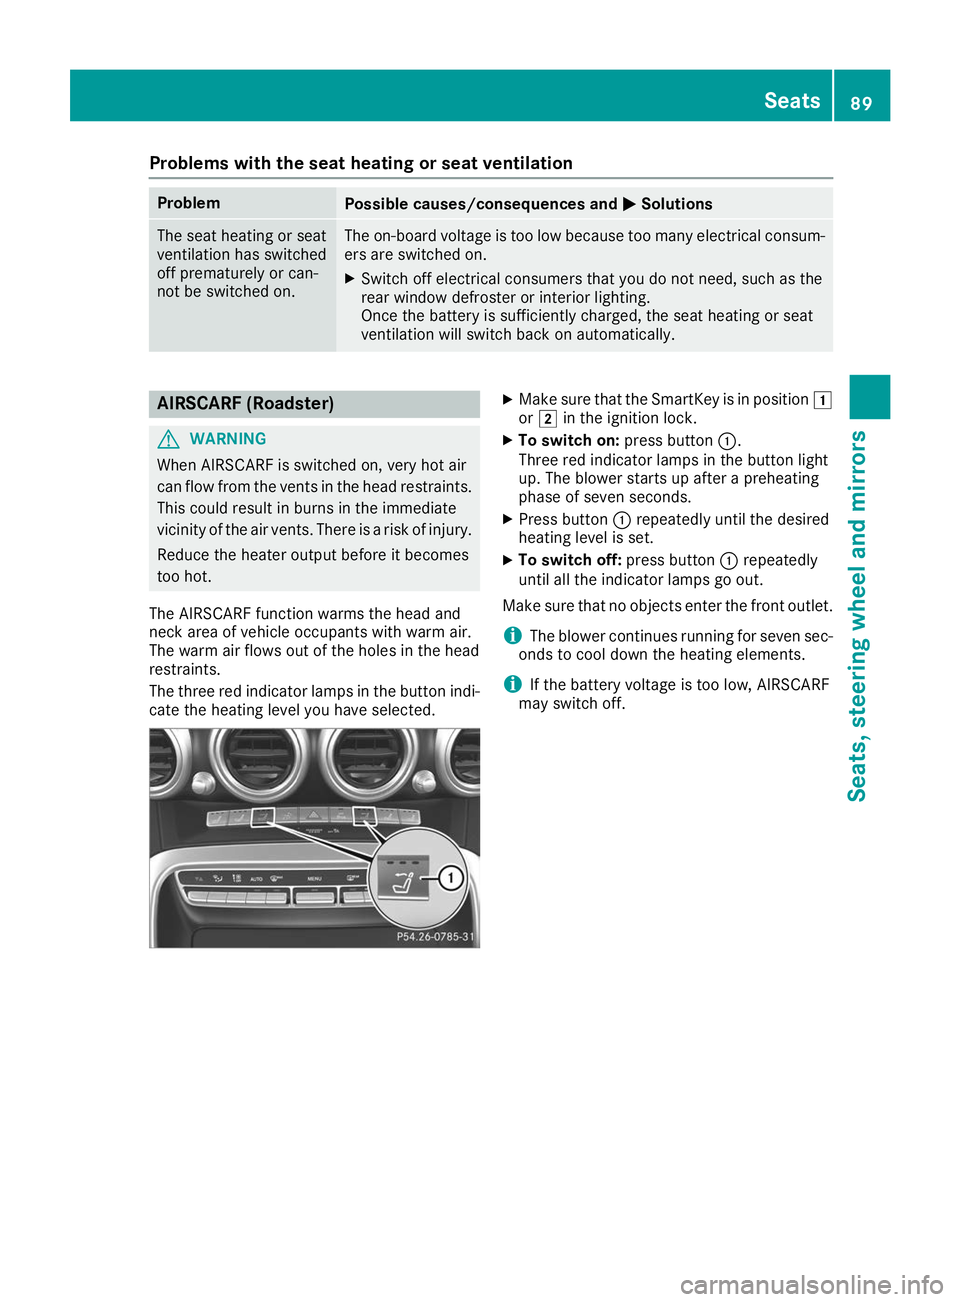
The three red indicator lamps in the button indi- cate the heating level you have selected. X
Make sure that the SmartKey is in position 0047
or 0048 in the ignition lock.
X To switch on: press button0043.
Three red indicator lamps in the button light
up. The blower starts up after a preheating
phase of seven seconds.
X Press button 0043repeatedly until the desired
heating level is set.
X To switch off: press button0043repeatedly
until all the indicator lamps go out.
Make sure that no objects enter the front outlet.
i The blower continues running for seven sec-
onds to cool down the heating elements.
i If the battery voltage is too low, AIRSCARF
may switch off. Seats
89Seats, steering wheel and mirrors Z
Page 94 of 298
G
WARNING
The exterior mirror on the front-passenger
side reduces the size of the image. Visible
objects are actually closer than they appear.
This means that you could misjudge the dis-
tance from road users traveling behind, e.g.
when changing lane. There is a risk of an acci-
dent.
For this reason, always make sure of the
actual distance from the road users traveling
behind by glancing over your shoulder.
Adjusting the exterior mirrors X
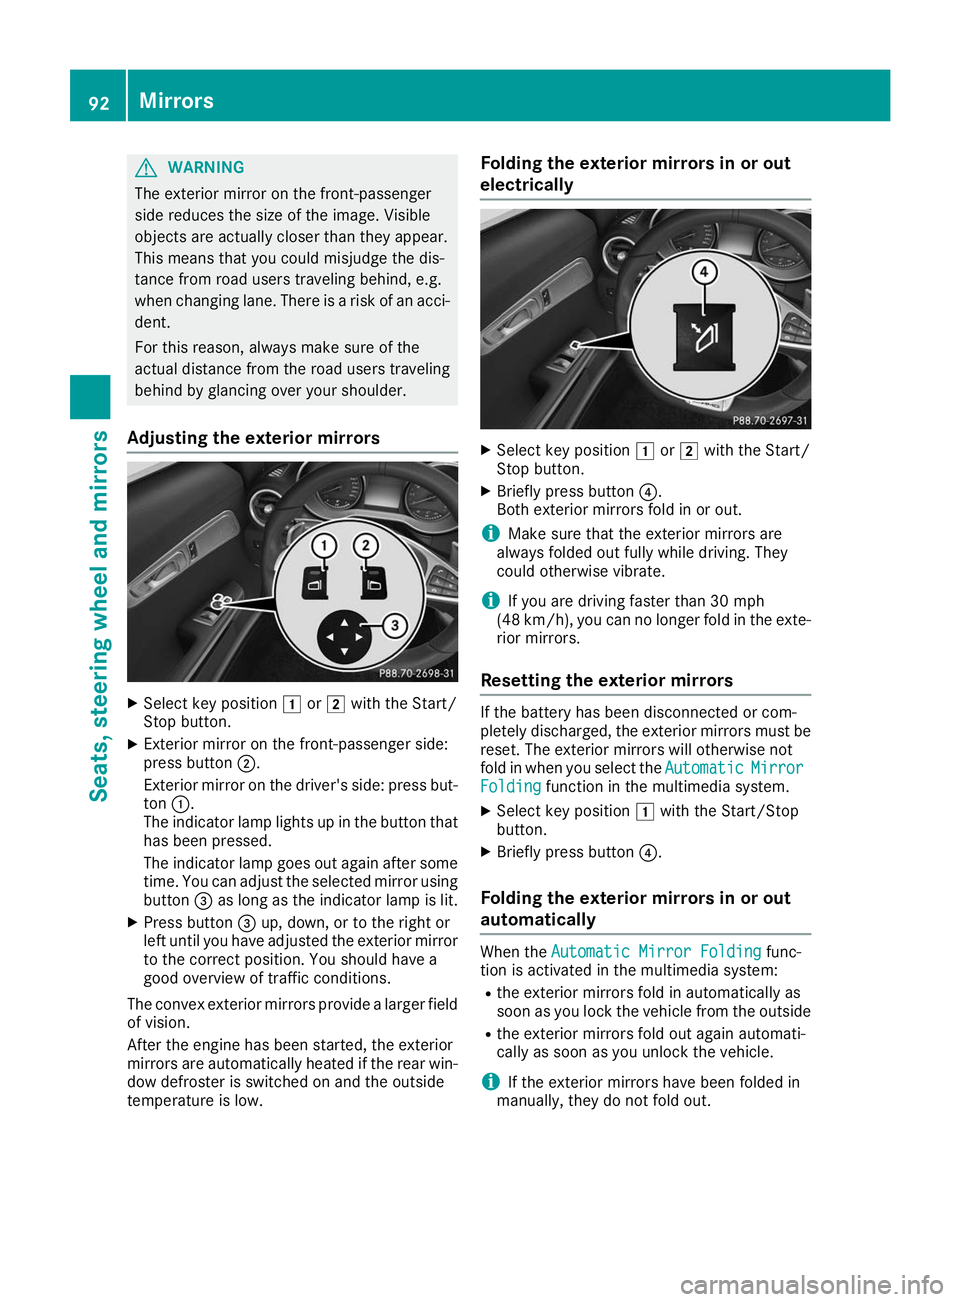
Select key position 0047or0048 with the Start/
Stop button.
X Exterior mirror on the front-passenger side:
press button 0044.
Exterior mirror on the driver's side: press but- ton 0043.
The indicator lamp lights up in the button that has been pressed.
The indicator lamp goes out again after some
time. You can adjust the selected mirror using
button 0087as long as the indicator lamp is lit.
X Press button 0087up, down, or to the right or
left until you have adjusted the exterior mirror to the correct position. You should have a
good overview of traffic conditions.
The convex exterior mirrors provide a larger field
of vision.
After the engine has been started, the exterior
mirrors are automatically heated if the rear win- dow defroster is switched on and the outside
temperature is low. Folding the exterior mirrors in or out
electrically X
Select key position 0047or0048 with the Start/
Stop button.
X Briefly press button 0085.
Both exterior mirrors fold in or out.
i Make sure that the exterior mirrors are
always folded out fully while driving. They
could otherwise vibrate.
i If you are driving faster than 30 mph
(48 km/h), you can no longer fold in the exte-
rior mirrors.
Resetting the exterior mirrors If the battery has been disconnected or com-
pletely discharged, the exterior mirrors must be reset. The exterior mirrors will otherwise not
fold in when you select the Automatic AutomaticMirror
Mirror
Folding
Folding function in the multimedia system.
X Select key position 0047with the Start/Stop
button.
X Briefly press button 0085.
Folding the exterior mirrors in or out
automatically When the
Automatic Mirror Folding
Automatic Mirror Folding func-
tion is activated in the multimedia system:
R the exterior mirrors fold in automatically as
soon as you lock the vehicle from the outside
R the exterior mirrors fold out again automati-
cally as soon as you unlock the vehicle.
i If the exterior mirrors have been folded in
manually, they do not fold out. 92
MirrorsSeats, steering wheel and mirrors
Page 99 of 298
The daytime running lamps improve the visibility
of your vehicle during the day. Here, the Day‐
Day‐
time Running Lights
time Running Lights function must be
switched on via the on-board computer
(Y page 169).
If the engine is running and you turn the light
switch to the 0060or0058 position, the manual
settings take precedence over the daytime run-
ning lamps.
Low-beam headlamps G
WARNING
When the light switch is set to 0058, the low-
beam headlamps may not be switched on
automatically if there is fog, snow or other
causes of poor visibility due to the weather
conditions such as spray. There is a risk of an
accident.
In such situations, turn the light switch to
0058.
When the ignition is switched on and the light
switch is in the 0058position, the parking lamps
and low-beam headlamps are switched on even if the light sensor does not sense dark condi-
tions. This is a particularly useful function in the
event of rain and fog.
X To switch on the low-beam headlamps:
select key position
0048with the Start/Stop
button or start the engine.
X Turn the light switch to the 0058position.
The green 0058indicator lamp in the instru-
ment cluster lights up.
Rear fog lamp The rear fog lamp improves visibility of your
vehicle for the traffic behind in the event of thick
fog. You must observe the legal requirements
for the country in which you are currently driving when operating the rear fog lamp.
X To switch on the rear fog lamp: select key
position 0048with the Start/Stop button or
start the engine.
X Turn the light switch to the 0058or0058
position. X
Press the 005Ebutton.
The yellow 005Eindicator lamp in the instru-
ment cluster lights up.
X To switch off the rear fog lamp: press the
005E button.
The yellow 005Eindicator lamp in the instru-
ment cluster goes out.
Parking lamps ! If the battery charge is very low, the parking
lamps or standing lamps are automatically
switched off to enable the next engine start.
Always park your vehicle safely and in a well lit area, in accordance with the relevant legal
stipulations. Avoid using the 0060parking
lamps over a period of several hours. If pos-
sible, switch on the right-hand 0064or left-
hand 0063 standing lamps.
X To switch on the parking lamps: turn the
light switch to the 0060position.
The green 0060indicator lamp in the instru-
ment cluster lights up.
Standing lamps Switching on the standing lamps ensures the
corresponding side of the vehicle is illuminated.
X To switch on the standing lamps: switch off
the engine with the Start/Stop button.
X Turn the light switch to the 0063position (left-
hand side of the vehicle) or 0064position
(right-hand side of the vehicle). Combination switch
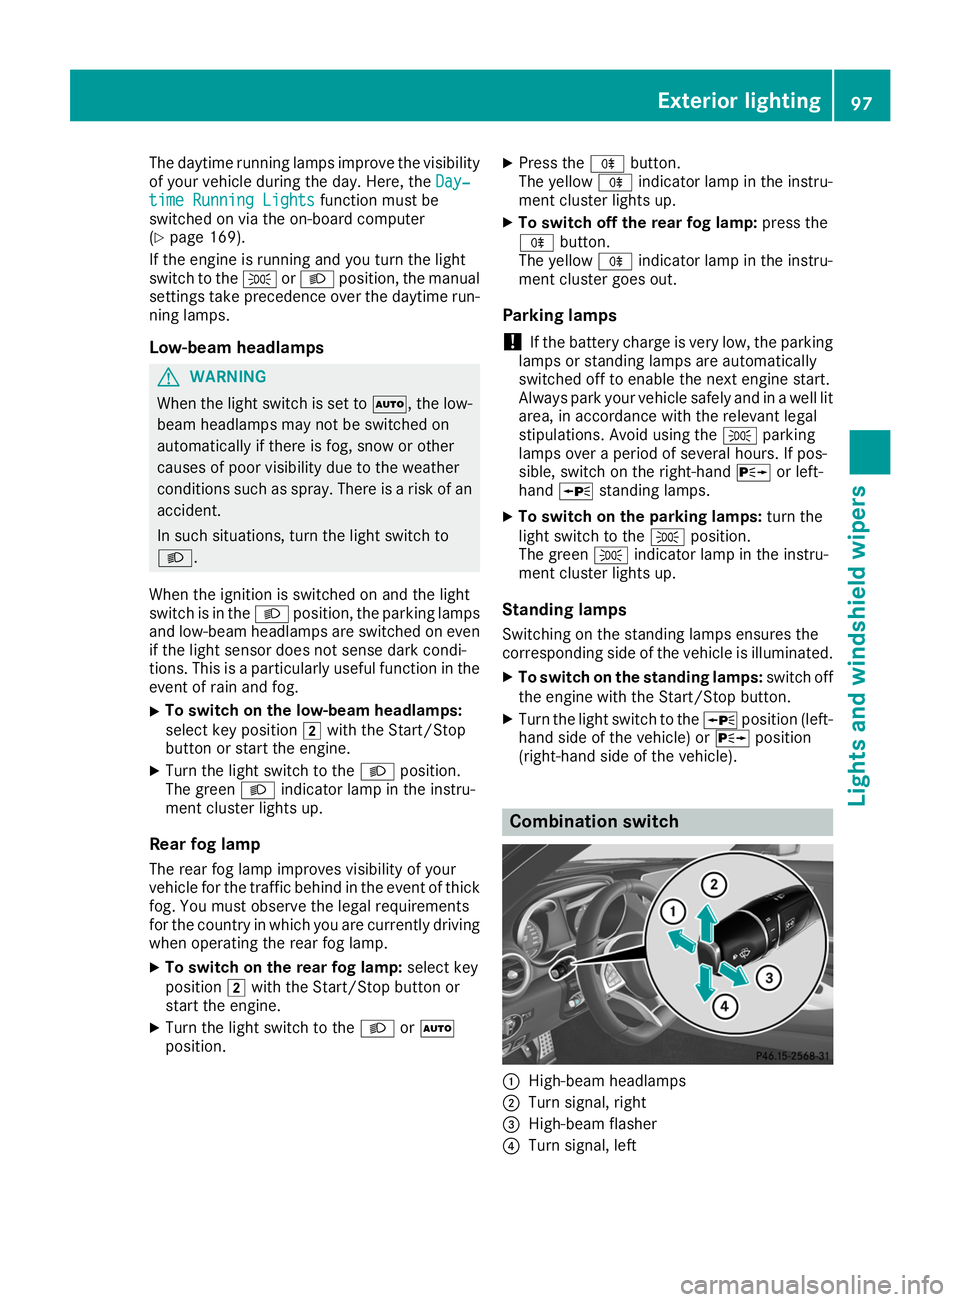
0043
High-beam headlamps
0044 Turn signal, right
0087 High-beam flasher
0085 Turn signal, left Exterior lighting
97Lights and windshield wipers Z
Page 101 of 298
On very rare occasions, Adaptive Highbeam
Assist may fail to recognize other road users
that have lights, or may recognize them too
late. In this, or in similar situations, the auto-
matic high-beam headlamps will not be deac- tivated or will be activated regardless. There is
a risk of an accident.
Always carefully observe the traffic conditions and switch off the high-beam headlamps in
good time.
Adaptive Highbeam Assist cannot take into
account road, weather or traffic conditions.
Adaptive Highbeam Assist is only an aid. You are
responsible for adjusting the vehicle's lighting
to the prevailing light, visibility and traffic con-
ditions.
In particular, the detection of obstacles can be
restricted if there is:
R poor visibility, e.g. due to fog, heavy rain or
snow
R dirt on the sensors or the sensors are
obscured
Switching Adaptive Highbeam Assist
on/off X
To switch on: turn the light switch to the
0058 position.
X Press the combination switch beyond the
pressure point in the direction of arrow 0043.
The 00CE indicator lamp in the multifunction
display lights up when it is dark and the light
sensor activates the low-beam headlamps.
If you are driving at speeds above approx-
imately 16 mph (25 km/h):
The headlamp range is set automatically
depending on the distance between the vehi- cle and other road users.
If you are driving at speeds above approx-
imately 19 mph (30 km/h) and no other road users have been detected:
The high-beam headlamps are switched on
automatically. The 0057indicator lamp in the
instrument cluster also lights up.
If you are driving at speeds below approx-
imately 16 mph (25 km/h) or other road users have been detected or the roads are ade-
quately lit:
The high-beam headlamps are switched off
automatically. The 0057indicator lamp in the instrument cluster goes out. The
00CEindi-
cator lamp in the multifunction display
remains lit.
X To switch off: move the combination switch
back to its normal position or move the light
switch to another position.
The 00CE indicator lamp in the instrument
cluster goes out. Headlamps fogged up on the inside
Certain climatic and physical conditions may
cause moisture to form in the headlamp. This
moisture does not affect the functionality of the headlamp. Interior lighting
Overview
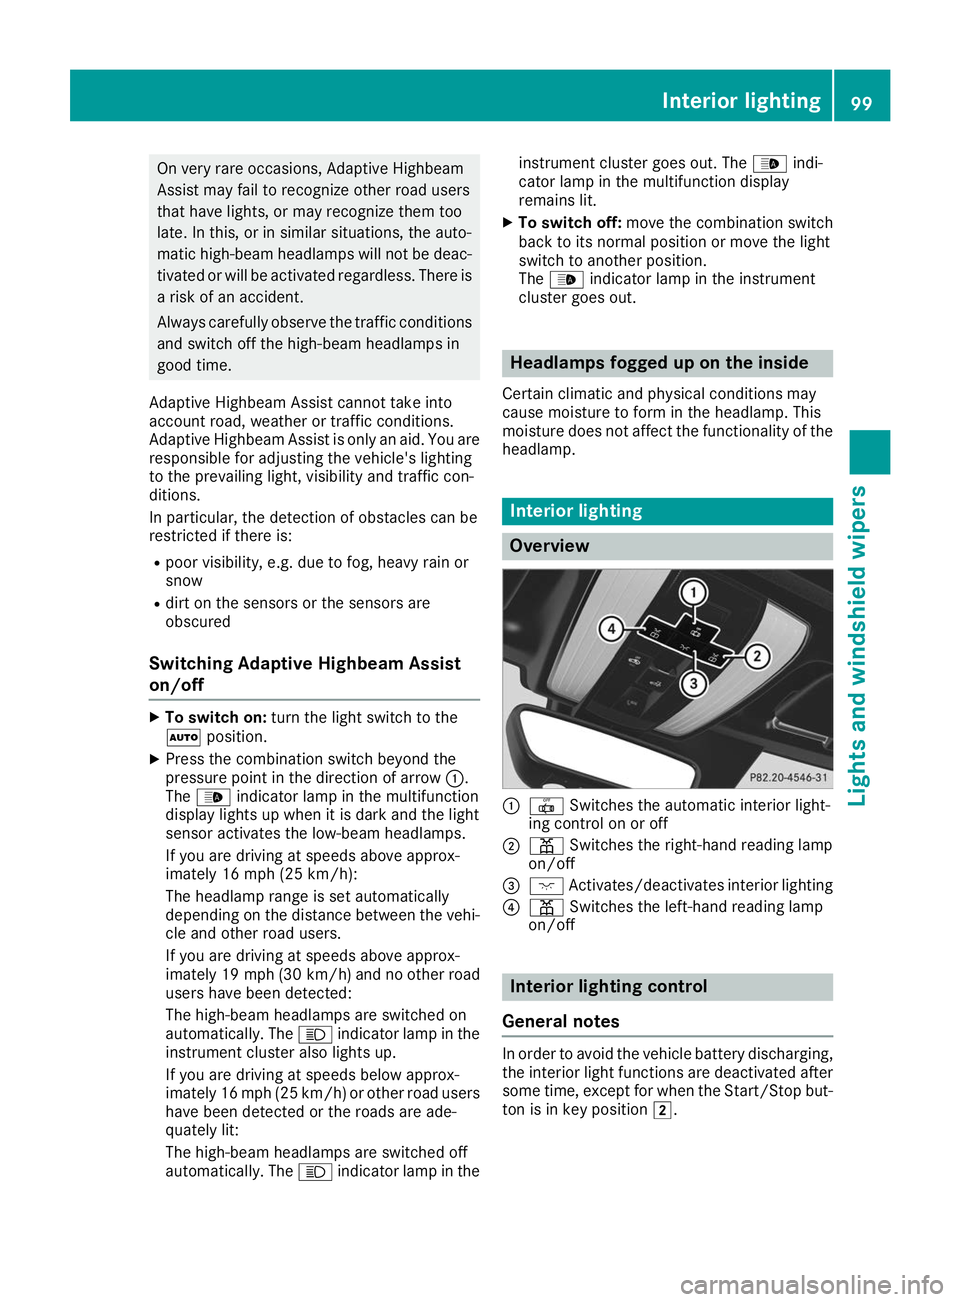
0043
0033 Switches the automatic interior light-
ing control on or off
0044 003D Switches the right-hand reading lamp
on/off
0087 004A Activates/deactivates interior lighting
0085 003D Switches the left-hand reading lamp
on/off Interior lighting control
General notes In order to avoid the vehicle battery discharging,
the interior light functions are deactivated after
some time, except for when the Start/Stop but-
ton is in key position 0048. Interior lighting
99Lights and windshield wipers Z
Page 108 of 298
Setting the airflow
X Select key position 0048with the Start/Stop
button (Y page 111).
X To increase or reduce: press theH
rocker switch up or down. Activating/deactivating synchroniza-
tion
General notes Climate control can be set centrally using the
synchronization function. The temperature set-
ting is adopted for the front-passenger side.
Activating/deactivating X
Press the 0rocker switch up or down.
The indicator lamp above the 0rocker
switch lights up or goes out.
The synchronization function deactivates if the
settings for the front-passenger side are
changed. Defrosting the windshield
General notes You can use this function to defrost the wind-
shield or to clear a fogged up windshield and
side windows.
Switch off the "Windshield defrosting" function
as soon as the windshield is clear again.
Activating/deactivating X
Select key position 0048with the Start/Stop
button (Y page 111).
X To switch on: press the0064rocker switch
up or down.
The indicator lamp above the 0064rocker
switch lights up. The current climate control
settings are deactivated.
The climate control system switches to the
following functions:
R high airflow
R high temperature R
air distribution to the windshield and front
side windows
R air-recirculation mode off
i If necessary, the "Cooling with air dehumid-
ification" function is activated. In this case,
the indicator lamp above the 005Arocker
switch remains switched off.
X To switch off: press the0064rocker switch
up or down.
The indicator lamp above the 0064rocker
switch goes out. The previously selected set- tings are restored. Air-recirculation mode
remains deactivated. Removing condensation from the win-
dows
Windows fogged up on the inside X
Activate the "Cooling with air dehumidifica-
tion" function with the 005Arocker switch.
X Switch on automatic mode using the 0058
rocker switch.
X If the windows continue to fog up, activate the
"Windshield defrosting" function using the
0064 rocker switch.
i You should only select this setting until the
windshield is clear again.
Windows fogged up on the outside X
Activate the windshield wipers.
X Switch on automatic mode using the 0058
rocker switch.
i If you clean the windows regularly, they do
not fog up so quickly. Rear window defroster
General notes The rear window defroster has a high current
draw. You should therefore switch it off as soon
as the rear window is clear. Otherwise, the rear
window defroster switches off automatically
after several minutes.
If the battery voltage is too low, the rear window defroster may switch off. 106
Operating the climate control systemsClimate control
Page 109 of 298
Activating/deactivating
X
Select key position 0048with the Start/Stop
button (Y page 111).
X Press the 006Crocker switch up or down.
The indicator lamp above the 006Crocker
switch lights up or goes out.
Problems with the rear window defroster Problem
Possible causes/consequences and
0050
0050Solutions The rear window
defroster has deactiva-
ted prematurely or can-
not be activated. The battery has not been sufficiently charged.
X Switch off any consumers that are not required, e.g. reading lamps,
interior lighting or the seat heating.
When the battery is sufficiently charged, the rear window defroster can be activated again. Switching air-recirculation mode
on/off
General notes You can also temporarily deactivate the flow of
fresh air manually if unpleasant odors are enter-
ing the vehicle from outside. The air already
inside the vehicle will then be recirculated.
If you switch on air-recirculation mode, the win-
dows can fog up more quickly, in particular at
low temperatures. Only use air-recirculation
mode briefly to prevent the windows from fog-
ging up.
Activating/deactivating X
Select key position 0048with the Start/Stop
button (Y page 111).
X To activate: press the0072rocker switch up
or down.
The indicator lamp above the 0072rocker
switch lights up.
Air-recirculation mode switches on automati-
cally:
R at high outside temperatures
R in a tunnel (vehicles with a navigation system
only)
The indicator lamp above the 0072rocker
switch is not lit when automatic air-recirculation
mode is activated. Outside air is added after
about 30 minutes. X
To deactivate: press the0072rocker switch
up or down.
The indicator lamp above the 0072rocker
switch goes out.
Air-recirculation mode deactivates automati-
cally:
R after approximately five minutes at outside
temperatures below approximately 41 ‡
(5 †)
R after approximately five minutes if cooling
with air dehumidification is deactivated
R after approximately 30 minutes at outside
temperatures above approximately 41 ‡
(5 †) if the "Cooling with dehumidification"
function is activated Air vents
Important safety notes
G
WARNING
Very hot or very cold air can flow from the air vents. This could result in burns or frostbite in the immediate vicinity of the air vents. There
is a risk of injury.
Make sure that all vehicle occupants always
maintain a sufficient distance to the air out-
lets. If necessary, redirect the airflow to
another area of the vehicle interior. Air vents
107Climate control Z
Page 116 of 298
R
the engine and the transmission are at a suf-
ficient temperature for the ECO start/stop
function
R the set temperature for the vehicle interior
has been reached
R the battery is sufficiently charged
R the system detects that the windshield is not
fogged up when the air-conditioning system is switched on
R the hood is closed
R the driver's door is closed and the driver's
seat belt is fastened
All of the vehicle's systems remain active when
the engine is stopped automatically.
The HOLD function can also be activated if the
engine has been switched off automatically. It is then not necessary to continue applying the
brakes during the automatic stop phase. When
you depress the accelerator pedal, the engine
starts automatically and the braking effect of
the HOLD function is deactivated.
Automatic engine start The engine starts automatically if:
R you switch off the ECO start/stop function by
pressing the ECO button
R switch to drive program RACE,S+orS
(Y page 116)
R you switch to manual mode M(Y page 121)
R in transmission position 005B, the brake pedal
is released and the HOLD function is not
active
R you depress the accelerator pedal
R you engage reverse gear 005E
R you move the transmission out of position 005D
R you unfasten your seat belt or open the driv-
er's door
R the vehicle starts to roll
R the brake system requires this
R the temperature in the vehicle interior devi-
ates from the set range
R the system detects moisture on the wind-
shield when the air-conditioning system is
switched on
R the battery's condition of charge is too low
Shifting the transmission to position 005Ddoes
not start the engine. Deactivating or activating the ECO
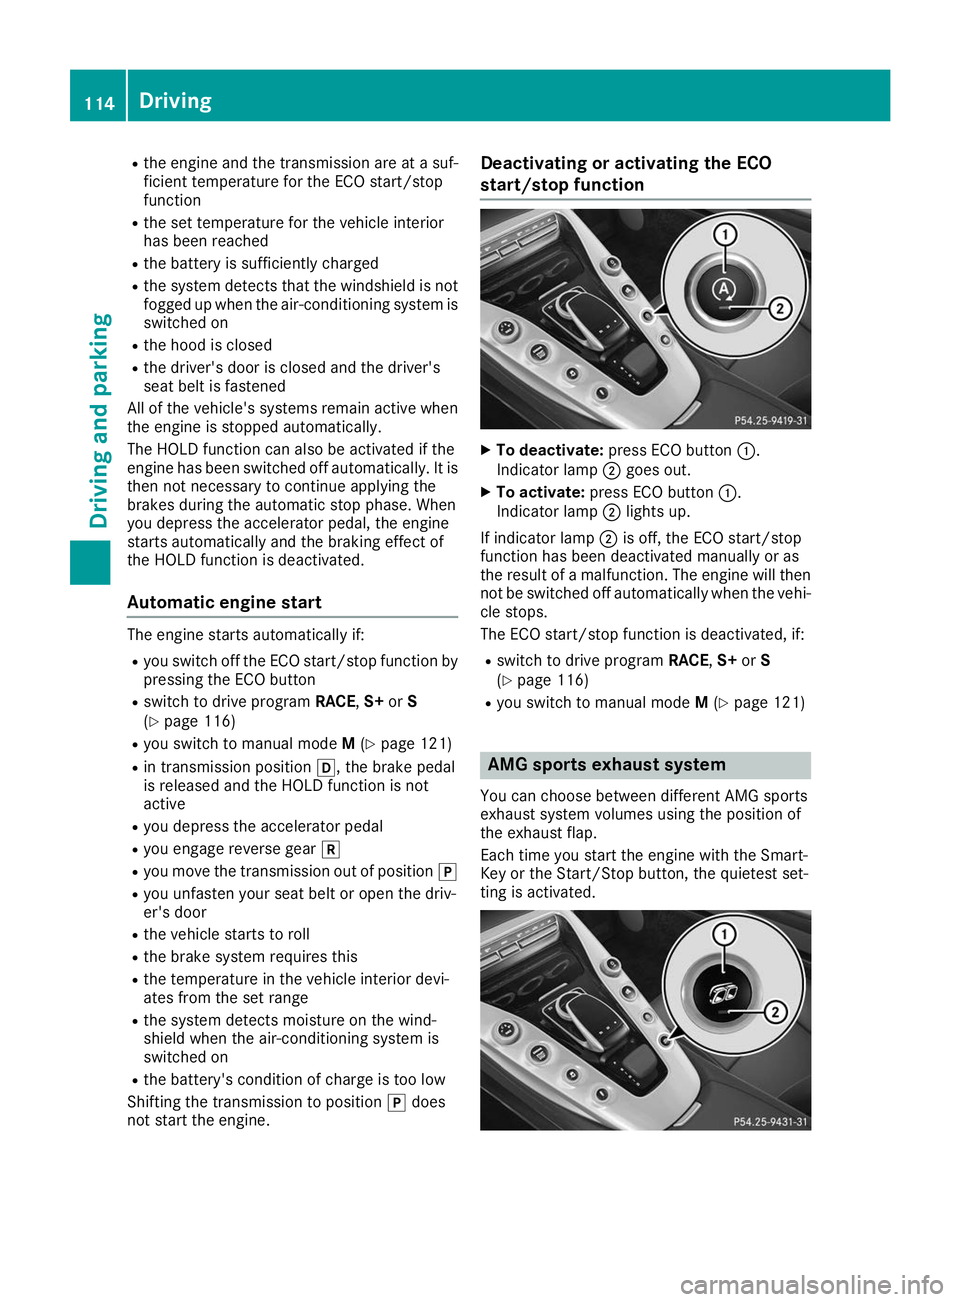
start/stop function
X
To deactivate: press ECO button 0043.
Indicator lamp 0044goes out.
X To activate: press ECO button 0043.
Indicator lamp 0044lights up.
If indicator lamp 0044is off, the ECO start/stop
function has been deactivated manually or as
the result of a malfunction. The engine will then
not be switched off automatically when the vehi- cle stops.
The ECO start/stop function is deactivated, if:
R switch to drive program RACE,S+orS
(Y page 116)
R you switch to manual mode M(Y page 121) AMG sports exhaust system
You can choose between different AMG sports
exhaust system volumes using the position of
the exhaust flap.
Each time you start the engine with the Smart-
Key or the Start/Stop button, the quietest set-
ting is activated. 114
DrivingDriving an
d parking
Page 117 of 298
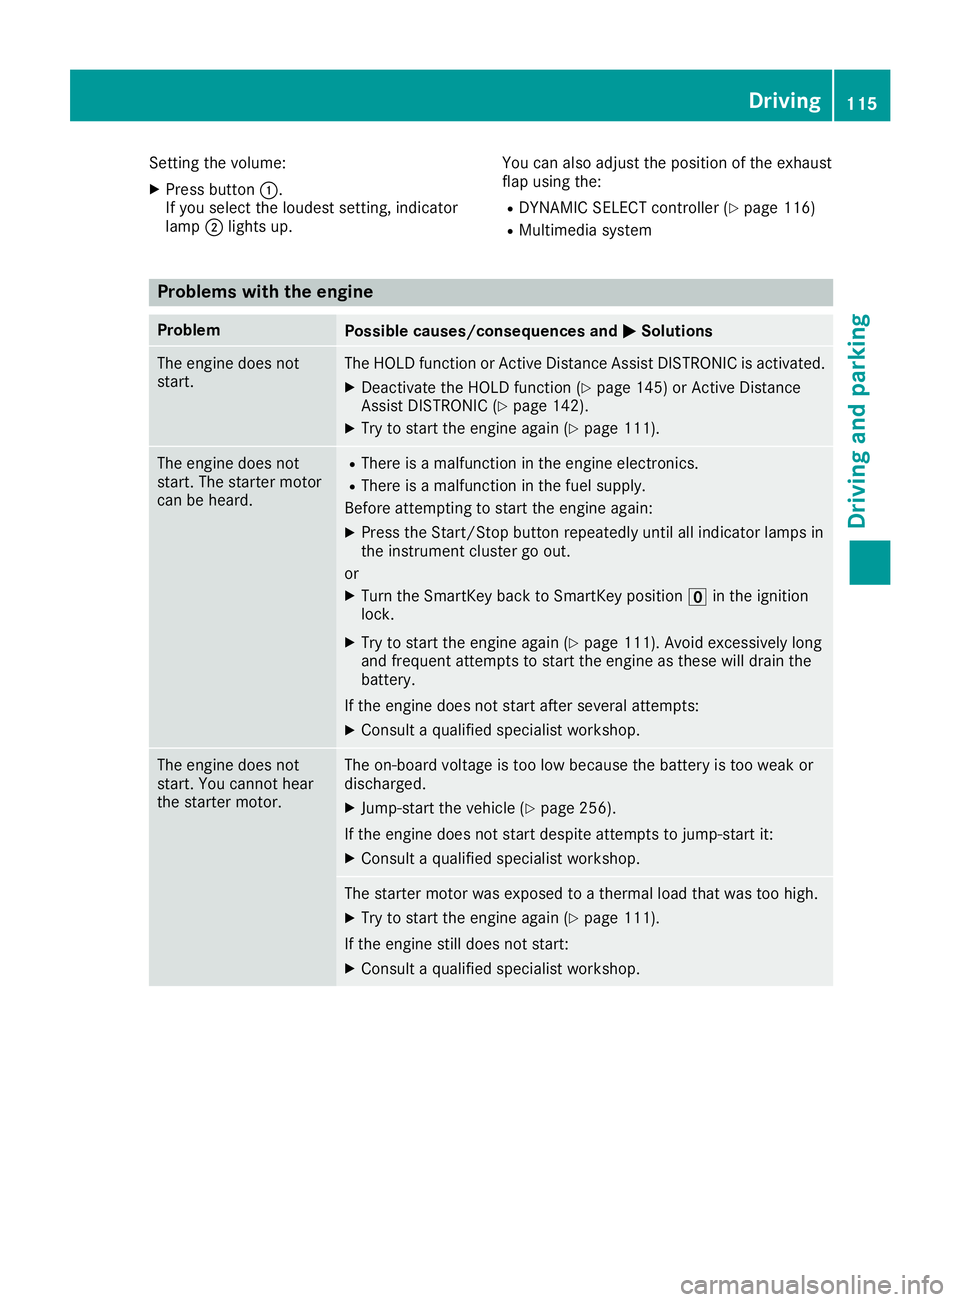
Setting the volume:
X Press button 0043.
If you select the loudest setting, indicator
lamp 0044lights up. You can also adjust the position of the exhaust
flap using the:
R DYNAMIC SELECT controller (Y page 116)
R Multimedia system Problems with the engine
Problem
Possible causes/consequences and
0050 0050Solutions The engine does not
start. The HOLD function or Active Distance Assist DISTRONIC is activated.
X Deactivate the HOLD function (Y page 145) or Active Distance
Assist DISTRONIC (Y page 142).
X Try to start the engine again (Y page 111).The engine does not
start. The starter motor
can be heard. R
There is a malfunction in the engine electronics.
R There is a malfunction in the fuel supply.
Before attempting to start the engine again:
X Press the Start/Stop button repeatedly until all indicator lamps in
the instrument cluster go out.
or X Turn the SmartKey back to SmartKey position 0092in the ignition
lock.
X Try to start the engine again (Y page 111). Avoid excessively long
and frequent attempts to start the engine as these will drain the
battery.
If the engine does not start after several attempts: X Consult a qualified specialist workshop. The engine does not
start. You cannot hear
the starter motor. The on-board voltage is too low because the battery is too weak or
discharged.
X Jump-start the vehicle (Y page 256).
If the engine does not start despite attempts to jump-start it:
X Consult a qualified specialist workshop. The starter motor was exposed to a thermal load that was too high.
X Try to start the engine again (Y page 111).
If the engine still does not start:
X Consult a qualified specialist workshop. Driving
115Driving and parking Z