2019 MERCEDES-BENZ AMG GT ROADSTER fuel type
[x] Cancel search: fuel typePage 23 of 298
Two-way radio
Frequencies ................................... 287
Installation ..................................... 287
Transmission output (maximum) .... 287
Type identification plate
see Vehicle identification plate U
Unlocking Emergency unlocking ....................... 73
From inside the vehicle (central
unlocking button) ............................. 72
USB devices
Connecting to the Media Inter-
face .............................................. .217 V
Vanity mirror (in the sun visor) ........221
Vehicle
Correct use ...................................... 28
Data acquisition ............................... 29
Display message ............................ 194
Electronics ..................................... 287
Equipment ....................................... 25
Individual settings .......................... 168
Limited Warranty ............................ .29
Loading .......................................... 271
Locking (in an emergency) ............... 73
Locking (SmartKey) .......................... 66
Lowering ........................................ 285
Maintenance .................................... 26
Operating safety .............................. 26
Parking .......................................... 127
Parking for a long period ................ 130
Pulling away ................................... 112
Raising ........................................... 282
Reporting problems ......................... 28
Securing from rolling away ............ 282
Towing away .................................. 258
Transporting .................................. 260
Unlocking (in an emergency) ........... 73
Unlocking (SmartKey )...................... 66
Vehicle data ................................... 293
Vehicle battery
see Battery (vehicle)
Vehicle data
Trunk load (maximum) ................... 293 Vehicle dimensions
........................... 293
Vehicle emergency locking ................ 73
Vehicle identification number
see VIN
Vehicle identification plate .............. 287
Vehicle maintenance
see ASSYST PLUS
Vehicle tool kit .................................. 249
Ventilation
see Climate control
Video
Operating the DVD ......................... 166
see also Digital Operator's Man-
ual .................................................. 209
VIN
Seat ............................................... 288
Type plate ...................................... 287 W
Warning and indicator lamps ABS ................................................ 201
Active Brake Assist ........................ 206
Brakes ........................................... 200
Check Engine ................................. 204
Coolant .......................................... 204
Distance warning ........................... 206
ESP ®
.............................................. 201
ESP ®
OFF ....................................... 202
Fuel tank ........................................ 204
Overview .......................................... 34
Parking brake ................................ 203
PASSENGER AIR BAG ...................... 41
Reserve fue l................................... 204
Restraint system ............................ 203
Seat belt ........................................ 199
SPORT handling mod e................... 203
Steering ......................................... 208
Tire pressure monitor .................... 207
Warranty .............................................. 25
Washer fluid
Display message ............................ 197
Weather display (COMAND)
see also Digital Operator's Man-
ual.................................................. 209
Wheel and tire combinations
Tires ............................................... 285
Wheel bolt tightening torque ........... 285 Index
21
Page 57 of 298
If the seat belt pre-tensioning is not reduced:
X Move the seat backrest or seat back slightly
when the vehicle is stationary.
The seat belt pre-tensioning is reduced and
the locking mechanism is released.
The seat-belt adjustment is an integral part of
the PRE-SAFE ®
convenience function. Informa-
tion about the convenience function can be
found under "Belt adjustment" (Y page 44).Automatic measures after an acci-
dent
Immediately after an accident, the following
measures are implemented, depending on the
type and severity of the impact:
R the hazard warning lamps are switched on
R the emergency lighting is activated
R the vehicle doors are unlocked
R the front side windows are lowered
R vehicles with a memory function: the electri-
cally adjustable steering wheel is raised when
the driver's door is opened
R the engine is switched off and the fuel supply
is cut off
R vehicles with Mercedes me connect: auto-
matic emergency call Children in the vehicle
Important safety notes
If a child younger than twelve years old and
under 5 ft (1.50 m) in height is traveling in the
vehicle: R always secure the child in a child restraint
system suitable for Mercedes-Benz vehicles.
The child restraint system must be appropri-
ate to the age, weight and size of the child.
R be sure to observe the instructions and safety
notes in this section in addition to the child
restraint system manufacturer's installation
instructions.
R always observe the instructions and safety
notes on the "Occupant classification system
(OCS)". (Y page 48) G
WARNING
If you leave children unsupervised in the vehi- cle, they could set it in motion, for example by:
R releasing the parking brake
R shifting the transmission to the neutral
position
R starting the engine
In addition, they may operate vehicle equip-
ment and become trapped. There is a risk of
an accident and injury.
When leaving the vehicle, always take the
SmartKey with you and lock the vehicle. Never leave children unsupervised in the vehicle. G
WARNING
If persons, particularly children are subjected to prolonged exposure to extreme heat or
cold, there is a risk of injury, possibly even
fatal. Never leave children unattended in the
vehicle. G
WARNING
If the child restraint system is subjected to
direct sunlight, parts may get very hot. Chil-
dren may burn themselves on these parts,
particularly on the metal parts of the child
restraint system. There is a risk of injury.
If you leave the vehicle, taking the child with
you, always ensure that the child restraint
system is not exposed to direct sunlight. Pro- tect it with a blanket, for example. If the child
restraint system has been exposed to direct
sunlight, let it cool down before securing the
child in it. Never leave children unattended in the vehicle.
Always ensure that all vehicle occupants have
their seat belts fastened correctly and are sitting properly. Particular attention must be paid to
children.
Observe the safety notes on the seat belt
(Y page 42) and the notes on correct use of seat
belts (Y page 43).
A booster seat may be necessary to achieve
proper seat belt positioning for children over
40 lbs (18 kg) until they reach a height where a Children in the vehicle
55Safety Z
Page 128 of 298
If you overfill the fuel tank, fuel could spray out
when the fuel pump nozzle is removed.
For further information on fuel and fuel quality
(Y page 289). Refueling
General information Pay attention to the important safety notes
(Y page 125).
If you unlock/lock the vehicle from the outside,
the fuel filler flap also unlocks/locks.
The position of the fuel filler cap is displayed
00B6 in the instrument cluster. The arrow next
to the filling pump indicates the side of the vehi-
cle.
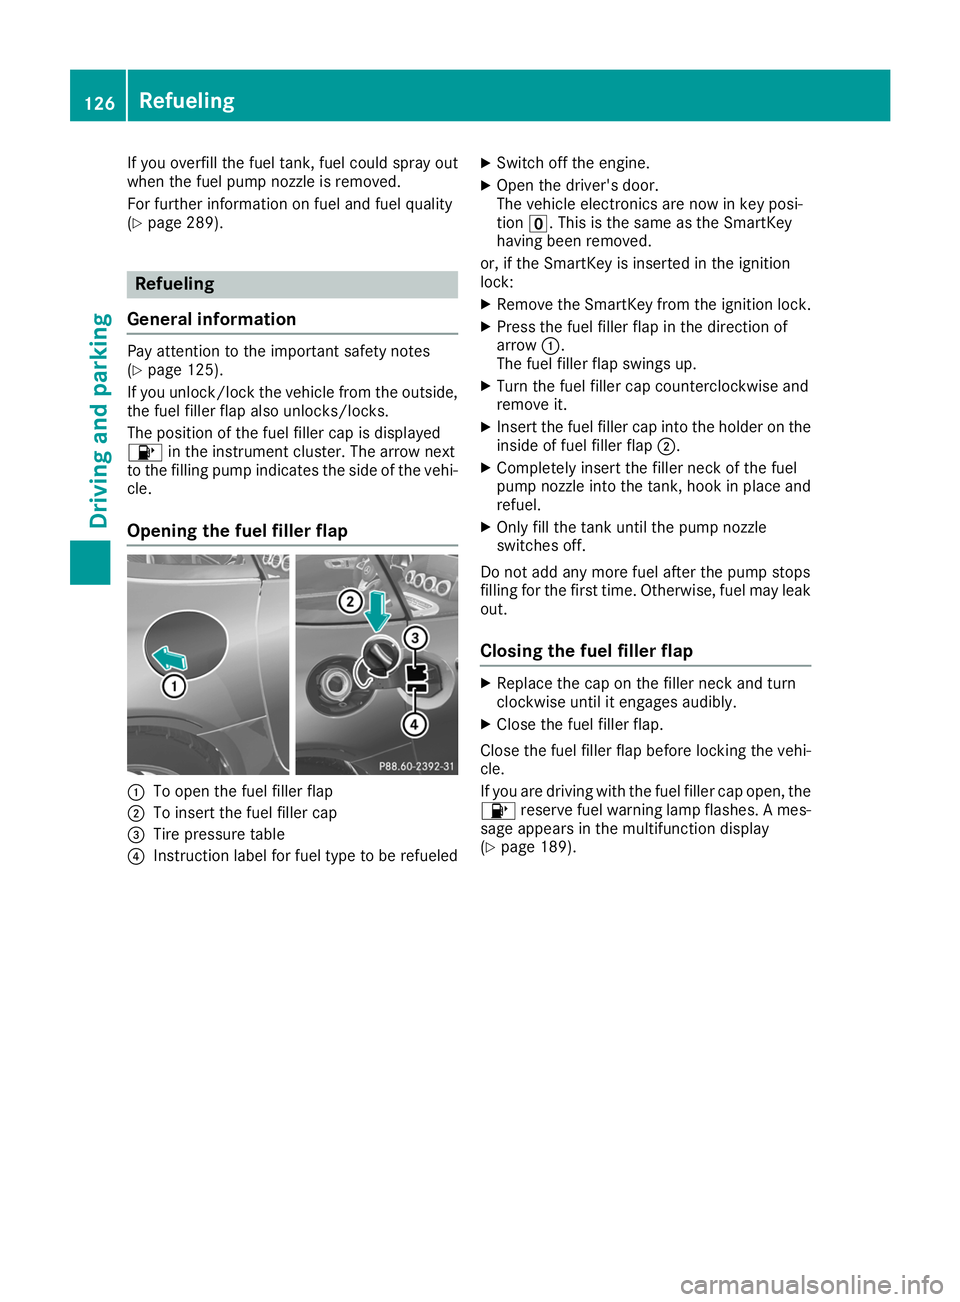
Opening the fuel filler flap 0043
To open the fuel filler flap
0044 To insert the fuel filler cap
0087 Tire pressure table
0085 Instruction label for fuel type to be refueled X
Switch off the engine.
X Open the driver's door.
The vehicle electronics are now in key posi-
tion 0092. This is the same as the SmartKey
having been removed.
or, if the SmartKey is inserted in the ignition
lock: X Remove the SmartKey from the ignition lock.
X Press the fuel filler flap in the direction of
arrow 0043.
The fuel filler flap swings up.
X Turn the fuel filler cap counterclockwise and
remove it.
X Insert the fuel filler cap into the holder on the
inside of fuel filler flap 0044.
X Completely insert the filler neck of the fuel
pump nozzle into the tank, hook in place and
refuel.
X Only fill the tank until the pump nozzle
switches off.
Do not add any more fuel after the pump stops
filling for the first time. Otherwise, fuel may leak out.
Closing the fuel filler flap X
Replace the cap on the filler neck and turn
clockwise until it engages audibly.
X Close the fuel filler flap.
Close the fuel filler flap before locking the vehi-
cle.
If you are driving with the fuel filler cap open, the 00B6 reserve fuel warning lamp flashes. A mes-
sage appears in the multifunction display
(Y page 189). 126
RefuelingDriving and parking
Page 161 of 298
Important safety notes
G
WARNING
If you operate information systems and com-
munication equipment integrated in the vehi- cle when driving, you may be distracted from
the traffic situation. You could also lose con-
trol of the vehicle. There is a risk of an acci-
dent.
Only operate this equipment when the traffic
situation permits. If you are not sure that this
is possible, park the vehicle paying attention
to traffic conditions and operate the equip-
ment when the vehicle is stationary.
You must observe the legal requirements for the country in which you are currently driving whenoperating the on-board computer. G
WARNING
If the instrument cluster has failed or mal-
functioned, you may not recognize function
restrictions in systems relevant to safety. The operating safety of your vehicle may be
impaired. There is a risk of an accident.
Drive on carefully. Have the vehicle checked
at a qualified specialist workshop immedi-
ately.
The on-board computer only shows messages or
warnings from certain systems in the multifunc- tion display. You should therefore make sure
your vehicle is operating safely at all times.
If the operating safety of your vehicle is
impaired, pull over as soon as it is safe to do so. Contact a qualified specialist workshop.
For an overview, see the instrument panel illus-
tration (Y page 34). Displays and operation
Speedometer with segments
The segments in the speedometer indicate
which speed range is available:
R Cruise control activated (Y page 134):The segments light up from the stored speed
to the type-tested maximum speed.
R Active Distance Assist DISTRONIC activated
(Y page 136):
One or two segments in the set speed range
light up.
R Active Distance Assist DISTRONIC detects a
vehicle in front moving more slowly than the
stored speed:
The segments between the speed of the vehi-
cle in front and the stored speed light up. Tachometer
! Do not drive in the overrevving range, as this
could damage the engine.
The red band in the tachometer indicates the
engine's overrevving range.
The fuel supply is interrupted to protect the
engine when the red band is reached. Outside temperature display
You should pay special attention to road condi-
tions when temperatures are around freezing
point.
Bear in mind that the outside temperature dis-
play indicates the measured air temperature
and not the road surface temperature.
The outside temperature display is in the multi-
function display (Y page 161).
Changes in the outside temperature are dis-
played after a short delay. Coolant temperature gauge
G
WARNING
Opening the hood when the engine is over-
heated or when there is a fire in the engine
compartment could expose you to hot gases
or other service products. There is a risk of
injury.
Let an overheated engine cool down before
opening the hood. If there is a fire in the
engine compartment, keep the hood closed
and contact the fire department. Displays and operation
159On-board computer and displays Z
Page 206 of 298
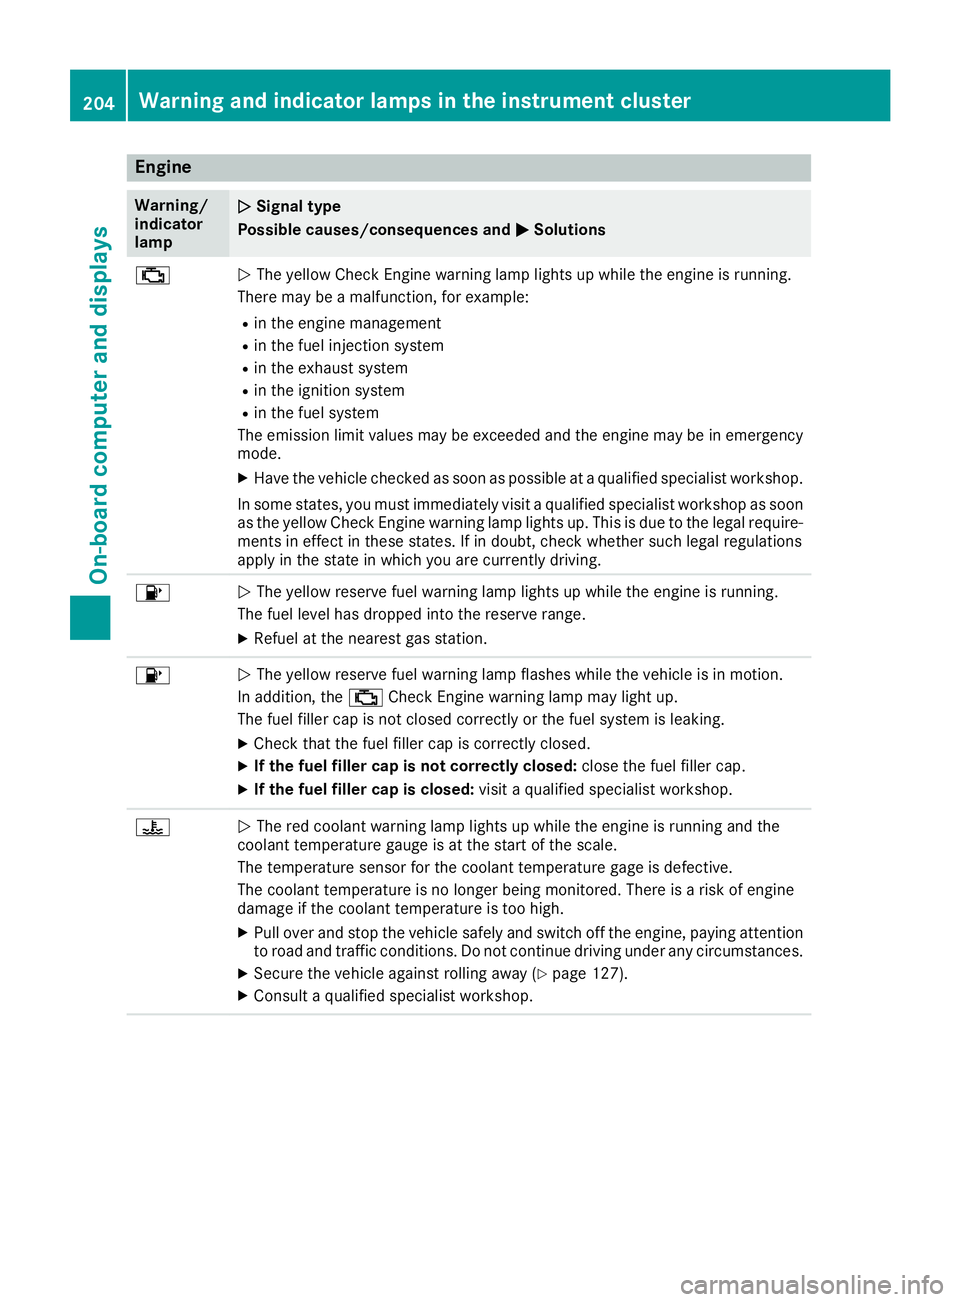
Engine
Warning/
indicator
lamp
0051 0051
Signal type
Possible causes/consequences and 0050
0050Solutions 00B9
0051
The yellow Check Engine warning lamp lights up while the engine is running.
There may be a malfunction, for example:
R in the engine management
R in the fuel injection system
R in the exhaust system
R in the ignition system
R in the fuel system
The emission limit values may be exceeded and the engine may be in emergency
mode.
X Have the vehicle checked as soon as possible at a qualified specialist workshop.
In some states, you must immediately visit a qualified specialist workshop as soon as the yellow Check Engine warning lamp lights up. This is due to the legal require-ments in effect in these states. If in doubt, check whether such legal regulations
apply in the state in which you are currently driving. 00B6
0051
The yellow reserve fuel warning lamp lights up while the engine is running.
The fuel level has dropped into the reserve range.
X Refuel at the nearest gas station. 00B6
0051
The yellow reserve fuel warning lamp flashes while the vehicle is in motion.
In addition, the 00B9Check Engine warning lamp may light up.
The fuel filler cap is not closed correctly or the fuel system is leaking.
X Check that the fuel filler cap is correctly closed.
X If the fuel filler cap is not correctly closed: close the fuel filler cap.
X If the fuel filler cap is closed: visit a qualified specialist workshop.00AC
0051
The red coolant warning lamp lights up while the engine is running and the
coolant temperature gauge is at the start of the scale.
The temperature sensor for the coolant temperature gage is defective.
The coolant temperature is no longer being monitored. There is a risk of engine
damage if the coolant temperature is too high.
X Pull over and stop the vehicle safely and switch off the engine, paying attention
to road and traffic conditions. Do not continue driving under any circumstances.
X Secure the vehicle against rolling away (Y page 127).
X Consult a qualified specialist workshop. 204
Warning and indicator lamps in the instrument clusterOn-board computer and displays
Page 216 of 298
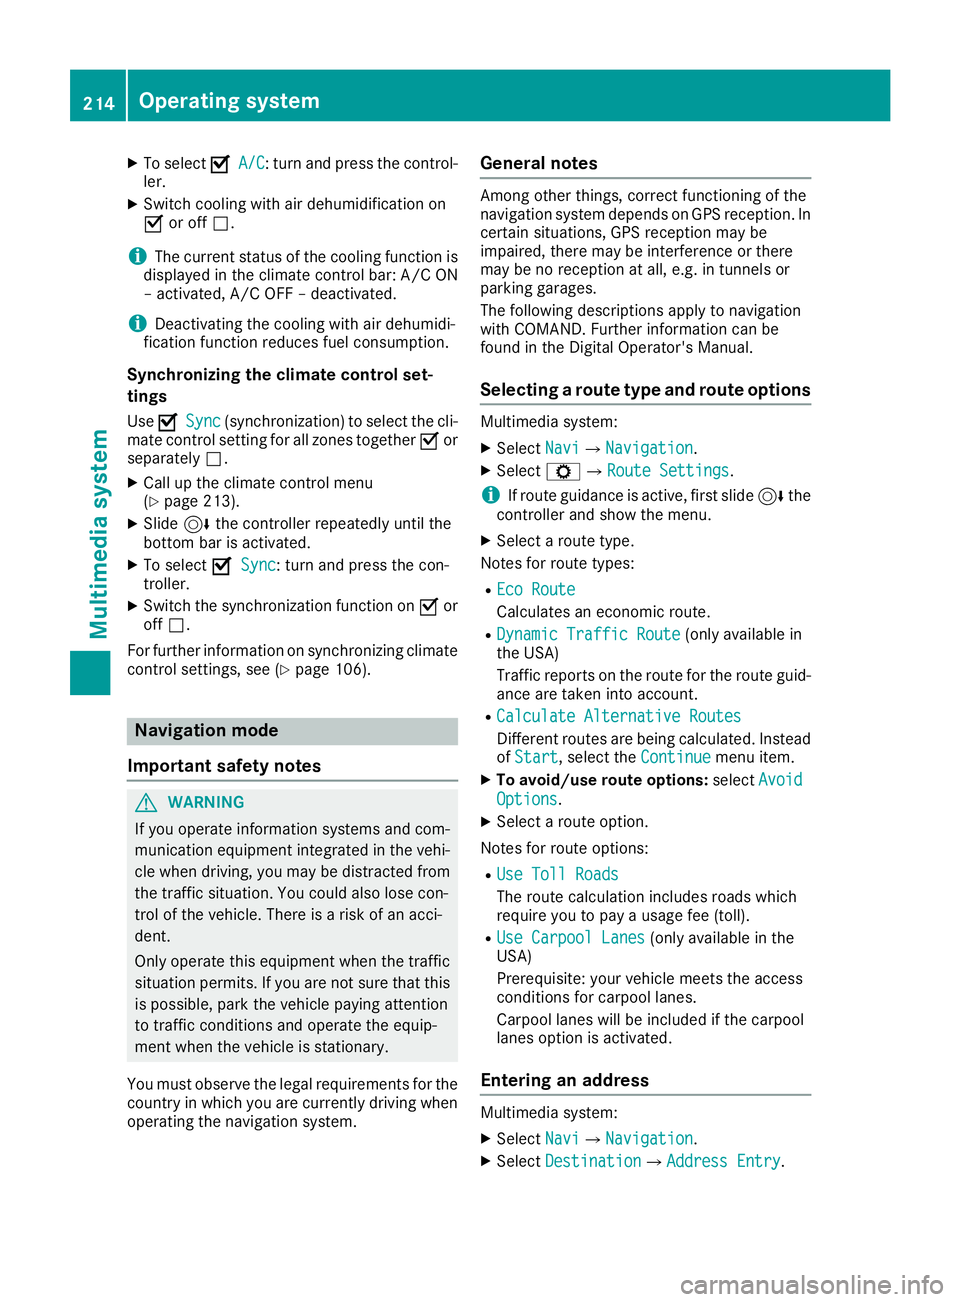
X
To select 0073
0073 A/C
A/C: turn and press the control-
ler.
X Switch cooling with air dehumidification on
0073 or off 0053.
i The current status of the cooling function is
displayed in the climate control bar: A/C ON
– activated, A/C OFF – deactivated.
i Deactivating the cooling with air dehumidi-
fication function reduces fuel consumption.
Synchronizing the climate control set-
tings
Use 0073
0073 Sync Sync (synchronization) to select the cli-
mate control setting for all zones together 0073or
separately 0053.
X Call up the climate control menu
(Y page 213).
X Slide 6the controller repeatedly until the
bottom bar is activated.
X To select 0073
0073 Sync Sync: turn and press the con-
troller.
X Switch the synchronization function on 0073or
off 0053.
For further information on synchronizing climate
control settings, see (Y page 106).Navigation mode
Important safety notes G
WARNING
If you operate information systems and com-
munication equipment integrated in the vehi- cle when driving, you may be distracted from
the traffic situation. You could also lose con-
trol of the vehicle. There is a risk of an acci-
dent.
Only operate this equipment when the traffic
situation permits. If you are not sure that this
is possible, park the vehicle paying attention
to traffic conditions and operate the equip-
ment when the vehicle is stationary.
You must observe the legal requirements for the country in which you are currently driving whenoperating the navigation system. General notes Among other things, correct functioning of the
navigation system depends on GPS reception. In
certain situations, GPS reception may be
impaired, there may be interference or there
may be no reception at all, e.g. in tunnels or
parking garages.
The following descriptions apply to navigation
with COMAND. Further information can be
found in the Digital Operator's Manual.
Selecting a route type and route options Multimedia system:
X Select Navi Navi007BNavigation Navigation.
X Select Z007BRoute Settings Route Settings.
i If route guidance is active, first slide
6the
controller and show the menu.
X Select a route type.
Notes for route types:
R Eco Route
Eco Route
Calculates an economic route.
R Dynamic Traffic Route Dynamic Traffic Route (only available in
the USA)
Traffic reports on the route for the route guid- ance are taken into account.
R Calculate Alternative Routes Calculate Alternative Routes
Different routes are being calculated. Instead
of Start Start, select the Continue
Continuemenu item.
X To avoid/use route options: selectAvoid
Avoid
Options
Options.
X Select a route option.
Notes for route options: R Use Toll Roads
Use Toll Roads
The route calculation includes roads which
require you to pay a usage fee (toll).
R Use Carpool Lanes Use Carpool Lanes (only available in the
USA)
Prerequisite: your vehicle meets the access
conditions for carpool lanes.
Carpool lanes will be included if the carpool
lanes option is activated.
Entering an address Multimedia system:
X Select Navi Navi007BNavigation Navigation.
X Select Destination
Destination 007BAddress EntryAddress Entry. 214
Operating systemMultimedia system
Page 245 of 298
Washing by hand
In some countries, washing by hand is only
allowed at specially equipped washing bays.
Observe the legal requirements in each country.
X Do not use hot water and do not wash the
vehicle in direct sunlight.
X Use a soft sponge to clean.
X Use a mild cleaning agent, such as a car
shampoo approved by Mercedes-Benz.
X Thoroughly hose down the vehicle with a gen-
tle jet of water.
X Do not point the water jet directly towards the
air inlet.
X Use plenty of water and rinse out the sponge
frequently.
X Rinse the vehicle with clean water and dry
thoroughly with a chamois.
X Do not let the cleaning agent dry on the paint-
work.
Carefully remove all deposits of road salt as
soon as possible when driving in winter.
Power washers G
WARNING
The water jet from a circular jet nozzle (dirt
blasters) can cause invisible exterior damage to the tires or chassis components. Compo-
nents damaged in this way may fail unexpect- edly. There is a risk of an accident.
Do not use power washers with circular jet
nozzles to clean the vehicle. Have damaged
tires or chassis components replaced imme-
diately.
! Always maintain a distance of at least
11.8 in (30 cm) between the vehicle and the
high-pressure cleaner nozzle. Information
about the correct distance is available from
the equipment manufacturer.
Move the power washer nozzle around when
cleaning your vehicle.
Do not aim directly at any of the following:
R tires
R door gaps, joints etc.
R soft top
R wind deflector net
R electrical components R
battery
R plug-type couplings
R lights
R seals
R trim
R ventilation slots
Damaged seals or electrical components can
lead to leaks or failures.
! Vehicles with decorative film: parts of your
vehicle are covered with decorative film.
Maintain a distance of at least 27.5 in (70 cm) between the film-covered parts of the vehicle
and the nozzle of the power washer.
Information about the correct distance is
available from the equipment manufacturer.
Move the power washer nozzle around when
cleaning your vehicle.
The water temperature of the power washer
must not exceed 140 ‡ (60 †).
! If the SmartKey is within the rear detection
range of KEYLESS-GO, the following situa-
tions, for example, could lead to the uninten-
tional opening of the trunk lid:
R when using an automatic car wash
R when using a power washer
Make sure that the SmartKey is at least 10 ft (3 m) away from the vehicle.
Cleaning the paintwork !
Do not affix:
R stickers
R films
R magnetic plates or similar items
to painted surfaces. You could otherwise
damage the paintwork.
Scratches, corrosive deposits, areas affected by corrosion and damage caused by inadequate
care cannot always be completely repaired. In
such cases, visit a qualified specialist workshop.
X Remove dirt immediately, where possible,
while avoiding rubbing too hard.
X Soak insect remains with insect remover and
rinse off the treated areas afterwards.
X Soak bird droppings with water and rinse off
the treated areas afterwards.
X Remove tree resin, oils, fuels and greases by
rubbing gently with a cloth soaked in petro-
leum ether or lighter fluid. Care
243Maintenance and care Z
Page 265 of 298
Important safety notes
G
WARNING
If wheels and tires of the wrong size are used, the wheel brakes or suspension components
may be damaged. There is a risk of an acci-
dent.
Always replace wheels and tires with those
that fulfill the specifications of the original
part.
When replacing wheels, make sure to use the
correct:
R designation
R model
When replacing tires, make sure to use the
correct:
R designation
R manufacturer
R model G
WARNING
A flat tire severely impairs the driving, steer-
ing and braking characteristics of the vehicle.
There is a risk of accident.
Tires without run-flat characteristics:
R do not drive with a flat tire.
R immediately replace the flat tire with your
emergency spare wheel or spare wheel, or
consult a qualified specialist workshop.
Tires with run-flat characteristics:
R pay attention to the information and warn-
ing notices on MOExtended tires (tires with
run-flat characteristics).
Accessories that are not approved for your vehi-
cle by Mercedes-Benz or are not being used cor- rectly can impair the operating safety.
Before purchasing and using non-approved
accessories, visit a qualified specialist work-
shop and inquire about:
R suitability
R legal stipulations
R factory recommendations Information on the sizes and types of wheels and
tires for your vehicle can be found under
"Wheel/tire combinations" (Y page 285).
Tire pressure information can be found:
R on the Tire and Loading Information placard
on the B-pillar on the driver's side
(Y page 271)
R in the tire pressure table in the fuel filler flap
(Y page 126)
R in the "Tire pressure" section Operation
Information on driving
Check the tire pressure when the vehicle is
heavily laden and adjust prior to a trip.
While driving, pay attention to vibrations, noises
and unusual handling characteristics, e.g. pull-
ing to one side. This may indicate that the
wheels or tires are damaged. If you suspect that a tire is defective, reduce your speed immedi-
ately. Stop the vehicle as soon as possible to
check the wheels and tires for damage. Hidden
tire damage could also be causing the unusual
handling characteristics. If you find no signs of
damage, have the tires and wheels checked at a
qualified specialist workshop.
When parking your vehicle, make sure that the
tires do not get deformed by the curb or other
obstacles. If they cannot be avoided, drive over obstacles such as curbs slowly and at an obtuse
angle. Otherwise, you may damage the wheels
or tires. Notes on high performance tires
G
WARNING
Due to the special tire tread in combination
with the optimized rubber compound, there is an increased risk of hydroplaning and skid-
ding on damp or wet road surfaces. In addi-
tion, tire traction is significantly reduced at
low outside temperatures and low tire-oper-
ating temperatures. There is a risk of an acci-
dent.
Activate ESP ®
and adapt your driving style. At
outside temperatures below 50 ‡(10 †), use
M+S tires. Operation
263Wheels and tires Z