2019 MASERATI LEVANTE key
[x] Cancel search: keyPage 176 of 436

Press and release the button to
return to the main menu.
6. TRIP
Press and release the switch in the
or arrow directions until this
menu item is displayed.
For each of the “Trip A” and “Trip B”
sub-menus the screen will display the
following: • “Distance ” traveled in miles or km.
Shows the total covered distance
since the last reset.
• “Average ” consumption in MPG (US),
MPG (UK) or L/100km.
Shows the average fuel
consumption since the last reset.
• “Average ” speed in MPH or km/h.
Shows the average speed since the
last reset.
• “Elapsed Time ”
Shows the total time of travel since
the last reset in “hours:minutes:
seconds.” Elapsed Time will
increment when the ignition switch
is in the RUN or START position.
Press the multifunction switch (
) for
1 second and release to reset “Trip A”
or “Trip B”.
“Trip B” is reset after each key on/key
off cycle.
Press and release the
button to
return to the main menu.
7. START & STOP
Press and release the switch in the
or arrow directions until this
menu item is displayed.
With the ignition device in RUN
position, the screen will display the
status of the function (see example in
picture). To change the status of the function, please see chapter
“Automatic Start&Stop System” of
section “Driving”.
8. AUDIO
Press and release the switch in the
or arrow directions until this
menu item is displayed.
The display will show the audio status
(source and current audio track) as set
on the MTC+. It is possible to display 5Dashboard Instruments and Controls
4
172
Page 180 of 436

• Time/Date (default: Upper Left)
• Range to Empty
• Average MPG (or L/100km or km/L)
• Current MPG (or L/100km or km/L)
• Trip A Distance
• Trip B Distance
Upper Right
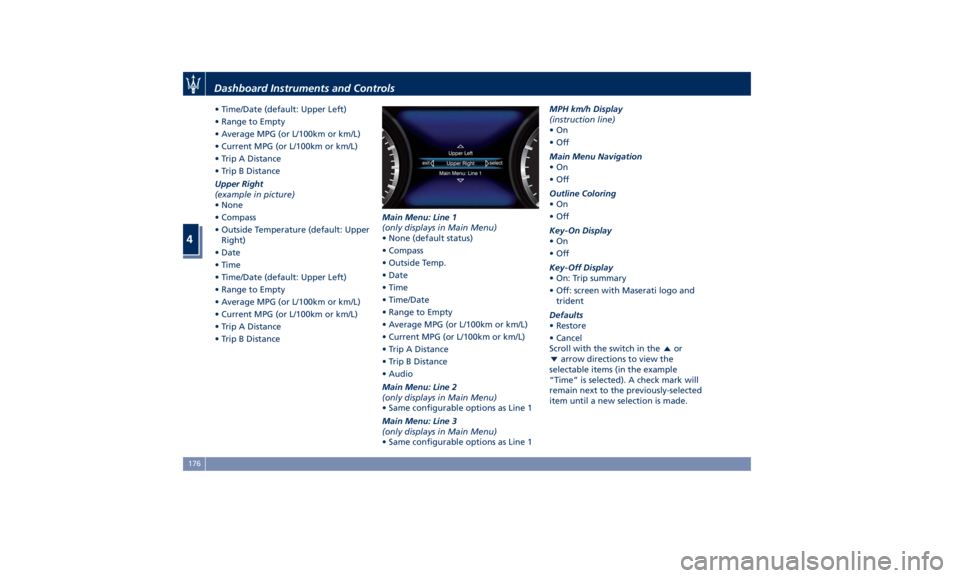
(example in picture)
• None
• Compass
• Outside Temperature (default: Upper
Right)
• Date
• Time
• Time/Date (default: Upper Left)
• Range to Empty
• Average MPG (or L/100km or km/L)
• Current MPG (or L/100km or km/L)
• Trip A Distance
• Trip B Distance Main Menu: Line 1
(only displays in Main Menu)
• None (default status)
• Compass
• Outside Temp.
• Date
• Time
• Time/Date
• Range to Empty
• Average MPG (or L/100km or km/L)
• Current MPG (or L/100km or km/L)
• Trip A Distance
• Trip B Distance
• Audio
Main Menu: Line 2
(only displays in Main Menu)
• Same configurable options as Line 1
Main Menu: Line 3
(only displays in Main Menu)
• Same configurable options as Line 1 MPH km/h Display
(instruction line)
•On
•Off
Main Menu Navigation
•On
•Off
Outline Coloring
•On
•Off
Key-On Display
•On
•Off
Key-Off Display
• On: Trip summary
• Off: screen with Maserati logo and
trident
Defaults
• Restore
• Cancel
Scroll with the switch in the
or
arrow directions to view the
selectable items (in the example
“Time” is selected). A check mark will
remain next to the previously-selected
item until a new selection is made.Dashboard Instruments and Controls
4
176
Page 182 of 436

“Key-On Display” and “Key-Off
Display” items allow user to set display
during vehicle key-on and off.
“Key-On Display” is normally set to
“On”. When entering the vehicle, after
the welcome screen, the display will
show the information concerning
engine starting sequence. While if it is
set to “Off” (example shown in
figure), the display will show the
information displayed before last
vehicle key-off.
When engine is started and ignition
device is pressed to stop it, it is
possible to set “Key-Off Display”, “On”
or “Off” to obtain the following
display settings:
• “On”: “Trip summary” screen (Trip B
is reset after each key-on/key-off
cycle);
• “Off”: screen with Maserati logo and
trident. The “Defaults” item of “Screen Setup”
submenu allows restoring Maserati
factory settings.
TFT Display: Warning/Indicator
Lights of Set Modes/Functions Display sections indicated in the figure
show warning/indicator lights
concerning all selected driving
functions and all set functions/systems.
The relevant messages will be
indicated within the main area for five
seconds, unless otherwise specified.
Fault messages will be stored under
“Stored messages”.
Charging System Warning Light
This warning light shows the
status of the electrical
charging system. If the light
stays on or comes on while
driving, turn off some of the vehicle's
non-essential electrical devices or
increase engine speed (if at idle). If the
charging system warning light remains
on, it means that the vehicle is
experiencing a problem with the
charging system. IMMEDIATELY
contact an Authorized Maserati Dealer
to have the vehicle serviced.
If jump starting is required, refer to
“Jump Start Procedures” in section “In
an Emergency”. Transmission Temperature Warning
Light
This warning light and the
related message indicate that
the transmission fluid
temperature is rising.
If this warning light turns on, safely
pull over and stop the vehicle.
Then, shift the transmission into P
(Park) and run the engine at idle until
the temperature drops and the light
switches off. If the problem persists,
contact an Authorized Maserati
Dealer .
CAUTION!
Continuous driving with the
transmission temperature warning
light illuminated will eventually cause
severe transmission damage or failure.
Engine Temperature Warning Light
This
warning light notifies
when
the engine is
overheated. If the
temperature reaches critical
levels and the gauge displayed in
sector 12 turns red, this warning light
under the engine temperature gauge
indicator will illuminate in red color
combined with the related message on
display. When the temperature isDashboard Instruments and Controls
4
178
Page 186 of 436

WARNING!
Do not drive with this warning light
on. Check that the fuel filler cap is
tightened correctly.
Electric Parking Brake Failure Warning
Light
This
warning light and
related
message illuminate when
there is an EPB system failure.
The failure could also
completely or partially block the
vehicle because the parking brake
could remain on even after it has been
automatically or manually disengaged
though its controls.
If it is still possible to use the vehicle
(parking brake not engaged) drive to
the nearest Authorized Maserati
Dealer and remember to performing
each operation/command that the
electric parking brake is not
functioning.
Start&Stop Disable Indicator
This indicator illuminates
when Start&Stop is turned off
through the controls located
on the right side of the
steering wheel or through the relevant
soft-key of the MTC+. See chapter “Automatic Start&Stop System” of
section “Driving” for further
information.
Start&Stop Failure Warning Light
This warning light illuminates
when there is a failure in the
Start&Stop system. Switch the
engine on or off using the
normal procedure with the ignition
device START/STOP and have the
vehicle checked at an Authorized
Maserati Dealer .
Scheduled Maintenance (Service)
Indicator
This indicator illuminates and
a message flashes on the
display for approximately 5
seconds after an acoustic
signal to indicate that the next
scheduled maintenance is due or is
already overdue.
Unless reset, the message will continue
to display each time you cycle the
ignition to the RUN position.
To turn off the message temporarily,
press and release the
button on the
steering wheel. To reset the service
indicator system, please visit an
Authorized Maserati Dealer . ADAS Status Indicators (If equipped)
When you are not viewing the
“Drive Assist” page, the
indicators at the top left-hand
side of the display indicate
status of individual ADAS system or
the combination of them (see
examples).
For further details, refer to
“Adaptive Cruise Control -
ACC”, “Lane Keeping Assist -
LKA” and “Highway Assist - HAS” in
section “Driving”.
Forward Collision Warning (FCW) Off
(If equipped)
This warning light informs the
driver that Forward Collision
Warning (FCW) is disabled. If
this light occurs together with
other specific messages, take your
vehicle to an Authorized Maserati
Dealer for service. This warning light
will light even when the activation of
another driver assistance feature or
drive mode (such as “
-ESC OFF”)
disables the FCW.
Forward Collision Warning (FCW) Fault
(If equipped)
This warning light informs that
FCW is in fault state. If this
occurred together with other
specific messages, could meanDashboard Instruments and Controls
4
182
Page 188 of 436

For further information, check
“Electronic Cruise Control” in section
“Driving”.
Cruise Control (CC) Set
This green light indicator will
illuminate with the set speed
when the CC is set and in
driver override. For further
information, check “Electronic Cruise
Control” in section “Driving”.
Lane Keeping Assist (LKA) Fault
This warning light on indicates
that the LKA system is in fault.
If the warning light and the
relevant message do not go
off after a few manoeuvres and
eventually a key cycle, contact an
Authorized Maserati Dealer .
Adaptive Cruise Control (ACC) Ready
or Canceled
This white warning light
indicates that the ACC is ready
to be set (with 3 dashes below)
and, once it sets, when it is
temporarily canceled (set speed in
white below). For further details, refer
to “Adaptive Cruise Control - ACC” in
section “Driving”. Adaptive Cruise Control (ACC) Set
This green warning light with
below the set speed turns on
when the ACC is set (for
further details, refer to
“Adaptive Cruise Control - ACC” in
section “Driving”) and vehicle will
keep set speed.
Adaptive Cruise Control (ACC) Fault
This warning light turns on
when ACC is not operating or
needs servicing, For further
details, refer to “Adaptive
Cruise Control - ACC” in section
“Driving”.
Blind Spot Assist (BSA) Failure
Warning Light
This warning light and related
message light on to report a
failure of the BSA system.
As consequence, on vehicles
equipped with ABSA also this latter
will be not working or malfunctioning.
Contact an Authorized Maserati
Dealer as soon as possible avoiding to
use this system.
Hill Descent Control (HDC) Ready
This white light turns on to
indicate that HDC is ready to
be set and, once it sets, to turn
it off temporarily. For further details, refer to “Brake and Stability
Control System” in section “Driving”.
Hill Descent Control (HDC) Set
This green light with below
the set speed turns on when
the HDC is set. For further
details, refer to “Brake and
Stability Control System” in section
“Driving”.
Headlight On Indicator
This indicator will illuminate
when the position lights or
headlights are turned on.
For further details, see
“Lights” in section “Understanding the
Vehicle”.
Front Fog lights On Indicator
This indicator turns on when
the fog lights are on.
Automatic High Beam On Indicator
This indicator turns on when
the “Auto High Beam Assist”
feature is set on MTC+ (see
“MTC+ Settings” in this
section).Dashboard Instruments and Controls
4
184
Page 190 of 436

7. Tune/scroll control.
Manual Controls and Devices SD, AUX and USB Ports
When an SD card is inserted into its
housing, the MTC+ is able to read it
and select multimedia files (music and
images) from the device.
By using the AUX and USB ports it is
possible to connect external devices to
the MTC+ (see chapter “Interior features” in section “Understanding
the Vehicle”).
After connecting the device, by using
the MTC+ display softkeys, knobs on
the central console and controls at the
steering wheel, user can navigate
through the content of the connected
device and set its playing mode.
Multimedia Navigation Controls on
Central Console
The manual controls located on the
central console are a further interface
for the driver and nearby passenger,
that adds to the MTC+ display
softkeys. Using the manual controls,
the MTC+ display will work as a
graphic display of the inputs from the
controls.
Volume Control
By working this knob in “Radio” or
“Media” mode, user can adjust the
volume of the radio or audio files,
from minimum to maximum and vice
versa. Turn knob clockwise to increase
the volume, counter-clockwise to
decrease it. The volume status will be
indicated in the top part of the MTC+
display. Tune/Scroll Control
By working this knob in “Radio” or
“Media” mode, user can go through
the radio stations or scroll the tracks
inside connected external devices and
confirm the selection by pressing enter
button.
In any other mode of the MTC+, use
this knob to scroll the list of available
options or to manage the cursor
movement in the lower bar of the
main menus. Then press enter button
to confirm the function or setting
highlighted on MTC+ display.
Browse button
After selecting a function, using the
tune/scroll knob or softkeys on MTC+
display, press this button to see the
detail of the items/options of the
selected function. This button is also
used as shortcut to display the phone
book, when the “Phone” menu isDashboard Instruments and Controls
4
186
Page 191 of 436

selected, or the favorites when the
“Nav (Navigation)” menu is selected.
Back button
Press this button to go back to
previous menu or previous screen.
Press this button to shift the
navigation one level backwards on
MTC+ screen. If it is pressed and held
for at least 2 seconds, it brings the
cursor back in the lower bar of the
main menus.
Enter Button
To confirm the function or setting
highlighted on MTC+ display.
When in “Radio” mode and the
ignition switch in RUN position, you
can save your preset stations.
Main Menu Bar on MTC+
Display The softkeys located on the lower part
of the MTC+ display represent the
main menu modes/functions, which
are briefly indicated below. Main menu bar is set up by Maserati:
it can be customized according to
personal requirements, as explained in
“Customizing the Main Menu Bar” in
this chapter.
For further information refer to the
dedicated booklet included in the
owner documentation.
1. “Radio ” softkey
Touch this softkey to enter the
Radio mode. The different tuner
modes: FM, AM, SXM and “Aha”
App (for countries where they are
supported) can be selected by
touching the related softkeys in the
Radio mode.
2. “Media ” softkey (if connected)
Touch this softkey to access media
sources such as: USB Device, AUX,
Bluetooth and SD card as long as
the requested media is present. 3. “Controls ” softkey
Touch this soft-key to access the
features of some driver assistance
system (ADAS) that can be set up (if
equipped). Features can be selected
and adjusted or turned on/off by
touching the related soft-key (see
"MTC+ "Controls" Screen" in this
section).
4.
softkey
Touch this softkey to access
Applications / settings screen.
5. “Climate ” softkey
Touch this soft-key to access the air
conditioning settings. In this screen
the following controls are also
available: Heated Seats, Heated
Steering Wheel and Ventilated
Seats. See “Air Conditioning
Controls” in this section for further
details.
6. “Nav ” softkey
Touch this softkey to access the
Navigation feature. Refer to the
MTC+ instruction manual for
further details.
7. “Phone ” softkey
Touch one of these softkey to access
the MTC+ Phone feature that can
be set or monitored via MTC+.Dashboard Instruments and Controls
4
187
Page 192 of 436

Touch one of these soft-keys to access
the list of functions that users can set.
Touchscreen Display Warnings
CAUTION!
• Do NOT attach any object to the
touchscreen, doing so can result in
damage to the touchscreen.
• Do not press the screen with any
hard or sharp objects (pen, USB stick,
jewelry, etc.) which could scratch the
touchscreen surface.
• Do not spray any liquid or caustic
chemicals directly on the screen. Use
a clean and dry micro fiber lens
cleaning cloth in order to clean the
touchscreen.
• If necessary, use a lint-free cloth
dampened with a cleaning solution,
such as isopropyl alcohol, or an
isopropyl alcohol and water solution
ratio of 50:50. Be sure to follow the
solvent manufacturer’s precautions
and directions.
Switch OFF Touchscreen Backlight
If
the screen backlight becomes
annoying when driving, it is possible to
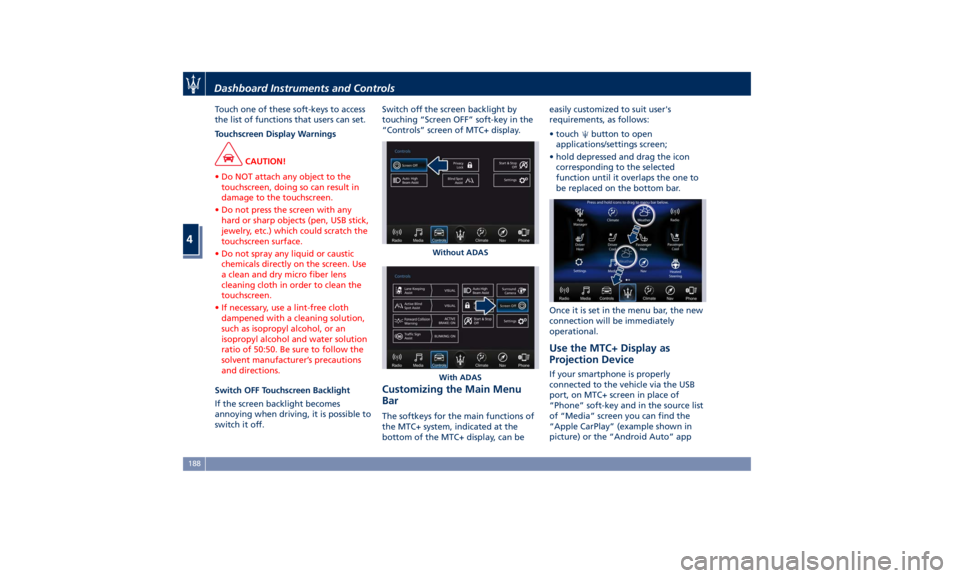
switch it off. Switch off the screen backlight by
touching “Screen OFF” soft-key in the
“Controls” screen of MTC+ display.
Customizing the Main Menu
Bar The softkeys for the main functions of
the MTC+ system, indicated at the
bottom of the MTC+ display, can be easily customized to suit user's
requirements, as follows:
• touch
button to open
applications/settings screen;
• hold depressed and drag the icon
corresponding to the selected
function until it overlaps the one to
be replaced on the bottom bar.
Once it is set in the menu bar, the new
connection will be immediately
operational.
Use the MTC+ Display as
Projection Device If your smartphone is properly
connected to the vehicle via the USB
port, on MTC+ screen in place of
“Phone” soft-key and in the source list
of “Media” screen you can find the
“Apple CarPlay” (example shown in
picture) or the “Android Auto” appWithout ADAS
With ADASDashboard Instruments and Controls
4
188