2019 MASERATI LEVANTE transmission
[x] Cancel search: transmissionPage 41 of 436

Remote Start System On the vehicles that are equipped
with this system, the key fob RKE
transmitter enables to start the engine
conveniently from outside the vehicle
while still maintaining security. The
system has a range of approximately
300 ft (91 m). Obstructions between
the vehicle and the key fob may
reduce this range.
NOTE:
Changes or modifications not
expressly approved by the party
responsible for compliance could void
the user's authority to operate the
equipment.
If your RKE transmitter fails to operate
from a normal distance, check for
these conditions:
• A weak battery in the RKE
transmitter. The expected life of the
battery is a minimum of three years.
• Closeness to a radio transmitter such
as a radio station tower, airport
transmitter, and some mobile or CB
radio.
• Obstructions between the vehicle
and the Key Fob. How to use Remote Start All of the following conditions must
be met before the engine will remote
start:
• System not disabled from previous
remote start event.
• Vehicle theft alarm not active.
• Vehicle Panic mode not active.
• Doors closed.
• Hood closed.
• Power liftgate closed.
• Hazard lights switched off.
• Brake pedal not pressed.
• Battery at an acceptable charge
level.
• The shift lever is in P (Park) position.
• The vehicle transmission is in
automatic mode.
• The remote start has not been
activated yet two consecutive times.
If EPB (Electric Parking Brake) is not
selected, at key-off in some conditions
the remote start system may not allow
engine to start. We suggest to set
“Auto Apply On” function through
the switch on the right-side of the
steering wheel (refer to “Instrument
Cluster” in section “Dashboard
Instrument and Controls”). WARNING!
• Do not start or run an engine in a
closed garage or confined area.
Exhaust gas contains Carbon
Monoxide (CO) which is odorless
and colorless
• Keep key fobs RKE transmitter away
from children. Operation of the
Remote Start System, windows,
door locks or other controls could
cause serious injury or death.
Engine Remote Start Abort
Message on Instrument Cluster The following messages will display on
the instrument cluster if the vehicle
fails to remote start or exits remote
start prematurely:
• “Remote Start Canceled Door
Open”.
• “Remote Start Canceled Liftgate
Open”.
• “Remote Start Canceled Fuel Low”.
• “Remote Start Canceled Time
Expired”.
• “Remote Start Disabled Start Vehicle
to Reset”.Before Starting
2
37
Page 44 of 436
Power Doors Locking/
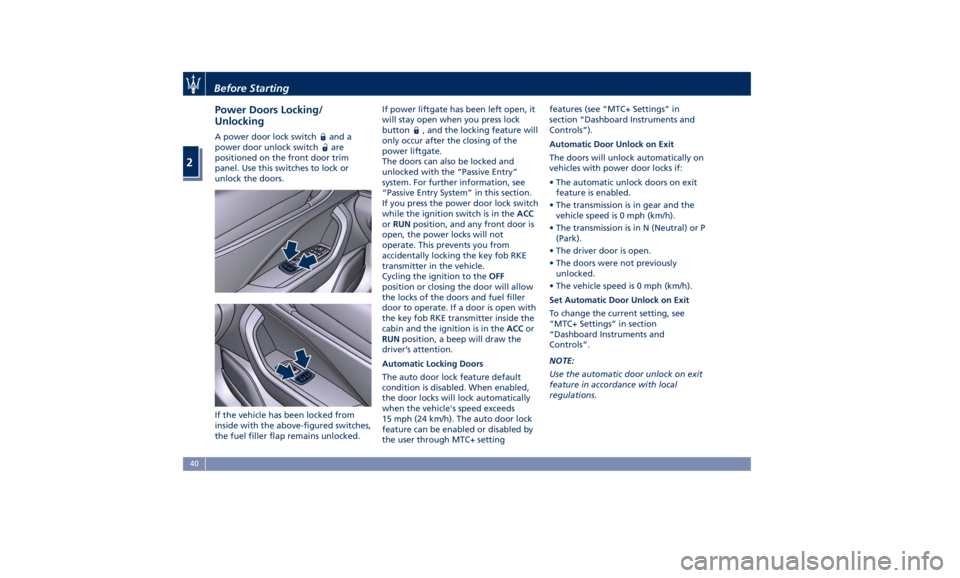
Unlocking A power door lock switch and a
power door unlock switch
are
positioned on the front door trim
panel. Use this switches to lock or
unlock the doors.
If the vehicle has been locked from
inside with the above-figured switches,
the fuel filler flap remains unlocked. If power liftgate has been left open, it
will stay open when you press lock
button
, and the locking feature will
only occur after the closing of the
power liftgate.
The doors can also be locked and
unlocked with the “Passive Entry”
system. For further information, see
“Passive Entry System” in this section.
If you press the power door lock switch
while the ignition switch is in the ACC
or RUN position, and any front door is
open, the power locks will not
operate. This prevents you from
accidentally locking the key fob RKE
transmitter in the vehicle.
Cycling the ignition to the OFF
position or closing the door will allow
the locks of the doors and fuel filler
door to operate. If a door is open with
the key fob RKE transmitter inside the
cabin and the ignition is in the ACC or
RUN position, a beep will draw the
driver’s attention.
Automatic Locking Doors
The auto door lock feature default
condition is disabled. When enabled,
the door locks will lock automatically
when the vehicle's speed exceeds
15 mph (24 km/h). The auto door lock
feature can be enabled or disabled by
the user through MTC+ setting features (see “MTC+ Settings” in
section “Dashboard Instruments and
Controls”).
Automatic Door Unlock on Exit
The doors will unlock automatically on
vehicles with power door locks if:
• The automatic unlock doors on exit
feature is enabled.
• The transmission is in gear and the
vehicle speed is 0 mph (km/h).
• The transmission is in N (Neutral) or P
(Park).
• The driver door is open.
• The doors were not previously
unlocked.
• The vehicle speed is 0 mph (km/h).
Set Automatic Door Unlock on Exit
To change the current setting, see
“MTC+ Settings” in section
“Dashboard Instruments and
Controls”.
NOTE:
Use the automatic door unlock on exit
feature in accordance with local
regulations.Before Starting
2
40
Page 60 of 436
Hood Operation Opening Two latches must be released to open
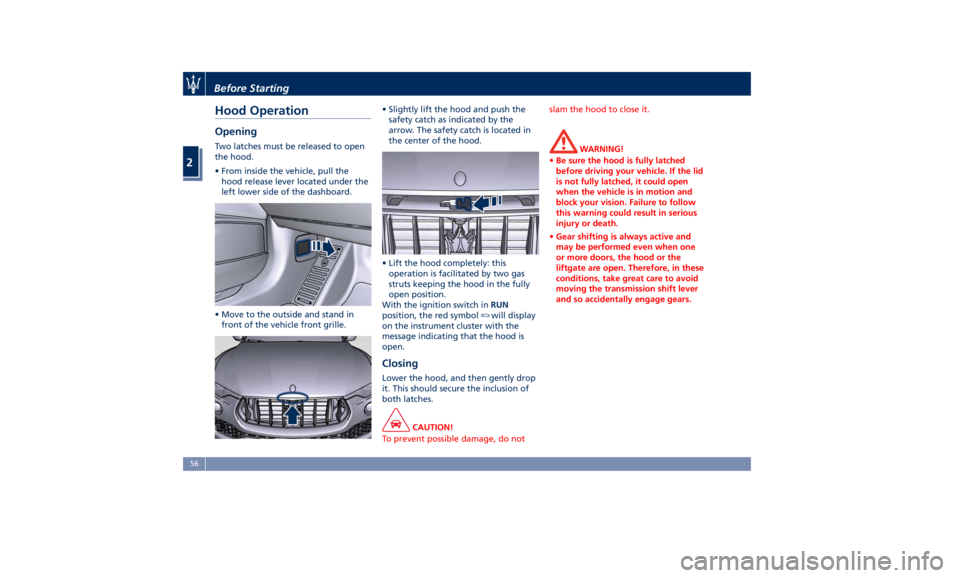
the hood.
• From inside the vehicle, pull the
hood release lever located under the
left lower side of the dashboard.
• Move to the outside and stand in
front of the vehicle front grille. • Slightly lift the hood and push the
safety catch as indicated by the
arrow. The safety catch is located in
the center of the hood.
• Lift the hood completely: this
operation is facilitated by two gas
struts keeping the hood in the fully
open position.
With the ignition switch in RUN
position, the red symbol
will display
on the instrument cluster with the
message indicating that the hood is
open.
Closing Lower the hood, and then gently drop
it. This should secure the inclusion of
both latches.
CAUTION!
To prevent possible damage, do not slam the hood to close it.
WARNING!
• Be sure the hood is fully latched
before driving your vehicle. If the lid
is not fully latched, it could open
when the vehicle is in motion and
block your vision. Failure to follow
this warning could result in serious
injury or death.
• Gear shifting is always active and
may be performed even when one
or more doors, the hood or the
liftgate are open. Therefore, in these
conditions, take great care to avoid
moving the transmission shift lever
and so accidentally engage gears.Before Starting
2
56
Page 91 of 436
Surround View Camera
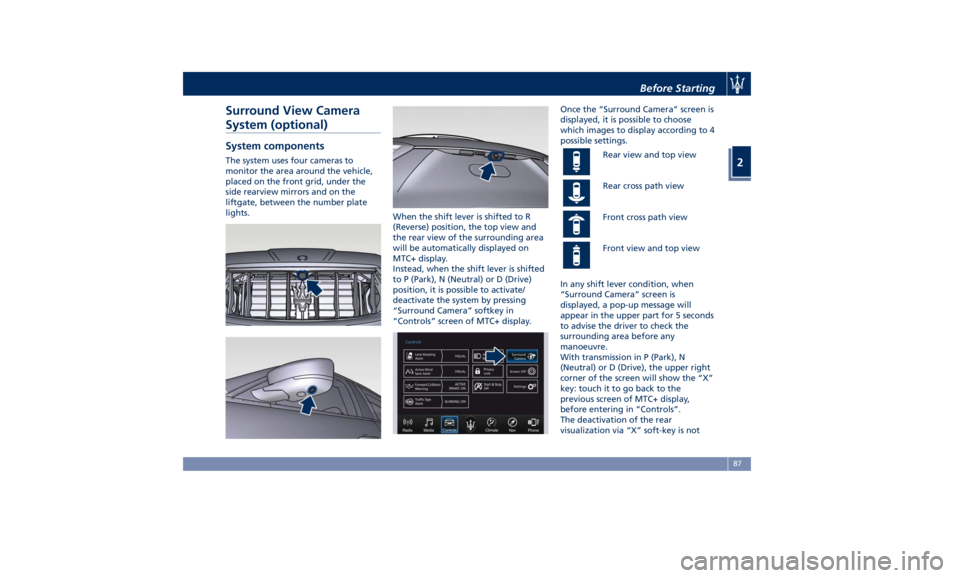
System (optional) System components The system uses four cameras to
monitor the area around the vehicle,
placed on the front grid, under the
side rearview mirrors and on the
liftgate, between the number plate
lights.
When the shift lever is shifted to R
(Reverse) position, the top view and
the rear view of the surrounding area
will be automatically displayed on
MTC+ display.
Instead, when the shift lever is shifted
to P (Park), N (Neutral) or D (Drive)
position, it is possible to activate/
deactivate the system by pressing
“Surround Camera” softkey in
“Controls” screen of MTC+ display. Once the “Surround Camera” screen is
displayed, it is possible to choose
which images to display according to 4
possible settings.
Rear view and top view
Rear cross path view
Front cross path view
Front view and top view
In any shift lever condition, when
“Surround Camera” screen is
displayed, a pop-up message will
appear in the upper part for 5 seconds
to advise the driver to check the
surrounding area before any
manoeuvre.
With transmission in P (Park), N
(Neutral) or D (Drive), the upper right
corner of the screen will show the “X”
key: touch it to go back to the
previous screen of MTC+ display,
before entering in “Controls”.
The deactivation of the rear
visualization via “X” soft-key is notBefore Starting
2
87
Page 92 of 436
possible when the transmission is in R
(Reverse) position.
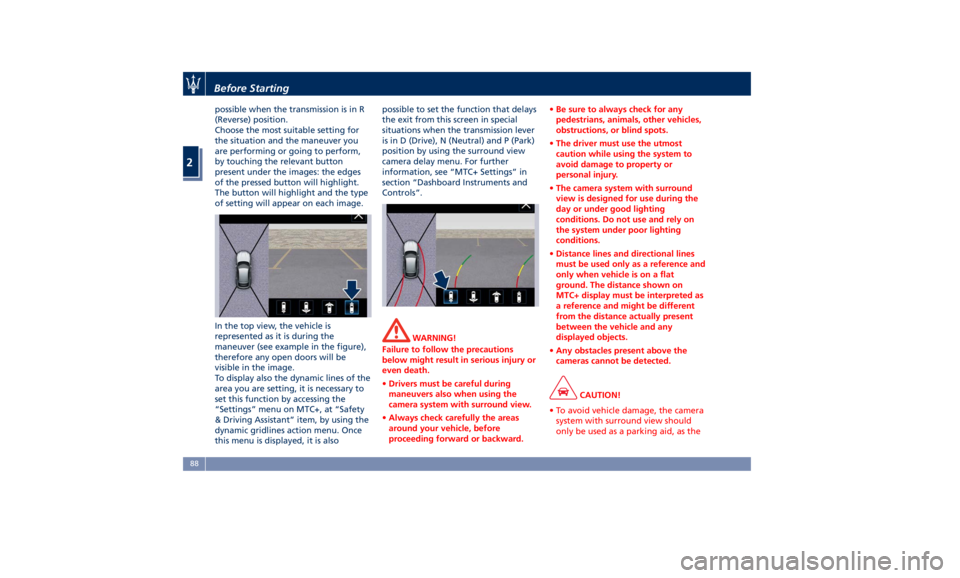
Choose the most suitable setting for
the situation and the maneuver you
are performing or going to perform,
by touching the relevant button
present under the images: the edges
of the pressed button will highlight.
The button will highlight and the type
of setting will appear on each image.
In the top view, the vehicle is
represented as it is during the
maneuver (see example in the figure),
therefore any open doors will be
visible in the image.
To display also the dynamic lines of the
area you are setting, it is necessary to
set this function by accessing the
“Settings” menu on MTC+, at “Safety
& Driving Assistant” item, by using the
dynamic gridlines action menu. Once
this menu is displayed, it is also possible to set the function that delays
the exit from this screen in special
situations when the transmission lever
is in D (Drive), N (Neutral) and P (Park)
position by using the surround view
camera delay menu. For further
information, see “MTC+ Settings” in
section “Dashboard Instruments and
Controls”.
WARNING!
Failure to follow the precautions
below might result in serious injury or
even death.
• Drivers must be careful during
maneuvers also when using the
camera system with surround view.
• Always check carefully the areas
around your vehicle, before
proceeding forward or backward. • Be sure to always check for any
pedestrians, animals, other vehicles,
obstructions, or blind spots.
• The driver must use the utmost
caution while using the system to
avoid damage to property or
personal injury.
• The camera system with surround
view is designed for use during the
day or under good lighting
conditions. Do not use and rely on
the system under poor lighting
conditions.
• Distance lines and directional lines
must be used only as a reference and
only when vehicle is on a flat
ground. The distance shown on
MTC+ display must be interpreted as
a reference and might be different
from the distance actually present
between the vehicle and any
displayed objects.
• Any obstacles present above the
cameras cannot be detected.
CAUTION!
• To avoid vehicle damage, the camera
system with surround view should
only be used as a parking aid, as theBefore Starting
2
88
Page 99 of 436

1 Adjustable side air outlets.
2 Engine START/STOP button.
3 Light switch.
4 Anti-theft system indicator.
5 Steering wheel controls.
6 Instrument cluster.
7 Right shift paddle +.
8 Left shift paddle –.
9 Multifunction lever (windshield
wipers, headlight washer and
headlight selection, turn
signals).
10 Adjustable central air outlets.
11 Analog clock.
12 MTC+ display.
13 Climate controls.
14 Dashboard glove box handle.
15 Dashboard glove box with two
USB ports for charging of
connected source.
16 Steering wheel adjustment
control. Central Console Components 1 Automatic transmission shift
lever.
2 Drive mode switches.
3 Electric Parking Brake lever.
4 Cover for compartment with
AUX, USB and SD memory card
port. 5 Cover for cupholder and
cigarette lighter/power socket
compartment.
6 Rotary selectors and buttons for
the multimedia navigation.
7 Hazard flashers switch.
8 Drive height selector.Understanding the Vehicle
3
95
Page 131 of 436
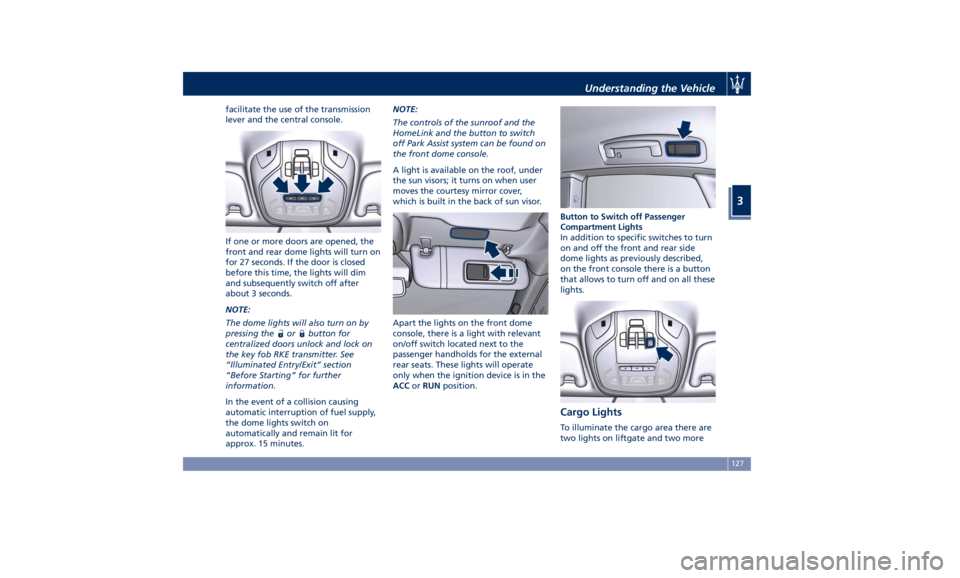
facilitate the use of the transmission
lever and the central console.
If one or more doors are opened, the
front and rear dome lights will turn on
for 27 seconds. If the door is closed
before this time, the lights will dim
and subsequently switch off after
about 3 seconds.
NOTE:
The dome lights will also turn on by
pressing the
or button for
centralized doors unlock and lock on
the key fob RKE transmitter. See
“Illuminated Entry/Exit” section
“Before Starting” for further
information.
In the event of a collision causing
automatic interruption of fuel supply,
the dome lights switch on
automatically and remain lit for
approx. 15 minutes. NOTE:
The controls of the sunroof and the
HomeLink and the button to switch
off Park Assist system can be found on
the front dome console.
A light is available on the roof, under
the sun visors; it turns on when user
moves the courtesy mirror cover,
which is built in the back of sun visor.
Apart the lights on the front dome
console, there is a light with relevant
on/off switch located next to the
passenger handholds for the external
rear seats. These lights will operate
only when the ignition device is in the
ACC or RUN position. Button to Switch off Passenger
Compartment Lights
In addition to specific switches to turn
on and off the front and rear side
dome lights as previously described,
on the front console there is a button
that allows to turn off and on all these
lights.
Cargo Lights To illuminate the cargo area there are
two lights on liftgate and two moreUnderstanding the Vehicle
3
127
Page 134 of 436

Rain Sensing Windshield
Wipers This feature detects moisture on the
windshield through an internal
rearview mirror integrated sensor,
which automatically activates the
relative wipers.
Rotate forward the end of the
multifunction lever to one of four
settings to adjust the detection system.
First wiper delay position is the least
sensitive, and fourth wiper delay
position is the most sensitive. Third
position should be used for normal
rain conditions.
The rain sense wipers will
automatically change between an
intermittent wipe, slow wipe and a
fast wipe depending on the amount of
detected moisture sensed by a
particular area of the windshield.
Place the wiper switch in the “OFF”
position when you do not want to use
the automatic intermittent system.
The rain sensing feature can be turned
on and off using the MTC+ System, see
“MTC+ Settings” in section
“Dashboard Instruments and Controls”
for further information. CAUTION!
• The rain sensing feature may not
function properly by ice or dried salt
water on the windshield.
• Use on the windshield of RainX ®
or
products containing wax or silicone
may reduce rain sensor performance.
The rain sensing system has protective
features for the wiper
blades and
arms. It will not operate under the
following conditions:
• Low Temperature Wipe Inhibit : the
rain sensing feature will not operate
when the ignition is in RUN position,
the vehicle is stationary and the
outside temperature is below 32°F
(0°C). To resume, set the automatic
feature on the multifunction lever,
start the engine and drive or wait
until the outside temperature rises
above freezing.
• Wipe Inhibit with Transmission in
Neutral Position : the rain sensing
feature will not operate when the
ignition is placed in the RUN
position, the transmission shift lever
is in the N (Neutral) position and the
vehicle speed is less than 5 mph
(8 km/h). To resume, set the multifunction lever to the automatic
function or move the shift lever out
of N (Neutral).
Headlights On with Windshield
Wipers When activating this function, the
headlights will light up approximately
10 seconds after the wipers acting on
the windshield are turned on if the
light switch is placed in “AUTO”
position. In addition, the headlights
switch off when the wipers are turned
off (position “OFF”) if they were
previously turned by using this
function. Powering on Headlights with
wipers can be activated and
deactivated with the MTC+ System, see
“MTC+ Settings” in section
“Dashboard Instruments and Controls”
for further information.
Wiper Blade Maintenance When the wiper arms acting on the
windshield are in the rest position it is
not possible to check or replace the
blades (Service position) as they are
folded under the hood. To service the
blades (see paragraph “Wiper
Maintenance and Blades
Replacement” in chapter
“Maintenance Procedures” of section
“Maintenance and Care”) it isUnderstanding the Vehicle
3
130