2019 MASERATI LEVANTE key
[x] Cancel search: keyPage 116 of 436
Seat" chapter in section
“Understanding the Vehicle”)
corresponds to a mirror tilt position in
reverse.
NOTE:
The mirrors tilt in reverse can be
turned on and off using the MTC+
System, refer to “MTC+ Settings” in
section “Dashboard Instruments and
Controls”.
Folding Mirrors
By selecting this feature on MTC+ the
rear-view mirrors automatically fold
when the vehicle is locked by the key
fob and when the power liftgate (if
equipped) is closed and locked by
pressing the
button on the outer
ledge of the left boot compartment
lining. When the vehicle and the
liftgate will be unlocked and the
ignition device is set in RUN position,
the rear-view mirrors will
automatically open in the position
they had before the lock.
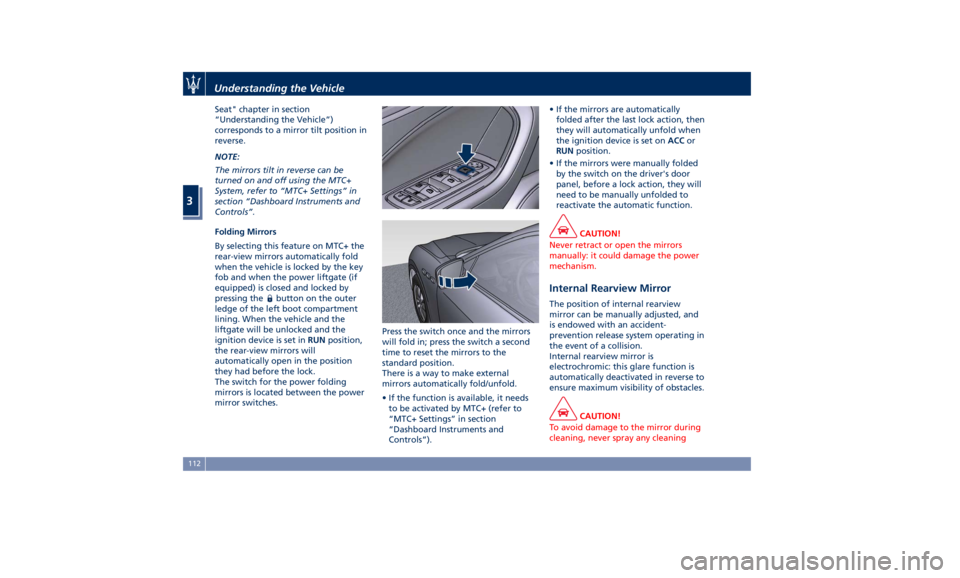
The switch for the power folding
mirrors is located between the power
mirror switches. Press the switch once and the mirrors
will fold in; press the switch a second
time to reset the mirrors to the
standard position.
There is a way to make external
mirrors automatically fold/unfold.
• If the function is available, it needs
to be activated by MTC+ (refer to
“MTC+ Settings” in section
“Dashboard Instruments and
Controls”). • If the mirrors are automatically
folded after the last lock action, then
they will automatically unfold when
the ignition device is set on ACC or
RUN position.
• If the mirrors were manually folded
by the switch on the driver's door
panel, before a lock action, they will
need to be manually unfolded to
reactivate the automatic function.
CAUTION!
Never retract or open the mirrors
manually: it could damage the power
mechanism.
Internal Rearview Mirror The position of internal rearview
mirror can be manually adjusted, and
is endowed with an accident-
prevention release system operating in
the event of a collision.
Internal rearview mirror is
electrochromic: this glare function is
automatically deactivated in reverse to
ensure maximum visibility of obstacles.
CAUTION!
To avoid damage to the mirror during
cleaning, never spray any cleaningUnderstanding the Vehicle
3
112
Page 124 of 436

Automatic High Beam (for
versions/markets, where
provided) The Automatic High Beam headlight
control system provides increased
forward lighting at night by
automating high beam control
through the use of the forward-facing
digital camera located behind the
rear-view mirror, which is the same
one used for example by the Lane
Keeping Assist - LKA system on vehicles
with ADAS systems.
This camera detects the environmental
luminosity, the headlamps of
oncoming vehicles and the tail lamps
of proceding vehicles in the front area.
In these cases, the system
automatically switches from high
beams to low beams until the
approaching vehicle is out of view.
Futhermore, the digital camera is able
to detect the urban areas and the
inhabited centers and to turn off the
high beams when driving near of one
of them.
The properly working for this feature
(if all the other conditions are met) is
ensured between 21.7 mph (35 km/h)
and 155 mph (250 km/h). Activation Mode
To activate Automatic High Beam
feature:
• Shift the multifunction lever onward
.
• Put the light switch in “AUTO”
position.
• Touch the "Controls" soft-key in the
lower part of the MTC+ display.
• Within 15 seconds, touch the "Auto
High Beam Assist" soft-key to turn
on the feature. • Within 15 seconds, touch the "Auto
High Beam Assist" soft-key a second
time to turn it off.
After these steps, the green indicator
on the upper right side of the TFT
display comes on.
Without ADAS With ADASUnderstanding the Vehicle
3
120
Page 126 of 436
the “Auto High Beam Assist” soft-key,
as shown in the previous paragraph
"Automatic High Beams".
The “Glare Free” feature will be
engaged after the following actions:
• Engine run.
• Feature enabled by MTC+.
• Low beam on.
• Interior light switch in position
“Auto”.
• Multifunction lever in “High beam”
activated position.
The “Glare Free” feature will work if:
• The vehicle speed is equal or greater
than 21.7 mph (35 km/h) in the
engagement phase of the feature.
• Environmental brightness is not
sufficient for a safe and comfortable
drive.
• Traffic scenario out of urban context.
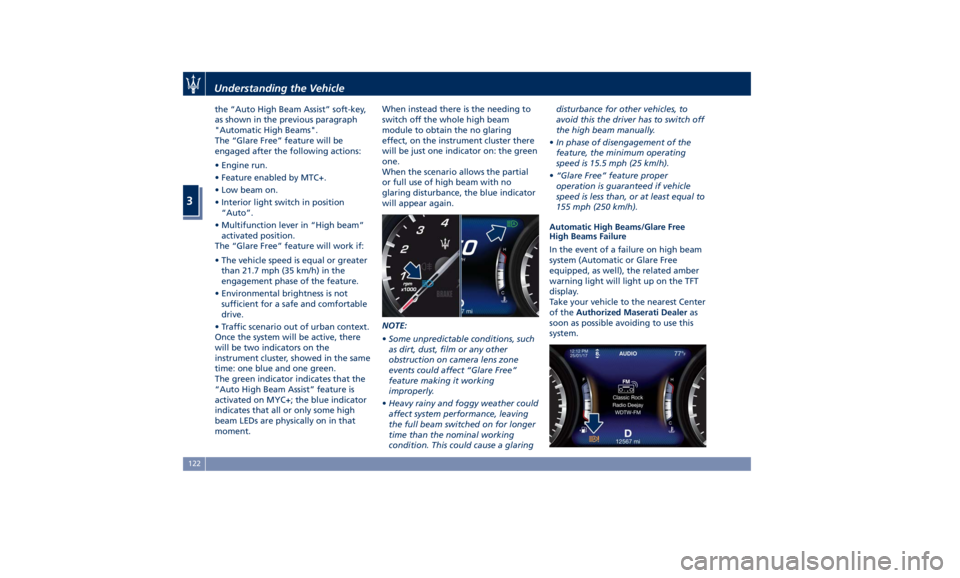
Once the system will be active, there
will be two indicators on the
instrument cluster, showed in the same
time: one blue and one green.
The green indicator indicates that the
“Auto High Beam Assist” feature is
activated on MYC+; the blue indicator
indicates that all or only some high
beam LEDs are physically on in that
moment. When instead there is the needing to
switch off the whole high beam
module to obtain the no glaring
effect, on the instrument cluster there
will be just one indicator on: the green
one.
When the scenario allows the partial
or full use of high beam with no
glaring disturbance, the blue indicator
will appear again.
NOTE:
• Some unpredictable conditions, such
as dirt, dust, film or any other
obstruction on camera lens zone
events could affect “Glare Free”
feature making it working
improperly.
• Heavy rainy and foggy weather could
affect system performance, leaving
the full beam switched on for longer
time than the nominal working
condition. This could cause a glaring disturbance for other vehicles, to
avoid this the driver has to switch off
the high beam manually.
• In phase of disengagement of the
feature, the minimum operating
speed is 15.5 mph (25 km/h).
• “Glare Free” feature proper
operation is guaranteed if vehicle
speed is less than, or at least equal to
155 mph (250 km/h).
Automatic High Beams/Glare Free
High Beams Failure
In the event of a failure on high beam
system (Automatic or Glare Free
equipped, as well), the related amber
warning light will light up on the TFT
display.
Take your vehicle to the nearest Center
of the Authorized Maserati Dealer as
soon as possible avoiding to use this
system.Understanding the Vehicle
3
122
Page 127 of 436
Fog Lights NOTE:
The front fog lights can only be
switched on if the position lights
are switched on. It is possible to
turn on the rear fog lights only if the
low beam lights
or the front fog
lights are on.
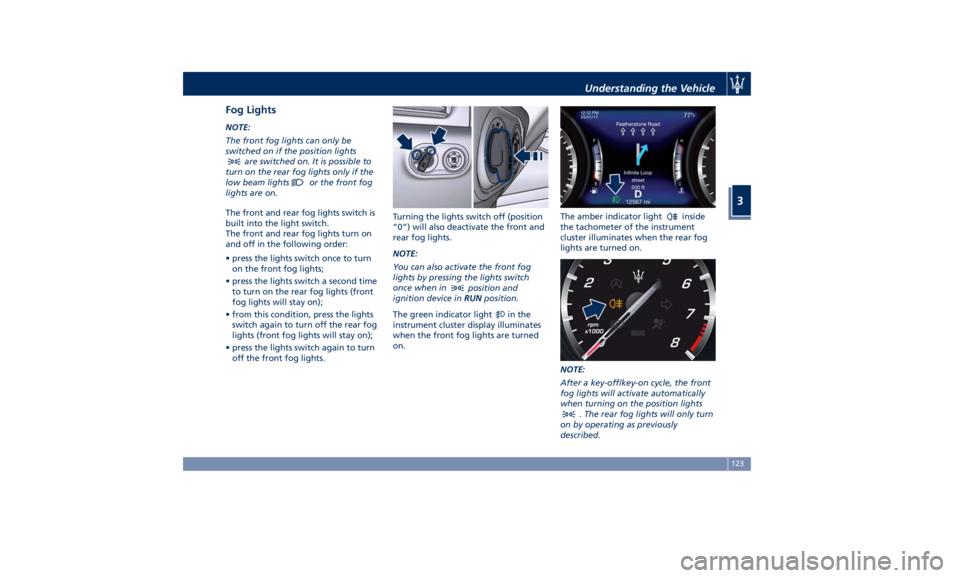
The front and rear fog lights switch is
built into the light switch.
The front and rear fog lights turn on
and off in the following order:
• press the lights switch once to turn
on the front fog lights;
• press the lights switch a second time
to turn on the rear fog lights (front
fog lights will stay on);
• from this condition, press the lights
switch again to turn off the rear fog
lights (front fog lights will stay on);
• press the lights switch again to turn
off the front fog lights. Turning the lights switch off (position
“0”) will also deactivate the front and
rear fog lights.
NOTE:
You can also activate the front fog
lights by pressing the lights switch
once when in
position and
ignition device in RUN position.
The green indicator light
in the
instrument cluster display illuminates
when the front fog lights are turned
on. The amber indicator light
inside
the tachometer of the instrument
cluster illuminates when the rear fog
lights are turned on.
NOTE:
After a key-off/key-on cycle, the front
fog lights will activate automatically
when turning on the position lights
. The rear fog lights will only turn
on by operating as previously
described.Understanding the Vehicle
3
123
Page 131 of 436
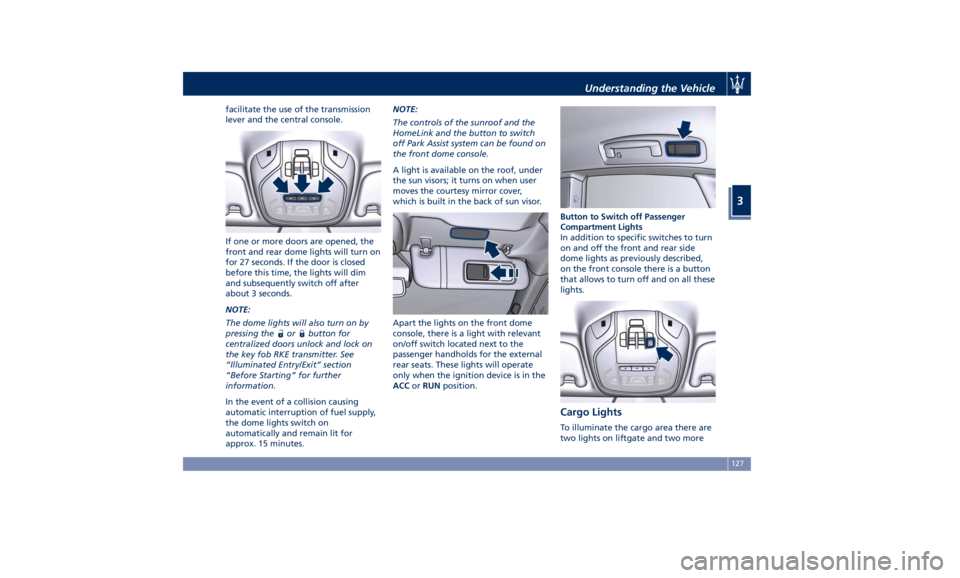
facilitate the use of the transmission
lever and the central console.
If one or more doors are opened, the
front and rear dome lights will turn on
for 27 seconds. If the door is closed
before this time, the lights will dim
and subsequently switch off after
about 3 seconds.
NOTE:
The dome lights will also turn on by
pressing the
or button for
centralized doors unlock and lock on
the key fob RKE transmitter. See
“Illuminated Entry/Exit” section
“Before Starting” for further
information.
In the event of a collision causing
automatic interruption of fuel supply,
the dome lights switch on
automatically and remain lit for
approx. 15 minutes. NOTE:
The controls of the sunroof and the
HomeLink and the button to switch
off Park Assist system can be found on
the front dome console.
A light is available on the roof, under
the sun visors; it turns on when user
moves the courtesy mirror cover,
which is built in the back of sun visor.
Apart the lights on the front dome
console, there is a light with relevant
on/off switch located next to the
passenger handholds for the external
rear seats. These lights will operate
only when the ignition device is in the
ACC or RUN position. Button to Switch off Passenger
Compartment Lights
In addition to specific switches to turn
on and off the front and rear side
dome lights as previously described,
on the front console there is a button
that allows to turn off and on all these
lights.
Cargo Lights To illuminate the cargo area there are
two lights on liftgate and two moreUnderstanding the Vehicle
3
127
Page 152 of 436
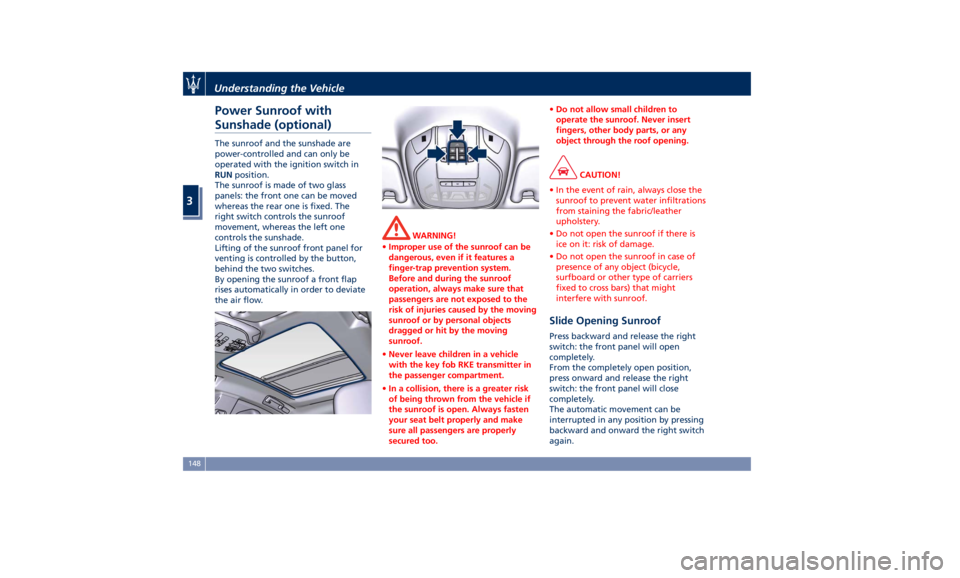
Power Sunroof with
Sunshade (optional) The sunroof and the sunshade are
power-controlled and can only be
operated with the ignition switch in
RUN position.
The sunroof is made of two glass
panels: the front one can be moved
whereas the rear one is fixed. The
right switch controls the sunroof
movement, whereas the left one
controls the sunshade.
Lifting of the sunroof front panel for
venting is controlled by the button,
behind the two switches.
By opening the sunroof a front flap
rises automatically in order to deviate
the air flow. WARNING!
• Improper use of the sunroof can be
dangerous, even if it features a
finger-trap prevention system.
Before and during the sunroof
operation, always make sure that
passengers are not exposed to the
risk of injuries caused by the moving
sunroof or by personal objects
dragged or hit by the moving
sunroof.
• Never leave children in a vehicle
with the key fob RKE transmitter in
the passenger compartment.
• In a collision, there is a greater risk
of being thrown from the vehicle if
the sunroof is open. Always fasten
your seat belt properly and make
sure all passengers are properly
secured too. • Do not allow small children to
operate the sunroof. Never insert
fingers, other body parts, or any
object through the roof opening.
CAUTION!
• In the event of rain, always close the
sunroof to prevent water infiltrations
from staining the fabric/leather
upholstery.
• Do not open the sunroof if there is
ice on it: risk of damage.
• Do not open the sunroof in case of
presence of any object (bicycle,
surfboard or other type of carriers
fixed to cross bars) that might
interfere with sunroof.
Slide Opening Sunroof Press backward and release the right
switch: the front panel will open
completely.
From the completely open position,
press onward and release the right
switch: the front panel will close
completely.
The automatic movement can be
interrupted in any position by pressing
backward and onward the right switch
again.Understanding the Vehicle
3
148
Page 171 of 436

sector 23, only the main menu number
and the scroll arrows remain displayed
in the sector 3 , left side.
Within a submenu, press and release
the switch in the
and arrow
directions to scroll the menu.
Press the
button to return to the
main menu from an item of interest or
from an information screen.
Main Menu & Submenu Content
Overview
1. MAIN MENU
• View speed in mph or km/h
2. VEHICLE INFO
• Tire Pressure
• Transmission Temperature
• Oil Temperature
• Oil Pressure
• Battery Voltage
• Maintenance 3. DRIVE MODE
• Drive Mode - Ride Height - Torque
Distribution - Powertrain status - ESC
status - Suspension stiffness status
4. Driver Assist (if equipped)
• Shows the status of any active driver
assist systems: CC, ACC, LKA and
HAS. Graphics in the main area of
TFT display only refer to ACC, LKA
and HAS systems
• LKA (LaneSense) status
5. FUEL ECONOMY
• Average, Range, Current gage
6. TRIP
• Trip A: Average, Avg. speed, Elapsed
time, Distance
• Trip B: Average, Avg. speed, Elapsed
time, Distance
7. START&STOP
• Messages relating to the Start&Stop
function
8. AUDIO
• Information concerning audio status
according to current media source,
track and station.
• Information on phone incoming call.
9. STORED MESSAGES
10. VEHICLE SETTINGS • Speed Warning: enables, disables or
sets the speed limit represented in
the dynamic icon on the TFT display
• Auto apply Off/On of the Electric
Parking Brake
• Interior Lighting
– Backlighting
– Ambient Lighting
• SCREEN SETUP
– Upper Left
– Upper Right
– Main Menu: Line 1
– Main Menu: Line 2
– Main Menu: Line 3
– MPH km/h Display On/Off
– Main Menu Navigation
– Outline Coloring
– Key-On Display
– Key-Off Display
– Defaults
Messages on Main Display Area
The main display area also displays
"pop up" messages. These pop up
messages fall into several categories:
• Five-Second Stored Messages
When the appropriate conditions
occur, this type of message appears
on the main display area for five
seconds and then returns to the
previous screen. Most of the
messages of this type are thenDashboard Instruments and Controls
4
167
Page 175 of 436

4. DRIVER ASSIST (if equipped)
Press and release the switch in the
or arrow directions until this
menu item is displayed.
• Active Driver Assist System
The screen graphically shows
current status of driver assist
systems: the figure shows an
example with ACC engaged and
HAS set.
• LKA (LaneSense) Status
Vehicle is delivered with LKA in off
state set on MTC+ system, page
“Controls”.
You can enable LKA in the “Visual”
only or “Visual & Haptic” mode by
turning on the function via MTC+
system soft-key and by changing
your selection in the dedicated
submenu. The setting chosen will
latch over key cycles. NOTE:
To set these systems, see chapters
“Adaptive Cruise Control - ACC”,
“Highway Assist - HAS” and “Lane
Keeping Assist - LKA” in section
“Driving”.
Press and release the
button to
return to the main menu.
5. FUEL ECONOMY
Press and release the switch in the
or arrow directions until this
menu item is displayed.
The screen will display the following:
• Current Fuel Economy in MPG (US),
MPG (UK) or L/100km
Shows the current fuel economy.
During AutoStop stage performed
by the Start&Stop system (see
“Normal Starting of the Engine” in
section “Driving”), a dash will be
displayed instead of the value. • Range in miles or km
Shows the range since the last fuel
average reset.
When the fuel economy is reset, the
display will read “Reset” or show
dashes for two seconds.
Then, the history information will
be erased, and the averaging will
continue from the last fuel average
reading before the reset.
• Fuel Economy Average in MPG (US),
MPG (UK) or L/100km
Shows the average fuel economy
since the last reset.
Press the multifunction switch (
)
for 1 second and release it to reset
the fuel economy average.
When the fuel economy is reset, the
display will read “Reset” or show
dashes for two seconds.
Then, the history information will
be erased, and the averaging will
continue from the last fuel average
reading before the reset.Dashboard Instruments and Controls
4
171