2019 MASERATI LEVANTE lock
[x] Cancel search: lockPage 65 of 436

Three-Point Seat Belt Height
Adjustment
WARNING!
• Wearing your seat belt incorrectly
could make your injuries in a
collision much worse. You might
suffer internal injuries, or you could
even slide out of the seat belt.
Follow these instructions to wear
your seat belt safely and to keep
your passengers safe, too.
• Position the shoulder belt across the
shoulder and chest with minimal, if
any slack so that it is comfortable
and not resting on your neck. The
retractor will withdraw any slack in
the shoulder belt.
• Misadjustment of the seat belt could
reduce the effectiveness of the
safety belt in a crash.
• Always make all seat belt height
adjustments when the vehicle is
stationary.
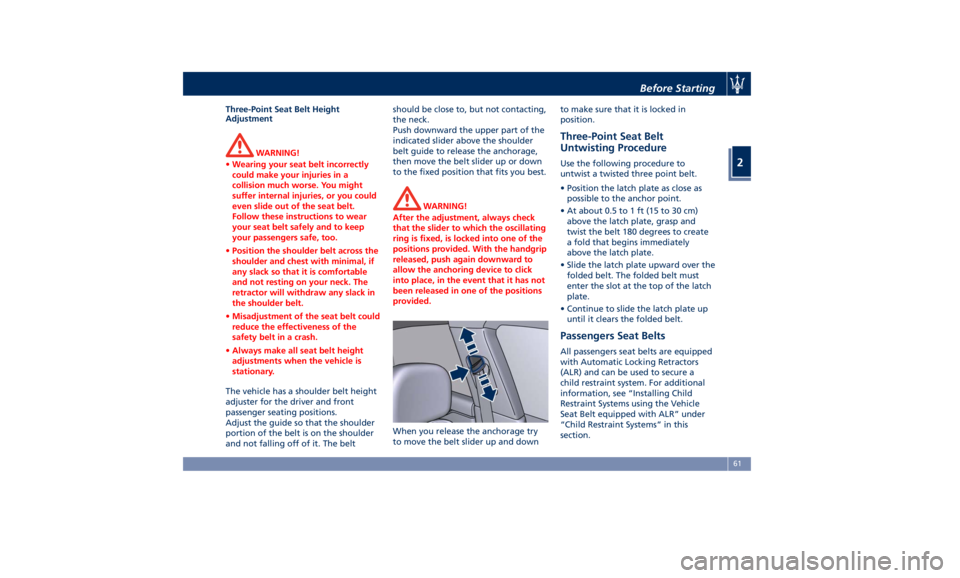
The vehicle has a shoulder belt height
adjuster
for the driver and front
passenger seating positions.
Adjust the guide so that the shoulder
portion of the belt is on the shoulder
and not falling off of it. The belt should be close to, but not contacting,
the neck.
Push downward the upper part of the
indicated slider above the shoulder
belt guide to release the anchorage,
then move the belt slider up or down
to the fixed position that fits you best.
WARNING!
After the adjustment, always check
that the slider to which the oscillating
ring is fixed, is locked into one of the
positions provided. With the handgrip
released, push again downward to
allow the anchoring device to click
into place, in the event that it has not
been released in one of the positions
provided.
When you release the anchorage try
to
move the belt
slider up and down to make sure that it is locked in
position.
Three-Point Seat Belt
Untwisting Procedure Use the following procedure to
untwist a twisted three point belt.
• Position the latch plate as close as
possible to the anchor point.
• At about 0.5 to 1 ft (15 to 30 cm)
above the latch plate, grasp and
twist the belt 180 degrees to create
a fold that begins immediately
above the latch plate.
• Slide the latch plate upward over the
folded belt. The folded belt must
enter the slot at the top of the latch
plate.
• Continue to slide the latch plate up
until it clears the folded belt.
Passengers Seat Belts All passengers seat belts are equipped
with Automatic Locking Retractors
(ALR) and can be used to secure a
child restraint system. For additional
information, see “Installing Child
Restraint Systems using the Vehicle
Seat Belt equipped with ALR” under
“Child Restraint Systems” in this
section.Before Starting
2
61
Page 67 of 436

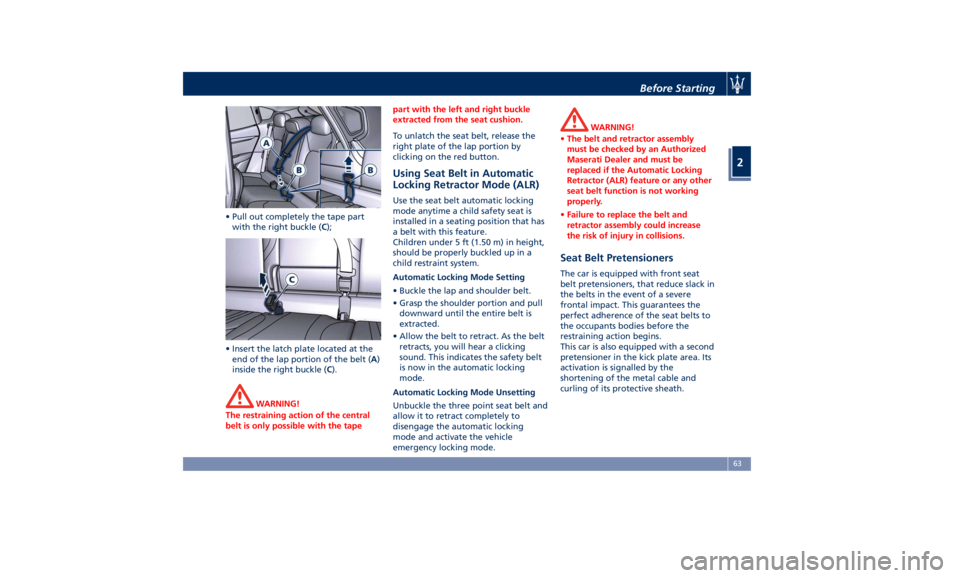
• Pull out completely the tape part
with the right buckle ( C );
• Insert the latch plate located at the
end of the lap portion of the belt ( A )
inside the right buckle ( C ).
WARNING!
The restraining action of the central
belt is only possible with the tape part with the left and right buckle
extracted from the seat cushion.
To unlatch the seat belt, release the
right
plate of the lap portion by
clicking on the red button.
Using Seat Belt in Automatic
Locking Retractor Mode (ALR) Use the seat belt automatic locking
mode anytime a child safety seat is
installed in a seating position that has
a belt with this feature.
Children under 5 ft (1.50 m) in height,
should be properly buckled up in a
child restraint system.
Automatic Locking Mode Setting
• Buckle the lap and shoulder belt.
• Grasp the shoulder portion and pull
downward until the entire belt is
extracted.
• Allow the belt to retract. As the belt
retracts, you will hear a clicking
sound. This indicates the safety belt
is now in the automatic locking
mode.
Automatic Locking Mode Unsetting
Unbuckle the three point seat belt and
allow it to retract completely to
disengage the automatic locking
mode and activate the vehicle
emergency locking mode. WARNING!
• The belt and retractor assembly
must be checked by an Authorized
Maserati Dealer and must be
replaced if the Automatic Locking
Retractor (ALR) feature or any other
seat belt function is not working
properly.
• Failure to replace the belt and
retractor assembly could increase
the risk of injury in collisions.
Seat Belt Pretensioners The car is equipped with front seat
belt pretensioners, that reduce slack in
the belts in the event of a severe
frontal impact. This guarantees the
perfect adherence of the seat belts to
the occupants bodies before the
restraining action begins.
This car is also equipped with a second
pretensioner in the kick plate area. Its
activation is signalled by the
shortening of the metal cable and
curling of its protective sheath.Before Starting
2
63
Page 75 of 436

inflates. This especially applies to
children.
Supplemental Side Air Bag Inflatable
Curtain (SABIC) Inflator Units
During collisions where the impact is
confined to a particular area of the
side of the vehicle, the ORC may
deploy the SABIC air bags, depending
on the severity and type of collision. In
these events, the ORC will deploy the
SABIC only on the impact side of the
vehicle. A quantity of non-toxic gas is
generated to inflate the side curtain
air bag.
The inflating side curtain air bag
pushes the head/s of the occupant/s
seating in the outside seats from the
edge of the headliner out of the way
and covers the window. The air bag
inflates with enough force to possibly
injure you if you are not belted and
seated properly, or if items are
positioned in the area where the side
curtain air bag inflates. This especially
applies to children.
The SABICs may also help reduce the
risk of partial or complete ejection of
vehicle occupants through side
windows in certain rollover events
(because equipped with rollover
sensing). Front and Side Impact Sensors
In front and side impacts, impact
sensors can aid the ORC in
determining appropriate response to
impact events.
Enhanced Accident Response System
In the event of an impact causing air
bag deployment, if the
communication network and the
power remains intact, depending on
the nature of the accident, the ORC
will determine whether the enhanced
accident response system will have to
perform the following functions:
• cut off fuel to the engine;
• turn hazard lights and interior lights
on as long as the battery has power
or until the ignition switch is turned
off;
• unlock the doors automatically;
• disconnect the battery with a
pyrotechnic charge.
Air Bag Deployment Result
The advanced front air bags are
designed to deflate immediately after
deployment.
If you do have a collision which
deploys the air bags, any or all of the
following may occur: • The nylon air bag material may
sometimes cause abrasions and/or
skin reddening to the driver and
front passenger as the air bags
deploy and unfold.
• As the air bags deflate, you may see
some smoke-like particles. The
particles are a normal by-product of
the process that generates the
non-toxic gas used for air bag
inflation. These airborne particles
may irritate the skin, eyes, nose, or
throat. If these particles settle on
your clothing, follow the garment
manufacturer's instructions for
cleaning. Do not drive your vehicle
after an air bag has deployed. If you
are involved in another collision, the
air bags will not be in place to
protect you.
ENVIRONMENTAL!
Air bag inflation releases a small
amount of powder. This powder is not
harmful to the environment.
WARNING!
California Proposition 65
Operating, servicing and maintaining
(Continued)Before Starting
2
71
Page 76 of 436

(Continued)
a passenger vehicle or off-road vehicle
can expose you to chemicals including
such as, engine exhaust, carbon
monoxide, phthalates and lead, that
which are known to the State of
California to cause cancer and birth
defects or other reproductive harm. To
minimize exposure, avoid breathing
exhaust, do not idle the engine except
as necessary, service your vehicle in a
well-ventilated area and wear gloves
or wash your hands frequently when
servicing your vehicle. For more
information go to:
www.P65Warnings.ca.gov/passenger-
vehicle
WARNING!
• Deployed air bags and seat belt
pretensioners cannot protect you in
another collision. Have the air bags,
seat belt pretensioners, and the
front seat belt retractor assemblies
replaced by an Authorized Maserati
Dealer. Also, have the Occupant
Restraint Controller (ORC) system
serviced as well.
• Have the air bag checked, serviced
and replaced only by an Authorized Maserati Dealer.
Air Bag System Maintenance
WARNING!
• Modifications to any part of the air
bag system could cause it to fail;
thus you could be injured if the air
bag system is not there to protect
you. Do not modify the components
or wiring. Do not modify the front
bumper, vehicle body structure, or
add aftermarket side steps or
running boards.
• It is dangerous to try to repair any
part of the air bag system without
the necessary know-how.
• Do not attempt to modify any part
of your air bag system. The air bag
may inflate accidentally or may not
function properly if modifications
are made. Take your vehicle to an
Authorized Maserati Dealer for any
air bag system service. If your seat
including your trim cover and
cushion needs to be serviced in any
way (including removal or
loosening/tightening of seat
attachment bolts), take the vehicle
to an Authorized Maserati Dealer.
• Only Maserati manufacturer approved seat accessories may be
used. If it is necessary to modify the
air bag system for persons with
disabilities, contact an Authorized
Maserati Dealer.
• If the speedometer, Rev Counter, or
any engine related gauges are not
working, the Occupant Restraint
Controller (ORC) may also be
disabled. The air bags may not be
ready to inflate for your protection.
Promptly check the fuse block for
blown fuses. To identify the air bag
fuse see “Fuse Replacement” in
section "Maintenance and Care". See
an Authorized Maserati Dealer if the
fuse does not fix the problem.
Transport of persons with
disability If it is necessary to modify the
advanced air bag system of your
vehicle to accommodate a person with
disabilities, contact an Authorized
Maserati Dealer .
WARNING!
• The advanced air bag system of your
vehicle is not designed to protect
adults with disabilities that requireBefore Starting
2
72
Page 80 of 436

Here are some tips on getting
the most out of your child
restraint • Before buying any restraint system,
make sure that it has a label
certifying that it meets all applicable
Safety Standards. Maserati also
recommends that you make sure that
you can install the child restraint in
the vehicle where you will use it
before you buy it.
• The restraint system must be
appropriate for your child’s weight
and height.
• Check the label on the restraint
system for weight and height limits.
• Carefully follow the instructions that
come with the restraint system.
• If installed improperly, it may not
work when needed.
• Fit the child into the seat according
to the child restraint manufacturer’s
directions.
WARNING!
When your child restraint system is
not in use, secure it in the vehicle with
the seat belt or remove it from the
vehicle. Do not leave it loose in the
vehicle. In a sudden stop or accident, it could strike the occupants or
seatbacks and cause serious personal
injury.
Installing Child Restraint
Systems using the Vehicle Seat
Belt equipped with ALR Child restraint systems are designed to
be secured in vehicle seats by lap belts
or the lap belt portion of a
lap/shoulder belt.
All the passenger seat belts are
equipped with an Automatic Locking
Retractor (ALR) to secure child
protection through a Child Restraint
System (CRS). These types of seat belts
are designed to keep the lap portion
of the seat belt tight around the child
restraint seat avoiding to use a locking
clip.
The ALR will make a ratcheting noise if
the entire belt is pulled out of the
retractor in order to enable the belt to
retract subsequently. For additional
information on ALR, see “Using Seat
Belt in Automatic Locking Retractor
(ALR) Mode” in “Occupants Restraint
Systems” in this section.
To install a Child Restraint System with
ALR, pull enough of the belt out of the
retractor leading it through the belt
path of the protection device. Slide the latch into the buckle until it clicks,
then remove the entire safety belt
from the retractor in order to
rewound. While rewinding a click will
indicate the safety belt is now in
Automatic Locking mode.
Exert then a traction on the exceeded
lap section of the belt in order to
tighten it around the child restraint
seat. All seat belts will loosen over
time, it is therefore necessary to check
them periodically and set them
properly.
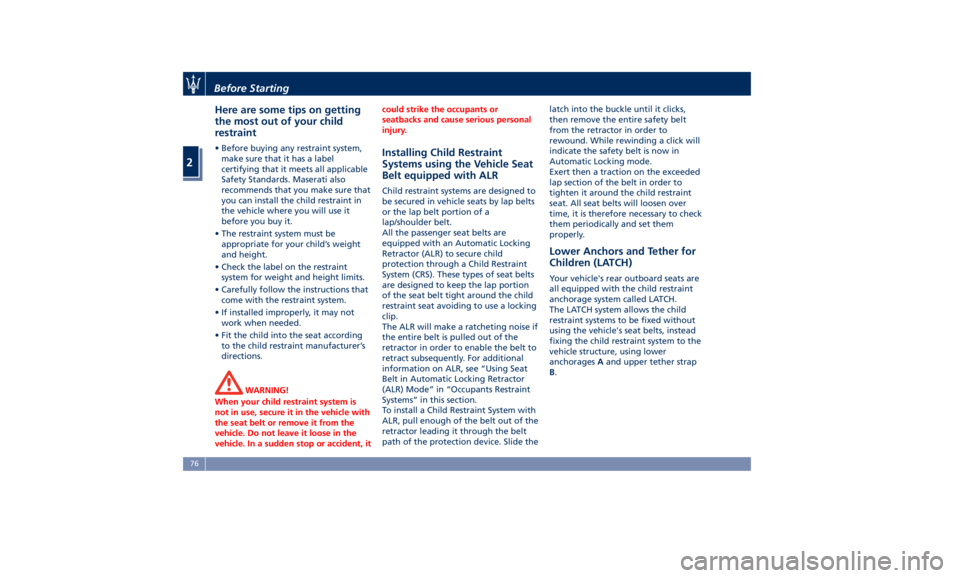
Lower Anchors and Tether for
Children (LATCH) Your vehicle's rear outboard seats are
all equipped with the child restraint
anchorage system called LATCH.
The LATCH system allows the child
restraint systems to be fixed without
using the vehicle's seat belts, instead
fixing the child restraint system to the
vehicle structure, using lower
anchorages A and upper tether strap
B .Before Starting
2
76
Page 87 of 436

Enabling and Disabling Park
Assist By accessing the submenu “Safety &
Driving Assistant” from MTC+ System,
the “Park Assist” can be disabled
(option “Off”). The available options
regarding the warning alerts are:
“Sound” or “Sound + Display”. Refer
to “MTC+ Settings” in section
“Dashboard Instruments and
Controls” for further information.
The front sensors can be enabled or
disabled at any time by pressing the
button on the front dome console.
After pressing the button the
instrument cluster will display the
state of front parking sensors for
approximately five seconds. The
button LED will be on when the front
sensors are disabled. The button LED
will be off when the front sensors are
enabled. If the button is pressed and the system requires service, the LED
will blink momentarily, and then the
LED will be on.
When the shift lever is moved to R
(Reverse) or to D (Drive) at a speed of
7 mph (11 km/h) or below and the
system is disabled, the instrument
cluster will display the “PARK ASSIST
Off” message for 5 seconds until the
shift lever remains in R (Reverse) or
when the shift lever is moved in D
(Drive).
Service the Park Assist System In case of malfunction of the Park
Assist system, the instrument cluster
will actuate a single sound, once per
ignition cycle. The instrument cluster
will display a message when any of
the rear or front sensor(s) are blocked
by snow, mud, or ice and the vehicle is
shifted into R (Reverse) or D (Drive).
The instrument cluster will display a
message when any of the rear or front
sensors are damaged and require
service.
When the shift lever is moved to R
(Reverse) or D (Drive) and the system
has detected a faulted condition, the
instrument cluster will display the
corresponding message for the time
lapse the vehicle is in R (Reverse) or D
(Drive) at speeds less than 7 mph (11 km/h). Under this condition Park
Assist will not operate. See
“Instrument Cluster” in section
“Dashboard Instruments and
Controls” for further information.
If the instrument cluster displays a
message prompting you to clean the
sensors, make sure the outer surface
and the underside of the rear bumper
and/or front bumper is clean and clear
of snow, ice, mud, dirt or other
obstruction and then cycle the ignition
switch. If the message continues to
appear contact the Authorized
Maserati Dealer .
If a failure message is displayed on the
instrument cluster, contact the
Authorized Maserati Dealer .Before Starting
2
83
Page 96 of 436

• Check the tires (see “Tire Inflation
Pressure” chapter in section
“Features and Specifications”) for
proper cold inflation pressure.
Lights and Indicator Lights
• Have someone observe the operation
of exterior lights while you operate
the controls (see “Lights” chapter in
section “Understanding the
Vehicle”).
• Check turn signal and high beam
indicator lights on the instrument
cluster (see “Instrument Cluster”
chapter in section “Dashboard
Instruments and Controls”).
Door Latches
• Check for positive closing, latching,
and locking of doors and liftgate (see
“Unlock the Vehicle with Key fob”
chapter in this section).
Fluid Leaks
• Check area under vehicle after
overnight parking for recent fluid
leaks (oil, fuel, etc.).
• If gasoline fumes are detected or
fluid leaks are suspected, contact the
Authorized Maserati Dealer . WARNING!
California Proposition 65
Operating, servicing and maintaining
a passenger vehicle or off-road vehicle
can expose you to chemicals including
such as, engine exhaust, carbon
monoxide, phthalates and lead, that
which are known to the State of
California to cause cancer and birth
defects or other reproductive harm. To
minimize exposure, avoid breathing
exhaust, do not idle the engine except
as necessary, service your vehicle in a
well-ventilated area and wear gloves
or wash your hands frequently when
servicing your vehicle. For more
information go to:
www.P65Warnings.ca.gov/passenger-
vehicleBefore Starting
2
92
Page 99 of 436

1 Adjustable side air outlets.
2 Engine START/STOP button.
3 Light switch.
4 Anti-theft system indicator.
5 Steering wheel controls.
6 Instrument cluster.
7 Right shift paddle +.
8 Left shift paddle –.
9 Multifunction lever (windshield
wipers, headlight washer and
headlight selection, turn
signals).
10 Adjustable central air outlets.
11 Analog clock.
12 MTC+ display.
13 Climate controls.
14 Dashboard glove box handle.
15 Dashboard glove box with two
USB ports for charging of
connected source.
16 Steering wheel adjustment
control. Central Console Components 1 Automatic transmission shift
lever.
2 Drive mode switches.
3 Electric Parking Brake lever.
4 Cover for compartment with
AUX, USB and SD memory card
port. 5 Cover for cupholder and
cigarette lighter/power socket
compartment.
6 Rotary selectors and buttons for
the multimedia navigation.
7 Hazard flashers switch.
8 Drive height selector.Understanding the Vehicle
3
95