2019 MASERATI LEVANTE lock
[x] Cancel search: lockPage 100 of 436

9 Unlock button for central
console compartment with
cupholder and power outlet.
10 Central console covers with
armrest function.
11 Adjustable air outlets.
12 Cover for power outlet and USB
slots compartment.
13 Four-zone climate controls for
rear passengers (optional).
Front Dome Console
Components
1 Reading lights control button.
2 Central light control button.
3 Reading lights.
4 Central light. 5 HomeLink controls.
6 Button to switch off passenger
compartment lights.
7 Button to open fully/partially
the power liftgate.
8 Button to enable/disable front
sensors of the Park Assist system.
9 Sunroof controls (optional).
Front Doors Components 1 Inside door handle.
2 Driver’s seat, steering wheel,
adjustable pedals and rear
mirrors memory switch (if
equipped).
3 External rearview mirrors
switches.
4 Power window switches.
5 Power door unlocks/locks.
6 Rear windows and sunshade
lockout button.
7 Loudspeakers.
8 Storage compartment.
9 Internal door lock/unlock knob.
10 Door panel grip.
11 Reflex reflector.
12 Outside door handle.Driver door Passenger doorUnderstanding the Vehicle
3
96
Page 101 of 436
13 Door lock button with “Passive
Entry” function.
14 Door outboard opening lock.
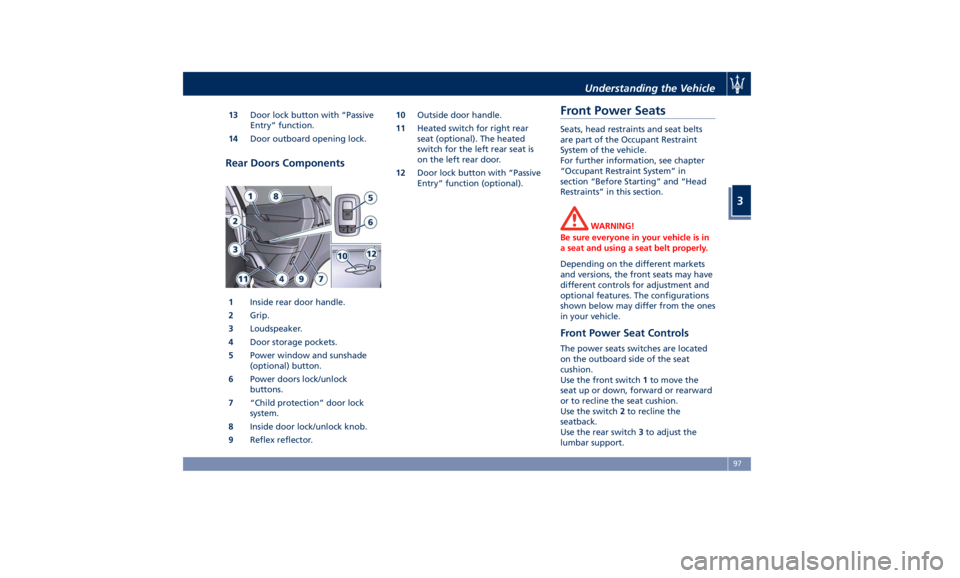
Rear Doors Components
1 Inside rear door handle.
2 Grip.
3 Loudspeaker.
4 Door storage pockets.
5 Power window and sunshade
(optional) button.
6 Power doors lock/unlock
buttons.
7 “Child protection” door lock
system.
8 Inside door lock/unlock knob.
9 Reflex reflector. 10 Outside door handle.
11 Heated switch for right rear
seat (optional). The heated
switch for the left rear seat is
on the left rear door.
12 Door lock button with “Passive
Entry” function (optional).
Front Power Seats Seats, head restraints and seat belts
are part of the Occupant Restraint
System of the vehicle.
For further information, see chapter
“Occupant Restraint System” in
section “Before Starting” and “Head
Restraints” in this section.
WARNING!
Be sure everyone in your vehicle is in
a seat and using a seat belt properly.
Depending on the different markets
and versions, the front
seats may have
different controls for adjustment and
optional features. The configurations
shown below may differ from the ones
in your vehicle.
Front Power Seat Controls The power seats switches are located
on the outboard side of the seat
cushion.
Use the front switch 1 to move the
seat up or down, forward or rearward
or to recline the seat cushion.
Use the switch 2 to recline the
seatback.
Use the rear switch 3 to adjust the
lumbar support.Understanding the Vehicle
3
97
Page 107 of 436
to the driver by moving the seat for
Easy Exit or Easy Entry.
Each stored memory setting will have
an associated easy entry/exit position.
NOTE:
The Easy Entry/Exit feature can be
enabled or disabled using the MTC+
System, refer to “MTC+ Settings” in
section “Dashboard Instruments and
Controls” for further information.
Rear Seats Rear seats can fit three passengers.
Seats, head restraints and seat belts
are parts of the occupant restraint
system of the vehicle.
For further information, see chapter
“Occupants Restraint Systems” in
section “Before Starting” and “Head
Restraints” in this section.
WARNING!
Be sure everyone in your vehicle is in
a seat and using a seat belt properly.
Rear Seat Folding Seatback The 60/40 split-folding seatback of the
rear seat provides for a recliner
feature with three available fixed
positions that can be set using the
lever on seat external side. The LH
lever tilts the long part (60), while the
RH lever tilts the shorter one (40).
The less tilted position (90°) is the one
most suitable when a child seat must
be installed; the other positions tilt
the seatback toward the liftgate up to
23°.
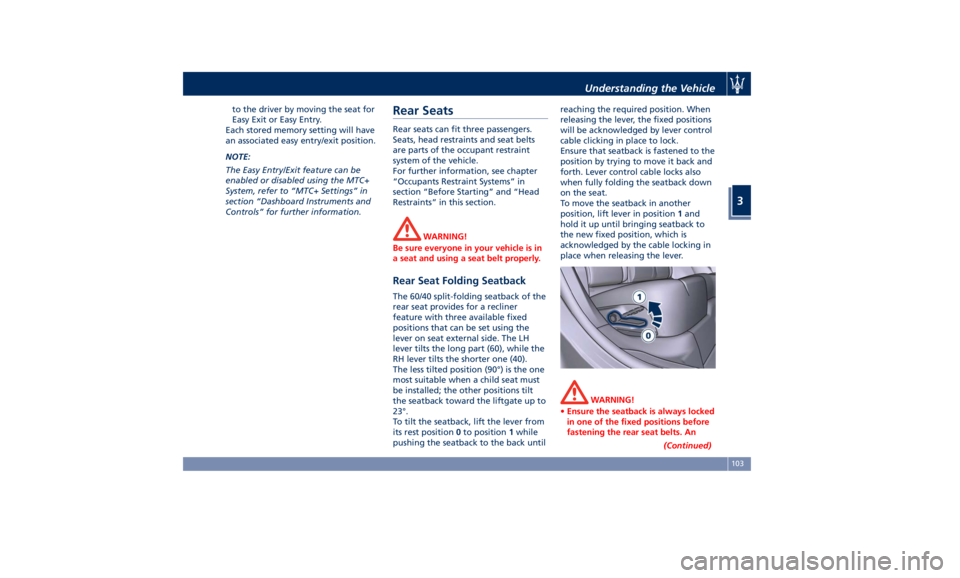
To tilt the seatback, lift the lever from
its rest position 0 to position 1 while
pushing the seatback to the back until reaching the required position. When
releasing the lever, the fixed positions
will be acknowledged by lever control
cable clicking in place to lock.
Ensure that seatback is fastened to the
position by trying to move it back and
forth. Lever control cable locks also
when fully folding the seatback down
on the seat.
To move the seatback in another
position, lift lever in position 1 and
hold it up until bringing seatback to
the new fixed position, which is
acknowledged by the cable locking in
place when releasing the lever.
WARNING!
• Ensure the seatback is always locked
in one of the fixed positions before
fastening the rear seat belts. An
(Continued)Understanding the Vehicle
3
103
Page 108 of 436
(Continued)
unlocked seatback cannot ensure the
necessary stability for passengers
and/or for child seats. An unlocked
seatback could cause severe injuries
in case of accident.
• When fastening a child seat on
external rear seats, ensure that the
corresponding seatback is in the full
upright position.
• Always check that the head restraint
of the rear seats that must be
occupied by a passenger is correctly
adjusted (see chapter “Head
Restraints” in this section).
NOTE:
Rear
seat backrest can
be fully folded
to increase luggage space. See “Cargo
Area” in this section for further
details.
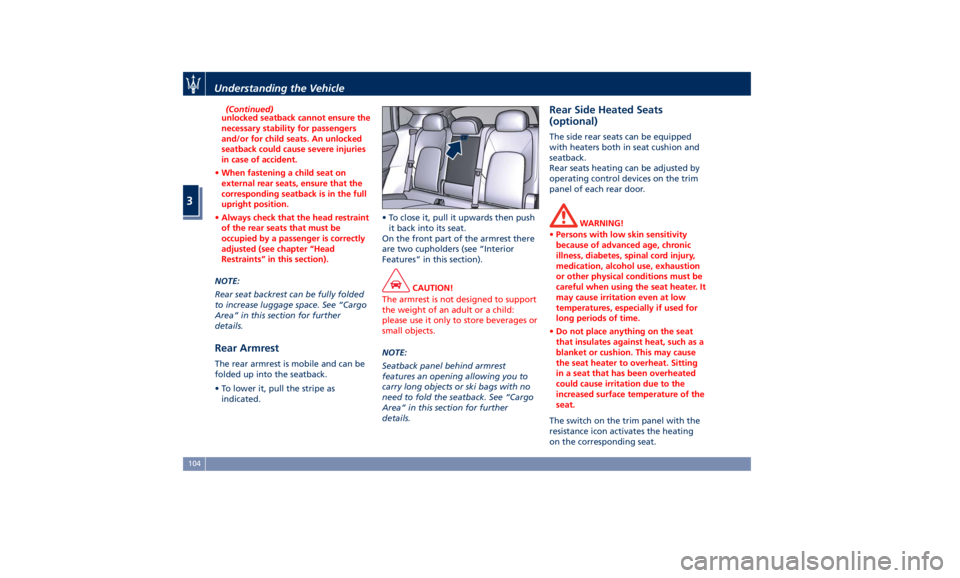
Rear Armrest The rear armrest is mobile and can be
folded up into the seatback.
• To lower it, pull the stripe as
indicated. • To close it, pull it upwards then push
it back into its seat.
On the front part of the armrest there
are two cupholders (see “Interior
Features” in this section).
CAUTION!
The armrest is not designed to support
the weight of an adult or a child:
please use it only to store beverages or
small objects.
NOTE:
Seatback
panel behind armrest
features an opening allowing you to
carry long objects or ski bags with no
need to fold the seatback. See “Cargo
Area” in this section for further
details. Rear Side Heated Seats
(optional) The side rear seats can be equipped
with heaters both in seat cushion and
seatback.
Rear seats heating can be adjusted by
operating control devices on the trim
panel of each rear door.
WARNING!
• Persons with low skin sensitivity
because of advanced age, chronic
illness, diabetes, spinal cord injury,
medication, alcohol use, exhaustion
or other physical conditions must be
careful when using the seat heater. It
may cause irritation even at low
temperatures, especially if used for
long periods of time.
• Do not place anything on the seat
that insulates against heat, such as a
blanket or cushion. This may cause
the seat heater to overheat. Sitting
in a seat that has been overheated
could cause irritation due to the
increased surface temperature of the
seat.
The switch on the trim panel with the
resistance
icon activates the heating
on the corresponding seat.Understanding the Vehicle
3
104
Page 110 of 436
Front Head Restraints
Adjustment (for Comfort Seat
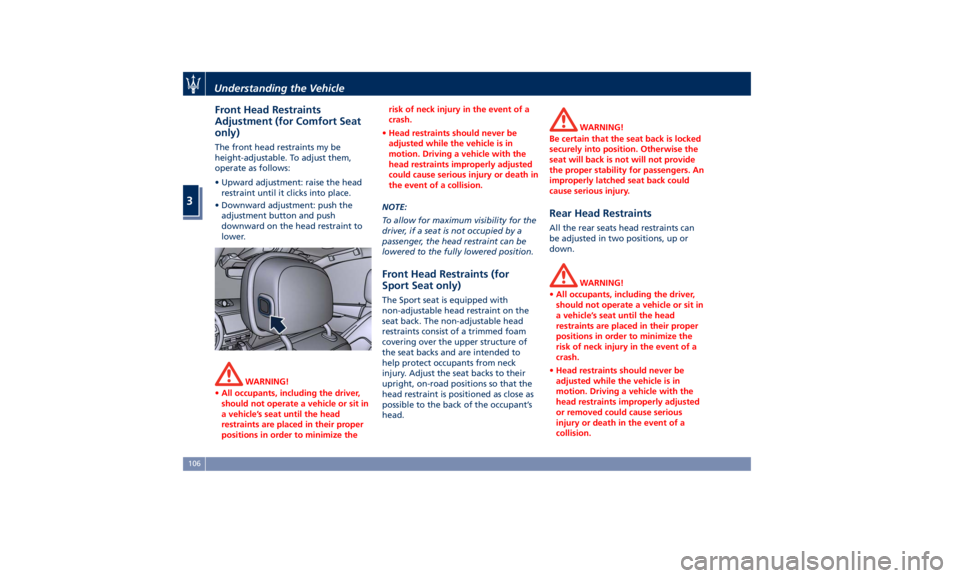
only) The front head restraints my be
height-adjustable. To adjust them,
operate as follows:
• Upward adjustment: raise the head
restraint until it clicks into place.
• Downward adjustment: push the
adjustment button and push
downward on the head restraint to
lower.
WARNING!
• All occupants, including the driver,
should not operate a vehicle or sit in
a vehicle’s seat until the head
restraints are placed in their proper
positions in order to minimize the risk of neck injury in the event of a
crash.
• Head restraints should never be
adjusted while the vehicle is in
motion. Driving a vehicle with the
head restraints improperly adjusted
could cause serious injury or death in
the event of a collision.
NOTE:
T
o allow for maximum visibility for the
driver, if a seat is not occupied by a
passenger, the head restraint can be
lowered to the fully lowered position.
Front Head Restraints (for
Sport Seat only) The Sport seat is equipped with
non-adjustable head restraint on the
seat back. The non-adjustable head
restraints consist of a trimmed foam
covering over the upper structure of
the seat backs and are intended to
help protect occupants from neck
injury. Adjust the seat backs to their
upright, on-road positions so that the
head restraint is positioned as close as
possible to the back of the occupant’s
head. WARNING!
Be certain that the seat back is locked
securely into position. Otherwise the
seat will back is not will not provide
the proper stability for passengers. An
improperly latched seat back could
cause serious injury.
Rear Head Restraints All the rear seats head restraints can
be adjusted in two positions, up or
down.
WARNING!
• All occupants, including the driver,
should not operate a vehicle or sit in
a vehicle’s seat until the head
restraints are placed in their proper
positions in order to minimize the
risk of neck injury in the event of a
crash.
• Head restraints should never be
adjusted while the vehicle is in
motion. Driving a vehicle with the
head restraints improperly adjusted
or removed could cause serious
injury or death in the event of a
collision.Understanding the Vehicle
3
106
Page 114 of 436
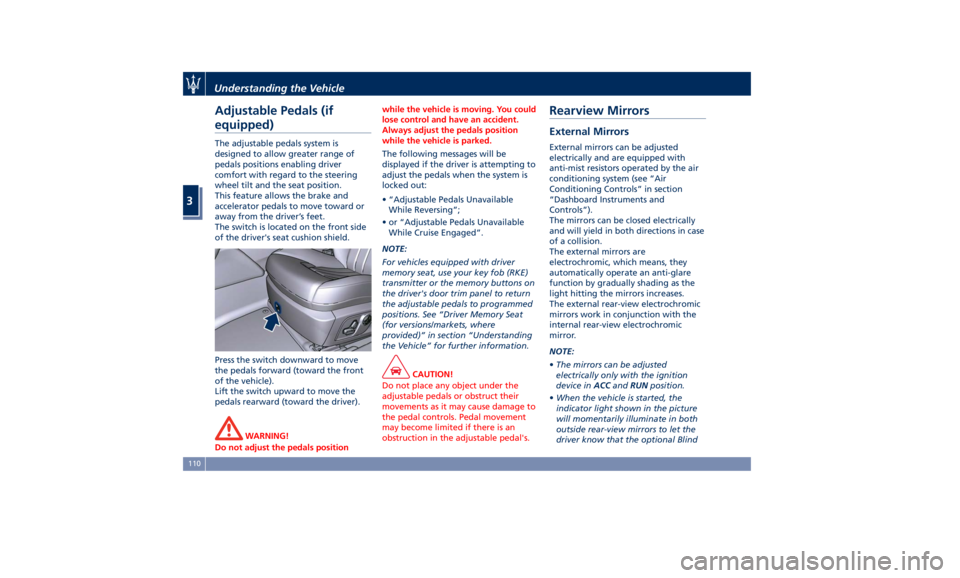
Adjustable Pedals (if
equipped) The adjustable pedals system is
designed to allow greater range of
pedals positions enabling driver
comfort with regard to the steering
wheel tilt and the seat position.
This feature allows the brake and
accelerator pedals to move toward or
away from the driver’s feet.
The switch is located on the front side
of the driver's seat cushion shield.
Press the switch downward to move
the pedals forward (toward the front
of the vehicle).
Lift the switch upward to move the
pedals rearward (toward the driver).
WARNING!
Do not adjust the pedals position while the vehicle is moving. You could
lose control and have an accident.
Always adjust the pedals position
while the vehicle is parked.
The following messages will be
displayed
if the driver is attempting to
adjust the pedals when the system is
locked out:
• “Adjustable Pedals Unavailable
While Reversing”;
• or “Adjustable Pedals Unavailable
While Cruise Engaged”.
NOTE:
For vehicles equipped with driver
memory seat, use your key fob (RKE)
transmitter or the memory buttons on
the driver's door trim panel to return
the adjustable pedals to programmed
positions. See “Driver Memory Seat
(for versions/markets, where
provided)” in section “Understanding
the Vehicle” for further information.
CAUTION!
Do not place any object under the
adjustable pedals or obstruct their
movements as it may cause damage to
the pedal controls. Pedal movement
may become limited if there is an
obstruction in the adjustable pedal's.Rearview Mirrors External Mirrors External mirrors can be adjusted
electrically and are equipped with
anti-mist resistors operated by the air
conditioning system (see “Air
Conditioning Controls” in section
“Dashboard Instruments and
Controls”).
The mirrors can be closed electrically
and will yield in both directions in case
of a collision.
The external mirrors are
electrochromic, which means, they
automatically operate an anti-glare
function by gradually shading as the
light hitting the mirrors increases.
The external rear-view electrochromic
mirrors work in conjunction with the
internal rear-view electrochromic
mirror.
NOTE:
• The mirrors can be adjusted
electrically only with the ignition
device in ACC and RUN position.
• When the vehicle is started, the
indicator light shown in the picture
will momentarily illuminate in both
outside rear-view mirrors to let the
driver know that the optional BlindUnderstanding the Vehicle
3
110
Page 116 of 436
Seat" chapter in section
“Understanding the Vehicle”)
corresponds to a mirror tilt position in
reverse.
NOTE:
The mirrors tilt in reverse can be
turned on and off using the MTC+
System, refer to “MTC+ Settings” in
section “Dashboard Instruments and
Controls”.
Folding Mirrors
By selecting this feature on MTC+ the
rear-view mirrors automatically fold
when the vehicle is locked by the key
fob and when the power liftgate (if
equipped) is closed and locked by
pressing the
button on the outer
ledge of the left boot compartment
lining. When the vehicle and the
liftgate will be unlocked and the
ignition device is set in RUN position,
the rear-view mirrors will
automatically open in the position
they had before the lock.
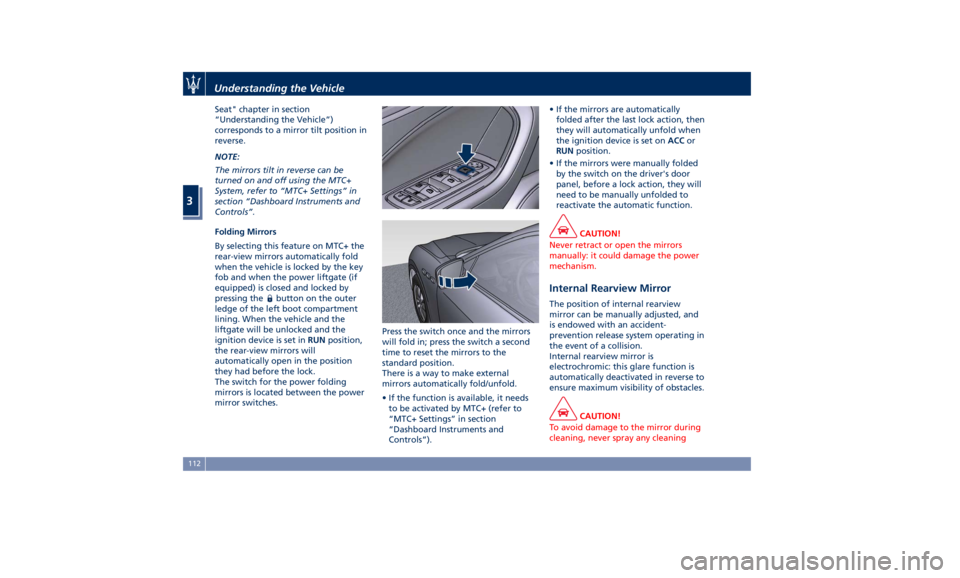
The switch for the power folding
mirrors is located between the power
mirror switches. Press the switch once and the mirrors
will fold in; press the switch a second
time to reset the mirrors to the
standard position.
There is a way to make external
mirrors automatically fold/unfold.
• If the function is available, it needs
to be activated by MTC+ (refer to
“MTC+ Settings” in section
“Dashboard Instruments and
Controls”). • If the mirrors are automatically
folded after the last lock action, then
they will automatically unfold when
the ignition device is set on ACC or
RUN position.
• If the mirrors were manually folded
by the switch on the driver's door
panel, before a lock action, they will
need to be manually unfolded to
reactivate the automatic function.
CAUTION!
Never retract or open the mirrors
manually: it could damage the power
mechanism.
Internal Rearview Mirror The position of internal rearview
mirror can be manually adjusted, and
is endowed with an accident-
prevention release system operating in
the event of a collision.
Internal rearview mirror is
electrochromic: this glare function is
automatically deactivated in reverse to
ensure maximum visibility of obstacles.
CAUTION!
To avoid damage to the mirror during
cleaning, never spray any cleaningUnderstanding the Vehicle
3
112
Page 119 of 436

Automatic Headlights This system automatically turns the
headlights on or off according to
ambient light intensity detected by
the twilight sensor positioned on the
inner surface of the windshield, over
the rear view mirror. To turn the
system on, rotate the lights switch
clockwise to “AUTO” position.
When the automatic system is
activated, the headlight time delay
feature is activated as well. This means
the headlights will stay on for up to 90
seconds after you place the ignition
device into OFF position.
To turn the automatic system off,
move the lights switch out of “AUTO”
position.
NOTE:
The engine must be running and the
twilight sensor in “NIGHT” mode
before the headlights turn on in
automatic mode.
WARNING!
The responsibility for turning on the
lights, depending on the daylight and
regulations in force in the country of
use, always lies with the driver. The
automatic system for switching on and off the external lights is to be
considered as an aid for the driver. If
necessary, switch the lights including
the front and rear fog lights on and
off manually.
Headlights On with Wipers When this feature is active, the
headlights will turn on approximately
10 seconds after activation of the
wipers, if the lights switch is placed in
the “AUTO” position. The headlights
will additionally turn off by
deactivation of the wipers if
previously activated with this function.
NOTE:
The headlights with wipers feature
may be turned on and off using the
MTC+ System, refer to “MTC+
Settings” in section “Dashboard
Instruments and Controls”.
Headlights Time Delay This safety feature provides headlight
illumination for up to 90 seconds
(programmable) when leaving your
vehicle in an unlit area. To activate the
delay feature, place the ignition
switch in the OFF or ACC position
while the headlights are still on. Then turn off the headlights within 45
seconds.
The delay interval begins when the
lights switch is turned off (position
“0”). If you turn the headlights or
position lights on, or place the
ignition switch in RUN , the system will
cancel the delay.
If you turn the headlights off (“0”
position) before the ignition, they will
turn off in the normal mode.
NOTE:
• To activate this feature the lights
must be turned off (“0” position)
within 45 seconds of placing the
ignition switch in the OFF or ACC
position.
• The headlight delay time is
programmable using the MTC+
System, see “MTC+ Settings” in
section “Dashboard Instruments and
Controls”.
• If the low beam bulbs/LEDs are
active due to “Headlights with
Wipers”, then the headlamps delay
feature will not be activated when
the ignition switch is set in OFF
position.Understanding the Vehicle
3
115