2019 MASERATI LEVANTE suspension
[x] Cancel search: suspensionPage 169 of 436

WARNING!
Maserati urges you to use the seat
belts correctly fastened and adjusted
at all times. Correct use of the seat
belts can help reduce the risk of
serious injury in the event of an
accident. Do not pass seat belts over
sharp edges: they could tear. Do not
pin anything to the seat belts. This
could reduce their initial strength and
cause them to tear in the event of a
crash.
Refer to “Occupants Restraint
Systems”
in section “Before
Starting”
for further information.
TFT Display: Menus and
Settings When operating, the TFT Display is
divided into sectors including menus
and sub-menus, running data,
warning/indicator lights and messages.
The different sectors of the display
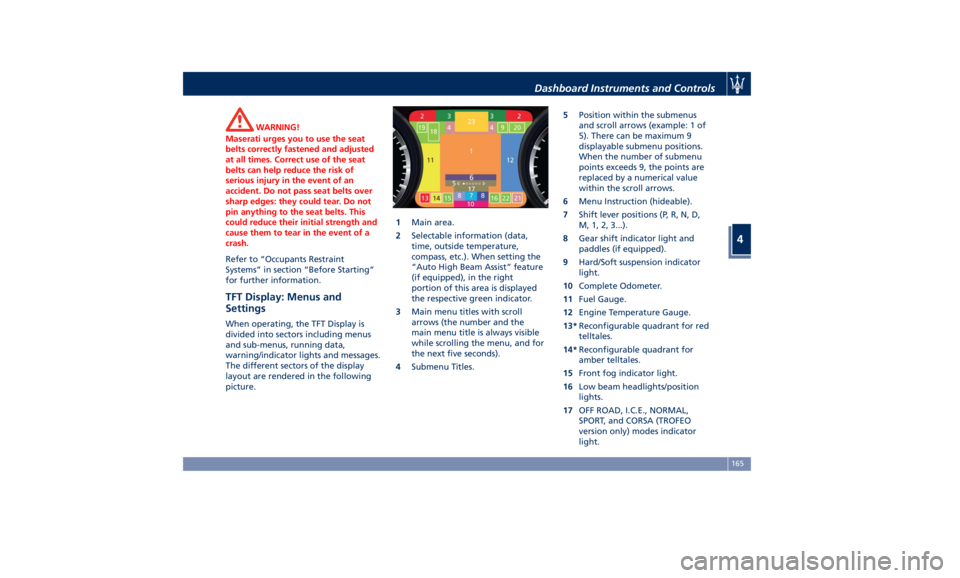
layout are rendered in the following
picture. 1 Main area.
2 Selectable information (data,
time, outside temperature,
compass, etc.). When setting the
“Auto High Beam Assist” feature
(if equipped), in the right
portion of this area is displayed
the respective green indicator.
3 Main menu titles with scroll
arrows (the number and the
main menu title is always visible
while scrolling the menu, and for
the next five seconds).
4 Submenu Titles. 5 Position within the submenus
and scroll arrows (example: 1 of
5). There can be maximum 9
displayable submenu positions.
When the number of submenu
points exceeds 9, the points are
replaced by a numerical value
within the scroll arrows.
6 Menu Instruction (hideable).
7 Shift lever positions (P, R, N, D,
M, 1, 2, 3...).
8 Gear shift indicator light and
paddles (if equipped).
9 Hard/Soft suspension indicator
light.
10 Complete Odometer.
11 Fuel Gauge.
12 Engine Temperature Gauge.
13* Reconfigurable quadrant for red
telltales.
14* Reconfigurable quadrant for
amber telltales.
15 Front fog indicator light.
16 Low beam headlights/position
lights.
17 OFF ROAD, I.C.E., NORMAL,
SPORT, and CORSA (TROFEO
version only) modes indicator
light.Dashboard Instruments and Controls
4
165
Page 171 of 436

sector 23, only the main menu number
and the scroll arrows remain displayed
in the sector 3 , left side.
Within a submenu, press and release
the switch in the
and arrow
directions to scroll the menu.
Press the
button to return to the
main menu from an item of interest or
from an information screen.
Main Menu & Submenu Content
Overview
1. MAIN MENU
• View speed in mph or km/h
2. VEHICLE INFO
• Tire Pressure
• Transmission Temperature
• Oil Temperature
• Oil Pressure
• Battery Voltage
• Maintenance 3. DRIVE MODE
• Drive Mode - Ride Height - Torque
Distribution - Powertrain status - ESC
status - Suspension stiffness status
4. Driver Assist (if equipped)
• Shows the status of any active driver
assist systems: CC, ACC, LKA and
HAS. Graphics in the main area of
TFT display only refer to ACC, LKA
and HAS systems
• LKA (LaneSense) status
5. FUEL ECONOMY
• Average, Range, Current gage
6. TRIP
• Trip A: Average, Avg. speed, Elapsed
time, Distance
• Trip B: Average, Avg. speed, Elapsed
time, Distance
7. START&STOP
• Messages relating to the Start&Stop
function
8. AUDIO
• Information concerning audio status
according to current media source,
track and station.
• Information on phone incoming call.
9. STORED MESSAGES
10. VEHICLE SETTINGS • Speed Warning: enables, disables or
sets the speed limit represented in
the dynamic icon on the TFT display
• Auto apply Off/On of the Electric
Parking Brake
• Interior Lighting
– Backlighting
– Ambient Lighting
• SCREEN SETUP
– Upper Left
– Upper Right
– Main Menu: Line 1
– Main Menu: Line 2
– Main Menu: Line 3
– MPH km/h Display On/Off
– Main Menu Navigation
– Outline Coloring
– Key-On Display
– Key-Off Display
– Defaults
Messages on Main Display Area
The main display area also displays
"pop up" messages. These pop up
messages fall into several categories:
• Five-Second Stored Messages
When the appropriate conditions
occur, this type of message appears
on the main display area for five
seconds and then returns to the
previous screen. Most of the
messages of this type are thenDashboard Instruments and Controls
4
167
Page 174 of 436

NOTE:
This strategy is also applicable in the
Transmission Temperature and Oil
Pressure information screen.
• Oil Pressure
Displays the current engine oil
pressure level.
• Battery Voltage
Displays the current battery voltage.
• Maintenance (service)
Displays mileage and days remaining
to the execution of scheduled
maintenance service.
Press and release the
button to
return to the main menu.
3. DRIVE MODE
Press and release the switch in the
or arrow directions until this
menu item is displayed. The screen graphically shows the Drive Mode: OFF
ROAD, I.C.E., NORMAL, SPORT, CORSA
(TROFEO version only) and
(Suspension) set by the user through
the relevant controls.
The display main area will show
vehicle image with parameters and
color-coded components affected by
the selected drive mode.
The image will show the following
parameters:
• current ground clearance indicated
in front of vehicle and on a specific
indicator on top right corner;
• torque distribution percentage
indicated under the arrow in front of
the wheels;
• selected drive mode (in the example
shown: I.C.E.).
For any color-coded components, color
depends on settings of:
• ESC: identified by wheel color.
• PowerTrain: identified by engine +
transmission unit color.
• Suspension
: identified by the
color of the four shock absorbers. For every drive mode, function (ESC,
PowerTrain and Suspension) and color
of the components shown are matched
as follows:
NOTE:
To set drive parameters according to
own needs and path, refer to chapter
“Drive Mode” and “Off-road Drive” in
section “Driving”.
Press and release the
button to
return to the main menu.Dashboard Instruments and Controls
4
170
Page 185 of 436

or engine stall and your vehicle may
require towing.
Low Fuel Indicator
When the fuel level reaches
approximately 4.2 Gallons (16
liters) this light under the fuel
gauge indicator will turn on,
and remain on until fuel is added
together with the related message. In
this condition the color indicating the
quantity of fuel in the tank, inside the
indicator on display, will go from
white to amber.
Refer to “Refueling” in section
“Driving” for fuel filling.
Windshield and Headlights Washer
Low Fluid Indicator
This indicator will illuminate
for 5 seconds to indicate a low
level of the windshield and
headlights washer fluid. A
related message will be displayed.
See “Maintenance Procedures” in
section “Maintenance and Care” for
fluid filling.
Headlight Aiming System Failure
Warning Light
This warning light and the
related message indicate a
failure of the automatic
headlight aiming system (horizontal leveling, electromechanical
swiveling) or of the Advanced
Frontlighting System (AFS).
Please contact an Authorized Maserati
Dealer to check the system.
Advanced Frontlighting System (AFS)
Failure Warning Light
This warning light and the
related message light up to
report a failure of the AFS
system.
Contact an Authorized Maserati
Dealer as soon as possible.
Automatic High Beam Failure Warning
Light
This warning light and the
related message illuminate to
report a failure of the
automatic high beam
headlights.
Contact an Authorized Maserati
Dealer as soon as possible.
Suspensions Failure Warning Light
This warning light and the
related message turn on while
driving if there is a failure of
the suspension system.
Please contact an Authorized Maserati
Dealer to check the system. Ice Hazard Indicator
When the external
temperature falls below 38°F
(3°C), the temperature value
blinks for a few seconds, the
indicator light turns on, a message is
displayed and an acoustic signal is
triggered to warn the driver of the
risk of icy roadbed.
Under such conditions, we recommend
using the I.C.E. drive mode (see
“Automatic Transmission” in section
“Driving”) drive carefully and slow
down as the grip of the tires may be
significantly reduced.
The indicator light flashes for 5
seconds and switches off when the
temperature reaches 43°F (6°C) or
higher.
Fuel Filler Cap (Gas cap) Open
Warning Light
After refueling the car
performs a check of the fuel
filler cap and this warning
light comes on if it is not
correctly closed, after approximately
10 minutes also depending on driving
conditions.
See “Refueling” in section “Driving”
for more details.Dashboard Instruments and Controls
4
181
Page 187 of 436

that a system fault requiring servicing
at an Authorized Maserati Dealer .Itis
nevertheless possible to drive the
vehicle without using this function
(for further details, refer to “Forward
Collision Warning - FCW” in section
“Driving”).
General Fault for Driving with a Trailer
(NOT for TROFEO version)
The warning light and the
relevant message are
displayed to indicate a fault or
failure of the connection
between vehicle and trailer. In these
cases please contact an Authorized
Maserati Dealer as soon as possible,
and avoid using the vehicle with a
trailer.
AWD Failure Warning Light
This warning light turns on to
indicate a fault of the AWD
system otherwise a fault or
overheating due to excessive
wheel spin.. Contact an Authorized
Maserati Dealer as soon as possible,
and avoid using the vehicle in heavy
duty conditions.
Set Passive Speed Limit
This indicator light indicates
the passive speed limit set via
the controls on the RH side of the steering wheel (for further details,
refer to “TFT Display: Menus and
Settings” in this chapter).
Passive Speed Limit Exceeded
This indicator light informs
the driver that the speed limit
that was set has been
exceeded.
Stiff Suspension Setting Indicator
This indicator light indicate
that the stiff suspensions
program (“S”) is on.
For further details, refer to
“Drive Mode” in section “Driving”.
Set Drive Mode Indicator
Drive mode set by the driver
through the controls on
central console is displayed
above the transmission lever indicator
(example in picture: NORMAL).
For further details, refer to “Drive
Mode” in section “Driving”.
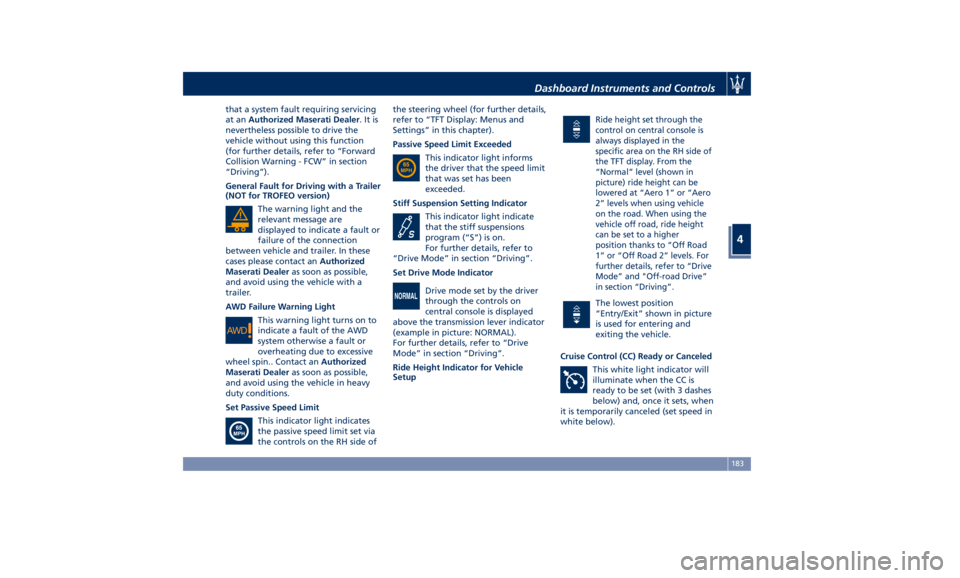
Ride Height Indicator for Vehicle
Setup Ride height set through the
control on central console is
always displayed in the
specific area on the RH side of
the TFT display. From the
“Normal” level (shown in
picture) ride height can be
lowered at “Aero 1” or “Aero
2” levels when using vehicle
on the road. When using the
vehicle off road, ride height
can be set to a higher
position thanks to “Off Road
1” or “Off Road 2” levels. For
further details, refer to “Drive
Mode” and "Off-road Drive”
in section “Driving”.
The lowest position
“Entry/Exit” shown in picture
is used for entering and
exiting the vehicle.
Cruise Control (CC) Ready or Canceled
This white light indicator will
illuminate when the CC is
ready to be set (with 3 dashes
below) and, once it sets, when
it is temporarily canceled (set speed in
white below).Dashboard Instruments and Controls
4
183
Page 203 of 436

NOTE:
• For further details refer to the
“Maserati Touch Control Plus
(MTC+)” guide.
• All settings must be edited with
ignition device set to RUN position.
To display the programmable features
menu on MTC+, you can also touch
soft-key to view all available
applications and then select
“Settings”. In this mode the MTC+ System allows
you to access the following
programmable features (some of them
are optional or for a specific
model/version and may not be
available on your vehicle): Display,
Units, Voice Commands, Clock, Safety
& Driving Assistant, Lights, Doors &
Locks, Auto-On Comfort & Remote
Start, Engine Off Options, Suspension,
Audio, Phone/Bluetooth, SiriusXM
Setup, Restore Settings and Clear
Personal Data.
NOTE:
• Only one touch screen area/soft-key
may be selected at a time.
• Menu navigation indications refer to
the use of soft-keys on MTC+ display:
the same operations can be
performed using the manual
controls on central console. To make a selection, and enter the
desired function, touch the
corresponding soft-key on the menu
(the picture shown is “Engine Off
Options”).
To scroll through the functions, move
the cursor up or down, or touch the
arrow
or . Once the desired
mode is entered, press and release the
touch screen area of the setting that
you wish to modify. The new setting
will be highlighted with one or more
boxes to indicate status or possible
variants of the function status. A
check mark in a box indicates the
current status of the function. Touch
the check mark to cancel, or the
empty box to insert the check mark,
and change the status of the function.With ADAS Dashboard Instruments and Controls
4
199
Page 210 of 436

Auto-On Comfort & Remote
Start (If equipped) • Auto-on Driver Heated/Vented Seat
& Steering
This feature allows to activate the
comfort of the driving seat when
starting the engine.
If equipped, the driver’s
heated/vented seat and/or heated
steering wheel will automatically
activate by temperatures below 40°F
(4°C). When temperatures are above
80°F (26°C) the driver vented seat
will turn on.
• Remote Start
If the vehicle is equipped with the
remote start system, you can choose
from the following options: “Off”,
“Remote Start” (activation of this
function when you use the key fob
RKE transmitter to start the engine) and “All Starts” (activation of this
function when you start the engine
in all modes).
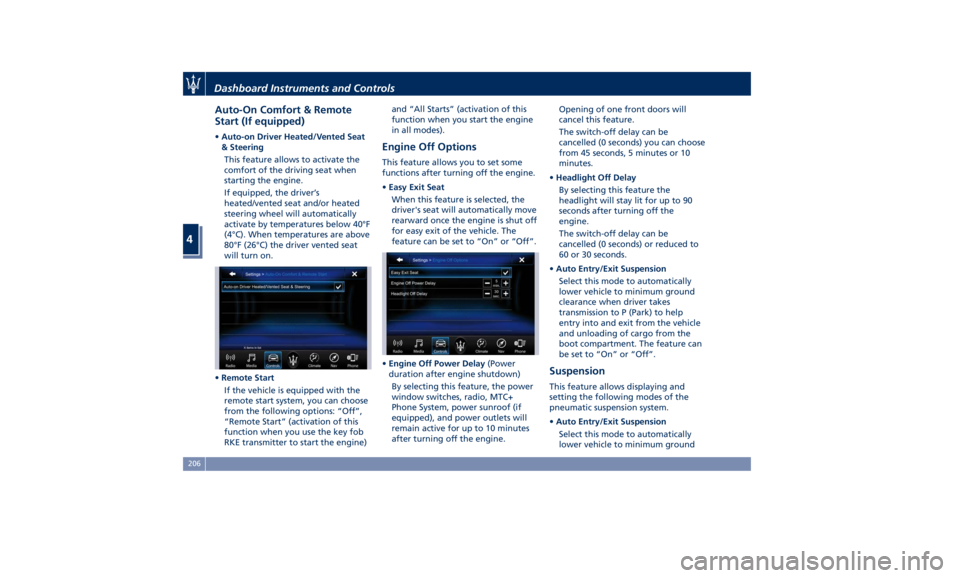
Engine Off Options This feature allows you to set some
functions after turning off the engine.
• Easy Exit Seat
When this feature is selected, the
driver's seat will automatically move
rearward once the engine is shut off
for easy exit of the vehicle. The
feature can be set to “On” or “Off”.
• Engine Off Power Delay (Power
duration after engine shutdown)
By selecting this feature, the power
window switches, radio, MTC+
Phone System, power sunroof (if
equipped), and power outlets will
remain active for up to 10 minutes
after turning off the engine. Opening of one front doors will
cancel this feature.
The switch-off delay can be
cancelled (0 seconds) you can choose
from 45 seconds, 5 minutes or 10
minutes.
• Headlight Off Delay
By selecting this feature the
headlight will stay lit for up to 90
seconds after turning off the
engine.
The switch-off delay can be
cancelled (0 seconds) or reduced to
60 or 30 seconds.
• Auto Entry/Exit Suspension
Select this mode to automatically
lower vehicle to minimum ground
clearance when driver takes
transmission to P (Park) to help
entry into and exit from the vehicle
and unloading of cargo from the
boot compartment. The feature can
be set to “On” or “Off”.
Suspension This feature allows displaying and
setting the following modes of the
pneumatic suspension system.
• Auto Entry/Exit Suspension
Select this mode to automatically
lower vehicle to minimum groundDashboard Instruments and Controls
4
206
Page 211 of 436

clearance when driver takes
transmission to P (Park) to help
entry into and exit from the vehicle
and unloading of cargo from the
trunk compartment. The feature
can be set to “On” or “Off”.
• Warning/Suspension Warning
Messages Only
Select this mode to choose whether
to display only warnings (option
“On”). The feature can be set to
“On” or “Off”.
• Tire Change Mode/Stationary Auto
Leveling
Select this mode to disable the
pneumatic suspension to avoid
automatic levelling, when vehicle
must be lifted for changing a wheel
or tire. The feature can be set to
“On” or “Off”.
• Transport To Mode
Select this mode to lower the
pneumatic suspension to minimum
ride height and disable system
operation to help vehicle loading
and transport, for instance on the
platform of a tow truck. The feature
can be set to “On” or “Off”.
• Wheel Alignment Mode
Select this mode to prevent
automatic pneumatic suspension alignment when servicing
suspension and/or steering parts.
The feature can be set to “On” or
“Off”.
Audio This feature enables to view and set
the available audio modes depending
on the type of audio system supplied
on the car.
The following modes refer to the
“High Premium” audio system.
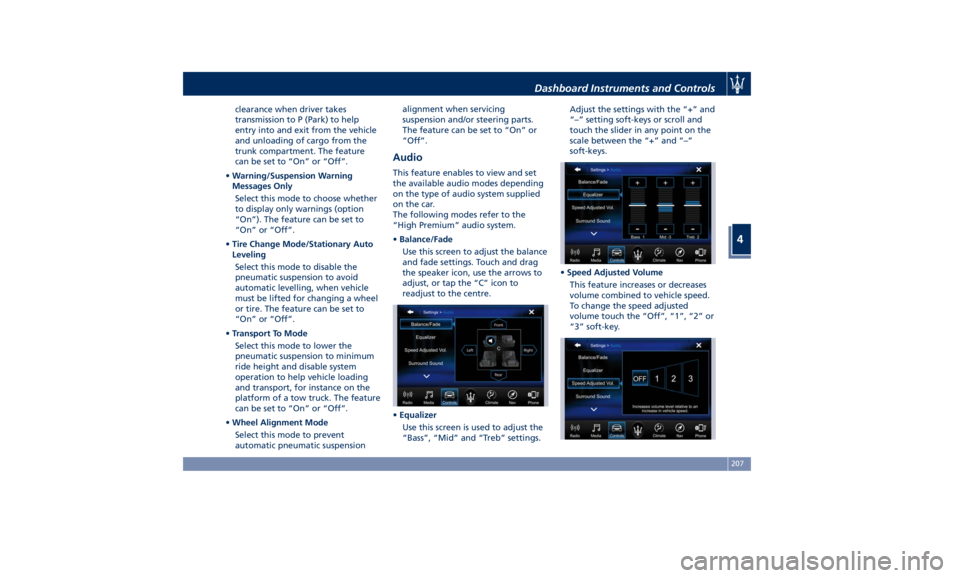
• Balance/Fade
Use this screen to adjust the balance
and fade settings. Touch and drag
the speaker icon, use the arrows to
adjust, or tap the “C” icon to
readjust to the centre.
• Equalizer
Use this screen is used to adjust the
“Bass”, “Mid” and “Treb” settings. Adjust the settings with the “+” and
“–” setting soft-keys or scroll and
touch the slider in any point on the
scale between the “+” and “–”
soft-keys.
• Speed Adjusted Volume
This feature increases or decreases
volume combined to vehicle speed.
To change the speed adjusted
volume touch the “Off”, “1”, “2” or
“3” soft-key.Dashboard Instruments and Controls
4
207