Page 147 of 436
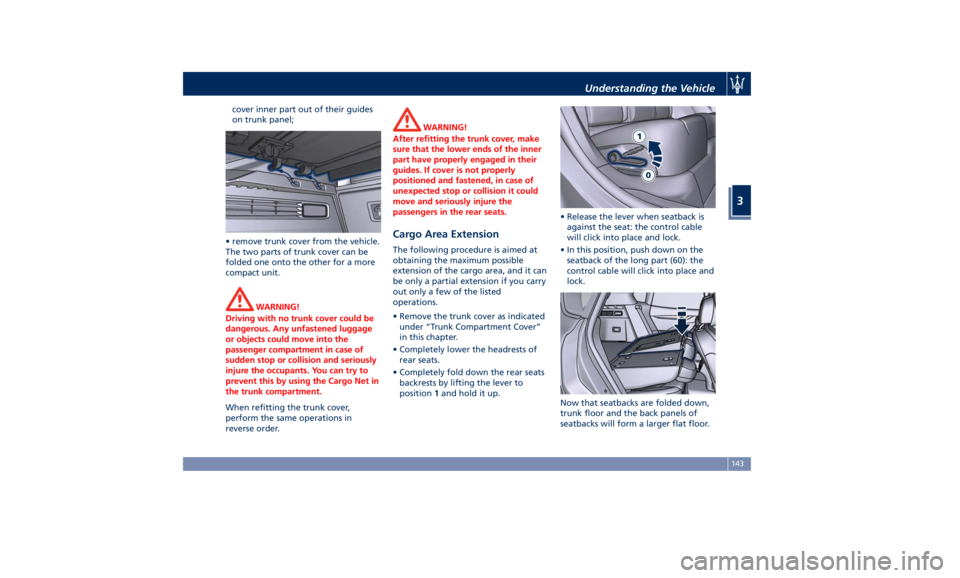
cover inner part out of their guides
on trunk panel;
• remove trunk cover from the vehicle.
The two parts of trunk cover can be
folded one onto the other for a more
compact unit.
WARNING!
Driving with no trunk cover could be
dangerous. Any unfastened luggage
or objects could move into the
passenger compartment in case of
sudden stop or collision and seriously
injure the occupants. You can try to
prevent this by using the Cargo Net in
the trunk compartment.
When refitting the trunk cover,
perform
the same operations in
reverse order. WARNING!
After refitting the trunk cover, make
sure that the lower ends of the inner
part have properly engaged in their
guides. If cover is not properly
positioned and fastened, in case of
unexpected stop or collision it could
move and seriously injure the
passengers in the rear seats.
Cargo Area Extension The following procedure is aimed at
obtaining the maximum possible
extension of the cargo area, and it can
be only a partial extension if you carry
out only a few of the listed
operations.
• Remove the trunk cover as indicated
under “Trunk Compartment Cover”
in this chapter.
• Completely lower the headrests of
rear seats.
• Completely fold down the rear seats
backrests by lifting the lever to
position 1 and hold it up. • Release the lever when seatback is
against the seat: the control cable
will click into place and lock.
• In this position, push down on the
seatback of the long part (60): the
control cable will click into place and
lock.
Now that seatbacks are folded down,
trunk floor and the back panels of
seatbacks will form a larger flat floor.Understanding the Vehicle
3
143
Page 148 of 436
CAUTION!
Seatback rear panel is not suitable to
support heavy loads and metal objects
with protruding elements that might
scratch its surface. If necessary, protect
the seatback rear panel surface using
rigid panels.
Installing the Cargo Net for
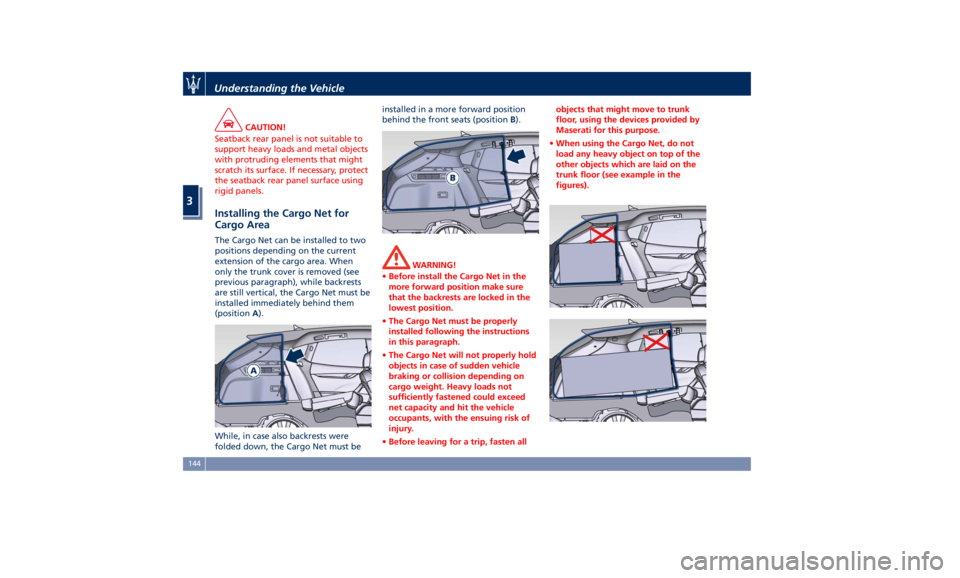
Cargo Area The Cargo Net can be installed to two
positions depending on the current
extension of the cargo area. When
only the trunk cover is removed (see
previous paragraph), while backrests
are still vertical, the Cargo Net must be
installed immediately behind them
(position A ).
While, in case also backrests were
folded down, the Cargo Net must be installed in a more forward position
behind the front seats (position B ).
WARNING!
• Before install the Cargo Net in the
more forward position make sure
that the backrests are locked in the
lowest position.
• The Cargo Net must be properly
installed following the instructions
in this paragraph.
• The Cargo Net will not properly hold
objects in case of sudden vehicle
braking or collision depending on
cargo weight. Heavy loads not
sufficiently fastened could exceed
net capacity and hit the vehicle
occupants, with the ensuing risk of
injury.
• Before leaving for a trip, fasten all objects that might move to trunk
floor, using the devices provided by
Maserati for this purpose.
• When using the Cargo Net, do not
load any heavy object on top of the
other objects which are laid on the
trunk floor (see example in the
figures).Understanding the Vehicle
3
144
Page 149 of 436
The Cargo Net is housed in the
accessories compartment under the
trunk floor.
The Cargo Net is supplied folded,
inside a bag that is part of the net
itself.
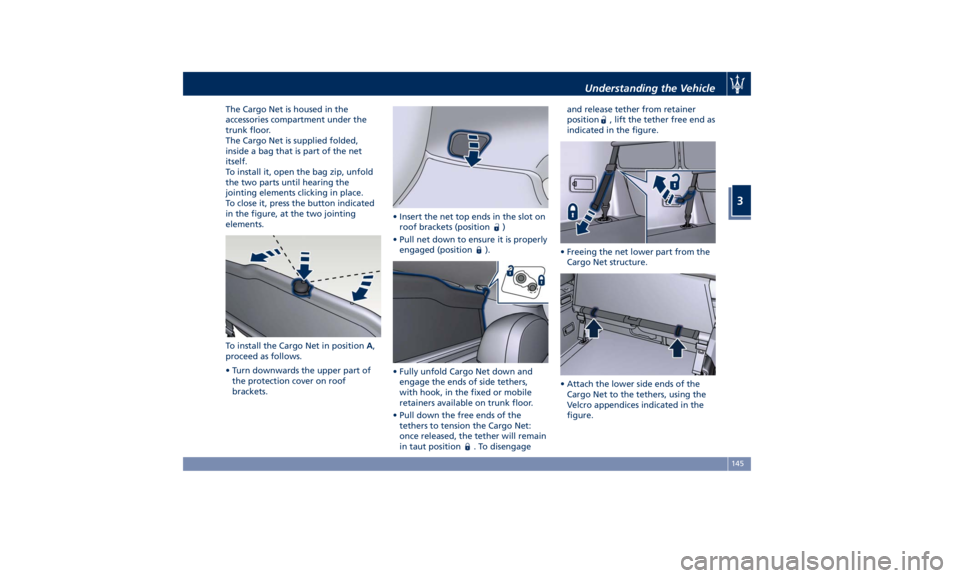
To install it, open the bag zip, unfold
the two parts until hearing the
jointing elements clicking in place.
To close it, press the button indicated
in the figure, at the two jointing
elements.
To install the Cargo Net in position A ,
proceed as follows.
• Turn downwards the upper part of
the protection cover on roof
brackets. • Insert the net top ends in the slot on
roof brackets (position
)
• Pull net down to ensure it is properly
engaged (position
).
• Fully unfold Cargo Net down and
engage the ends of side tethers,
with hook, in the fixed or mobile
retainers available on trunk floor.
• Pull down the free ends of the
tethers to tension the Cargo Net:
once released, the tether will remain
in taut position
. To disengage and release tether from retainer
position
, lift the tether free end as
indicated in the figure.
• Freeing the net lower part from the
Cargo Net structure.
• Attach the lower side ends of the
Cargo Net to the tethers, using the
Velcro appendices indicated in the
figure.Understanding the Vehicle
3
145
Page 150 of 436
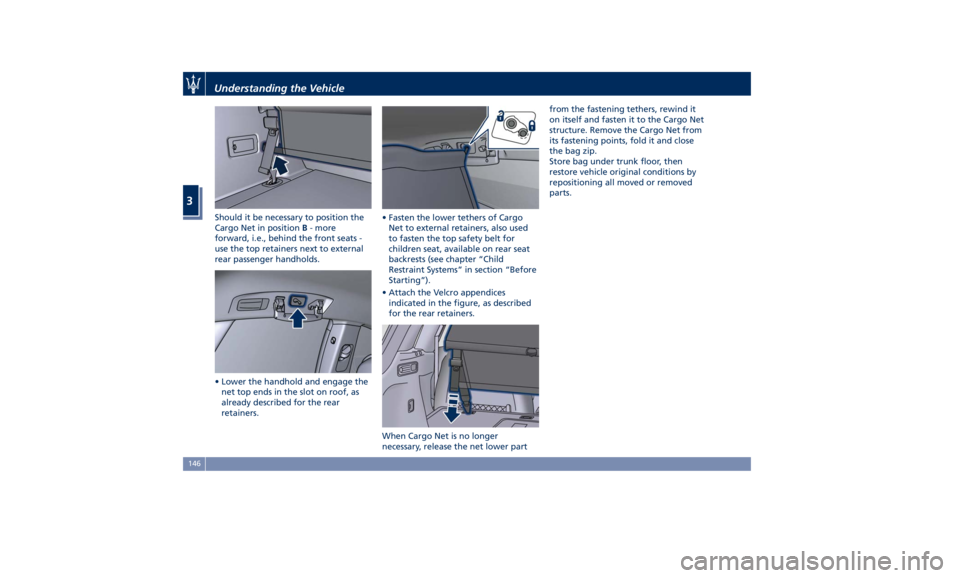
Should it be necessary to position the
Cargo Net in position B - more
forward, i.e., behind the front seats -
use the top retainers next to external
rear passenger handholds.
• Lower the handhold and engage the
net top ends in the slot on roof, as
already described for the rear
retainers. • Fasten the lower tethers of Cargo
Net to external retainers, also used
to fasten the top safety belt for
children seat, available on rear seat
backrests (see chapter “Child
Restraint Systems” in section “Before
Starting”).
• Attach the Velcro appendices
indicated in the figure, as described
for the rear retainers.
When Cargo Net is no longer
necessary, release the net lower part from the fastening tethers, rewind it
on itself and fasten it to the Cargo Net
structure. Remove the Cargo Net from
its fastening points, fold it and close
the bag zip.
Store bag under trunk floor, then
restore vehicle original conditions by
repositioning all moved or removed
parts.Understanding the Vehicle
3
146
Page 197 of 436
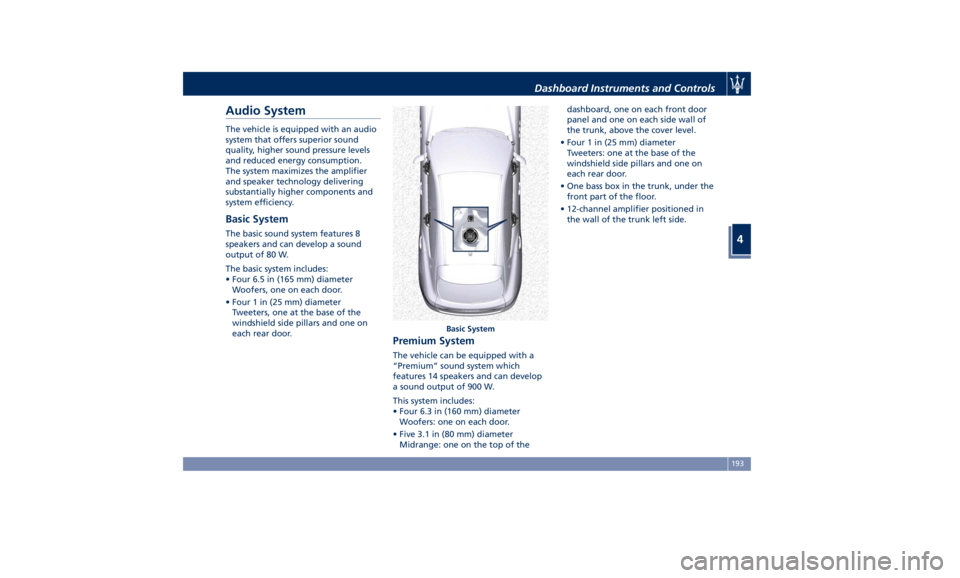
Audio System The vehicle is equipped with an audio
system that offers superior sound
quality, higher sound pressure levels
and reduced energy consumption.
The system maximizes the amplifier
and speaker technology delivering
substantially higher components and
system efficiency.
Basic System The basic sound system features 8
speakers and can develop a sound
output of 80 W.
The basic system includes:
• Four 6.5 in (165 mm) diameter
Woofers, one on each door.
• Four 1 in (25 mm) diameter
Tweeters, one at the base of the
windshield side pillars and one on
each rear door.
Premium System The vehicle can be equipped with a
“Premium” sound system which
features 14 speakers and can develop
a sound output of 900 W.
This system includes:
• Four 6.3 in (160 mm) diameter
Woofers: one on each door.
• Five 3.1 in (80 mm) diameter
Midrange: one on the top of the dashboard, one on each front door
panel and one on each side wall of
the trunk, above the cover level.
• Four 1 in (25 mm) diameter
Tweeters: one at the base of the
windshield side pillars and one on
each rear door.
• One bass box in the trunk, under the
front part of the floor.
• 12-channel amplifier positioned in
the wall of the trunk left side.
Basic SystemDashboard Instruments and Controls
4
193
Page 198 of 436
High Premium System The vehicle can be equipped with a
“High Premium” audio system
including 17 speakers and 1280 W of
sound power, available upon request.
The “High Premium” system includes:
• Four 6.5 in (165 mm) Woofers: one
on each door.
• Five 4 in (100 mm) Midranges: one
on center dashboard, one on each front door and one on each side wall
of the trunk, above the cover level.
• Seven 1 in (25 mm) Tweeters: one on
center dashboard, one at the base of
the windshield side pillars, one on
each rear door and one on each side
wall of the trunk, above the cover
level.
• One bass box in the trunk, under the
front part of the floor.
• 16-channel amplifier positioned in
the wall of the trunk left side.
Premium System High Premium SystemDashboard Instruments and Controls
4
194
Page 211 of 436
clearance when driver takes
transmission to P (Park) to help
entry into and exit from the vehicle
and unloading of cargo from the
trunk compartment. The feature
can be set to “On” or “Off”.
• Warning/Suspension Warning
Messages Only
Select this mode to choose whether
to display only warnings (option
“On”). The feature can be set to
“On” or “Off”.
• Tire Change Mode/Stationary Auto
Leveling
Select this mode to disable the
pneumatic suspension to avoid
automatic levelling, when vehicle
must be lifted for changing a wheel
or tire. The feature can be set to
“On” or “Off”.
• Transport To Mode
Select this mode to lower the
pneumatic suspension to minimum
ride height and disable system
operation to help vehicle loading
and transport, for instance on the
platform of a tow truck. The feature
can be set to “On” or “Off”.
• Wheel Alignment Mode
Select this mode to prevent
automatic pneumatic suspension alignment when servicing
suspension and/or steering parts.
The feature can be set to “On” or
“Off”.
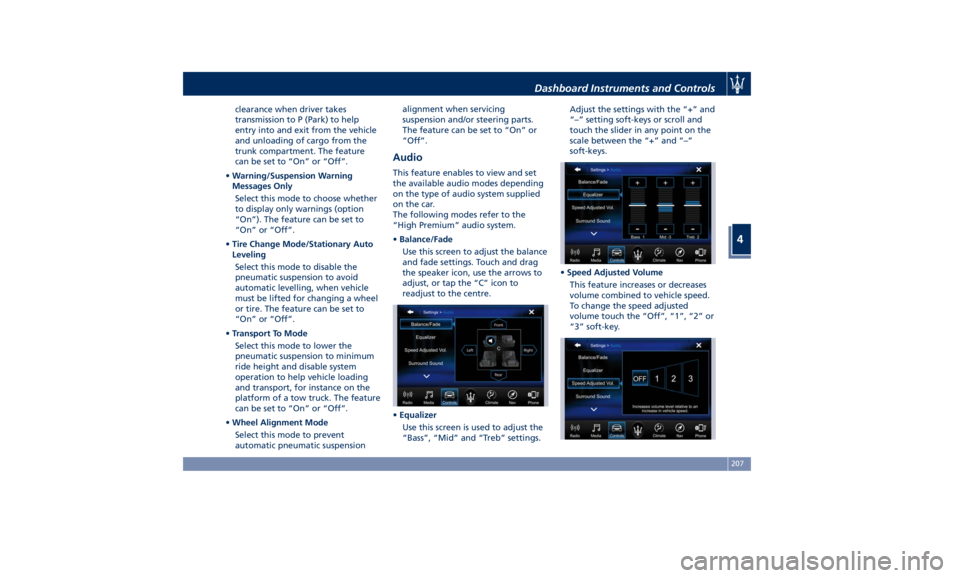
Audio This feature enables to view and set
the available audio modes depending
on the type of audio system supplied
on the car.
The following modes refer to the
“High Premium” audio system.
• Balance/Fade
Use this screen to adjust the balance
and fade settings. Touch and drag
the speaker icon, use the arrows to
adjust, or tap the “C” icon to
readjust to the centre.
• Equalizer
Use this screen is used to adjust the
“Bass”, “Mid” and “Treb” settings. Adjust the settings with the “+” and
“–” setting soft-keys or scroll and
touch the slider in any point on the
scale between the “+” and “–”
soft-keys.
• Speed Adjusted Volume
This feature increases or decreases
volume combined to vehicle speed.
To change the speed adjusted
volume touch the “Off”, “1”, “2” or
“3” soft-key.Dashboard Instruments and Controls
4
207
Page 217 of 436
• After removing the molding, take
the screwdriver from the tool kit
under trunk mat (see “Tool kit” in
section “In an Emergency”).
• Insert screwdriver tip inside the hole
on LH side of glove box structure:
push until home against actuator
pin.
• Push down screwdriver tip to release
actuator pin and manually unlock
the glove box. The actuator will
remain in this condition until battery
feed is restored. • Reinstall the molding ensuring that
pins match with the clips of
dashboard structure.
• Press on the molding, always starting
from the central part until all 10 pins
are engaged in their clips and “click”
in place.
After releasing the glove box by
means of this procedure, do not lock
glove box using the PIN code and
contact an Authorized Maserati Dealer to have unlock feature via PIN
code checked.
Inner SectionDashboard Instruments and Controls
4
213