2019 MASERATI LEVANTE tow
[x] Cancel search: towPage 122 of 436
NOTE:
• Each time the adaptive headlight
system is turned on, the headlights
will perform a self-regulation cycle.
• All AFS features are available only if
the vehicle is moving forward.
• “Adaptive Front Light” function can
be turned on or off using the MTC+
System, refer to “MTC+ Settings” in
section “Dashboard Instrument and
Controls” for further information. “Full-LED” Headlight with AFS
(optional) These headlights combines the
“Full-LED” technology to the AFS
(Advanced Frontlighting System)
adaptive features, using a
forward-facing camera located on the
windshield behind the internal
rear-view mirror.
“Full-LED” Technology
This technology allows having
headlights with a simpler construction
and a more compact size compared to
those equipped with traditional or
Xenon light bulbs.
Other advantages are:
• a clearer light beam, with a cool
white tone that allows a better
perception of the contrasts thus
making the night vision more
efficient and less tiring;
• a longer duration equivalent at least
to that of the vehicle;
• a reduced current consumption. These features positively affect some
vehicle management economy aspects
by eliminating/reducing the light bulb
replacements and the fuel
consumption.
AFS Features
The system is able to process signals of
onboard systems and subsequently
start up five strategic steps in the
following situations:
• “motorway beam”;
• “country beam”;
• “town beam”;
• “adverse weather beam”;
• “tourist beam” (for example in
countries with circulation on the
opposite side). In this case this
function must be activated via the
menu of MTC+ (refer to “MTC+
Settings” in section “Dashboard
Instruments and Controls”).
The advantages offered by the AFS
system are perceived especially in case
of bad weather, fog and/or insufficient
road indications providing broader
illumination of the side zones, which
are normally left in the dark, and for
motorway driving.
This surely increases driving safety as it
offers less eye stress and increased
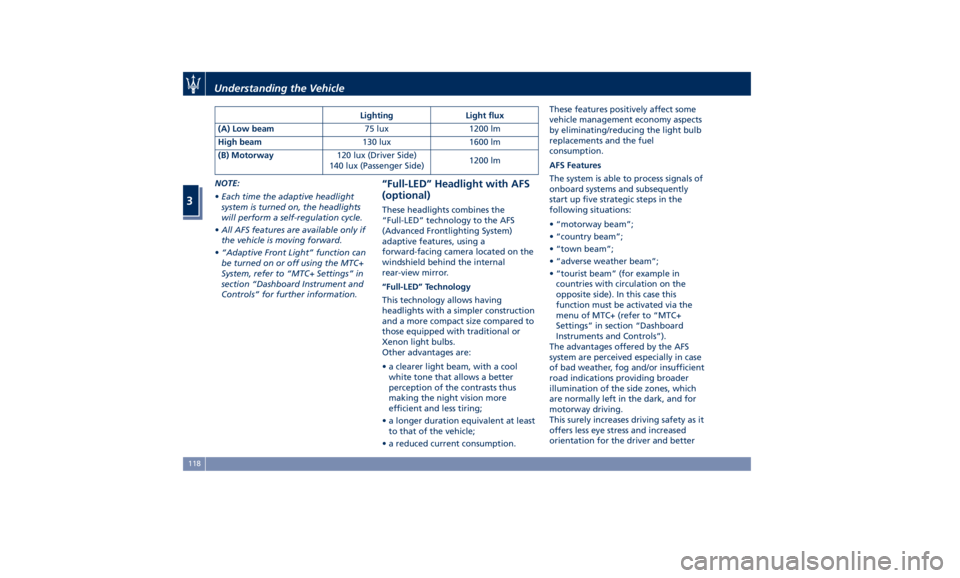
orientation for the driver and betterLighting Light flux
(A) Low beam 75 lux 1200 lm
High beam 130 lux 1600 lm
(B) Motorway 120 lux (Driver Side)
140 lux (Passenger Side) 1200 lm
Understanding the Vehicle
3
118
Page 129 of 436
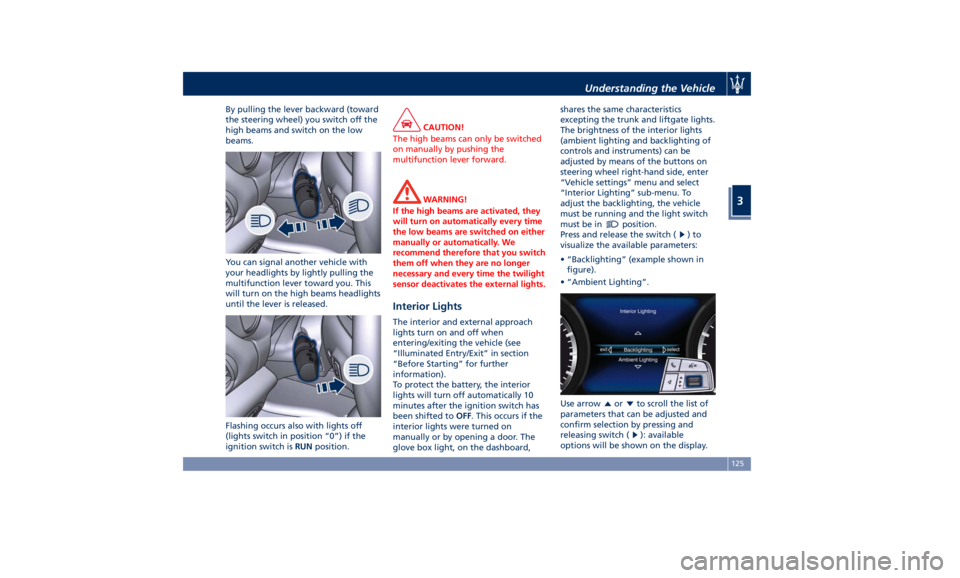
By pulling the lever backward (toward
the steering wheel) you switch off the
high beams and switch on the low
beams.
You can signal another vehicle with
your headlights by lightly pulling the
multifunction lever toward you. This
will turn on the high beams headlights
until the lever is released.
Flashing occurs also with lights off
(lights switch in position “0”) if the
ignition switch is RUN position. CAUTION!
The high beams can only be switched
on manually by pushing the
multifunction lever forward.
WARNING!
If the high beams are activated, they
will turn on automatically every time
the low beams are switched on either
manually or automatically. We
recommend therefore that you switch
them off when they are no longer
necessary and every time the twilight
sensor deactivates the external lights.
Interior Lights The interior and external approach
lights turn on and off when
entering/exiting the vehicle (see
“Illuminated Entry/Exit” in section
“Before Starting” for further
information).
To protect the battery, the interior
lights will turn off automatically 10
minutes after the ignition switch has
been shifted to OFF . This occurs if the
interior lights were turned on
manually or by opening a door. The
glove box light, on the dashboard, shares the same characteristics
excepting the trunk and liftgate lights.
The brightness of the interior lights
(ambient lighting and backlighting of
controls and instruments) can be
adjusted by means of the buttons on
steering wheel right-hand side, enter
“Vehicle settings” menu and select
“Interior Lighting” sub-menu. To
adjust the backlighting, the vehicle
must be running and the light switch
must be in
position.
Press and release the switch (
)to
visualize the available parameters:
• “Backlighting” (example shown in
figure).
• “Ambient Lighting”.
Use arrow
or to scroll the list of
parameters that can be adjusted and
confirm selection by pressing and
releasing switch (
): available
options will be shown on the display.Understanding the Vehicle
3
125
Page 135 of 436
necessary to shift the multifunction
lever to “OFF” and the ignition switch
to OFF position.
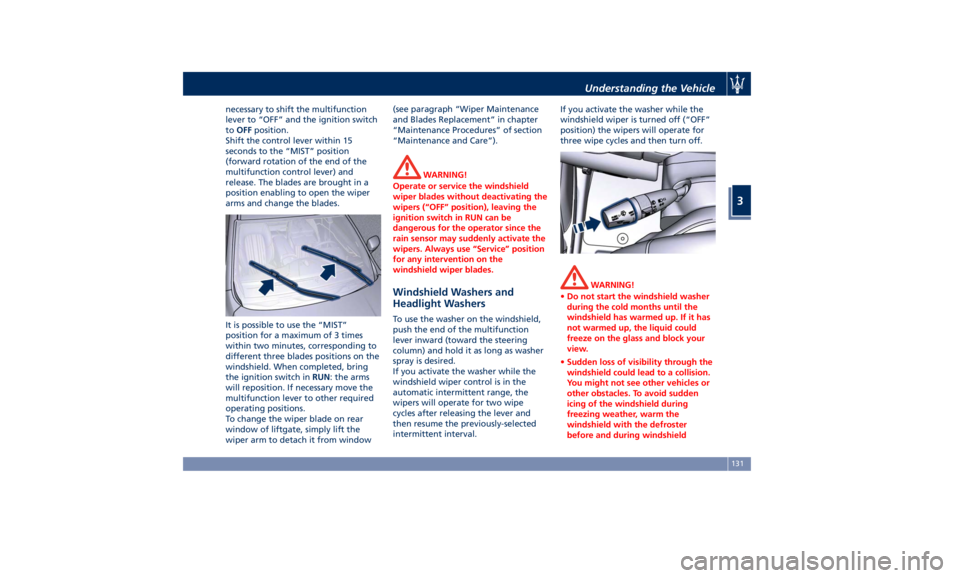
Shift the control lever within 15
seconds to the “MIST” position
(forward rotation of the end of the
multifunction control lever) and
release. The blades are brought in a
position enabling to open the wiper
arms and change the blades.
It is possible to use the “MIST”
position for a maximum of 3 times
within two minutes, corresponding to
different three blades positions on the
windshield. When completed, bring
the ignition switch in RUN : the arms
will reposition. If necessary move the
multifunction lever to other required
operating positions.
To change the wiper blade on rear
window of liftgate, simply lift the
wiper arm to detach it from window (see paragraph “Wiper Maintenance
and Blades Replacement” in chapter
“Maintenance Procedures” of section
“Maintenance and Care”).
WARNING!
Operate or service the windshield
wiper blades without deactivating the
wipers (“OFF” position), leaving the
ignition switch in RUN can be
dangerous for the operator since the
rain sensor may suddenly activate the
wipers. Always use “Service” position
for any intervention on the
windshield wiper blades.
Windshield Washers and
Headlight Washers To use the washer on the windshield,
push the end of the multifunction
lever inward (toward the steering
column) and hold it as long as washer
spray is desired.
If you activate the washer while the
windshield wiper control is in the
automatic intermittent range, the
wipers will operate for two wipe
cycles after releasing the lever and
then resume the previously-selected
intermittent interval. If you activate the washer while the
windshield wiper is turned off (“OFF”
position) the wipers will operate for
three wipe cycles and then turn off.
WARNING!
• Do not start the windshield washer
during the cold months until the
windshield has warmed up. If it has
not warmed up, the liquid could
freeze on the glass and block your
view.
• Sudden loss of visibility through the
windshield could lead to a collision.
You might not see other vehicles or
other obstacles. To avoid sudden
icing of the windshield during
freezing weather, warm the
windshield with the defroster
before and during windshieldUnderstanding the Vehicle
3
131
Page 144 of 436
To load your vehicle properly, store
heavier items below and be sure you
distribute their weight as evenly as
possible.
Stow all loose items securely before
start driving as they could move during
the trip.
To separate trunk from passenger
compartment, the vehicle is equipped
with a rigid horizontal panel, fitted
behind the rear seat backrest. When
vehicle is at a standstill, cargo area
cover can withstand a maximum static
load of 260 lb (120 kg).
Apart from cargo area cover, the
vehicle can be also equipped with a
vertical rolling Cargo Net, to be used
to separate the cargo area from the
passenger area.
The Authorized Maserati Dealer can
provide you with any information
about the items dedicated to the
usage of the trunk (luggage
compartment mat, net, foldable
box,...), available in the "Genuine
Accessories" range.
Luggage Fasteners and
Retainers Vehicle can be equipped with fixed
and mobile anchorages on trunk floor
allowing to fasten and retain any
luggage in a convenient and safe manner. Using a special and approved
net with hooks available in the
"Genuine Accessories" range, also
large and heavy objects can be
fastened to trunk floor.
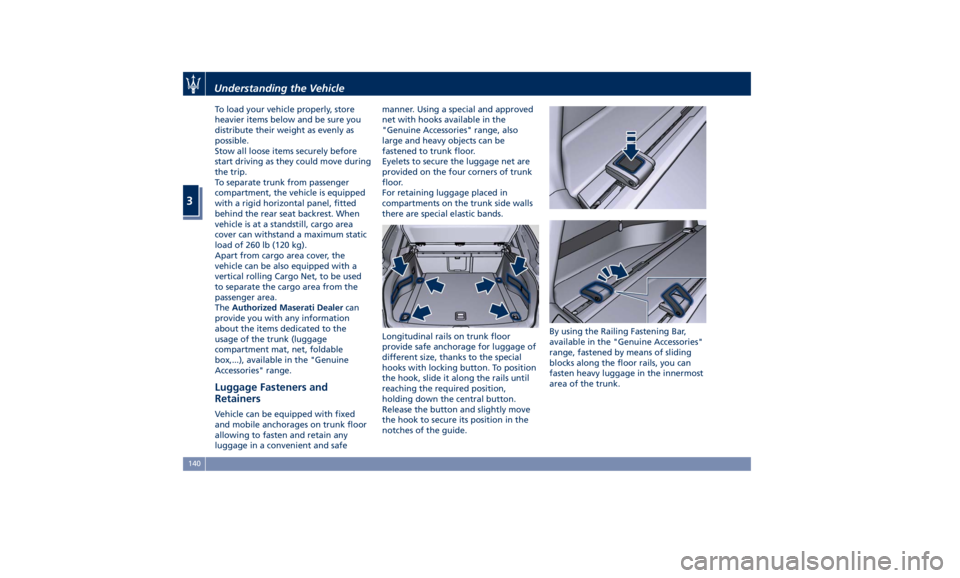
Eyelets to secure the luggage net are
provided on the four corners of trunk
floor.
For retaining luggage placed in
compartments on the trunk side walls
there are special elastic bands.
Longitudinal rails on trunk floor
provide safe anchorage for luggage of
different size, thanks to the special
hooks with locking button. To position
the hook, slide it along the rails until
reaching the required position,
holding down the central button.
Release the button and slightly move
the hook to secure its position in the
notches of the guide. By using the Railing Fastening Bar,
available in the "Genuine Accessories"
range, fastened by means of sliding
blocks along the floor rails, you can
fasten heavy luggage in the innermost
area of the trunk.Understanding the Vehicle
3
140
Page 145 of 436
CAUTION!
To avoid luggage inadvertent
movement, in case of sudden braking
or collision, always check correct
fastening of the retainers onto floor
rails before anchoring any luggage.
NOTE:
The Authorized
Maserati Dealer can
provide you with information about
the available “Genuine Accessories”
for the trunk compartment.
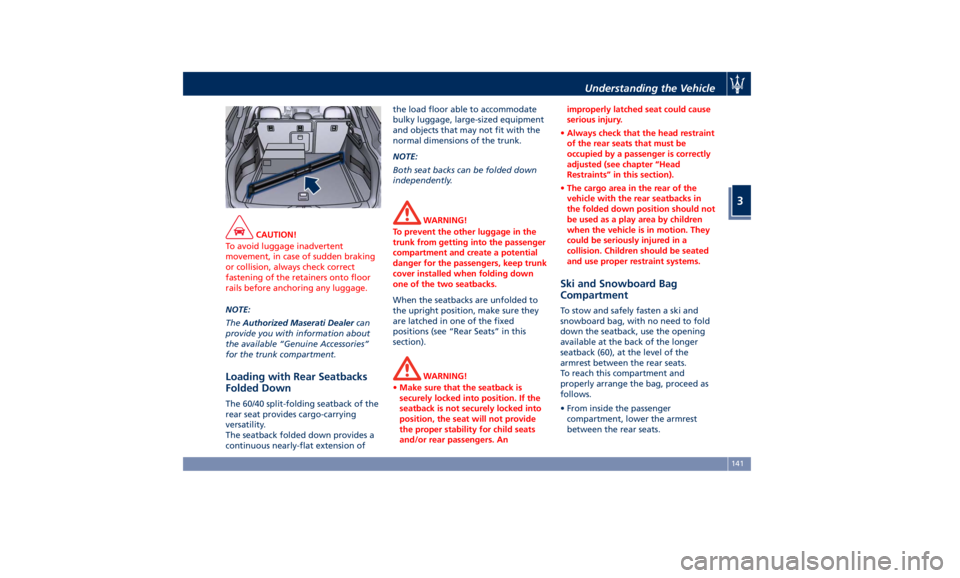
Loading with Rear Seatbacks
Folded Down The 60/40 split-folding seatback of the
rear seat provides cargo-carrying
versatility.
The seatback folded down provides a
continuous nearly-flat extension of the load floor able to accommodate
bulky luggage, large-sized equipment
and objects that may not fit with the
normal dimensions of the trunk.
NOTE:
Both seat backs can be folded down
independently.
WARNING!
To prevent the other luggage in the
trunk from getting into the passenger
compartment and create a potential
danger for the passengers, keep trunk
cover installed when folding down
one of the two seatbacks.
When the seatbacks are unfolded to
the
upright position, make
sure they
are latched in one of the fixed
positions (see “Rear Seats” in this
section).
WARNING!
• Make sure that the seatback is
securely locked into position. If the
seatback is not securely locked into
position, the seat will not provide
the proper stability for child seats
and/or rear passengers. An improperly latched seat could cause
serious injury.
• Always check that the head restraint
of the rear seats that must be
occupied by a passenger is correctly
adjusted (see chapter “Head
Restraints” in this section).
• The cargo area in the rear of the
vehicle with the rear seatbacks in
the folded down position should not
be used as a play area by children
when the vehicle is in motion. They
could be seriously injured in a
collision. Children should be seated
and use proper restraint systems.
Ski and Snowboard Bag
Compartment To stow and safely fasten a ski and
snowboard bag, with no need to fold
down the seatback, use the opening
available at the back of the longer
seatback (60), at the level of the
armrest between the rear seats.
To reach this compartment and
properly arrange the bag, proceed as
follows.
• From inside the passenger
compartment, lower the armrest
between the rear seats.Understanding the Vehicle
3
141
Page 146 of 436
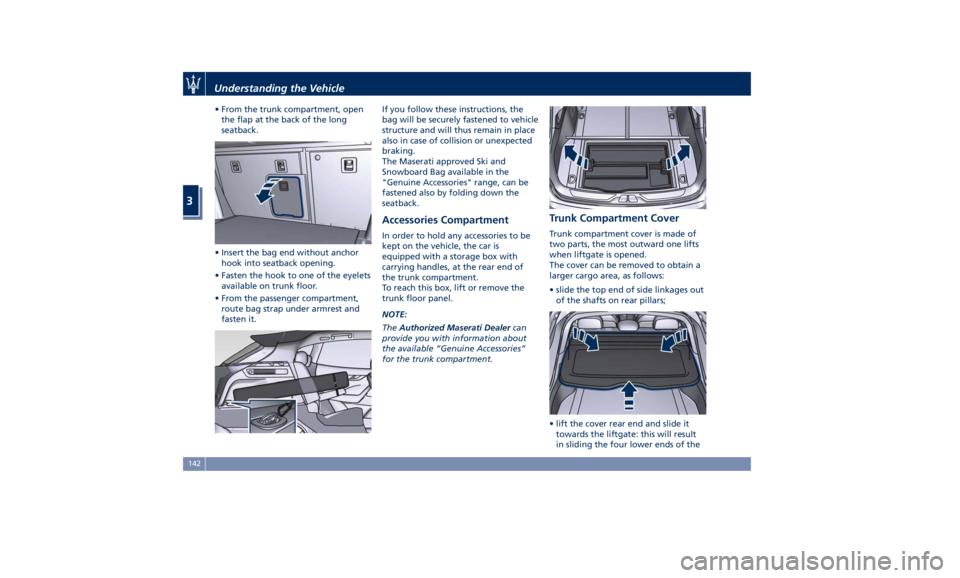
• From the trunk compartment, open
the flap at the back of the long
seatback.
• Insert the bag end without anchor
hook into seatback opening.
• Fasten the hook to one of the eyelets
available on trunk floor.
• From the passenger compartment,
route bag strap under armrest and
fasten it. If you follow these instructions, the
bag will be securely fastened to vehicle
structure and will thus remain in place
also in case of collision or unexpected
braking.
The Maserati approved Ski and
Snowboard Bag available in the
"Genuine Accessories" range, can be
fastened also by folding down the
seatback.
Accessories Compartment In order to hold any accessories to be
kept on the vehicle, the car is
equipped with a storage box with
carrying handles, at the rear end of
the trunk compartment.
To reach this box, lift or remove the
trunk floor panel.
NOTE:
The Authorized Maserati Dealer can
provide you with information about
the available “Genuine Accessories”
for the trunk compartment. Trunk Compartment Cover Trunk compartment cover is made of
two parts, the most outward one lifts
when liftgate is opened.
The cover can be removed to obtain a
larger cargo area, as follows:
• slide the top end of side linkages out
of the shafts on rear pillars;
• lift the cover rear end and slide it
towards the liftgate: this will result
in sliding the four lower ends of theUnderstanding the Vehicle
3
142
Page 185 of 436

or engine stall and your vehicle may
require towing.
Low Fuel Indicator
When the fuel level reaches
approximately 4.2 Gallons (16
liters) this light under the fuel
gauge indicator will turn on,
and remain on until fuel is added
together with the related message. In
this condition the color indicating the
quantity of fuel in the tank, inside the
indicator on display, will go from
white to amber.
Refer to “Refueling” in section
“Driving” for fuel filling.
Windshield and Headlights Washer
Low Fluid Indicator
This indicator will illuminate
for 5 seconds to indicate a low
level of the windshield and
headlights washer fluid. A
related message will be displayed.
See “Maintenance Procedures” in
section “Maintenance and Care” for
fluid filling.
Headlight Aiming System Failure
Warning Light
This warning light and the
related message indicate a
failure of the automatic
headlight aiming system (horizontal leveling, electromechanical
swiveling) or of the Advanced
Frontlighting System (AFS).
Please contact an Authorized Maserati
Dealer to check the system.
Advanced Frontlighting System (AFS)
Failure Warning Light
This warning light and the
related message light up to
report a failure of the AFS
system.
Contact an Authorized Maserati
Dealer as soon as possible.
Automatic High Beam Failure Warning
Light
This warning light and the
related message illuminate to
report a failure of the
automatic high beam
headlights.
Contact an Authorized Maserati
Dealer as soon as possible.
Suspensions Failure Warning Light
This warning light and the
related message turn on while
driving if there is a failure of
the suspension system.
Please contact an Authorized Maserati
Dealer to check the system. Ice Hazard Indicator
When the external
temperature falls below 38°F
(3°C), the temperature value
blinks for a few seconds, the
indicator light turns on, a message is
displayed and an acoustic signal is
triggered to warn the driver of the
risk of icy roadbed.
Under such conditions, we recommend
using the I.C.E. drive mode (see
“Automatic Transmission” in section
“Driving”) drive carefully and slow
down as the grip of the tires may be
significantly reduced.
The indicator light flashes for 5
seconds and switches off when the
temperature reaches 43°F (6°C) or
higher.
Fuel Filler Cap (Gas cap) Open
Warning Light
After refueling the car
performs a check of the fuel
filler cap and this warning
light comes on if it is not
correctly closed, after approximately
10 minutes also depending on driving
conditions.
See “Refueling” in section “Driving”
for more details.Dashboard Instruments and Controls
4
181
Page 208 of 436
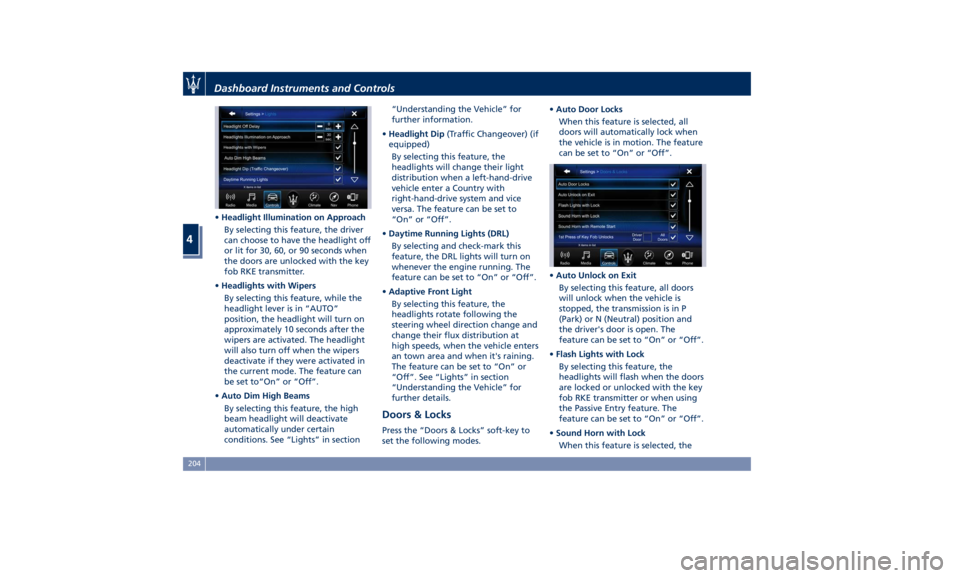
• Headlight Illumination on Approach
By selecting this feature, the driver
can choose to have the headlight off
or lit for 30, 60, or 90 seconds when
the doors are unlocked with the key
fob RKE transmitter.
• Headlights with Wipers
By selecting this feature, while the
headlight lever is in “AUTO”
position, the headlight will turn on
approximately 10 seconds after the
wipers are activated. The headlight
will also turn off when the wipers
deactivate if they were activated in
the current mode. The feature can
be set to“On” or “Off”.
• Auto Dim High Beams
By selecting this feature, the high
beam headlight will deactivate
automatically under certain
conditions. See “Lights” in section “Understanding the Vehicle” for
further information.
• Headlight Dip (Traffic Changeover) (if
equipped)
By selecting this feature, the
headlights will change their light
distribution when a left-hand-drive
vehicle enter a Country with
right-hand-drive system and vice
versa. The feature can be set to
“On” or “Off”.
• Daytime Running Lights (DRL)
By selecting and check-mark this
feature, the DRL lights will turn on
whenever the engine running. The
feature can be set to “On” or “Off”.
• Adaptive Front Light
By selecting this feature, the
headlights rotate following the
steering wheel direction change and
change their flux distribution at
high speeds, when the vehicle enters
an town area and when it's raining.
The feature can be set to “On” or
“Off”. See “Lights” in section
“Understanding the Vehicle” for
further details.
Doors & Locks Press the “Doors & Locks” soft-key to
set the following modes. • Auto Door Locks
When this feature is selected, all
doors will automatically lock when
the vehicle is in motion. The feature
can be set to “On” or “Off”.
• Auto Unlock on Exit
By selecting this feature, all doors
will unlock when the vehicle is
stopped, the transmission is in P
(Park) or N (Neutral) position and
the driver's door is open. The
feature can be set to “On” or “Off”.
• Flash Lights with Lock
By selecting this feature, the
headlights will flash when the doors
are locked or unlocked with the key
fob RKE transmitter or when using
the Passive Entry feature. The
feature can be set to “On” or “Off”.
• Sound Horn with Lock
When this feature is selected, theDashboard Instruments and Controls
4
204