2019 MASERATI LEVANTE turn signal
[x] Cancel search: turn signalPage 115 of 436

Spot Assist (BSA) system is
operational. For more details see
chapter “Blind Spot Assist - BSA” in
section “Driving”.
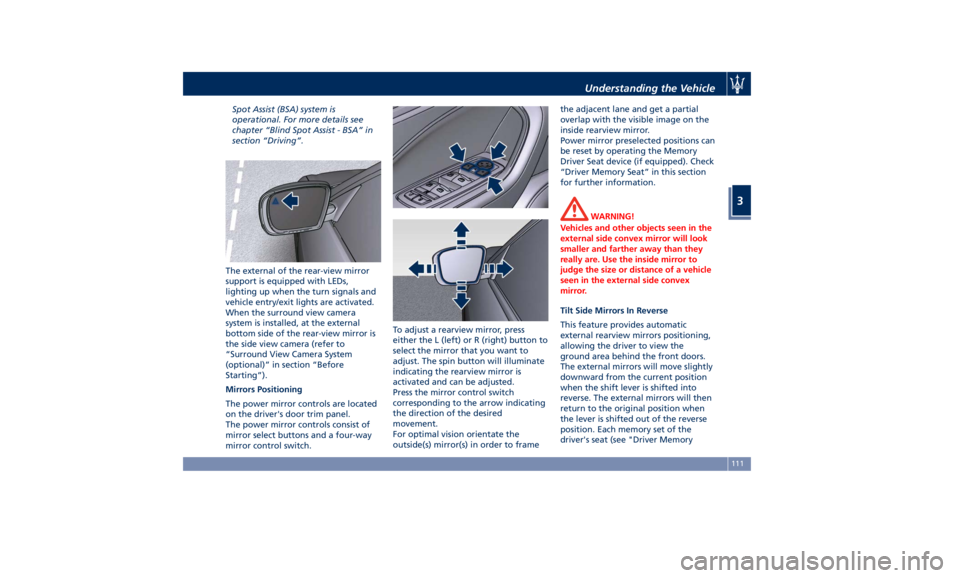
The external of the rear-view mirror
support is equipped with LEDs,
lighting up when the turn signals and
vehicle entry/exit lights are activated.
When the surround view camera
system is installed, at the external
bottom side of the rear-view mirror is
the side view camera (refer to
“Surround View Camera System
(optional)” in section “Before
Starting”).
Mirrors Positioning
The power mirror controls are located
on the driver's door trim panel.
The power mirror controls consist of
mirror select buttons and a four-way
mirror control switch. To adjust a rearview mirror, press
either the L (left) or R (right) button to
select the mirror that you want to
adjust. The spin button will illuminate
indicating the rearview mirror is
activated and can be adjusted.
Press the mirror control switch
corresponding to the arrow indicating
the direction of the desired
movement.
For optimal vision orientate the
outside(s) mirror(s) in order to frame the adjacent lane and get a partial
overlap with the visible image on the
inside rearview mirror.
Power mirror preselected positions can
be reset by operating the Memory
Driver Seat device (if equipped). Check
“Driver Memory Seat” in this section
for further information.
WARNING!
Vehicles and other objects seen in the
external side convex mirror will look
smaller and farther away than they
really are. Use the inside mirror to
judge the size or distance of a vehicle
seen in the external side convex
mirror.
Tilt Side Mirrors In Reverse
This
feature provides automatic
external rearview mirrors positioning,
allowing the driver to view the
ground area behind the front doors.
The external mirrors will move slightly
downward from the current position
when the shift lever is shifted into
reverse. The external mirrors will then
return to the original position when
the lever is shifted out of the reverse
position. Each memory set of the
driver's seat (see "Driver MemoryUnderstanding the Vehicle
3
111
Page 120 of 436

SmartBeam™ System (for
versions/markets, where
provided) The SmartBeam™ system provides
increased forward lighting for a more
comfortable and secure driving
experience without resulting in glare
to other vehicles in certain traffic
situations. The SmartBeam™ system
uses a forward facing digital camera,
located on the windshield behind the
internal rear-view mirror, and an
electronical headlights controller in
order to dynamically adapt the front
light distribution according to the
traffic scenario.
The digital camera works like a human
eye, it is able to see which is the traffic
context while the headlight electronic
controller works like a human brain,
using information from the camera to
command an headlight reaction that
gives to the driver the “best” light
distribution (best is always in reference
to the specific traffic environment).
The camera gives information to the
electronical headlight controller about
environmental brightness, traffic
participants vehicle and obstacles
lights, distances and velocities. Using a
proper combination of all these data
the smart beam system is able to dynamically modify the light shape
produced by the dipped beam and by
the full beam as well, to make the
driver visibility as much comfortable as
possible in every condition without
glaring other traffic participants.
System Limitations
There are some cases in which the
SmartBeam TM
system may not function
properly temporarily, and cause
glaring for other vehicles especially
with “Auto High Beam Assist” feature
activated on MTC+ “Controls” page
(see “MTC+ “Controls” Screen” in
section "Dashboard Instruments and
Controls").
These cases could be related to:
• Vehicles headlight and/or rear light
(one or both of them) not visible in
the field of view of the camera.
• Heavy rainy weather.
• Heavy foggy weather.
• Snowing weather.
• Windshield dirt or impurities in
camera lens zone.
• Camera lens obstruction or logging.
In all these cases, it will be the driver’s
responsibility to avoid this glaring by
acting manually on the system,
switching off the high beam by means
of steering wheel multifunction lever. Daytime Running Lights (DRL) The lighting system uses the same high
or low intensity headlamps LED,
respectively, for the DRL lights and
front position lights.
DRL lights will turn on when the
twilight sensor is in “DAY” mode, the
engine is running and the light switch
is in
or “AUTO” position.
If a turn signal is activated, the DRL
LED on the same side of the vehicle
will turn off for the duration of the
turn signal activation. Once the turn
signal is deactivated, the DRL LED will
light up again.
NOTE:
On Canadian vehicles DRL are always
on. On USA vehicles the DRL lights can
be turned on and off using the MTC+
System, see “MTC+ Settings” in section
“Dashboard Instruments and Controls”
for further information.Understanding the Vehicle
3
116
Page 121 of 436

Bi-Xenon Headlight (for
headlights without AFS) The gas-discharge (xenon) headlights
operate with an electric arc saturated
with Xenon gas under pressure,
instead of the incandescent filament.
The light produced is assuredly higher
compared to traditional light bulbs, in
terms of quality (brighter light) as well
as of the span and positioning of the
illuminated area.
WARNING!
If xenon headlamp replacement is
necessary, contact the Authorized
Maserati Dealer only: DANGER - RISK
OF ELECTRICAL SHOCK.
Headlight with AFS (for
versions/markets, where
provided) These headlights combines the “xeno”
technology to the AFS (Advanced
Frontlighting System) adaptive
features.
The system is able to process signals of
onboard systems and subsequently
start up five strategic steps in the
following situations:
• “motorway beam”; • “country beam”;
• “town beam”;
• “adverse weather beam”;
• “tourist beam” (for example in
countries with circulation on the
opposite side). In this case this
function must be activated via the
menu of MTC+ (refer to “MTC+
Settings” in section “Dashboard
Instruments and Controls”).
The advantages offered by the AFS
system are perceived especially in case
of bad weather, fog and/or insufficient
road indications providing broader
illumination of the side zones, which
are normally left in the dark, and for
motorway driving (see comparison
rendered below).
This surely increases driving safety as it
offers less eye stress and increased
orientation for the driver and better
detection of other persons on the
road sides (pedestrians, bicycle riders
and motorcycle drivers).
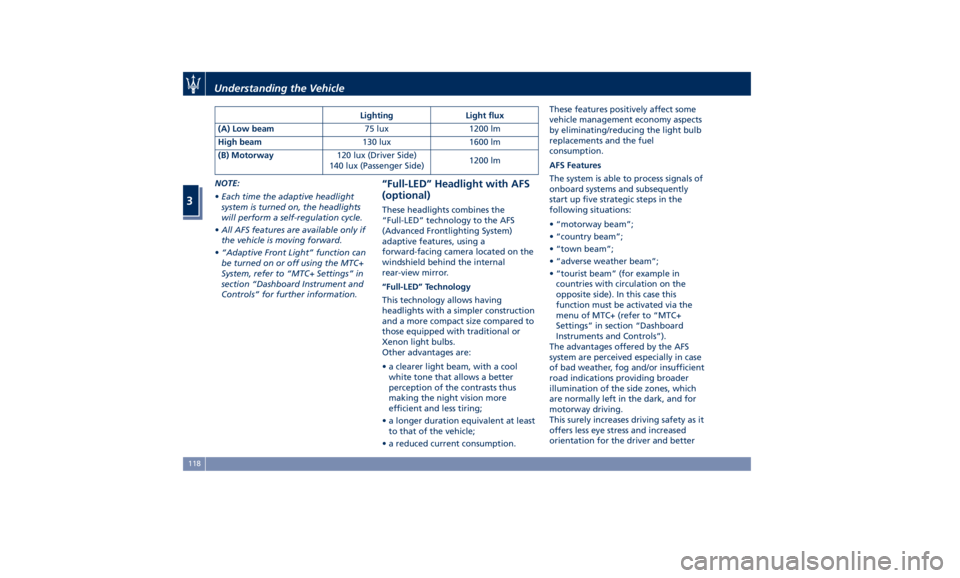
The table shows the light values (lux)
and the light flux (lumen) of AFS
headlights. Combining a bending mode and a
vertical adjustment, the system assures
better visibility of the road surface
when driving on a curve, steering, or
in the event of road deviations,
optimizing vertical and horizontal
light distribution according to the
current drive path.
The increased lateral illumination is
gained through a fixed bending light
or a cornering light (depending on the
market) elaborating information
about the steering angle, the vehicle
speed and the turn indicator.
The improved vertical illumination, in
case of fast acceleration and/or fast
deceleration, will assure the deeper
illuminated distance from the vehicle,
through a dynamical adaptation of
headlight vertical attitude.Understanding the Vehicle
3
117
Page 122 of 436

NOTE:
• Each time the adaptive headlight
system is turned on, the headlights
will perform a self-regulation cycle.
• All AFS features are available only if
the vehicle is moving forward.
• “Adaptive Front Light” function can
be turned on or off using the MTC+
System, refer to “MTC+ Settings” in
section “Dashboard Instrument and
Controls” for further information. “Full-LED” Headlight with AFS
(optional) These headlights combines the
“Full-LED” technology to the AFS
(Advanced Frontlighting System)
adaptive features, using a
forward-facing camera located on the
windshield behind the internal
rear-view mirror.
“Full-LED” Technology
This technology allows having
headlights with a simpler construction
and a more compact size compared to
those equipped with traditional or
Xenon light bulbs.
Other advantages are:
• a clearer light beam, with a cool
white tone that allows a better
perception of the contrasts thus
making the night vision more
efficient and less tiring;
• a longer duration equivalent at least
to that of the vehicle;
• a reduced current consumption. These features positively affect some
vehicle management economy aspects
by eliminating/reducing the light bulb
replacements and the fuel
consumption.
AFS Features
The system is able to process signals of
onboard systems and subsequently
start up five strategic steps in the
following situations:
• “motorway beam”;
• “country beam”;
• “town beam”;
• “adverse weather beam”;
• “tourist beam” (for example in
countries with circulation on the
opposite side). In this case this
function must be activated via the
menu of MTC+ (refer to “MTC+
Settings” in section “Dashboard
Instruments and Controls”).
The advantages offered by the AFS
system are perceived especially in case
of bad weather, fog and/or insufficient
road indications providing broader
illumination of the side zones, which
are normally left in the dark, and for
motorway driving.
This surely increases driving safety as it
offers less eye stress and increased
orientation for the driver and betterLighting Light flux
(A) Low beam 75 lux 1200 lm
High beam 130 lux 1600 lm
(B) Motorway 120 lux (Driver Side)
140 lux (Passenger Side) 1200 lm
Understanding the Vehicle
3
118
Page 128 of 436

Multifunction Lever The multifunction lever controls the
operation of the turn signals,
headlight beam selection and
overtaking lights, wipers and washers
acting on the windshield and on the
liftgate (for this content see the
chapter “Wipers and Washers” of this
section).
The multifunction lever is fitted on the
left side of the steering column.
Turn Signals
Move the multifunction lever all the
way up or down until the stop
triggers.
The left or right arrow on the
speedometer and tachometer
instrument cluster respectively, flashes
to show proper operation of the front
and rear turn signal lights. To activate lane change function, tap
the lever up or down once, without
moving beyond the detent. The turn
signals (right or left) will flash three
times then automatically turn off.
This function is useful when
overtaking or changing lanes. NOTE:
• If either light remains on and does
not flash, or flashes at a fast rate,
check for a defective outside light. If
an indicator on the instrument
cluster fails while moving the lever,
then the turn indicator is probably
defective.
• The message that a turn signal is on
will appear in the instrument cluster
and a continuous chime will sound if
the vehicle is driven more than 1 mile
(1.6 km) with either turn signal on.
High Beams and Flashing
To switch on the high beams with the
light switch in headlamp
or
“AUTO” position, shift the
multifunction lever onward.
The blue telltale
will illuminate on
the tachometer.Understanding the Vehicle
3
124
Page 129 of 436

By pulling the lever backward (toward
the steering wheel) you switch off the
high beams and switch on the low
beams.
You can signal another vehicle with
your headlights by lightly pulling the
multifunction lever toward you. This
will turn on the high beams headlights
until the lever is released.
Flashing occurs also with lights off
(lights switch in position “0”) if the
ignition switch is RUN position. CAUTION!
The high beams can only be switched
on manually by pushing the
multifunction lever forward.
WARNING!
If the high beams are activated, they
will turn on automatically every time
the low beams are switched on either
manually or automatically. We
recommend therefore that you switch
them off when they are no longer
necessary and every time the twilight
sensor deactivates the external lights.
Interior Lights The interior and external approach
lights turn on and off when
entering/exiting the vehicle (see
“Illuminated Entry/Exit” in section
“Before Starting” for further
information).
To protect the battery, the interior
lights will turn off automatically 10
minutes after the ignition switch has
been shifted to OFF . This occurs if the
interior lights were turned on
manually or by opening a door. The
glove box light, on the dashboard, shares the same characteristics
excepting the trunk and liftgate lights.
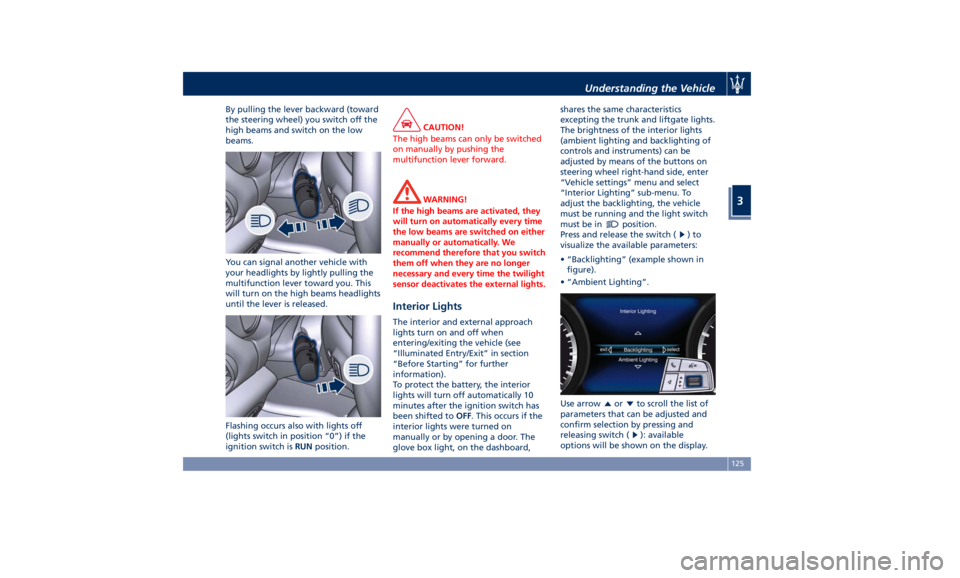
The brightness of the interior lights
(ambient lighting and backlighting of
controls and instruments) can be
adjusted by means of the buttons on
steering wheel right-hand side, enter
“Vehicle settings” menu and select
“Interior Lighting” sub-menu. To
adjust the backlighting, the vehicle
must be running and the light switch
must be in
position.
Press and release the switch (
)to
visualize the available parameters:
• “Backlighting” (example shown in
figure).
• “Ambient Lighting”.
Use arrow
or to scroll the list of
parameters that can be adjusted and
confirm selection by pressing and
releasing switch (
): available
options will be shown on the display.Understanding the Vehicle
3
125
Page 132 of 436

inside the trunk compartment. These
lights turn on when liftgate is opened
and turn off when it is closed.
If liftgate is left open for a long time,
lights will turn off after 30 minutes to
save battery charge.
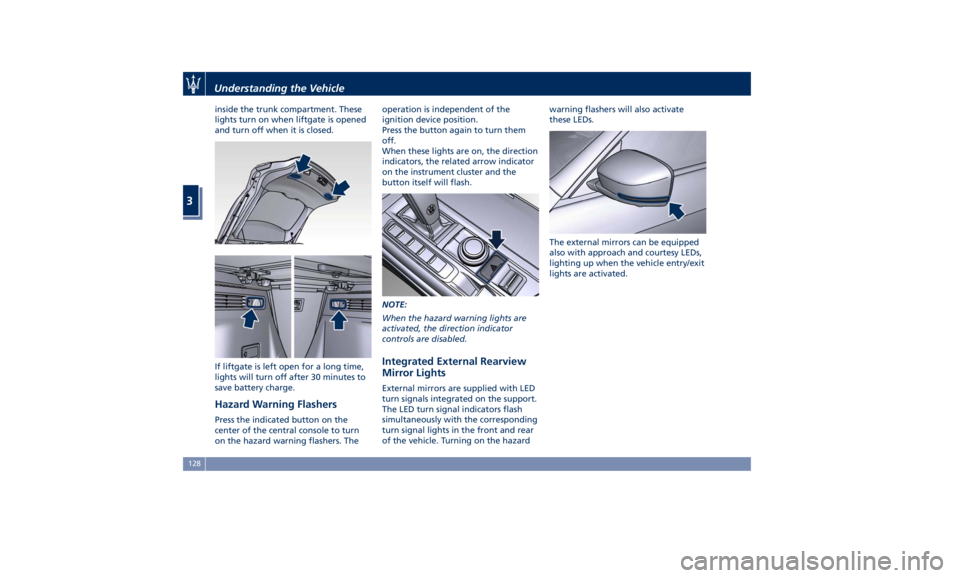
Hazard Warning Flashers Press the indicated button on the
center of the central console to turn
on the hazard warning flashers. The operation is independent of the
ignition device position.
Press the button again to turn them
off.
When these lights are on, the direction
indicators, the related arrow indicator
on the instrument cluster and the
button itself will flash.
NOTE:
When the hazard warning lights are
activated, the direction indicator
controls are disabled.
Integrated External Rearview
Mirror Lights External mirrors are supplied with LED
turn signals integrated on the support.
The LED turn signal indicators flash
simultaneously with the corresponding
turn signal lights in the front and rear
of the vehicle. Turning on the hazard warning flashers will also activate
these LEDs.
The external mirrors can be equipped
also with approach and courtesy LEDs,
lighting up when the vehicle entry/exit
lights are activated.Understanding the Vehicle
3
128
Page 165 of 436

Warning and Indicator Lights
on Analog Instruments Telltales on Speedometer
The following telltales are displayed
on the speedometer, and related
messages are visible for 5 seconds on
the central sector of the display, unless
otherwise indicated (see “TFT Display:
Warning/Indicator Lights of Set
Modes/Functions” paragraph in this
chapter).
Malfunction Indicator Light (MIL)
The Malfunction Indicator
Light (MIL) is part of an
onboard diagnostic system
that monitors engine and
automatic transmission control
systems.
Under normal conditions, this
indicator light should switch on when
the ignition switch is in RUN position and switch off soon after the engine is
started (the MIL does not shut off
immediately).
This is a sign of the indicator light
working properly. If the indicator
remains illuminated or switches on
while driving, there is a failure in the
fuel supply/ignition and emission
control systems.
The failure could cause high exhaust
emissions, loss of performance, poor
vehicle handling and high
consumption levels.
Should this occur, proceed with
caution to your Authorized Maserati
Dealer without heavy throttle
application or driving at high speeds.
Obey all applicable local traffic
regulations.
The indicator light will go out if the
problem is no longer present.
The error will be registered by the
system in any case.
CAUTION!
• When the ignition switch is in the
RUN position and if the indicator
light does not switch on or if it
switches on while driving, contact an
Authorized Maserati Dealer as soon
as possible. • Prolonged driving with the MIL on
could cause damage to the engine
control system. It also could affect
fuel economy and drivability. If the
MIL is flashing, severe catalytic
converter damage and power loss
will soon occur. Immediate service is
required. In addition, the OBDII
system incorporates a diagnostic
connector that can be interfaced
using diagnostic equipment. This
makes it possible to read the error
codes stored in the control unit,
together with a set of specific
parameters for the engine operation
diagnostic cycle, for compliance with
CARB & EPA OBDII regulations.
Left Turn Signal Indicator Light
The
indicator lights up when
the left turn signals or the
hazard flashers are turned on.
The indicator light will flash at
the same frequency of the turn signals
and is controlled by the multifunction
lever behind the steering wheel.
If the vehicle electronics sense that the
vehicle drives for more than 1 mile
(1.6 km) with either turn signal on, a
continuous sound will alert the driver
to turn the signal off.Dashboard Instruments and Controls
4
161