2019 MASERATI GRANTURISMO CONVERTIBLE interior lights
[x] Cancel search: interior lightsPage 73 of 296

3 – Understanding the Vehicle Interior Components ..................................... 70
Front Seats ............................................ 74
Comfort Pack Front Seats .................................. 76
Rear Seats ............................................. 78
Steering Wheel Adjustment ................................ 79
Rearview Mirrors ........................................ 80
Lights ................................................ 82
Windshield Wipers and Washers ............................ 89
Soft Top ............................................... 92
Windstop (optional) ..................................... 100
Interior Features ....................................... 102
Cargo Area ........................................... 107
HomeLink (for versions/markets, where provided) .............. 108
Air Conditioning Distribution ............................. 112
Sport Skyhook Suspension
(for versions/markets, where provided) ..................... 114
69
Page 91 of 296

You can signal another vehicle with
your headlights by lightly pulling the
left-hand multifunction lever toward
you. This will turn on the high beams
headlights until the lever is released.
Flashing occurs also with lights off
(light switch in position “0”) if the key
in the ignition switch is in MAR (ON)
position. CAUTION!
The high beams can only be switched
on manually by pushing the left-hand
multifunction lever forward.
WARNING!
If the high beams are activated, they
will turn on automatically every time
the low beams are switched on either
manually or automatically. We
recommend therefore that you switch
them off when they are no longer
necessary and every time the twilight
sensor deactivates the external lights.
“Follow me Home” Function
This
function allows you to set a
timing for activation of the position
lights and low beams, so that they
may remain on for a set time after
turning off the vehicle.
This function is activated by pushing
the left-hand multifunction lever on
the steering column, used to flash the
headlights.
The position lights and low beams
turn on for 30 seconds, the message
“Follow me” appears on the
instrument cluster display for 20 seconds, and the light activation time
is displayed.
When this function is active, every
time the left-hand multifunction lever
for flashing the headlights is
operated, the time the lights remain
on is increased by 30 seconds, with a
maximum total time of 210 seconds.
The display will show the time set.
If the left-hand multifunction lever for
flashing the headlights is operated for
more than 2 seconds, the function is
deactivated, and the indicator on the
instrument cluster display goes off.
When the function is active, turning
the key in the ignition switch back to
MAR (ON) position deactivates the
system.
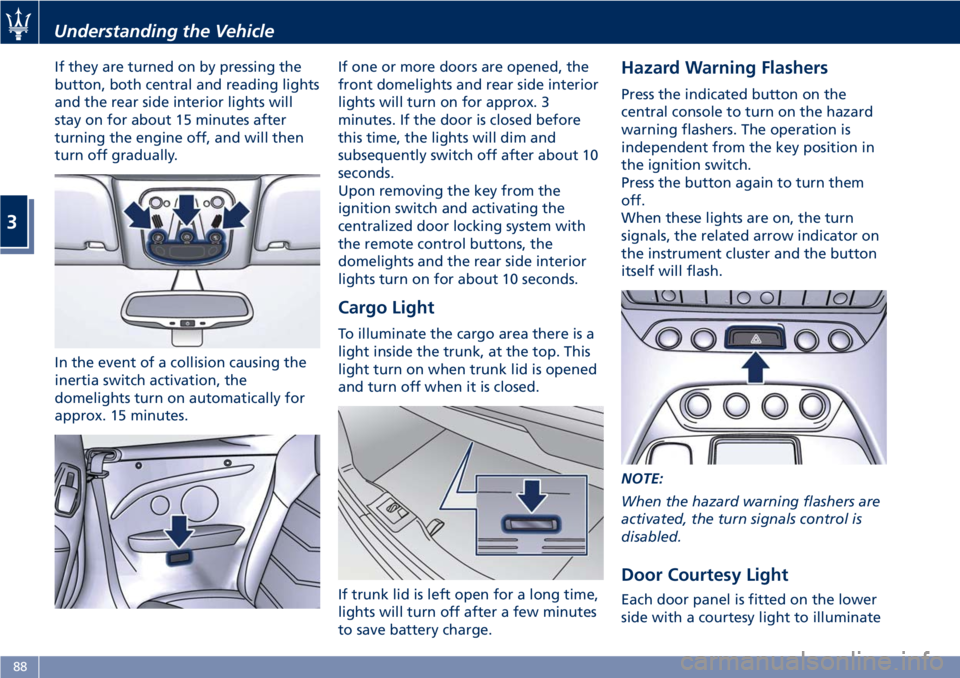
Front Domelights The front domelight includes a central
and two reading lights.
The central light automatically turns
on together with the two lights on the
sides of the rear seats (see "Rear Side
Interior Lights" in this chapter) when
one of the doors is opened and turns
off when the door is closed (timed
switching off). These lights may be
switched on manually by pressing the
central button
The reading lights are controlled by
the respective side buttons.Understanding the Vehicle
3
87
Page 92 of 296

If they are turned on by pressing the
button, both central and reading lights
and the rear side interior lights will
stay on for about 15 minutes after
turning the engine off, and will then
turn off gradually.
In the event of a collision causing the
inertia switch activation, the
domelights turn on automatically for
approx. 15 minutes. If one or more doors are opened, the
front domelights and rear side interior
lights will turn on for approx. 3
minutes. If the door is closed before
this time, the lights will dim and
subsequently switch off after about 10
seconds.
Upon removing the key from the
ignition switch and activating the
centralized door locking system with
the remote control buttons, the
domelights and the rear side interior
lights turn on for about 10 seconds.
Cargo Light To illuminate the cargo area there is a
light inside the trunk, at the top. This
light turn on when trunk lid is opened
and turn off when it is closed.
If trunk lid is left open for a long time,
lights will turn off after a few minutes
to save battery charge. Hazard Warning Flashers Press the indicated button on the
central console to turn on the hazard
warning flashers. The operation is
independent from the key position in
the ignition switch.
Press the button again to turn them
off.
When these lights are on, the turn
signals, the related arrow indicator on
the instrument cluster and the button
itself will flash.
NOTE:
When the hazard warning flashers are
activated, the turn signals control is
disabled.
Door Courtesy Light
Each door panel is fitted on the lower
side with a courtesy light to illuminateUnderstanding the Vehicle
3
88
Page 253 of 296

self-learning cycle. At the same time,
you can run the date and time set up
procedure for the MTC.
• Every time the battery is reconnected the
and
warning lights will flash for
about 10 seconds and then go off.
WARNING!
California Proposition 65
Operating, servicing and maintaining
a passenger vehicle or off-road vehicle
can expose you to chemicals including
such as, engine exhaust, carbon
monoxide, phthalates and lead, that
which are know to the State of
California to cause cancer and birth
defects or other reproductive harm. To
minimize exposure, avoid breathing
exhaust, do not idle the engine except
as necessary, service your vehicle in a
well-ventilated area and wear gloves
or wash your hands frequently when
servicing your vehicle. For more
information go to:
www.P65Warnings.ca.gov/passenger-
vehicle
Useful Advice to Extend
Battery Life
When parking the vehicle, make sure
that the doors, front, rear lids and
flaps are properly closed. All interior
lights should be off.
When the engine is turned off, do not
keep the connected devices switched
on for a long time (such as radio,
hazard warning flashers, fan, etc.).
CAUTION!
If the battery charge remains below
50% for a long period of time, it will
be damaged due to sulfation; its
performance and starting power will
be reduced and it will be more subject
to freezing (this can happen even at
14°F/-10°C).
We recommend you to have the
battery
charge condition checked,
preferably at the beginning of the
cold season, to prevent the electrolyte
from freezing.
This check should be carried out more
frequently if the vehicle is used mainly
for short trips or if it is equipped with
power absorbing devices that remain
permanently on even when the
ignition switch is off. This applies above all if these devices have been
retrofitted ("Aftermarket" services).
If the vehicle is not used for long
periods of time, please see “Vehicle
Stored for Long Periods” in this
section.
Battery Recharge
WARNING!
The process of charging or recharging
the battery produces hydrogen, a
flammable gas that can explode and
cause serious injuries. When charging
or recharging the battery, follow the
recommended precautions at all
times.
• Before using a charger device
always check that this tool is
suitable for the installed battery,
with constant voltage (lower than
14.8 V) and low amperage
(maximum limit 15 A).
• Recharge the battery in a
well-ventilated environment.
• Never charge or recharge a frozen
battery: it can explode due to
hydrogen trapped inside the ice
crystals.
• Ensure that any sparks or open
(Continued)
Maintenance and Care
7
249
Page 264 of 296

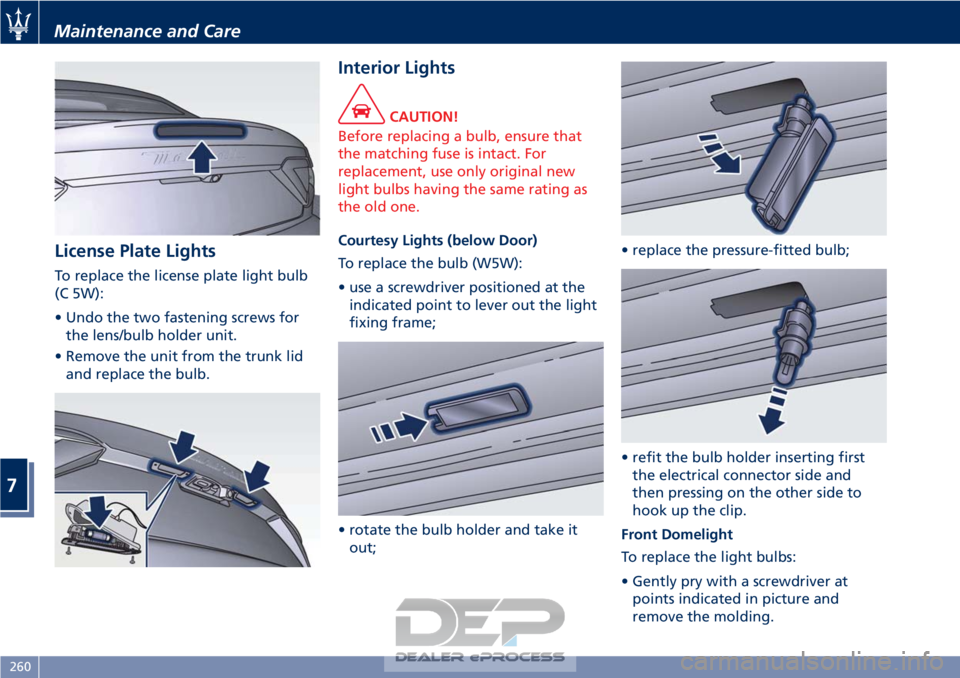
License Plate Lights
To replace the license plate light bulb
(C 5W):
• Undo the two fastening screws forthe lens/bulb holder unit.
• Remove the unit from the trunk lid and replace the bulb.
Interior Lights
CAUTION!
Before replacing a bulb, ensure that
the matching fuse is intact. For
replacement, use only original new
light bulbs having the same rating as
the old one.
Courtesy Lights (below Door)
T
o replace the bulb (W5W):
• use a screwdriver positioned at the indicated point to lever out the light
fixing frame;
• rotate the bulb holder and take it out; • replace the pressure-fitted bulb;
• refit the bulb holder inserting first
the electrical connector side and
then pressing on the other side to
hook up the clip.
Front Domelight
To replace the light bulbs:
• Gently pry with a screwdriver at points indicated in picture and
remove the molding.
Maintenance and Care
7
260
Page 291 of 296

Jump Starting Procedure......225
ToolKit..................212
Towing a Disabled Vehicle .....228
Engine Engine Air Filter Replacement . .245
Engine Coolant Level Check . . . .240
Engine Oil Level Check .......243
Engine Overheating .........214
Engine Start Failure .........159
Engine Turn Off ............159
Hood, Open and Close ........37
Normal Starting of the Engine . .158
Use of the Engine ...........183
EPB (Electric Parking Brake) ......174
ESC (Electronic Stability Control) . .177
Filters A/C Air Filter Replacement .....263
Engine Air Filter Replacement . .245
Fuel Carbon Monoxide Warning . . . .201
Emergency Fuel Filler Door
Release ..................203
Fuel Consumption Data .......278
Fuel Requirements ..........199
Fuel System Warnings ........201
Gasoline/Oxygenate Blends . . . .200
Materials Added to Fuel ......201
MMT in Gasoline ...........200
Reformulated Gasoline .......200
Fuses Position and Replacement. . .251
HomeLink ..................108 Hood, Open and Close
..........37
Indicator Lights Air bag Warning Light ........66
Indicator Lights/Warning Lights TFT Display: Warning/Indicator
Lights ...................126
Warning and Indicator Lights on
Analog Instrument ..........119
Inertia Switch, Fuel Cut-out ......229
Infotainment System ..........130
Manual Controls and Devices . .132
Installing a LATCH-Compatible Child Restraint System .........57
Instrument Cluster ............118
Interior Components ...........70
Interior Maintenance and Cure . . .268
Interiors Features .............102
Jump Start Procedure .........
.226
Keys ......................
22
Level Checks ................240
Adding Windshield/Headlight
Washer ..................243
Brake Fluid Level Check .......242
Engine Coolant Level Check . . . .240
Engine Oil Level Check .......240
Power Steering Fluid Level
Check ...................245
Transmission Oil Check .......245
Lights .....................82 Adaptive Bi-Xenon Headlights . . .84
Automatic Headlights
.........84
Bulb Replacement ..........257
Cargo Light ................88
DRL, Daytime Running Lights ....83
Front Domelights ............87
Hazard Warning Flasher .......88
Headlights ................84
High Beams and Flashing ......86
Light Switch ...............82
Parking Lights ..............84
Rear Fog Lights .............85
Turn Signals ................86
Twilight Sensor .............85
Loading the Vehicle Vehicle Load Carrying Capacity . .107
Maintenance A/C System Maintenance ......262
Bodywork Maintenance and
Care ....................265
Interior Maintenance and Care . .268
Maintenance Procedures ......239
Periodic Maintenance ........237
Scheduled Maintenance
Service ..................232
Scheduled Service Plan .......234
Wheels Maintenance ........263
Maserati Roadside Assistance Program ...................15
MIL (Malfunction Indicator Light). .119
Mirrors Folding Mirrors .............81
Index
9
287