2019 MASERATI GRANTURISMO CONVERTIBLE stop start
[x] Cancel search: stop startPage 203 of 296

“--,--” will be displayed in the place of
the values.
NOTE:
•The system will not perform
calibration if the pressure is below 2
bar (29 psi).
• To allow the system to acquire the
sensors’s data, after the startup of
the car, if possible avoid to stop.
During this interval the TFT display
can show screen page with dashes
“--,--” in the place of the pressure
levels of each tire.
• If calibration is not completed within
10 minutes of driving the car, the
instrument cluster shows “TPMS
Malfunction” pop-up message and
“Tire Pressure” screen disappear. The
warning light remains light on.
TPMS Malfunction
Screen page shown in picture may
appear in the following cases:
• malfunction in the ECU
system/wiring;
• no signal reception by one or more sensors due to malfunctioning,
broken or dead battery;
• ECU malfunction. The display procedure follows the
usual logic of malfunctions. Therefore,
after 30 seconds, the display will show
the screen page that was active before
the malfunction occurred.
In addition to screen page being
displayed, the
amber warning
light, which is permanently
illuminated on the instrument cluster,
will flash for 85 seconds, after which it
will remain permanently on until the
situation is corrected. The information
page that shows the pressure value for
each tire cannot be recalled.
Fuel Requirements
The engines are designed to meet all
environmental regulations and
provide excellent fuel economy and
performance when using unleaded
premium gasoline with an AKI octane
rating of 91 or above. AKI (Anti Knock
Index) is an average on the Research
Octane Number, RON, and the Motor
Octane Number, MON (RON + MON/2
gives you the AKI).
For vehicle top performance, use
unleaded premium gasoline with no
less than 93 minimum AKI octane
rating.
Poor quality gasoline can cause
problems such as hard starting,
stalling, and hesitations. If you
experience these symptoms, try
another brand of gasoline before
considering service for the vehicle at
an Authorized Maserati Dealer .
Besides using unleaded gasoline with
the proper octane rating, gasoline
that contain detergents, anti-corrosion
and stability additives are
recommended. Using gasoline that
have these additives may help improve
fuel economy, reduce emissions, and
maintain vehicle performance.
Driving
5
199
Page 207 of 296

the amount of fuel allowed by the
system is very low, we recommend
therefore not to persist further.
• Wait approximately 10 seconds before removing the fuel nozzle in
order to ensure completed supply of
residual fuel and restrict the risk of
fouling the fuel filler door area.
• Remove the fuel nozzle.
• Insert the cap on the fuel filler neck.
• Tighten the cap, turning it clockwise until it stops.
• Close the fuel tank door.
CAUTION!
To avoid fuel spillage and overfilling,
do not “top off” the fuel tank after
filling.
Emergency Fuel Filler Door
Release
If you are unable to unlock the fuel
filler door using the dedicated button,
use the fuel filler door emergency
release located in the trunk.
• Open the trunk lid (see “Open and Close the Trunk Lid” in section
“Before Starting”).
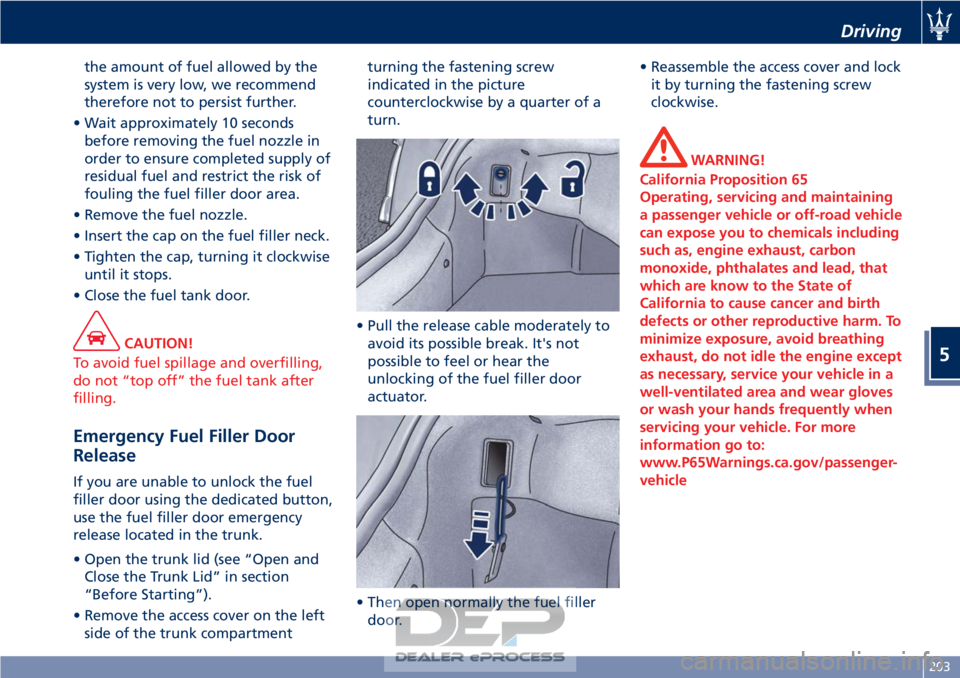
• Remove the access cover on the left side of the trunk compartment turning the fastening screw
indicated in the picture
counterclockwise by a quarter of a
turn.
• Pull the release cable moderately to avoid its possible break. It's not
possible to feel or hear the
unlocking of the fuel filler door
actuator.
• Then open normally the fuel filler door. • Reassemble the access cover and lock
it by turning the fastening screw
clockwise.
WARNING!
California Proposition 65
Operating, servicing and maintaining
a passenger vehicle or off-road vehicle
can expose you to chemicals including
such as, engine exhaust, carbon
monoxide, phthalates and lead, that
which are know to the State of
California to cause cancer and birth
defects or other reproductive harm. To
minimize exposure, avoid breathing
exhaust, do not idle the engine except
as necessary, service your vehicle in a
well-ventilated area and wear gloves
or wash your hands frequently when
servicing your vehicle. For more
information go to:
www.P65Warnings.ca.gov/passenger-
vehicle
Driving
5
203
Page 211 of 296

before driving through the standing
water.
• Do not exceed 5 mph (8 km/h) when driving through standing water. This
will minimize wave effects.
•
Driving through standing water may
cause damage to your vehicle
drivetrain components. After driving
through standing water, do not drive if
you are not sure about drivetrain
condition. Such damage is not covered
by the New Vehicle Warranty.
• Getting water inside your vehicle engine can cause it to lock up and
stall out, and cause serious internal
damage to the engine. Such damage
is not covered by the New Vehicle
Warranty.
• After driving through standing water always have the fluids (engine
oil, transmission oil, etc) checked for
contamination at an Authorized
Maserati Dealer.
WARNING!
• Driving through standing water
limits your vehicle traction
capabilities. Do not exceed 5 mph
(8 km/h) when driving through
standing water. •
Driving through standing water
limits your vehicle braking
capabilities, which increases
stopping distances. Therefore, after
driving through standing water,
drive slowly and lightly press on the
brake pedal several times to
progressively dry the brakes discs
and pads.
• Getting water inside your vehicle
engine can cause it to lock up and
stall out.
• Failure to follow these warnings
may result in injuries that are
serious or fatal to you, your
passengers, and others around you.
Pollution Control Devices
Even if the vehicle is fitted with
antipollution devices, the environment
deserves the greatest respect from
every one of us.
By following a few simple rules, the
driver can avoid damaging the
environment and very often can
reduce fuel consumption as well.
In this regard, some useful
information is listed here below;
please read it carefully.
• The first precaution is to follow the
Scheduled Service Plan scrupulously
(see “Scheduled Service Plan” in
section “Maintenance and Care”.
• The correct operation of the antipollution devices not only helps
respect for the environment, but
also has an impact on vehicle
efficiency. Keeping these devices in
good working conditions is the first
rule for driving both ecologically
sound and economically.
• Always use unleaded fuel.
• If starting is difficult, do not make prolonged attempts. In particular,
avoid push starts, towing or
downhill starts: these are all
maneuvers that can damage the
catalytic converters. For any
Driving
5
207
Page 212 of 296

emergency starting, only use an
auxiliary battery.
• While driving, if the engine does not run smoothly, you may continue
driving but reducing engine
performance to a minimum; you
should then contact the Authorized
Maserati Dealer as soon as possible.
• Never run the engine, even if only for testing, with one or more spark
plugs disconnected.
• Do not warm up the engine letting it idle before starting off, except in the
event that the external temperature
is very low and, even then, for no
longer than 30 seconds.
Catalytic Converter Warnings
During normal operation the catalytic
converter produces high temperatures.
Failure to comply with following rules
can create fire hazards.
• Do not park the vehicle onflammable materials (e.g. grass, dry
leaves, pine needles, etc.).
• Do not install heat guards and do not remove those already fitted to
the catalytic converter and to the
exhaust manifold.
• Do not spray anything on the catalytic converter, Oxygen sensor
and exhaust manifold. In addition to the catalytic converter
system, the vehicles are equipped with
a system for controlling fuel vapor
emissions. This system, called ORVR,
has been designed to help reduce
atmospheric pollution by the
evaporation from the fuel system
during the refueling process. Also,
specific to these vehicles is the fuel
filler neck which comes equipped with
a sealed plug that is grounded to
avoid possible sparking during
re-fueling.
WARNING!
California Proposition 65
Operating, servicing and maintaining
a passenger vehicle or off-road vehicle
can expose you to chemicals including
such as, engine exhaust, carbon
monoxide, phthalates and lead, that
which are know to the State of
California to cause cancer and birth
defects or other reproductive harm. To
minimize exposure, avoid breathing
exhaust, do not idle the engine except
as necessary, service your vehicle in a
well-ventilated area and wear gloves
or wash your hands frequently when
servicing your vehicle. For more
information go to: www.P65Warnings.ca.gov/passenger-
vehicle
Other Tips
• Do not warm up the engine when
the vehicle is stationary: in these
conditions the engine heats up much
more slowly, thus increasing fuel
consumption and emissions. It is
advisable to move off slowly,
avoiding high engine rpm.
• As soon as traffic conditions and the route permit it, use a higher gear.
• Avoid depressing the accelerator repeatedly during stops at traffic
lights or before turning off the
engine.
• Keep your speed as regular as possible, avoiding unnecessary
braking and acceleration, which
cause fuel wastage and strongly
increase exhaust emissions.
• Turn the engine off if the vehicle remains stationary for a long time.
• Check the tire pressure regularly: if the pressure is too low, fuel
consumption increases and the tires
are damaged.
• Do not transport unnecessary heavy objects in the trunk compartment.
Driving
5
208
Page 220 of 296

• If necessary, turn the hazard warningflashers on and place the warning
triangle at the required distance.
WARNING!
• The jack should be used on level firm
ground wherever possible.
• It is recommended that the wheels
of the vehicle be chocked, and that
no person should remain in a vehicle
that is being jacked.
• If the vehicle has been stopped on a
slope or an uneven surface, place
chocks or other suitable items in
front of or behind the wheels to
stop the vehicle from moving.
• Never start or run the engine with
the vehicle on a jack.
• No person should place any portion
of their body under a vehicle that is
supported by a jack.
• Take the bag with compact spare wheel
and tools out of the trunk
compartment and remove it from the
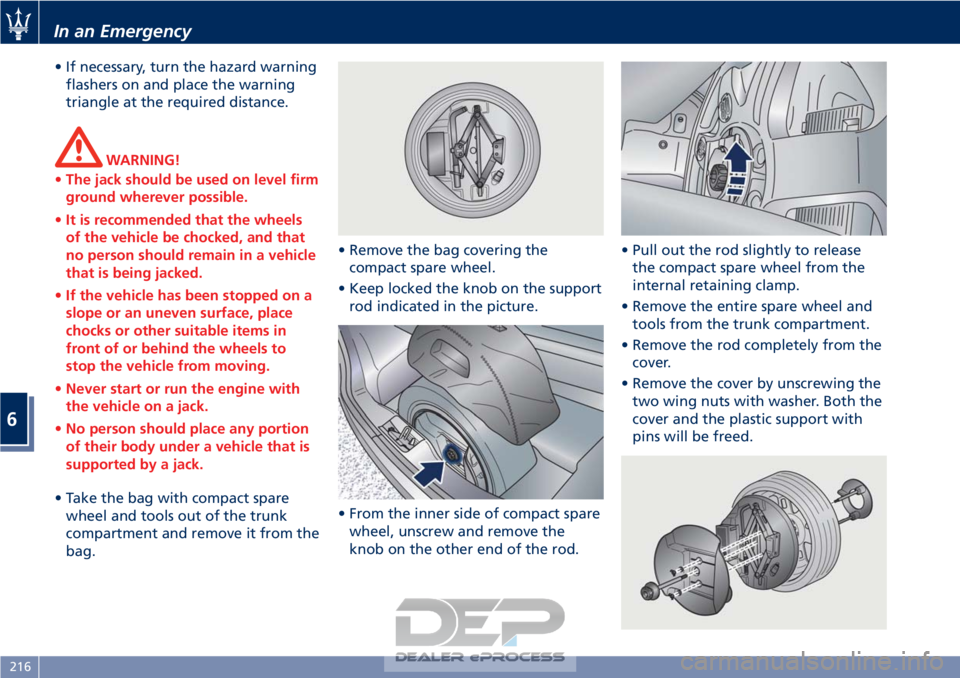
bag. • Remove the bag covering the
compact spare wheel.
• Keep locked the knob on the support rod indicated in the picture.
• From the inner side of compact spare wheel, unscrew and remove the
knob on the other end of the rod. • Pull out the rod slightly to release
the compact spare wheel from the
internal retaining clamp.
• Remove the entire spare wheel and tools from the trunk compartment.
• Remove the rod completely from the cover.
• Remove the cover by unscrewing the two wing nuts with washer. Both the
cover and the plastic support with
pins will be freed.
In an Emergency
6
216
Page 221 of 296

• Remove from the compressor casethe inflation hose and the cable with
a plug for the power outlet.
• Unscrew the valve cap of the compact spare wheel and screw the
fitting of the inflation hose onto the
valve.
• Insert the plug in one of the available power outlets fitted in the
trunk or passenger compartment.
• Turn the key in the ignition switch in MAR (ON) position.
• Turn the compressor on by pressing the switch.
• Stop the compressor pressing switch again, when the pressure indicated
by the gage reaches the
recommended level (see “Tire
Inflation Pressure” in section
“Features and Specifications”) and
screw the cap on the compact spare
wheel valve.
CAUTION!
• In order to obtain a more accurate reading, the compressor should be
switched off when checking the tire
pressure of the compact spare wheel
on the pressure gage.
• Do not run the compressor for more than 20 minutes: there is a risk it
could overheat. Also, prolonged
power absorption may discharge the
battery, subsequently preventing the
engine from starting.
• The compressor has been designed exclusively to inflate compact spare
wheels; do not use it to inflate air
mattresses, dinghies etc.
• Fit the adapter on the wrench. Extend
the wrench as shown, then
loosen by approximately one turn, the five bolts on the wheel to be
changed.
• Open the jack partially, releasing and turning the control lever clockwise.
• Place the jack near the wheel to be changed in one of the indicated
positions.
• Make sure that the head of the jack is correctly inserted in one of the
slots beneath the sole bar.
In an Emergency
6
217
Page 228 of 296

Emergency Starting with
Maserati Code
If the Maserati CODE fails to
deactivate the engine immobilizer, the
CODE warning light will illuminate
permanently, while the
MIL
warning light will go off after four
seconds and will turn on again
immediately afterward: the engine will
not start.
To start the engine, follow the
emergency starting procedure.
Emergency Starting Procedure
NOTE:
We recommend that you carefully read
the entire procedure before
performing it. If you make a mistake,
turn the key in the ignition switch to
STOP (OFF) position and repeat the
operations from the first step.
WARNING!
California Proposition 65
Operating, servicing and maintaining
a passenger vehicle or off-road vehicle
can expose you to chemicals including
such as, engine exhaust, carbon
monoxide, phthalates and lead, that which are know to the State of
California to cause cancer and birth
defects or other reproductive harm. To
minimize exposure, avoid breathing
exhaust, do not idle the engine except
as necessary, service your vehicle in a
well-ventilated area and wear gloves
or wash your hands frequently when
servicing your vehicle. For more
information go to:
www.P65Warnings.ca.gov/passenger-
vehicle
• Read the 5-digit electronic code found
on the CODE card.
• Turn the key in the ignition switch to MAR (ON) position: at this moment
the
CODE andMIL warning
lights are on.
• Push and hold down the accelerator pedal. Approximately 8 seconds later,
the
MIL warning light will go off.
Release the accelerator and get
ready to count the number of times
the
MIL warning light flashes.
• Wait until the number of flashes is equal to the first digit of your CODE
card, then push and hold down the
accelerator pedal until the
MIL
warning light goes off, after about 4
seconds, then release the accelerator
pedal. • The
MIL warning light starts
flashing again. As soon as the
displayed number of flashing is equal
to the second digit of your CODE
card, press down the accelerator
pedal and hold it.
• Proceed in the same manner for the remaining digits in the code on the
CODE card.
• When the last digit has been entered, hold the accelerator pedal
pushed down. The
MIL warning
light comes on for 4 seconds and
then goes off; you can now release
the accelerator pedal.
• When the
MIL warning light
flashes fast (for about 4 seconds) it
confirms that the procedure has
been performed correctly.
• Start the engine by turning the key in the ignition switch from MAR (ON)
position to AVVposition.
If the
MIL warning light remains
on, turn the key to STOP (OFF)position
and repeat the procedure from the
first step. This procedure can be
repeated an unlimited number of
times.
In an Emergency
6
224
Page 230 of 296

WARNING!
• Using booster packs that have not
been checked, which could therefore
release a too high charging voltage
(higher than 14 V), in extreme
environmental conditions (for
example: closed areas or without
proper ventilation and temperatures
higher than 122°F/50°C or lower
than -4°F/-20°C) create the right
conditions for ignition which could
then cause the battery to explode.
Therefore you shall always perform
jump-starting operations using the
adequate tools and in the best
environmental conditions, taking all
necessary precautions.
• Do not attempt jump-starting if the
discharged battery is frozen. It could
rupture or explode during jump start
and cause personal injury.
• Do not carry out this procedure if
you have not done it before:
incorrect maneuvers can originate
high electrical discharges and even
cause the battery to explode.
• To avoid the risk of explosion or fire,
do not approach the battery with open flames or cigarettes that could
generate sparks.
NOTE:
If
you need to disconnect the battery
from the vehicle electrical system, see
“Maintenance - Free Battery” in
section “Maintenance and Care”).
Access the Battery
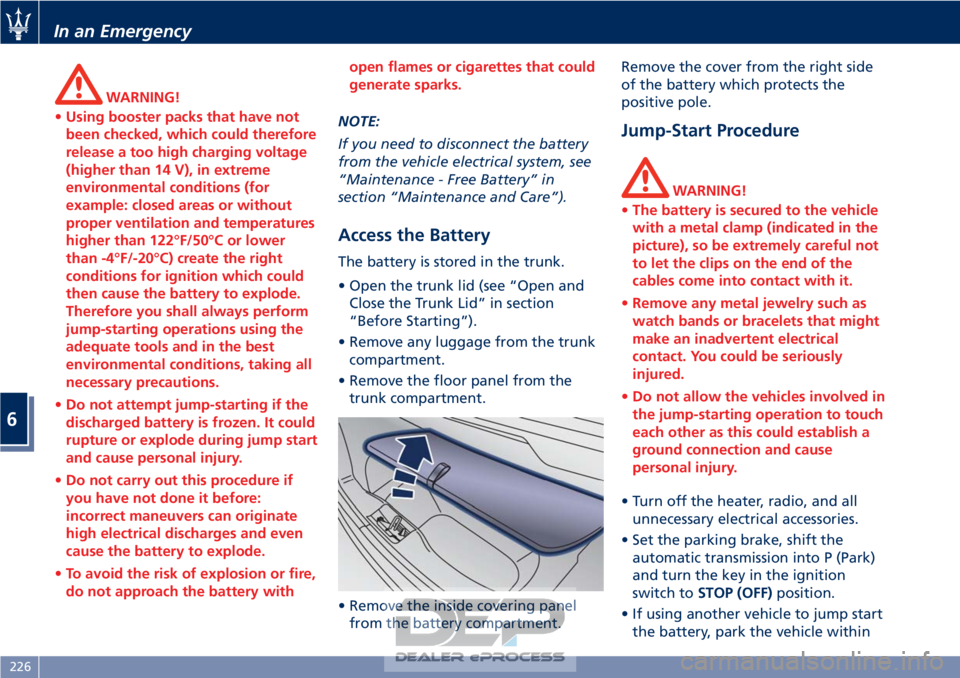
The battery is stored in the trunk.
• Open the trunk lid (see “Open and Close the Trunk Lid” in section
“Before Starting”).
• Remove any luggage from the trunk compartment.
• Remove the floor panel from the trunk compartment.
• Remove the inside covering panel from the battery compartment. Remove the cover from the right side
of the battery which protects the
positive pole.
Jump-Start Procedure
WARNING!
• The battery is secured to the vehicle
with a metal clamp (indicated in the
picture), so be extremely careful not
to let the clips on the end of the
cables come into contact with it.
• Remove any metal jewelry such as
watch bands or bracelets that might
make an inadvertent electrical
contact. You could be seriously
injured.
• Do not allow the vehicles involved in
the jump-starting operation to touch
each other as this could establish a
ground connection and cause
personal injury.
• Turn off the heater, radio, and all unnecessary
electrical accessories.
• Set the parking brake, shift the automatic transmission into P (Park)
and turn the key in the ignition
switch to STOP (OFF) position.
• If using another vehicle to jump start the battery, park the vehicle within
In an Emergency
6
226