2019 MASERATI GRANTURISMO CONVERTIBLE stop start
[x] Cancel search: stop startPage 119 of 296
Calibration Selection The driver can select, in relation to
road surface conditions, vehicle speed,
driving style and comfort, one of the
two calibration levels provided by the
system: normal or sports-style.
• Normal calibration , active when
SPORT drive mode is disabled
("SPORT" button not pressed), favors
comfort and higher driving stability
with low and average grip
conditions.
• Sport-style calibration , active when
SPORT drive mode is enabled
("SPORT" button pressed) , favors
wheel drive and permits a
dynamic-style driving with optimal
road holding.
Whenever the engine is started, the
system automatically activates
NORMAL drive mode, even if SPORT
drive mode was selected before the
engine was last turned off.
The sport-style calibration can be
selected only with the key in the
ignition switch in MAR (ON) position
and it is enabled by pressing button
"SPORT", even while driving.
When SPORT drive mode is activated,
the word “SPORT” on the instrument
cluster display and the LED on the
button illuminate. WARNING!
SPORT drive mode should not be
activated if the road surface is rough
or slippery.
The electronic suspension control
system
works in combination with the
ESC system.
When the suspension is set to normal
calibration, stability is increased under
medium and low grip conditions,
while when it is set to sport-style
calibration, the ESC system optimizes a
sportier driving.
WARNING!
In low- and medium-grip conditions
(e.g., rain, snow, ice, sand, etc.) it is
advisable not to use SPORT drive
mode, even with the ESC system
enabled.
Malfunction Indicators If one or more electric components in
the system prove to be malfunctioning
while driving, the ECU illuminates the
amber warning light accompanied
by the message “Check suspensions”
on the display. In addition, the ECU
calibrates the shock absorbers to a preset value, thus ensuring a safe
vehicle set up.
Should the malfunction involve one
shock absorber only, this will no
longer be controlled by the ECU and
will therefore remain set as it was
when the fault occurred. It is
therefore possible for one of the four
shock absorbers to work with a fixed
calibration, different from that of the
other ones.
In any case, safe and secure vehicle
driving is always ensured at low
speeds.
CAUTION!
In the event of a malfunction in the
suspension control electronic system,
which will be indicated by the
illumination of the amber warning
light on the display while driving,
keep a moderate speed and have the
vehicle checked as soon as possible by
an Authorized Maserati Dealer .
If a malfunction occurs while driving,
and
this is signaled by the illumination
of the
amber warning light on the
display, it is advisable to stop the
vehicle as soon as possible, turn the
key in the ignition switch to STOP
(OFF) position and then restart the
engine.Understanding the Vehicle
3
115
Page 132 of 296

Engine Temperature Warning Light
This warning light coupled
with the light on the coolant
thermometer notifies when
the engine is overheated. If
the temperature reaches critical levels
this warning light will illuminate in red
color combined with the related
message on display.
If the indicator light switches on while
driving, safely pull over and stop the
vehicle. If the A/C system is on, turn it
off. Also, shift the transmission into N
(Neutral) and idle the vehicle. If the
temperature does not return to
normal, immediately turn the engine
off and contact an Authorized
Maserati Dealer .
Check “Engine Overheating” in section
“In an Emergency” for more
information.
Doors and Lids Open Warning Light
This warning light indicates
that the doors or lids are open
or not properly closed. The
instrument cluster display also
shows an image of the vehicle with the
part not closed highlighted in red and
the related message. WARNING!
Before starting off, close any doors
and lids that are open or not properly
closed.
Soft Top Failure Warning Light
This
warning light illuminates
if the hydraulic and electric
soft top movement systems
fail.
Fuel Cutout Enabled Warning Light
This warning light illuminates
when a collision activates the
inertia switch, thus cutting off
the fuel supply.
WARNING!
After a collision, if you smell fuel or
note leakages from the fuel system,
do not reactivate the switch in order
to prevent the risk of fire.
Windshield and Headlights Washer
Low
Fluid Indicator
This indicator will illuminate
for 10 seconds to indicate a
low level of the windshield
and headlights washer fluid. A
related message will be displayed. See “Maintenance Procedures” in
section “Maintenance and Care” for
fluid filling.
Lighting System Failure Warning Light
This warning light illuminates
in the case of a system failure
or burning-out of the position,
turn signal, rear fog and
license plate light bulbs.
See "Bulb Replacement" in section
"Maintenance and Care" for further
details.
Stop Light Failure Warning Light
This warning light illuminates
in the case of a system failure
or burning-out of the stop
light bulbs.
See "Bulb Replacement" in section
"Maintenance and Care" for further
details.
Twilight Sensor Failure Warning Light
This warning light illuminates
in the case of a failure of the
twilight sensor.
Contact an Authorized
Maserati Dealer to have the vehicle
checked.Dashboard Instruments and Controls
4
128
Page 149 of 296

• Set Time Hours
With “Sync with GPS Time” feature
unchecked and this mode selected,
you can set the hours manually
from 1 to 24. To select, touch the
“+” or “–” softkeys to adjust the
hours.
• Set Time Minutes
With “Sync with GPS Time” feature
unchecked and this mode selected,
you can set the minutes manually
from 0 to 59. To select, touch the
“+” or “–” softkeys as done for the
hours.
• Time Format
When in this mode, you can select
the time format display. To change
the current setting, touch and
release the “12 Hrs” or “24 Hrs”
softkey. • Show Time In Status Bar
This feature will allow you to turn
on or shut off the digital clock in
the status bar.
• Set Date in Cluster
When in this mode, you can set the
date manually on the instrument
cluster display.
Tick the soft-key to enable the
feature and enter the setting page.
Touch than the “+” or “-” soft-keys
to set the day, the month and the
year”.
Safety & Driving Assistant Touch this softkey to set the following
modes.
• Stop & Go Parking Sensors
This feature allows you to disable the parking sensors signal under
special traffic conditions.
See “Park Assist” in section “Before
Starting” for further information.
• ParkView Camera with Dynamic
Guidelines
When this feature is selected, by
moving the transmission lever in R
(Reverse) position, the rearview
image with dynamic guidelines will
appear on MTC+ display.
The feature can be set to “On” or
“Off”.
• ParkView Camera Off Delay
By selecting this feature, when the
transmission lever is moved out of R
(Reverse), the rear view image with
dynamic guidelines will be displayed
for up to 10 seconds after shifting
unless the forward vehicle speed
exceeds 8 mph (12 km/h), or the
transmission is shifted into P (Park)
or the key in the ignition switch is
turned in STOP (OFF) position.
The feature can be set to “On” or
“Off”.
• Instrument Panel Buzzer Volume
This feature allows adjusting the
volume of the acoustic signal that
accompanies some instrument panel
warnings (EPB overheating, seatDashboard Instruments and Controls
4
145
Page 157 of 296
• left-hand/right-hand vent airdistribution;
• fan speed (stepless change);
• compressor activation;
• air recirculation.
All the functions listed above can be
modified manually, i.e. the user can
select one or more of these functions
as desired, using the control panel.
The manual selections always have
priority over the automatic ones and
are memorized until the user chooses
the automatic control again.
When a function has been set
manually, the other automatic
functions will not be affected.
The following parameters/functions
can be set/modified manually:
• left-hand/right-hand side air temperature;
• fan speed;
• air distribution on 7 positions (left-hand/ right-hand);
• compressor activation;
• single/dual-zone distribution priority;
• defrosting/defogging function (MAX DEF);
• air recirculation;
• automatic/manual control of the system; • heated rear window;
• system deactivation;
• opening/closing of air duct leading
to rear vents.
Activation
The system can be started up in a
number of ways. It is however
advisable to begin by pressing one of
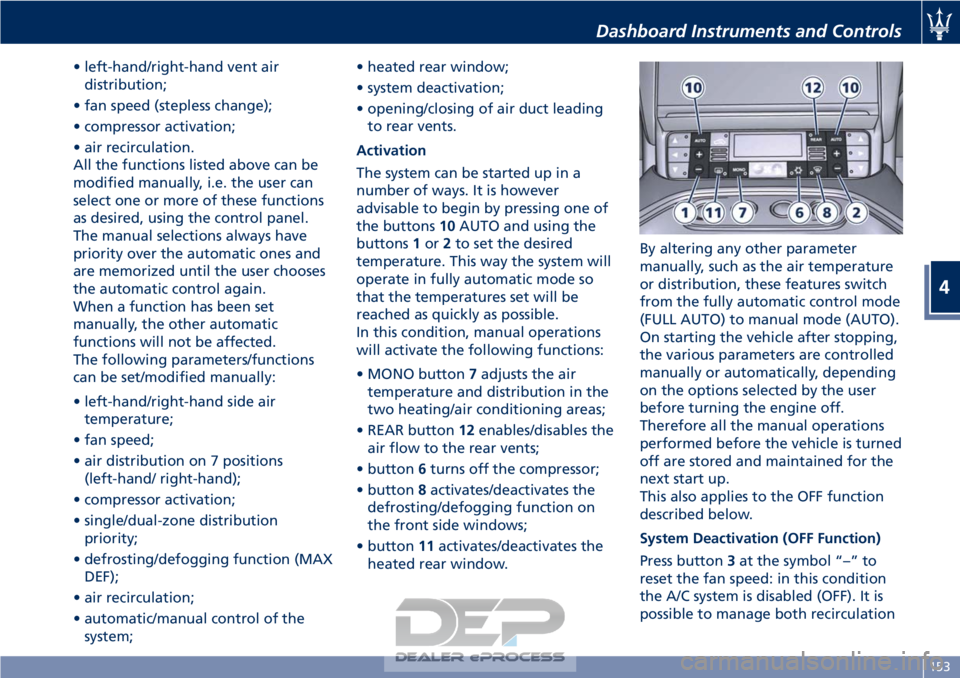
the buttons 10AUTO and using the
buttons 1or 2to set the desired
temperature. This way the system will
operate in fully automatic mode so
that the temperatures set will be
reached as quickly as possible.
In this condition, manual operations
will activate the following functions:
• MONO button 7adjusts the air
temperature and distribution in the
two heating/air conditioning areas;
• REAR button 12enables/disables the
air flow to the rear vents;
• button 6turns off the compressor;
• button 8activates/deactivates the
defrosting/defogging function on
the front side windows;
• button 11activates/deactivates the
heated rear window. By altering any other parameter
manually, such as the air temperature
or distribution, these features switch
from the fully automatic control mode
(FULL AUTO) to manual mode (AUTO).
On starting the vehicle after stopping,
the various parameters are controlled
manually or automatically, depending
on the options selected by the user
before turning the engine off.
Therefore all the manual operations
performed before the vehicle is turned
off are stored and maintained for the
next start up.
This also applies to the OFF function
described below.
System Deactivation (OFF Function)
Press button
3at the symbol “–” to
reset the fan speed: in this condition
the A/C system is disabled (OFF). It is
possible to manage both recirculation
Dashboard Instruments and Controls
4
153
Page 162 of 296
Normal Starting of the
Engine
WARNING!
It is dangerous to run the engine in an
enclosed area. The engine consumes
oxygen and discharges carbon
dioxide, carbon monoxide and other
toxic gases in the atmosphere.
WARNING!
California Proposition 65
Operating, servicing and maintaining
a passenger vehicle or off-road vehicle
can expose you to chemicals including
such as, engine exhaust, carbon
monoxide, phthalates and lead, that
which are know to the State of
California to cause cancer and birth
defects or other reproductive harm. To
minimize exposure, avoid breathing
exhaust, do not idle the engine except
as necessary, service your vehicle in a
well-ventilated area and wear gloves
or wash your hands frequently when
servicing your vehicle. For more
information go to: www.P65Warnings.ca.gov/passenger-
vehicle
When you open a door to get into the
car
, the instrument cluster turns on.
The TFT displays the complete
odometer, time, outside temperature
and the
open doors indicator.
Before starting the engine, close the
doors, adjust your seat, the inside and
outside mirrors, fasten your seat belt
and instruct all other occupants to
buckle their seat belts.
Make sure that the Electric Parking
Brake (EPB) is applied.
The shift lever must be in P (Park) or N
(Neutral) position before you can start
the engine. Apply the brakes before
shifting into any driving gear (see
“Automatic Transmission” in this
section).
CAUTION!
• Before starting the engine, switch off the electrical devices with a high
power consumption (air-conditioning
and heating system, heated rear
window, headlights, etc.).
• Do not start the engine if the fuel level in the tank is low. Press the brake pedal and turn the key
in
the ignition switch to MAR (ON)
position.
Instrument cluster displays the initial
sequence with warning light and
analog instruments test routine.
Turn the key into AVVposition and
release it when the engine starts. The
key will return to MAR (ON)position
automatically.
Do not hold the key in AVVposition
for a long time.
If the engine fails to start, the starter
will disengage automatically after 10
seconds. If you wish to stop the
cranking of the engine prior to
starting it, turn the key to STOP (OFF)
position.
If the engine does not start, turn the
key to STOP (OFF) position and wait
for the gear display to go off. Then
repeat the entire procedure.
NOTE:
Normal starting of either a cold or a
warm engine is obtained without
pumping or pressing the accelerator
pedal.
Driving
5
158
Page 163 of 296
Engine Start Failure
CAUTION!
• Do not attempt to push or tow your vehicle to get it started. Vehicles
equipped with an automatic
transmission cannot be started this
way.
• If the vehicle battery is dead, booster cables may be used to obtain a start
from a booster battery or the
battery in another vehicle. This type
of start can be dangerous if done
improperly. See “Auxiliary Jump
Start Procedure” in section “In an
Emergency” for further information.
Starting by cold engine
Start-of
f slowly, avoiding sudden
acceleration and rev the engine up at
low medium speeds. High-
performance driving should be
avoided until the engine temperature
reaches 149-158°F (65-70°C).
Engine Turn-Off
• Place the shift lever in P (Park) (see “Automatic Transmission” in this
section).
• With the engine at idle, turn the key in the ignition switch to STOP (OFF)position. A burst on the accelerator
pedal before turning off the engine
has no purpose and increases fuel
consumption.
WARNING!
Never leave a vehicle out of the P
(Park) position, as it could move.
The key can only be removed from the
ignition
switch when the transmission
is in P (Park) position and within 30
seconds after turning the key to STOP
(OFF) position. If you do not remove
the key within 30 seconds, you will
need to turn it back to MAR (ON)and
then to STOP (OFF) position to have a
further 30 seconds within which to
remove the key from the ignition
switch.
In the event that the key unlocking
system fails or if it is not possible to
shift the transmission to P (Park)
position, to remove the key you must
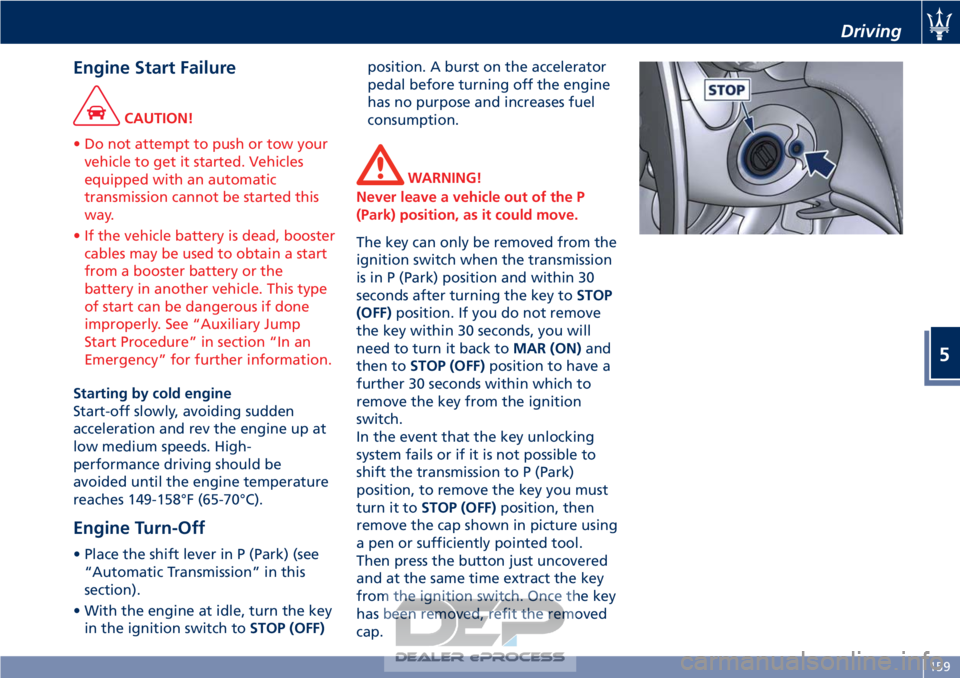
turn it to STOP (OFF) position, then
remove the cap shown in picture using
a pen or sufficiently pointed tool.
Then press the button just uncovered
and at the same time extract the key
from the ignition switch. Once the key
has been removed, refit the removed
cap.
Driving
5
159
Page 164 of 296
Automatic Transmission
The electronic shift lever replaces the
conventional mechanical lever and has
no mechanical connection to the
transmission. The transmission is
operated by electrical actuators on the
hydraulic system and all commands to
the control system are transmitted by
the CAN network.
The automatic transmission has six
forward gear ratios and one reverse
gear. The gears can also be engaged
manually once you have shifted the
transmission shift lever to the sector
provided.
CAUTION!
In order to properly use the automatic
transmission, it is essential that you
read through the whole chapter, so
that you can understand right from
the start what the correct and
permitted operations are.
Damage to the transmission may occur
if the following precautions are not
observed:
• Shift into P (Park) only after the vehicle has come to a complete stop.
This is the default position of the
lever and should be used every time the key in the ignition switch is
turned to
STOP (OFF) position.
• Shift into or out of R (Reverse) only after the vehicle has come to a
complete stop and the engine is at
idle speed.
• Do not shift between P (Park), R (Reverse), N (Neutral) or D (Drive)
when the engine is above idle speed.
• To effect any change from vehicle stop to R (Reverse), D (Drive), 1
stor
2ndgear, it is necessary to keep the
brake pedal fully depressed.
WARNING!
• It is dangerous to move the shift
lever out of P (Park) or N (Neutral) if
the engine speed is higher than idle
speed. Only shift into gear when the
engine is idling normally and when
your foot is firmly pressing on the
brake pedal.
• As with all vehicles, you should
never exit a vehicle while the engine
is running. Before exiting a vehicle,
always apply the electronic parking
brake, shift the transmission into P
(Park), and turn the engine off.
• When leaving the vehicle, always
remove the key from the ignition switch and lock your vehicle.
• Do not leave the key in or near the
vehicle.
The transmission system is equipped
with
"Shift-Lock" and "Key-Lock"
safety functions.
Shift-Lock
This safety function allows you to shift
from P (Park) to another position only
if the brake pedal is depressed. This
prevents the vehicle from involuntarily
jumping forward or backward.
Key-Lock
This function allows you to remove the
key from the ignition switch only
when the transmission shift lever is in
P (Park) position and within a
maximum time of 30 seconds. When
this time has elapsed, the key can no
longer be removed.
Automatic Transmission Lever
Automatic transmission is operated by
a lever with unlock button to engage
R (Reverse) and P (Park) located on the
central console.
By using the transmission shift lever it
is possible to select following
positions, indicated on the gear display
at the side of the transmission shift
Driving
5
160
Page 166 of 296
(Continued)
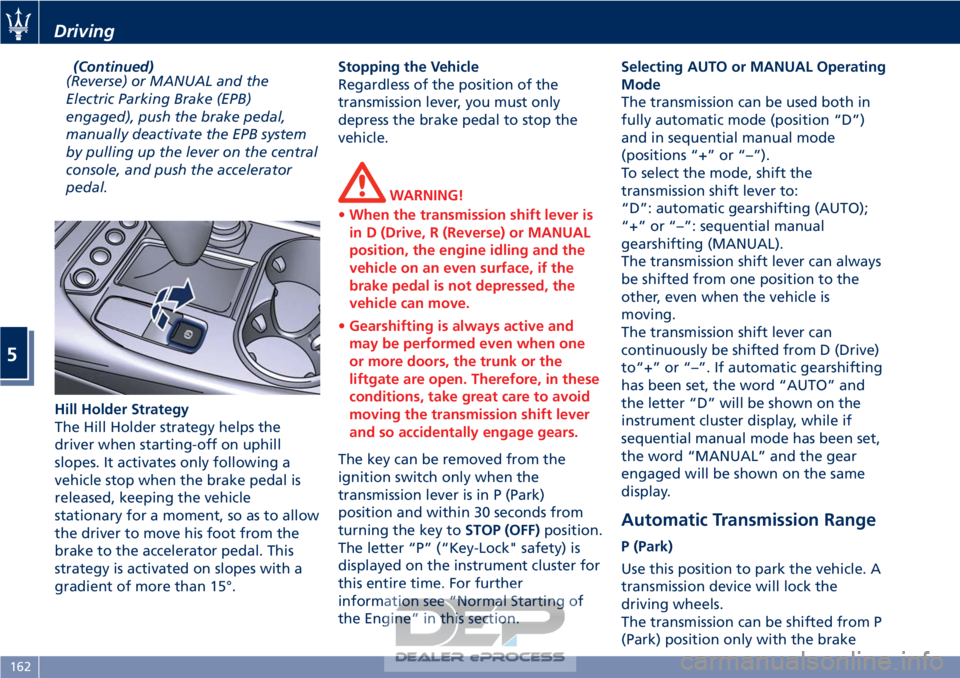
(Reverse) or MANUAL and the
Electric Parking Brake (EPB)
engaged), push the brake pedal,
manually deactivate the EPB system
by pulling up the lever on the central
console, and push the accelerator
pedal.
Hill Holder Strategy
The Hill Holder strategy helps the
driver when starting-off on uphill
slopes. It activates only following a
vehicle stop when the brake pedal is
released, keeping the vehicle
stationary for a moment, so as to allow
the driver to move his foot from the
brake to the accelerator pedal. This
strategy is activated on slopes with a
gradient of more than 15°. Stopping the Vehicle
Regardless of the position of the
transmission lever, you must only
depress the brake pedal to stop the
vehicle.
WARNING!
• When the transmission shift lever is
in D (Drive, R (Reverse) or MANUAL
position, the engine idling and the
vehicle on an even surface, if the
brake pedal is not depressed, the
vehicle can move.
• Gearshifting is always active and
may be performed even when one
or more doors, the trunk or the
liftgate are open. Therefore, in these
conditions, take great care to avoid
moving the transmission shift lever
and so accidentally engage gears.
The key can be removed from the
ignition
switch only when the
transmission lever is in P (Park)
position and within 30 seconds from
turning the key to STOP (OFF)position.
The letter “P” (“Key-Lock" safety) is
displayed on the instrument cluster for
this entire time. For further
information see “Normal Starting of
the Engine” in this section. Selecting AUTO or MANUAL Operating
Mode
The transmission can be used both in
fully automatic mode (position “D”)
and in sequential manual mode
(positions “+” or “–”).
To select the mode, shift the
transmission shift lever to:
“D”: automatic gearshifting (AUTO);
“+” or “–”: sequential manual
gearshifting (MANUAL).
The transmission shift lever can always
be shifted from one position to the
other, even when the vehicle is
moving.
The transmission shift lever can
continuously be shifted from D (Drive)
to“+” or “–”. If automatic gearshifting
has been set, the word “AUTO” and
the letter “D” will be shown on the
instrument cluster display, while if
sequential manual mode has been set,
the word “MANUAL” and the gear
engaged will be shown on the same
display.
Automatic Transmission Range
P (Park)
Use this position to park the vehicle. A
transmission device will lock the
driving wheels.
The transmission can be shifted from P
(Park) position only with the brake
Driving
5
162