2019 MASERATI GRANTURISMO CONVERTIBLE remove seats
[x] Cancel search: remove seatsPage 53 of 296
Improper intervention involving the
system components can cause failures
or undesired activation of the air bags
with damage resulting.
The air bag system components have
been specially designed for this
specific vehicle model. Do not attempt
to use them on other vehicles, as this
could cause serious injuries to
passengers in the event of an accident.
To scrap the vehicle, please contact an
Authorized Maserati Dealer to have
the air bag system disposed of
properly.
If the vehicle has been stolen or there
has been an attempted theft, have the
air bag system checked by an
Authorized Maserati Dealer .
WARNING!
The air bag modules must be replaced
at the expiration date indicated in the
label on the right-hand side of the
dashboard, even if the vehicle was
not involved in collisions.
Please contact an Authorized Maserati
Dealer for replacement of the air bag
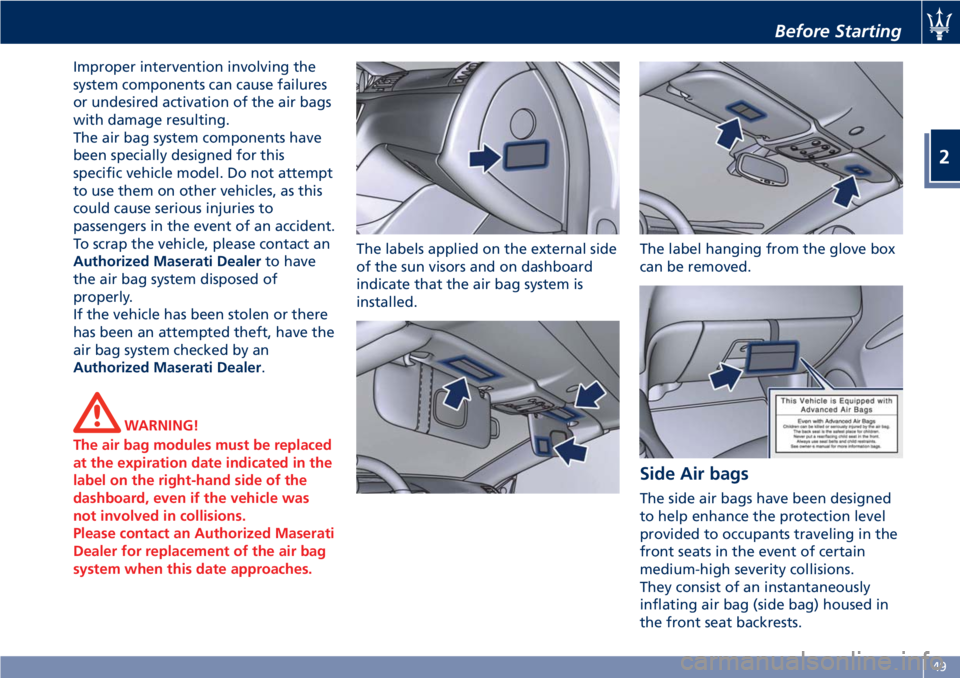
system when this date approaches. The labels applied on the external side
of
the sun visors and on dashboard
indicate that the air bag system is
installed. The label hanging from the glove box
can be removed.
Side Air bags The side air bags have been designed
to help enhance the protection level
provided to occupants traveling in the
front seats in the event of certain
medium-high severity collisions.
They consist of an instantaneously
inflating air bag (side bag) housed in
the front seat backrests.Before Starting
2
49
Page 58 of 296
(Continued)
• Passengers traveling in the rear seats
must never travel with their head
resting on the roll bars or sitting on
them. If the roll bars are deployed,
passengers traveling in these
positions would be exposed to the
risk of severe injuries.
• We recommend that you do not
place stickers or other objects on top
or in the vicinity of the roll bars, as
these could delay or inhibit roll bar
deployment. In addition, these
objects could be propelled inside the
passenger compartment at very high
speeds, which may jeopardize the
occupants personal safety.
• Active roll bar is a device with
pyrotechnic activation: it cannot be
repaired. After activation, the roll
bar must be replaced. Contact an
Authorized Maserati Dealer to have
the system properly repaired.
• As a consequence of incorrect repairs
on the electric system, the active roll
bars could possibly activate causing
injuries to persons in the vicinity.
• Never remove or tamper with the
system components. Any and all
operations must be performed only
by qualified and authorized personnel. Always contact an
Authorized Maserati Dealer.
• If the vehicle was stolen or its theft
attempted, if it was vandalized or
involved in flooding, contact an
Authorized Maserati Dealer to have
the active roll bar system checked.
Child Restraint Systems NOTE:
A child restraint system can help
protect a child in a vehicle so ensure
that the child restraint selected has a
certification label applicable to FMVSS
213 and 225 in the U.S., or CMVSS 213
and 210.2 in Canada.
Everyone in your vehicle must be
buckled up all the time, including
babies and children. Every state in the
United States and all Canadian
provinces require that small children
ride in proper restraint systems. Please
be reminded that you can be
prosecuted for ignoring this law.
Children 12 years or younger should
ride properly buckled up in a rear seat,
if available. According to crash
statistics, children are safer when
properly restrained in the rear seats
rather than in the front.
WARNING!
In a collision, an unrestrained child,
even a baby, can become a projectile
inside the vehicle. The force required
to hold even an infant on your lap
could become so great that you couldBefore Starting
2
54
Page 60 of 296
the vehicle’s seat cushion while the
back is against the seatback, they
should use a belt-positioning booster
seat.
The child and belt-positioning booster
seat are fixed to the car by the
lap/shoulder belt.
Children Too Large for Booster
Seats Children who are large enough to
wear the shoulder belt comfortably
and whose legs are long enough to
bend over the front of the seat when
their back is against the seatback
should use the lap/shoulder belt in a
rear seat.
• Make sure that the child is upright in
the seat.
• The lap portion should be low on the
hips and as snug as possible.
• Check belt fit periodically. A child’s
squirming or slouching can move the
belt out of position.
• If the shoulder belt contacts the face
or neck, move the child closer to the
center of the vehicle. Never allow a
child to put the shoulder belt under
an arm or behind their back. NOTE:
For additional information, refer to
www.seatcheck.org or call
1–866–SEATCHECK. Canadian residents
should refer to Transport Canada’s
website for additional information:
http://www.tc.gc.ca/roadsafety/
safedrivers/childsafety/index.htm
WARNING!
• Improper installation can lead to
failure of an infant or child restraint.
It could come loose in a collision. The
child could be badly injured or killed.
Follow the restraint manufacturer’s
directions exactly when installing an
infant or child restraint.
• A rearward-facing child restraint
should only be used in a rear seat. A
rearward-facing child restraint in the
front seat may be struck by a
deploying passenger air bag, which
may cause severe or fatal injury to
the infant.
Here are Some Tips on Getting
the Most Out of Your Child
Restraint
• Before buying any restraint system,
make sure that it has a label certifying that it meets all applicable
Safety Standards. Maserati also
recommends that you make sure that
you can install the child restraint in
the vehicle where you will use it
before you buy it.
• The restraint system must be
appropriate for your child’s weight
and height.
• Check the label on the restraint
system for weight and height limits.
• Carefully follow the instructions that
come with the restraint system.
• If installed improperly, it may not
work when needed.
• Fit the child into the seat according
to the child restraint manufacturer’s
directions.
WARNING!
When your child restraint system is
not in use, secure it in the vehicle with
the seat belt or remove it from the
vehicle. Do not leave it loose in the
vehicle. In a sudden stop or accident, it
could strike the occupants or
seatbacks and cause serious personal
injury.Before Starting
2
56
Page 61 of 296
Installing Child Restraint
Systems using the Vehicle Seat
Belt equipped with ALR All the passenger seat belts are
equipped with an Automatic Locking
Retractor (ALR) to secure child
protection through a Child Restraint
System (CRS). These types of seat belts
are designed to keep the lap portion
of the seat belt tight around the child
restraint seat avoiding to use a locking
clip.
The ALR will make a ratcheting noise
if the entire belt is pulled out of the
retractor in order to enable the belt to
retract subsequently. For additional
information on ALR, see “Using Seat
Belt in Automatic Locking Retractor
(ALR) Mode” in “Occupants Restraint
Systems” in this section.
To install a Child Restraint System with
ALR, pull enough of the belt out of
the retractor leading it through the
belt path of the protection device.
Slide the latch into the buckle until it
clicks, then remove the entire safety
belt from the retractor in order to
rewound. While rewinding a click will
indicate the safety belt is now in
Automatic Locking mode.
Exert then a traction on the exceeded
lap section of the belt in order to tighten it around the child restraint
seat. All seat belts will loosen over
time, it is therefore necessary to check
them periodically and set them
properly.
Lower Anchors and Tether for
Children (LATCH) Your vehicle's rear outboard seats are
all equipped with the child restraint
anchorage system called LATCH.
The LATCH system allows the child
restraint systems to be fixed without
using the vehicle's seat belts, instead
fixing the child restraint system to the
vehicle structure, using lower
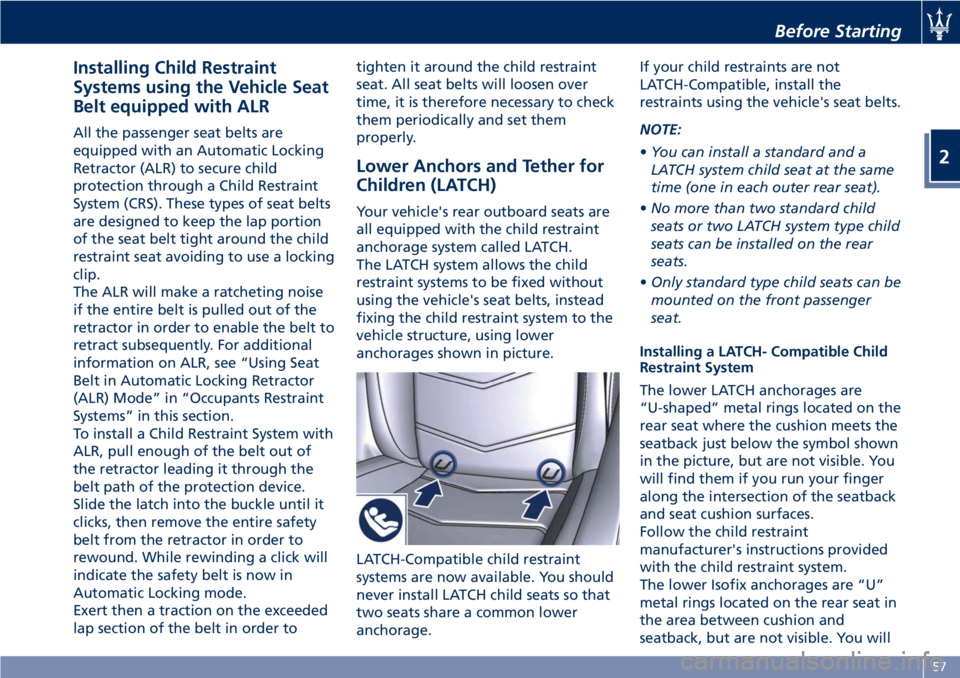
anchorages shown in picture.
LATCH-Compatible child restraint
systems are now available. You should
never install LATCH child seats so that
two seats share a common lower
anchorage. If your child restraints are not
LATCH-Compatible, install the
restraints using the vehicle's seat belts.
NOTE:
• You can install a standard and a
LATCH system child seat at the same
time (one in each outer rear seat).
• No more than two standard child
seats or two LATCH system type child
seats can be installed on the rear
seats.
• Only standard type child seats can be
mounted on the front passenger
seat.
Installing a LATCH- Compatible Child
Restraint System
The lower LATCH anchorages are
“U-shaped” metal rings located on the
rear seat where the cushion meets the
seatback just below the symbol shown
in the picture, but are not visible. You
will find them if you run your finger
along the intersection of the seatback
and seat cushion surfaces.
Follow the child restraint
manufacturer's instructions provided
with the child restraint system.
The lower Isofix anchorages are “U”
metal rings located on the rear seat in
the area between cushion and
seatback, but are not visible. You willBefore Starting
2
57
Page 96 of 296
Soft Top NOTE:
By soft top “opening” we
mean folding the soft top
into the rear luggage
compartment.
By soft top “closing” we
mean the opposite.
Precautions Before and during the soft top
operation observe the following
precautions.
WARNING!
• Before opening or closing the soft
top, always check that no one is in
the way, as impact with the soft top
may cause injury. Also check that no
objects stand in the way of the soft
top, as impact may cause damage to
both the soft top and the object.
• The movement of the soft top with
the engine running must be
performed outdoor. Exhaust gases
contain carbon monoxide which is
strongly toxic and potentially lethal. • In case of hazard, release the soft
top button, which stops its
movement.
• Keep your hands away from the soft
top levers, the soft top compartment
and the upper edge of the
windshield.
• Before operating the soft top, make
sure that no passengers are sitting in
the rear seats.
• Never operate or act on a soft top
that is performing an automatic
movement cycle.
CAUTION!
• Do not open the soft top when it is
wet, as the damp that would form in
the soft top housing might cause
permanent damage to the structure
or stains or mold in the canvas.
Should it need to be opened, do not
leave it sitting in the housing for
more than a day.
• Open the soft top when it is dirty, as
both the canvas and the rear window
might be damaged when it is folded.
• Do not open the soft top if there is
ice or snow on it. Should it need to
be opened, remove the snow or ice and do not use sharp or pointed
objects.
• Do not place objects on the soft top
as they might fall and cause damage
and injury when it is moved.
• Do not place any objects in the soft
top housing.
• Do not fasten roof-racks or similar on
the soft top.
• When closing the soft top, never
start driving before the soft top has
completed the closing cycle and has
locked on the windshield frame.
• Only open or close the soft top when
the vehicle is stationary, otherwise it
might not fully open or close. For
example, if you start moving the soft
top when you are standing at a
traffic light and you start driving
before the soft top has completed its
opening or closing cycle, you can
complete the operation by driving
slowly (do not exceed 19 mph -
30 km/h) and holding the soft top
movement switch pushed until the
process has been completed.
• If you are driving at high speeds,
vacuum might be created in the
passenger compartment and the soft
top might start “wobbling”; to solveUnderstanding the Vehicle
3
92
Page 104 of 296
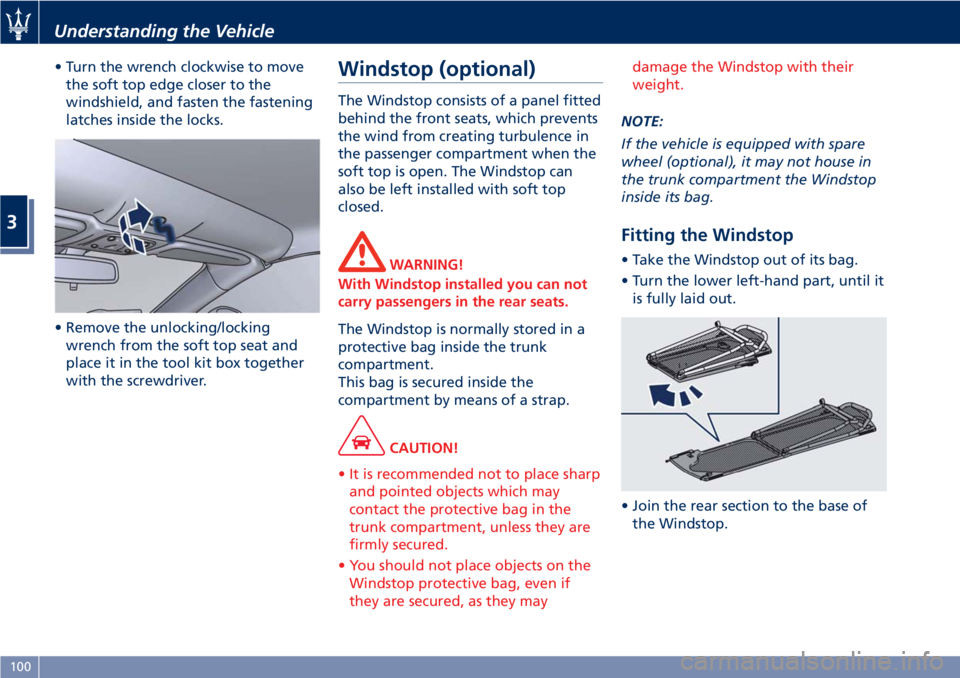
• Turn the wrench clockwise to move
the soft top edge closer to the
windshield, and fasten the fastening
latches inside the locks.
• Remove the unlocking/locking
wrench from the soft top seat and
place it in the tool kit box together
with the screwdriver. Windstop (optional) The Windstop consists of a panel fitted
behind the front seats, which prevents
the wind from creating turbulence in
the passenger compartment when the
soft top is open. The Windstop can
also be left installed with soft top
closed.
WARNING!
With Windstop installed you can not
carry passengers in the rear seats.
The Windstop is normally stored in a
protective
bag inside the trunk
compartment.
This bag is secured inside the
compartment by means of a strap.
CAUTION!
• It is recommended not to place sharp
and pointed objects which may
contact the protective bag in the
trunk compartment, unless they are
firmly secured.
• You should not place objects on the
Windstop protective bag, even if
they are secured, as they may damage the Windstop with their
weight.
NOTE:
If
the vehicle is equipped with spare
wheel (optional), it may not house in
the trunk compartment the Windstop
inside its bag.
Fitting the Windstop • Take the Windstop out of its bag.
• Turn the lower left-hand part, until it
is fully laid out.
• Join the rear section to the base of
the Windstop.Understanding the Vehicle
3
100
Page 252 of 296
(Continued)
quick coupling from the negative
pole (–) of the battery.
If the battery needs to be removed
from
its compartment, you must first
detach the terminal clamp from
negative pole (–) and then the other
terminal clamp from positive pole (+),
after removing the protective cover.
Battery poles are marked positive (+)
and negative (–) and are identified on
the battery case.
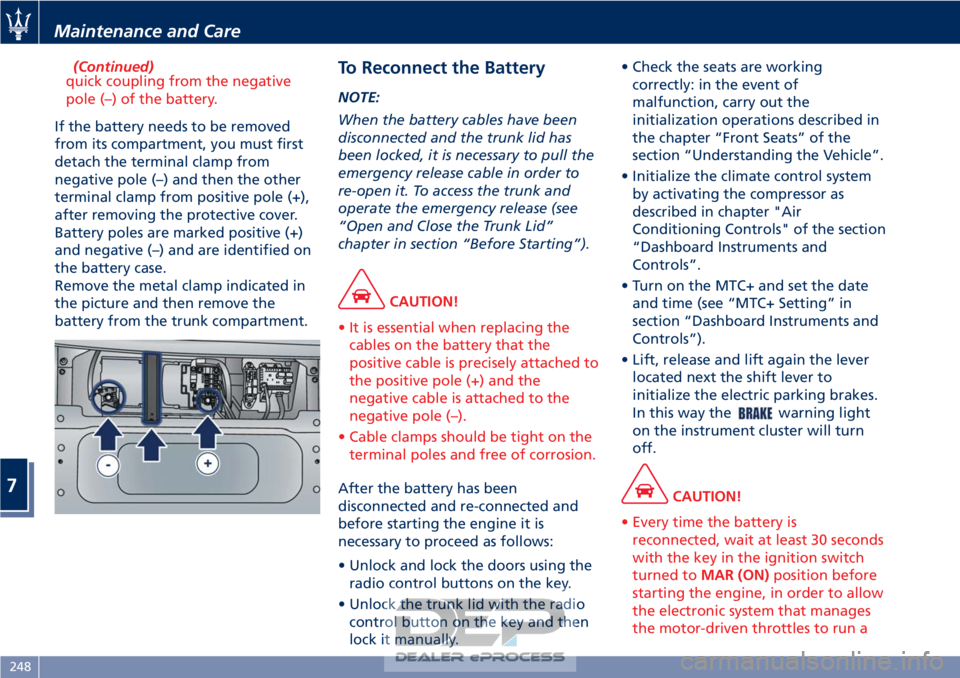
Remove the metal clamp indicated in
the picture and then remove the
battery from the trunk compartment.
To Reconnect the Battery
NOTE:
When the battery cables have been
disconnected and the trunk lid has
been locked, it is necessary to pull the
emergency release cable in order to
re-open it. To access the trunk and
operate the emergency release (see
“Open and Close the Trunk Lid”
chapter in section “Before Starting”).
CAUTION!
• It is essential when replacing the cables on the battery that the
positive cable is precisely attached to
the positive pole (+) and the
negative cable is attached to the
negative pole (–).
• Cable clamps should be tight on the terminal poles and free of corrosion.
After the battery has been
disconnected
and re-connected and
before starting the engine it is
necessary to proceed as follows:
• Unlock and lock the doors using the radio control buttons on the key.
• Unlock the trunk lid with the radio control button on the key and then
lock it manually. • Check the seats are working
correctly: in the event of
malfunction, carry out the
initialization operations described in
the chapter “Front Seats” of the
section “Understanding the Vehicle”.
• Initialize the climate control system by activating the compressor as
described in chapter "Air
Conditioning Controls" of the section
“Dashboard Instruments and
Controls”.
• Turn on the MTC+ and set the date and time (see “MTC+ Setting” in
section “Dashboard Instruments and
Controls”).
• Lift, release and lift again the lever located next the shift lever to
initialize the electric parking brakes.
In this way the
warning light
on the instrument cluster will turn
off.
CAUTION!
• Every time the battery is reconnected, wait at least 30 seconds
with the key in the ignition switch
turned to MAR (ON) position before
starting the engine, in order to allow
the electronic system that manages
the motor-driven throttles to run a
Maintenance and Care
7
248