2019 MASERATI GRANTURISMO CONVERTIBLE warning lights
[x] Cancel search: warning lightsPage 16 of 296

Towing the Vehicle The vehicle has not been designed,
developed and homologated to be
used as a towing vehicle for other
means (e.g. trailers, campers, etc.).
Symbols There are specific colored plates on or
near some of the components on your
Maserati designed to attract user’s
attention. The related symbols are
important warnings that the user must
follow when using the component
involved.
All symbols reported on the plate and
inside the vehicle, as well as the
component for which the symbols
stand, are summarized in the
following list. These symbols are
divided into categories according to
their meaning.
Danger Symbols Battery
Corrosive liquid.
Battery
Explosion.
Blower
May start automatically
even with engine off.
Coolant expansion
reservoir
Do not open cap with
engine warm. Coil - headlights
High voltage.
Belts and pulleys
Moving parts, keep body
and clothing clear.
Air-conditioning lines
High pressure gas, do not
open.
Symbols of Prohibitions and
Compulsory Measures Battery
Keep away from flames.
Battery
Keep out of children’s
reach.
Heat guards - belts -
pulleys - fans
Do not touch.
Battery
Wear eye protection.
Battery - jack
Refer to the owner manual.Introduction
1
12
Page 36 of 296

Opening from the Inside To open the door, even if the lock is
engaged, pull the internal handle.
There are two buttons in front of the
transmission lever which operate the
door locking and unlocking functions:
: door locking;
: door unlocking. NOTE:
By pulling the internal handle on the
driver’s door, all the locks can be
released at the same time or just the
driver’s door, depending on the MTC+
settings (see "MTC+ Settings" in
section "Dashboard Instrument and
Controls").
Door Open Warning Lights If the doors and the engine/luggage
compartment lids are not closed
properly, this is signaled by the
illumination of relative symbols on the
instrument panel display, accompanied
by the messages “Door open” or
“Doors open” shown in the picture.
Door Lock ECU Initialization
Every time the battery is connected or
a fuse replaced, you must perform the
system initialization procedure to ensure proper system operation. To
perform this procedure, lock and then
unlock the doors using the buttons
and on the radio control device.
For more details, see "Maintenance-
Free Battery" in section "Maintenance
and Care".
Door Open Indicator Light Each door is provided with a reflector
fitted on the rear side of the door
panel that makes it visible when
illuminated by the headlights of a
vehicle.
Signal Upon exceeding a speed of 3 mph
(5 km/h), if one or more doors/lid are
open or not properly closed, a warning
signal will be activated.
Door Courtesy Light Each door panel is fitted with a
courtesy light, on the lower part of the
door framework, to illuminate the
area where passengers enter/exit the
vehicle.Before Starting
2
32
Page 71 of 296

• Mounting posts must be properly
installed, if not equipped from the
factory. Failure to properly follow
floor mat installation or mounting
can cause interference with the
brake pedal and accelerator pedal
operation causing loss of control of
the vehicle.
Tires
•
Examine tires for excessive tread
wear and uneven wear patterns.
• Check for stones, nails, glass, or
other objects lodged in the tread or
sidewall.
• Inspect the tread for cuts and cracks.
• Inspect sidewalls for cuts, cracks and
bulges.
• Check the wheel nuts for tightness.
• Check the tires (see “Tire Inflation
Pressure” chapter in section
“Features and Specifications”) for
proper cold inflation pressure.
Lights and Indicator Lights
• Have someone observe the
operation of exterior lights while
you operate the controls (see
“Lights” chapter in section
“Understanding the Vehicle”).
• Check turn signal and high beam
indicator lights on the instrument cluster (see “Instrument Cluster”
chapter in section “Dashboard
Instruments and Controls”).
Door Latches
• Check for positive closing, latching,
and locking of doors and trunk lid
(see chapter “Doors” and “Open and
Close the Trunk Lid” in this section).
Fluid Leaks
• Check area under vehicle after
overnight parking for recent fluid
leaks (oil, fuel, etc.).
• If gasoline fumes are detected or
fluid leaks are suspected, contact an
Authorized Maserati Dealer .
WARNING!
California Proposition 65
Operating, servicing and maintaining
a passenger vehicle or off-road vehicle
can expose you to chemicals including
such as, engine exhaust, carbon
monoxide, phthalates and lead, that
which are know to the State of
California to cause cancer and birth
defects or other reproductive harm. To
minimize exposure, avoid breathing
exhaust, do not idle the engine except
as necessary, service your vehicle in a
well-ventilated area and wear gloves or wash your hands frequently when
servicing your vehicle. For more
information go to:
www.P65Warnings.ca.gov/passenger-
vehicle
Before Starting
2
67
Page 88 of 296

Adaptive Bi-Xenon Headlights The gas-discharge (xenon) headlights
operate with an electric arc saturated
with Xenon gas under pressure,
instead of the incandescent filament.
The light produced is assuredly higher
compared to traditional light bulbs, in
terms of quality (brighter light) as well
as of the span and positioning of the
illuminated area.
In addition, the headlights are
equipped with an ALC system
(Adaptive Light Control).
This system combines the light beam
with the steering angle to assure
better visibility of the road surface
when driving in a curve, steering or in
the event of road deviations.
The advantages offered by improved
lighting system are perceived
especially in case of bad weather, fog
and/or insufficient road indications
providing broader illumination of the
side zones, which are normally left in
the dark, and for highway driving (see
comparison rendered below).
This surely increases driving safety as it
offers less eye strain and increased
orientation for the driver and better
detection of other persons on the road
sides (pedestrians, bicycle riders and
motorcycle drivers). The electric arc requires very high
voltage for activation, but afterward
power is supplied at a lower voltage.
The headlights reach maximum
brightness about 0,5 seconds after
being turned on.
The strong light produced by this type
of headlight requires the use of an
automatic system to keep the position
of the headlights constant and to
prevent dazzling approaching cars, in
the case of braking, acceleration or
load transport.
WARNING!
If xenon headlamp replacement is
necessary, contact the Authorized
Maserati Dealer only: DANGER - RISK
OF ELECTRICAL SHOCK.
Parking Lights The parking lights only work with the
key in the ignition switch turned to
STOP (OFF) or ACC position, or with
the key removed.
They are activated by turning the light
switch to
position.
It is harder to turn the switch to
position than to the other
positions. This is to avoid activating the parking lights unintentionally and
wasting power.
When the parking lights are on, the
warning light on the instrument
cluster illuminates.
With parking lights on, move down
left-hand multifunction lever to switch
on position lights on left-hand side,
and move it up to switch on only the
ones on right-hand side.
Automatic Headlights When the light switch is turned to
"AUTO" position and the key in the
ignition switch is in MAR (ON)
position, the position lights, low beam
lights and license plate lights turn on
and off automatically, depending on
the light outside.
NOTE:
The high beams can only be turned on
manually by pushing the left-hand
multifunction lever forward.
WARNING!
• If the low beams are activated, they
will come on automatically every
time the lights are turned on. You
are therefore advised to turn off the
high beams every time the twilightUnderstanding the Vehicle
3
84
Page 89 of 296

sensor deactivates the external
lights.
• In case of fog during the day,
position lights and low beam lights
are not turned on automatically. The
driver must always be ready to turn
the lights on manually, including
rear fog lights, if necessary.
• The driver is always responsible for
turning on the external lights,
depending on the light outside and
in compliance with the applicable
legislation in the country of use. The
automatic system for activating/
deactivating the external lights must
be considered an aid for the driver.
If necessary, turn the lights on and
off manually.
NOTE:
After
external lights turn on
automatically, driver can always
manually turn on rear fog lights.
When external lights turn off
automatically, rear fog lights will turn
off automatically too, if on. Upon the
following automatic switch-on driver
must manually turn on rear fog lights,
if necessary. Rear Fog Lights Press button on the light switch to
turn on the rear fog lights.
Fog lights only work when the low
beams are on by operating the light
switch in
(low beam) or "AUTO"
position.
The symbol on the button and the
dedicated indicator light in the
instrument cluster illuminate when
the lights are on.
WARNING!
Do not use the rear fog lights in
normal visibility conditions to avoid
dazzling vehicles behind.
Pressing again the
button will
deactivate the rear fog lights. Twilight Sensor This device consists of two sensors: a
global sensor, capable of measuring
the light intensity above and a
directional sensor, which measures the
light intensity in the vehicle’s traveling
direction, enabling it to recognize
tunnels and driveways.
You can adjust the sensing range of
the twilight sensor by means of the
MTC+, by selecting the “Settings”
menu and "Safety & Driving Assistant"
function (see chapter "MTC+ Settings"
in section "Dashboard instruments
and Controls").
In the event of a sensor failure, the
system will turn on the low beams and
the position lights, regardless of the
light outside, and a failure message
will appear on the instrument cluster
display.
The failure indication will be displayed
as long as the light switch is turned to
"AUTO" position.
In this case, we recommend that you
deactivate the automatic system and
turn on the external lights manually if
necessary; contact an Authorized
Maserati Dealer as soon as possible.Understanding the Vehicle
3
85
Page 91 of 296

You can signal another vehicle with
your headlights by lightly pulling the
left-hand multifunction lever toward
you. This will turn on the high beams
headlights until the lever is released.
Flashing occurs also with lights off
(light switch in position “0”) if the key
in the ignition switch is in MAR (ON)
position. CAUTION!
The high beams can only be switched
on manually by pushing the left-hand
multifunction lever forward.
WARNING!
If the high beams are activated, they
will turn on automatically every time
the low beams are switched on either
manually or automatically. We
recommend therefore that you switch
them off when they are no longer
necessary and every time the twilight
sensor deactivates the external lights.
“Follow me Home” Function
This
function allows you to set a
timing for activation of the position
lights and low beams, so that they
may remain on for a set time after
turning off the vehicle.
This function is activated by pushing
the left-hand multifunction lever on
the steering column, used to flash the
headlights.
The position lights and low beams
turn on for 30 seconds, the message
“Follow me” appears on the
instrument cluster display for 20 seconds, and the light activation time
is displayed.
When this function is active, every
time the left-hand multifunction lever
for flashing the headlights is
operated, the time the lights remain
on is increased by 30 seconds, with a
maximum total time of 210 seconds.
The display will show the time set.
If the left-hand multifunction lever for
flashing the headlights is operated for
more than 2 seconds, the function is
deactivated, and the indicator on the
instrument cluster display goes off.
When the function is active, turning
the key in the ignition switch back to
MAR (ON) position deactivates the
system.
Front Domelights The front domelight includes a central
and two reading lights.
The central light automatically turns
on together with the two lights on the
sides of the rear seats (see "Rear Side
Interior Lights" in this chapter) when
one of the doors is opened and turns
off when the door is closed (timed
switching off). These lights may be
switched on manually by pressing the
central button
The reading lights are controlled by
the respective side buttons.Understanding the Vehicle
3
87
Page 92 of 296

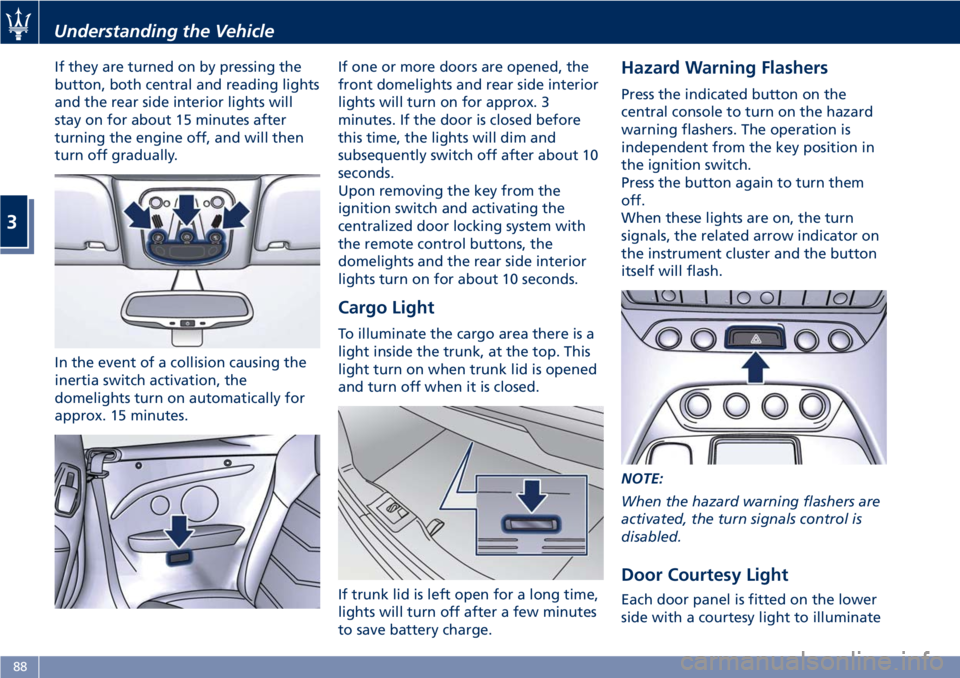
If they are turned on by pressing the
button, both central and reading lights
and the rear side interior lights will
stay on for about 15 minutes after
turning the engine off, and will then
turn off gradually.
In the event of a collision causing the
inertia switch activation, the
domelights turn on automatically for
approx. 15 minutes. If one or more doors are opened, the
front domelights and rear side interior
lights will turn on for approx. 3
minutes. If the door is closed before
this time, the lights will dim and
subsequently switch off after about 10
seconds.
Upon removing the key from the
ignition switch and activating the
centralized door locking system with
the remote control buttons, the
domelights and the rear side interior
lights turn on for about 10 seconds.
Cargo Light To illuminate the cargo area there is a
light inside the trunk, at the top. This
light turn on when trunk lid is opened
and turn off when it is closed.
If trunk lid is left open for a long time,
lights will turn off after a few minutes
to save battery charge. Hazard Warning Flashers Press the indicated button on the
central console to turn on the hazard
warning flashers. The operation is
independent from the key position in
the ignition switch.
Press the button again to turn them
off.
When these lights are on, the turn
signals, the related arrow indicator on
the instrument cluster and the button
itself will flash.
NOTE:
When the hazard warning flashers are
activated, the turn signals control is
disabled.
Door Courtesy Light
Each door panel is fitted on the lower
side with a courtesy light to illuminateUnderstanding the Vehicle
3
88
Page 95 of 296

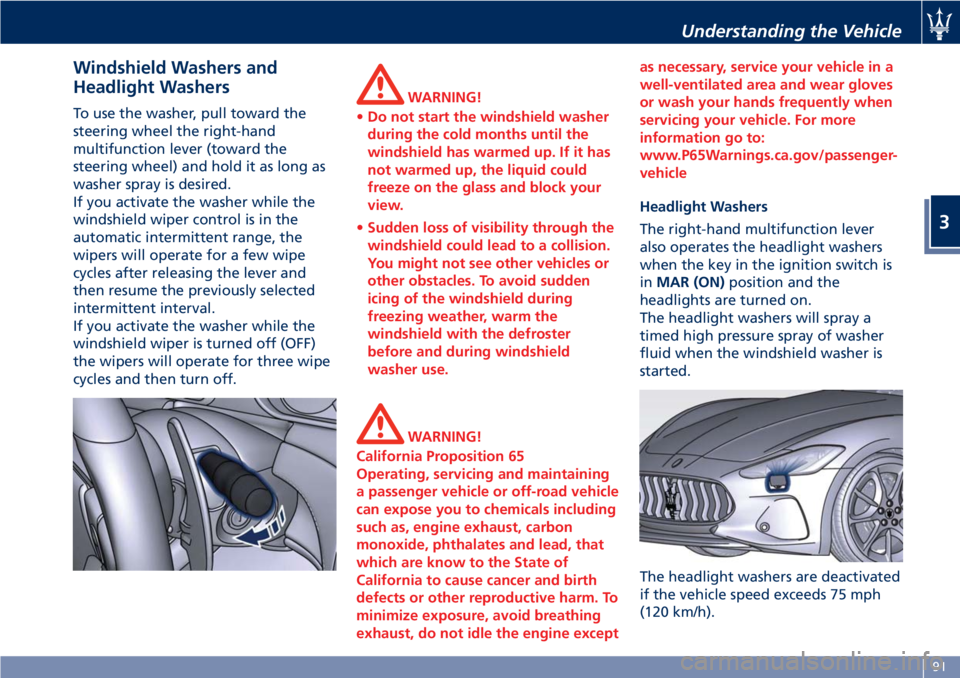
Windshield Washers and
Headlight Washers To use the washer, pull toward the
steering wheel the right-hand
multifunction lever (toward the
steering wheel) and hold it as long as
washer spray is desired.
If you activate the washer while the
windshield wiper control is in the
automatic intermittent range, the
wipers will operate for a few wipe
cycles after releasing the lever and
then resume the previously selected
intermittent interval.
If you activate the washer while the
windshield wiper is turned off (OFF)
the wipers will operate for three wipe
cycles and then turn off. WARNING!
• Do not start the windshield washer
during the cold months until the
windshield has warmed up. If it has
not warmed up, the liquid could
freeze on the glass and block your
view.
• Sudden loss of visibility through the
windshield could lead to a collision.
You might not see other vehicles or
other obstacles. To avoid sudden
icing of the windshield during
freezing weather, warm the
windshield with the defroster
before and during windshield
washer use.
WARNING!
California Proposition 65
Operating, servicing and maintaining
a passenger vehicle or off-road vehicle
can expose you to chemicals including
such as, engine exhaust, carbon
monoxide, phthalates and lead, that
which are know to the State of
California to cause cancer and birth
defects or other reproductive harm. To
minimize exposure, avoid breathing
exhaust, do not idle the engine except as necessary, service your vehicle in a
well-ventilated area and wear gloves
or wash your hands frequently when
servicing your vehicle. For more
information go to:
www.P65Warnings.ca.gov/passenger-
vehicle
Headlight Washers
The
right-hand multifunction lever
also operates the headlight washers
when the key in the ignition switch is
in MAR (ON) position and the
headlights are turned on.
The headlight washers will spray a
timed high pressure spray of washer
fluid when the windshield washer is
started.
The headlight washers are deactivated
if the vehicle speed exceeds 75 mph
(120 km/h).Understanding the Vehicle
3
91