2019 MASERATI GRANTURISMO CONVERTIBLE trunk
[x] Cancel search: trunkPage 230 of 296
WARNING!
• Using booster packs that have not
been checked, which could therefore
release a too high charging voltage
(higher than 14 V), in extreme
environmental conditions (for
example: closed areas or without
proper ventilation and temperatures
higher than 122°F/50°C or lower
than -4°F/-20°C) create the right
conditions for ignition which could
then cause the battery to explode.
Therefore you shall always perform
jump-starting operations using the
adequate tools and in the best
environmental conditions, taking all
necessary precautions.
• Do not attempt jump-starting if the
discharged battery is frozen. It could
rupture or explode during jump start
and cause personal injury.
• Do not carry out this procedure if
you have not done it before:
incorrect maneuvers can originate
high electrical discharges and even
cause the battery to explode.
• To avoid the risk of explosion or fire,
do not approach the battery with open flames or cigarettes that could
generate sparks.
NOTE:
If
you need to disconnect the battery
from the vehicle electrical system, see
“Maintenance - Free Battery” in
section “Maintenance and Care”).
Access the Battery
The battery is stored in the trunk.
• Open the trunk lid (see “Open and Close the Trunk Lid” in section
“Before Starting”).
• Remove any luggage from the trunk compartment.
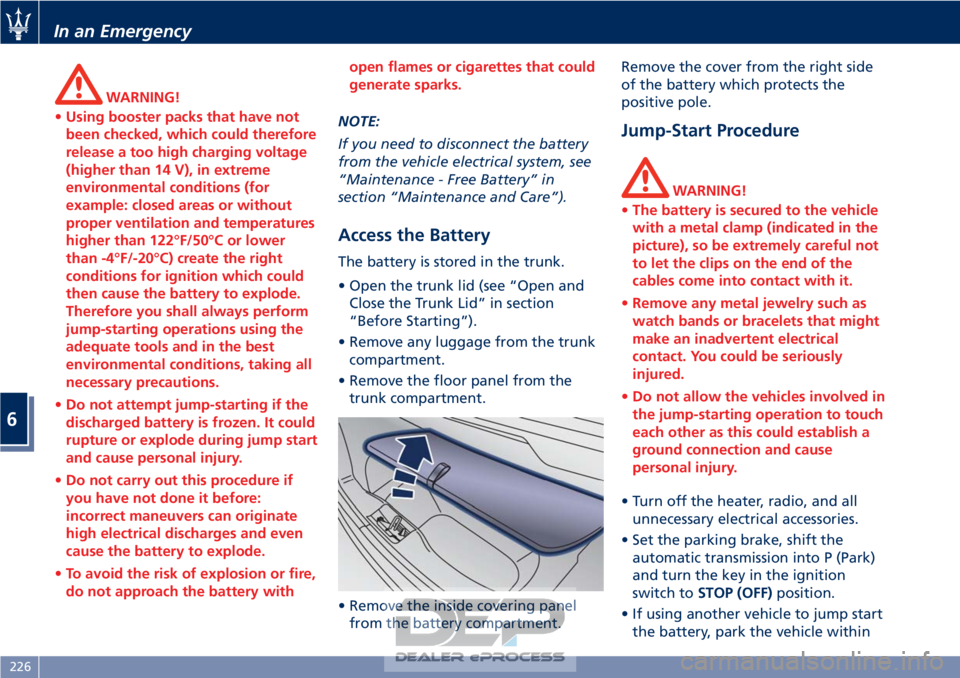
• Remove the floor panel from the trunk compartment.
• Remove the inside covering panel from the battery compartment. Remove the cover from the right side
of the battery which protects the
positive pole.
Jump-Start Procedure
WARNING!
• The battery is secured to the vehicle
with a metal clamp (indicated in the
picture), so be extremely careful not
to let the clips on the end of the
cables come into contact with it.
• Remove any metal jewelry such as
watch bands or bracelets that might
make an inadvertent electrical
contact. You could be seriously
injured.
• Do not allow the vehicles involved in
the jump-starting operation to touch
each other as this could establish a
ground connection and cause
personal injury.
• Turn off the heater, radio, and all unnecessary
electrical accessories.
• Set the parking brake, shift the automatic transmission into P (Park)
and turn the key in the ignition
switch to STOP (OFF) position.
• If using another vehicle to jump start the battery, park the vehicle within
In an Emergency
6
226
Page 233 of 296
Use the Vehicle Tow Hook of
the Tool Kit
CAUTION!
The tow hook should only be used for
towing the car on flat roads. Do not
use the tow hook to remove the car
that is stuck on off road stretches.
The tow hook can also be used to tow
the
vehicle on the platform of a tow
truck.
It is necessary to inform the operators
of the rescue vehicle about the vehicle
minimum height to avoid, during its
loading, any contact of the lower ends
of the front or rear bumper with the
tow truck loading ramp.
The tow hook is contained in the tool
kit (see “Tool Kit” in this section) and
must be screwed in its seat accessible
behind the front grille, right-hand
side.
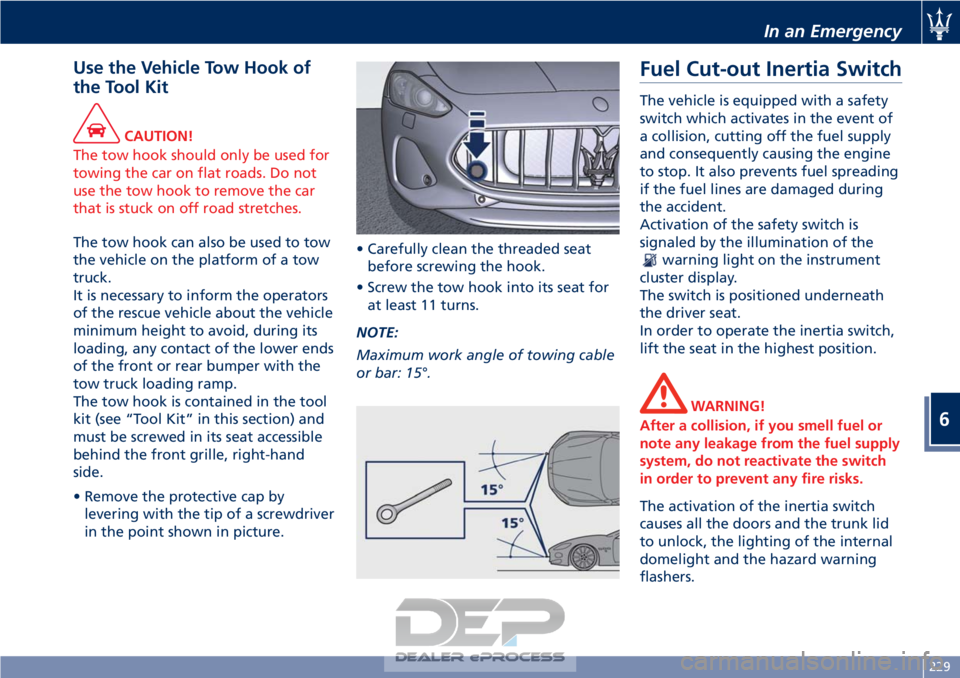
• Remove the protective cap by levering with the tip of a screwdriver
in the point shown in picture. • Carefully clean the threaded seat
before screwing the hook.
• Screw the tow hook into its seat for at least 11 turns.
NOTE:
Maximum work angle of towing cable
or bar: 15°.
Fuel Cut-out Inertia Switch
The vehicle is equipped with a safety
switch which activates in the event of
a collision, cutting off the fuel supply
and consequently causing the engine
to stop. It also prevents fuel spreading
if the fuel lines are damaged during
the accident.
Activation of the safety switch is
signaled by the illumination of the
warning light on the instrument
cluster display.
The switch is positioned underneath
the driver seat.
In order to operate the inertia switch,
lift the seat in the highest position.
WARNING!
After a collision, if you smell fuel or
note any leakage from the fuel supply
system, do not reactivate the switch
in order to prevent any fire risks.
The activation of the inertia switch
causes
all the doors and the trunk lid
to unlock, the lighting of the internal
domelight and the hazard warning
flashers.
In an Emergency
6
229
Page 239 of 296

Service coupons 1° 2° 3° 4° 5° 6° 7° 8° 9° 10° 11° 12°
Main operations Maintenance schedules: every 12500 mi (20000 km) or 2 years
Air injection system: connections and pipes
valves IIIIIIIIIIII
Blow-by system III II
Fuel emission control system: lines,
connections and valves III III
Automatic transmission oil level IIIIIIIIIIII
Differential oil level IIIIIIIIIIII
Hydraulic steering fluid level (bleed if
necessary) IIIIIIIIIIII
Replace at least every 2 years
Engine coolant level IIIIIIIIIIII
Replace at least every 2 years
Brake fluid level (bleed if necessary) IIIIIIIIIIII
Replace at least every 2 years
Brake system: lines, calipers, connections -
Efficiency of the dashboard warning lights
- Parking brake operation IIIIIIIIIIII
Wear condition of the braking parts
(rotors, pads); replace if necessary IIIIIIIIIIII
Joints for front and rear suspensions, front
and rear under-chassis – Tightening
torques IIIIIIIIIIII
Steering system components, joint
protection, rack trunks on the steering
levers and on the axle shafts IIIIIIIIIIII
Maintenance and Care
7
235
Page 242 of 296

you should perform the following
inspections more frequently than
recommended on the “Scheduled
Service Plan”:
• check front disc brake pad conditionsand wear;
• check cleanliness of hood and trunk locks, cleanliness and lubrication of
linkage;
• visually inspect conditions of: engine, transmission, pipes and hoses
(exhaust - fuel system - brakes) and
rubber elements (trunks - sleeves -
bushes - etc.);
• check battery charge;
• visually inspect condition of the accessory drive belts;
• check and, if necessary, change engine oil and replace oil filter;
• check and, if necessary, replace pollen filter of the A/C system;
• check and, if necessary, replace air cleaner filter.
CAUTION!
All maintenance operations for the
vehicle must be carried out by the
Authorized Maserati Dealer . For
routine and minor maintenance
operations which you can carry out yourself, make sure that you have the
necessary experience and always use
suitable equipment, original
Maserati
spare parts (or equivalent) and the
prescribed fluids. Shall this not be the
case, do not carry any operation on
your own and contact an Authorized
Maserati Dealer.
Onboard Diagnostic System
Your vehicle is equipped with a
sophisticated onboard diagnostic
system. This system monitors the
performance of the emissions, engine,
and automatic transmission control
systems. When these systems are
operating properly, your vehicle will
provide excellent performance and
fuel economy, as well as engine
emissions suited to current
government regulations.
If any of these systems require service,
the system will turn on the
Malfunction Indicator Light on the
instrument cluster display (refer to
“Instrument Cluster” in section
“Dashboard Instruments and
Controls”). The system stores as well
diagnostic codes and other
information to assist your service
technician by performing repairs. Although the vehicle will be driveable
and will not need towing, contact an
Authorized Maserati Dealer
for service
as soon as possible.
CAUTION!
• Prolonged driving with the
MIL
on could cause further damage to
the emissions control system. It could
also affect fuel economy and
drivability. The vehicle must be
serviced before any emissions tests
can be performed.
•Ifthe
MIL is flashing while the
engine is running, severe catalytic
converter damage and power loss
will soon occur. Immediate service at
the Authorized Maserati Dealer is
required.
Spare Parts
Use of genuine parts for normal or
scheduled maintenance and repairs is
highly recommended to ensure
excellent performance.
Damage or failures caused by
non-genuine spare parts used for
maintenance and repairs will not be
covered by the manufacturer's
warranty.
Maintenance and Care
7
238
Page 250 of 296
Always use washer fluid when using
the wipers to remove salt or dirt from
a dry windshield.
Avoid using the wiper blades to
remove frost or ice from the
windshield. Keep the blade rubber out
of contact with petroleum products
such as engine oil, gasoline, etc.
Spray nozzles
If the jet does not work, first check
that there is fluid in the pan (see
paragraph “Level checks” in this
section) then check that the nozzles
are not clogged.
Blades Replacement
• Move the right multifunction leverinto “OFF” position, (see chapter
“Windshield Wipers and Washers” in
section “Understanding the
Vehicle”).
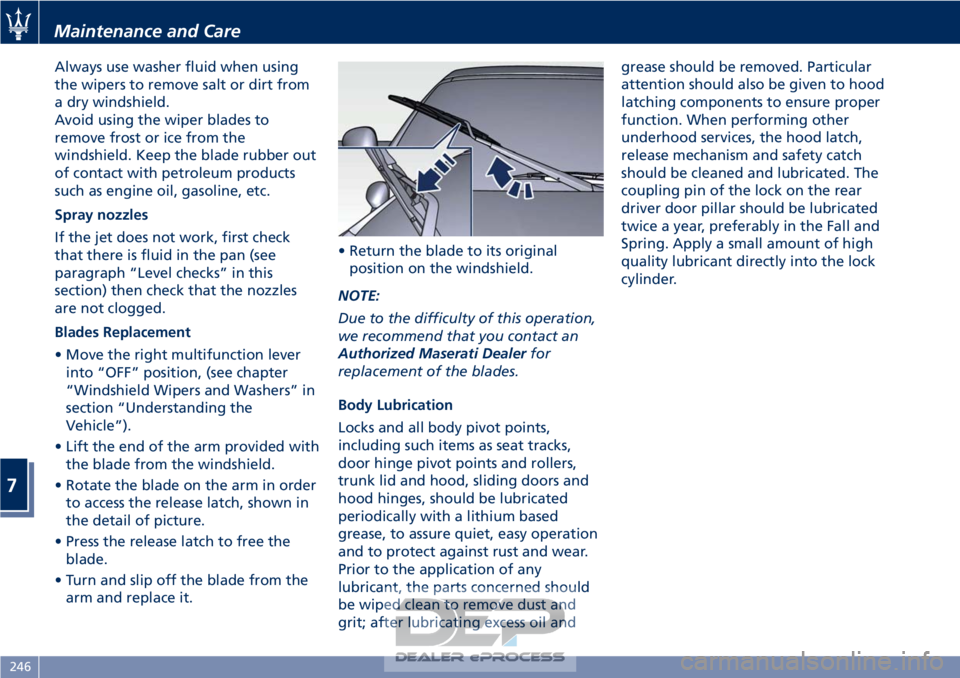
• Lift the end of the arm provided with the blade from the windshield.
• Rotate the blade on the arm in order to access the release latch, shown in
the detail of picture.
• Press the release latch to free the blade.
• Turn and slip off the blade from the arm and replace it. • Return the blade to its original
position on the windshield.
NOTE:
Due to the difficulty of this operation,
we recommend that you contact an
Authorized Maserati Dealer for
replacement of the blades.
Body Lubrication
Locks and all body pivot points,
including such items as seat tracks,
door hinge pivot points and rollers,
trunk lid and hood, sliding doors and
hood hinges, should be lubricated
periodically with a lithium based
grease, to assure quiet, easy operation
and to protect against rust and wear.
Prior to the application of any
lubricant, the parts concerned should
be wiped clean to remove dust and
grit; after lubricating excess oil and grease should be removed. Particular
attention should also be given to hood
latching components to ensure proper
function. When performing other
underhood services, the hood latch,
release mechanism and safety catch
should be cleaned and lubricated. The
coupling pin of the lock on the rear
driver door pillar should be lubricated
twice a year, preferably in the Fall and
Spring. Apply a small amount of high
quality lubricant directly into the lock
cylinder.
Maintenance and Care
7
246
Page 251 of 296
Maintenance-Free Battery
This vehicle is equipped with a sealed
type maintenance-free battery. You
will never have to add water, nor is
periodic maintenance required.
WARNING!
• Battery fluid is a corrosive acid
solution and can burn or damage
the eyes. Do not allow battery fluid
to contact your eyes, skin, or
clothing. Do not lean with the face
over a battery. If acid splashes in
eyes or on skin, flush the area
immediately with large amounts of
water.
• Battery gas is flammable and
explosive. Keep flame or sparks
away from the battery. Do not use a
booster battery or any other booster
source with an output greater than
12 Volts. Do not allow cable clamps
to touch each other.
• Battery posts, terminals, and related
accessories contain lead and lead
compounds. Wash hands after
handling the battery.
• The battery in this vehicle has a vent
hose that should not be
disconnected and should only be replaced with a component of the
same type (vented).
To Disconnect the Battery
The battery is fitted in the trunk
compartment.
To access the battery it is necessary to
remove the floor panel of the trunk
compartment and the inside covering
panel on the battery compartment as
already described in the chapter
"Auxiliary Jump-Start Procedure" in
section "In an Emergency".
WARNING!
California Proposition 65
Operating, servicing and maintaining
a passenger vehicle or off-road vehicle
can expose you to chemicals including
such as, engine exhaust, carbon
monoxide, phthalates and lead, that
which are know to the State of
California to cause cancer and birth
defects or other reproductive harm. To
minimize exposure, avoid breathing
exhaust, do not idle the engine except
as necessary, service your vehicle in a
well-ventilated area and wear gloves
or wash your hands frequently when
servicing your vehicle. For more
information go to: www.P65Warnings.ca.gov/passenger-
vehicle
CAUTION!
• Before disconnecting the battery, open the trunk lid and lower the
windows by about 1.6-2 in (4-5
centimeters), to avoid damaging the
seal when opening and closing the
door. When the battery is connected,
this operation is performed
automatically when the door is
opened and closed. The windows
must remain lowered until the
charged battery is reconnected.
• If you need to disconnect the battery, wait at least 30 seconds
from the last seat movement. If
disconnecting the battery before,
you will have to run the initialization
procedure described in the following
paragraph “To Reconnect the
Battery”.
• Never disconnect the battery from the electrical system when the
engine is running.
• To temporarily disconnect the vehicle electrical system from the battery,
simply remove the cable end with
Maintenance and Care
7
247
Page 252 of 296
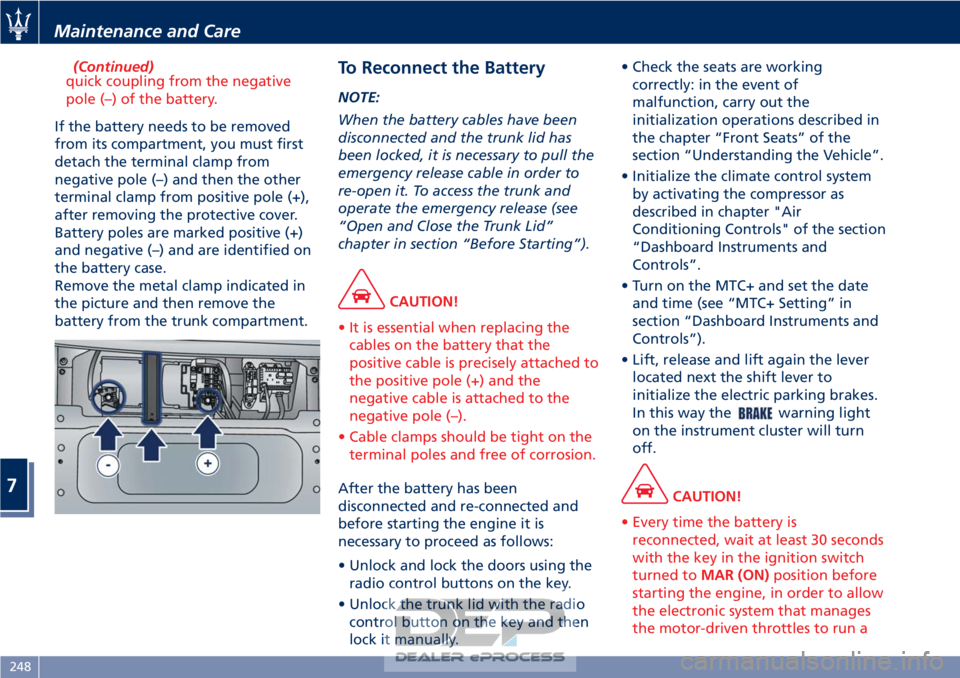
(Continued)
quick coupling from the negative
pole (–) of the battery.
If the battery needs to be removed
from
its compartment, you must first
detach the terminal clamp from
negative pole (–) and then the other
terminal clamp from positive pole (+),
after removing the protective cover.
Battery poles are marked positive (+)
and negative (–) and are identified on
the battery case.
Remove the metal clamp indicated in
the picture and then remove the
battery from the trunk compartment.
To Reconnect the Battery
NOTE:
When the battery cables have been
disconnected and the trunk lid has
been locked, it is necessary to pull the
emergency release cable in order to
re-open it. To access the trunk and
operate the emergency release (see
“Open and Close the Trunk Lid”
chapter in section “Before Starting”).
CAUTION!
• It is essential when replacing the cables on the battery that the
positive cable is precisely attached to
the positive pole (+) and the
negative cable is attached to the
negative pole (–).
• Cable clamps should be tight on the terminal poles and free of corrosion.
After the battery has been
disconnected
and re-connected and
before starting the engine it is
necessary to proceed as follows:
• Unlock and lock the doors using the radio control buttons on the key.
• Unlock the trunk lid with the radio control button on the key and then
lock it manually. • Check the seats are working
correctly: in the event of
malfunction, carry out the
initialization operations described in
the chapter “Front Seats” of the
section “Understanding the Vehicle”.
• Initialize the climate control system by activating the compressor as
described in chapter "Air
Conditioning Controls" of the section
“Dashboard Instruments and
Controls”.
• Turn on the MTC+ and set the date and time (see “MTC+ Setting” in
section “Dashboard Instruments and
Controls”).
• Lift, release and lift again the lever located next the shift lever to
initialize the electric parking brakes.
In this way the
warning light
on the instrument cluster will turn
off.
CAUTION!
• Every time the battery is reconnected, wait at least 30 seconds
with the key in the ignition switch
turned to MAR (ON) position before
starting the engine, in order to allow
the electronic system that manages
the motor-driven throttles to run a
Maintenance and Care
7
248
Page 254 of 296
(Continued)
flames are kept well away from the
battery while it is charging.
• Before using a charger to charge or
maintain the battery charge status,
carefully follow the instructions
provided to ensure the charger is
connected to the battery safely and
correctly.
It is possible to recharge the battery
without
disconnecting the cables of
the vehicle electrical system.
• To access the battery remove the floor panel from the trunk
compartment and remove the inside
covering panel on the battery
compartment as previously shown
(see “Auxiliary Jump-Start
Procedure” in section “In an
Emergency”).
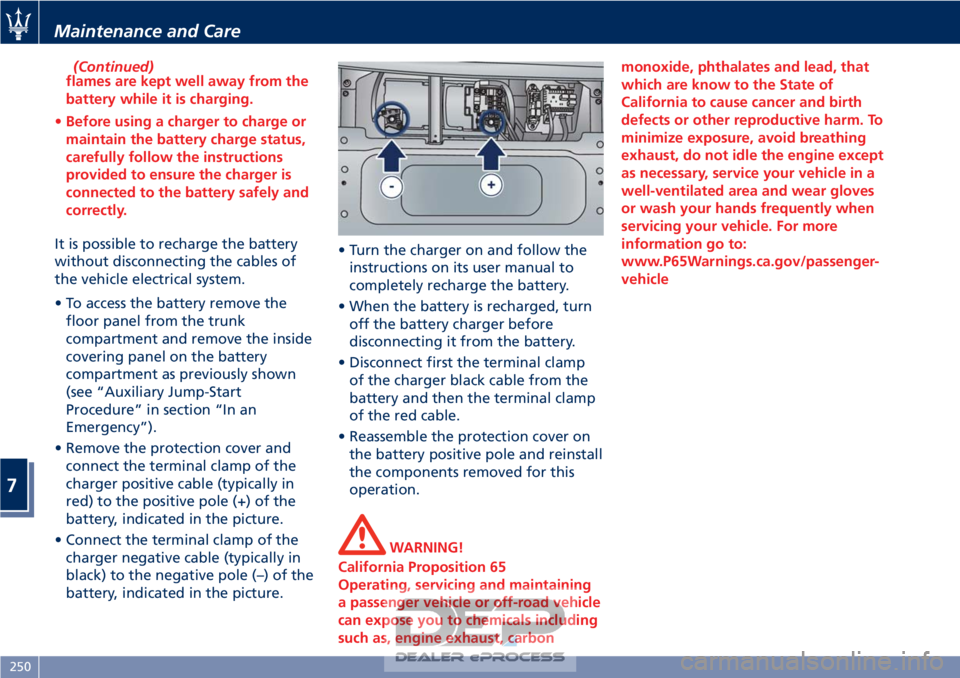
• Remove the protection cover and connect the terminal clamp of the
charger positive cable (typically in
red) to the positive pole (+) of the
battery, indicated in the picture.
• Connect the terminal clamp of the charger negative cable (typically in
black) to the negative pole (–) of the
battery, indicated in the picture. • Turn the charger on and follow the
instructions on its user manual to
completely recharge the battery.
• When the battery is recharged, turn off the battery charger before
disconnecting it from the battery.
• Disconnect first the terminal clamp of the charger black cable from the
battery and then the terminal clamp
of the red cable.
• Reassemble the protection cover on the battery positive pole and reinstall
the components removed for this
operation.
WARNING!
California Proposition 65
Operating, servicing and maintaining
a passenger vehicle or off-road vehicle
can expose you to chemicals including
such as, engine exhaust, carbon monoxide, phthalates and lead, that
which are know to the State of
California to cause cancer and birth
defects or other reproductive harm. To
minimize exposure, avoid breathing
exhaust, do not idle the engine except
as necessary, service your vehicle in a
well-ventilated area and wear gloves
or wash your hands frequently when
servicing your vehicle. For more
information go to:
www.P65Warnings.ca.gov/passenger-
vehicle
Maintenance and Care
7
250