2019 MASERATI GRANTURISMO CONVERTIBLE lock
[x] Cancel search: lockPage 103 of 296
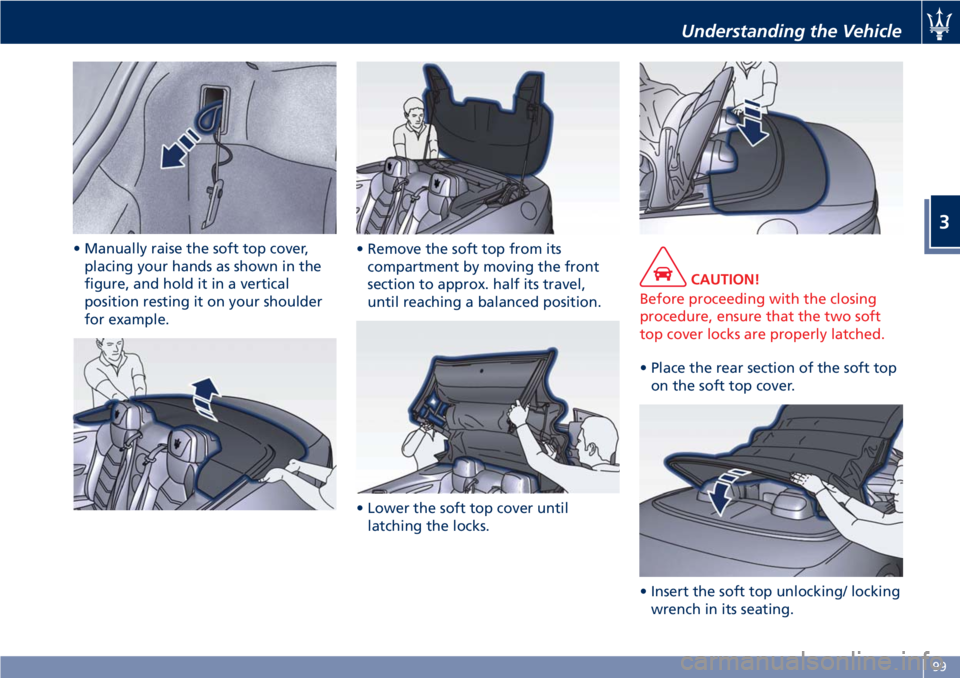
• Manually raise the soft top cover,
placing your hands as shown in the
figure, and hold it in a vertical
position resting it on your shoulder
for example. • Remove the soft top from its
compartment by moving the front
section to approx. half its travel,
until reaching a balanced position.
• Lower the soft top cover until
latching the locks. CAUTION!
Before proceeding with the closing
procedure, ensure that the two soft
top cover locks are properly latched.
• Place the rear section of the soft top
on
the soft top cover.
• Insert the soft top unlocking/ locking
wrench in its seating.Understanding the Vehicle
3
99
Page 104 of 296
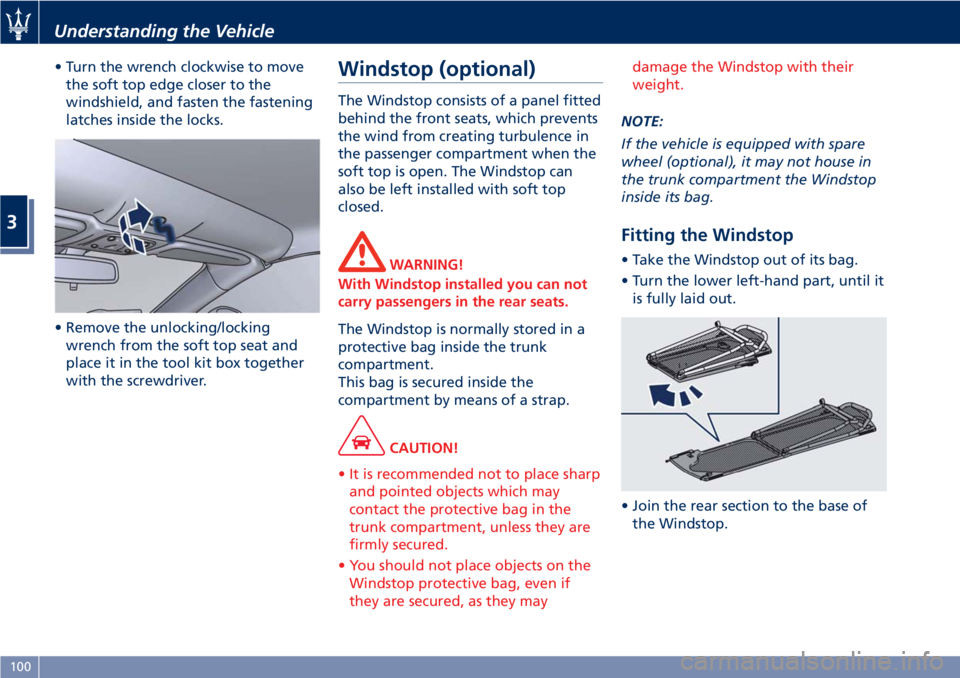
• Turn the wrench clockwise to move
the soft top edge closer to the
windshield, and fasten the fastening
latches inside the locks.
• Remove the unlocking/locking
wrench from the soft top seat and
place it in the tool kit box together
with the screwdriver. Windstop (optional) The Windstop consists of a panel fitted
behind the front seats, which prevents
the wind from creating turbulence in
the passenger compartment when the
soft top is open. The Windstop can
also be left installed with soft top
closed.
WARNING!
With Windstop installed you can not
carry passengers in the rear seats.
The Windstop is normally stored in a
protective
bag inside the trunk
compartment.
This bag is secured inside the
compartment by means of a strap.
CAUTION!
• It is recommended not to place sharp
and pointed objects which may
contact the protective bag in the
trunk compartment, unless they are
firmly secured.
• You should not place objects on the
Windstop protective bag, even if
they are secured, as they may damage the Windstop with their
weight.
NOTE:
If
the vehicle is equipped with spare
wheel (optional), it may not house in
the trunk compartment the Windstop
inside its bag.
Fitting the Windstop • Take the Windstop out of its bag.
• Turn the lower left-hand part, until it
is fully laid out.
• Join the rear section to the base of
the Windstop.Understanding the Vehicle
3
100
Page 106 of 296
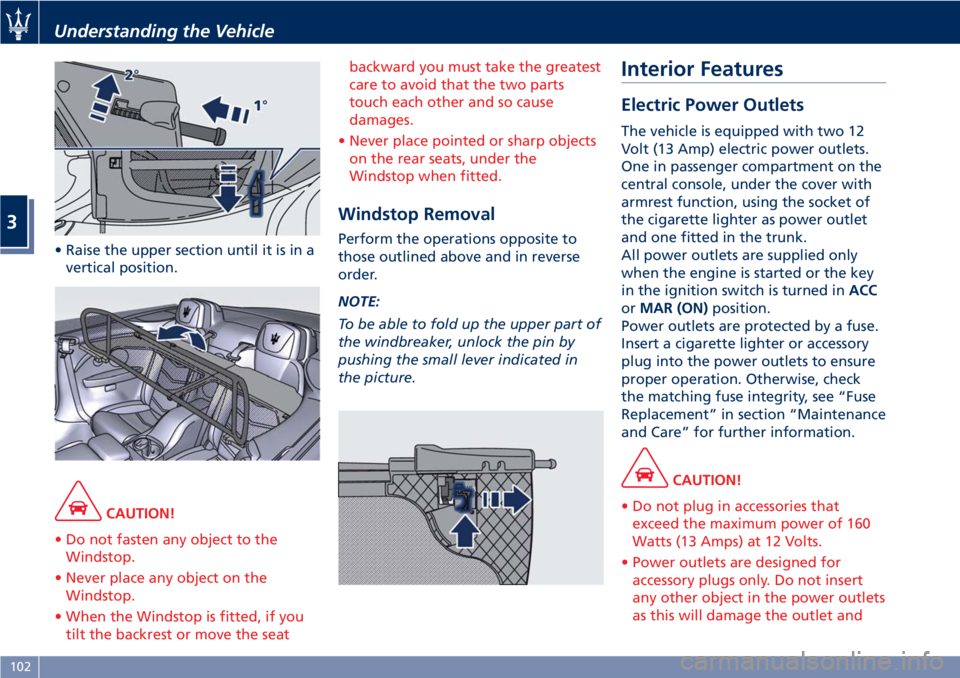
• Raise the upper section until it is in a
vertical position.
CAUTION!
• Do not fasten any object to the
Windstop.
• Never place any object on the
Windstop.
• When the Windstop is fitted, if you
tilt the backrest or move the seat backward you must take the greatest
care to avoid that the two parts
touch each other and so cause
damages.
• Never place pointed or sharp objects
on the rear seats, under the
Windstop when fitted.
Windstop Removal Perform the operations opposite to
those outlined above and in reverse
order.
NOTE:
To be able to fold up the upper part of
the windbreaker, unlock the pin by
pushing the small lever indicated in
the picture. Interior Features Electric Power Outlets The vehicle is equipped with two 12
Volt (13 Amp) electric power outlets.
One in passenger compartment on the
central console, under the cover with
armrest function, using the socket of
the cigarette lighter as power outlet
and one fitted in the trunk.
All power outlets are supplied only
when the engine is started or the key
in the ignition switch is turned in ACC
or MAR (ON) position.
Power outlets are protected by a fuse.
Insert a cigarette lighter or accessory
plug into the power outlets to ensure
proper operation. Otherwise, check
the matching fuse integrity, see “Fuse
Replacement” in section “Maintenance
and Care” for further information.
CAUTION!
• Do not plug in accessories that
exceed the maximum power of 160
Watts (13 Amps) at 12 Volts.
• Power outlets are designed for
accessory plugs only. Do not insert
any other object in the power outlets
as this will damage the outlet andUnderstanding the Vehicle
3
102
Page 121 of 296

4 – Dashboard Instruments and Controls Instrument Cluster ...................................... 118
Infotainment System .................................... 130
Audio Controls ......................................... 138
Audio System .......................................... 140
MTC+ “Controls” Screen ................................. 141
MTC+ Settings ......................................... 141
Glove Compartments .................................... 149
Analog Clock .......................................... 150
Air Conditioning Controls ................................ 151
Phone and Voice Controls on Steering Wheel ................. 155
117
Page 125 of 296
Left Turn Signal Indicator Light
The indicator lights up when
the left turn signals or the
hazard flashers are turned on.
The indicator light will flash at
the same frequency of the turn signals
and is controlled by the left
multifunction lever.
If the vehicle electronics sense that the
vehicle drives for more than 1 mile
(1.6 km) with either turn signal on, a
continuous sound will alert the driver
to turn the signal off.
If the indicator flashes at a rapid rate,
check for a defective exterior light
bulb.
Rear Fog Light Indicator
This indicator lights up when
the rear fog lights are
switched on.
Tire Pressure Monitoring Light (*)
This indicator light is
connected to the Tire Pressure
Monitoring System (TPMS).
Under normal conditions, the
warning light should illuminate when
the key in the ignition switch is in
MAR (ON) position and should go off
as soon as the engine is started.
If the warning light remains lit or
illuminates while driving, the pressure of one or more tires is too low: the
related message will be displayed.
If the warning light flashes prior to
remain on, it indicates that the system
is temporarily unavailable.
This warning light illuminates even
when you calibrate the TPMS and
remains lit until the system is
calibrated.
Please refer to “Tire Pressure
Monitoring System (TPMS)” in section
“Driving” for further information.
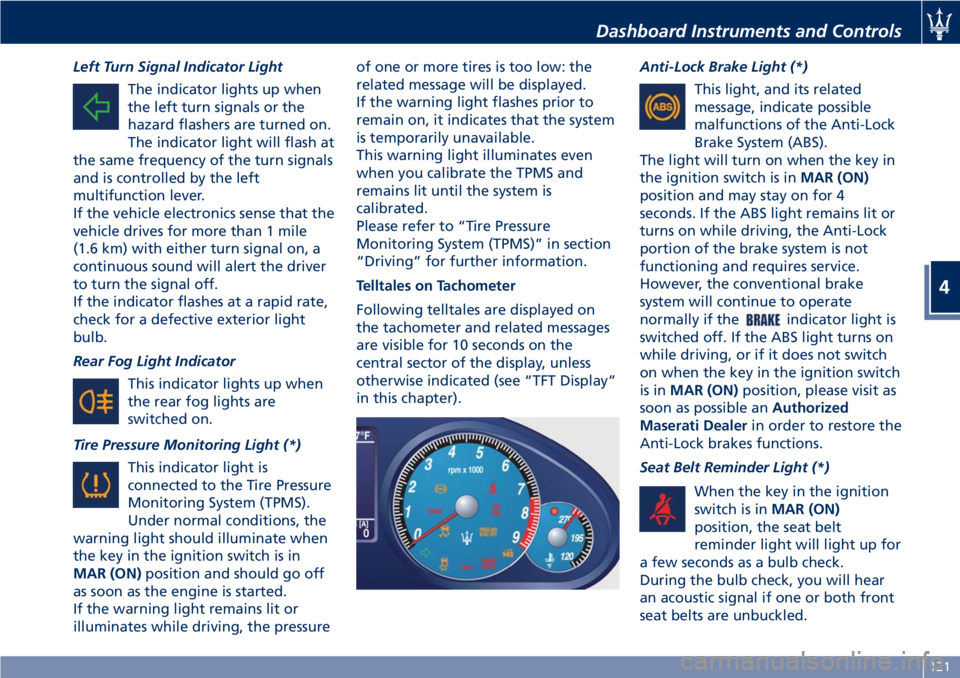
Telltales on Tachometer
Following telltales are displayed on
the tachometer and related messages
are visible for 10 seconds on the
central sector of the display, unless
otherwise indicated (see “TFT Display”
in this chapter). Anti-Lock Brake Light (*)
This light, and its related
message, indicate possible
malfunctions of the Anti-Lock
Brake System (ABS).
The light will turn on when the key in
the ignition switch is in MAR (ON)
position and may stay on for 4
seconds. If the ABS light remains lit or
turns on while driving, the Anti-Lock
portion of the brake system is not
functioning and requires service.
However, the conventional brake
system will continue to operate
normally if the
indicator light is
switched off. If the ABS light turns on
while driving, or if it does not switch
on when the key in the ignition switch
is in MAR (ON) position, please visit as
soon as possible an Authorized
Maserati Dealer in order to restore the
Anti-Lock brakes functions.
Seat Belt Reminder Light (*)
When the key in the ignition
switch is in MAR (ON)
position, the seat belt
reminder light will light up for
a few seconds as a bulb check.
During the bulb check, you will hear
an acoustic signal if one or both front
seat belts are unbuckled.Dashboard Instruments and Controls
4
121
Page 126 of 296
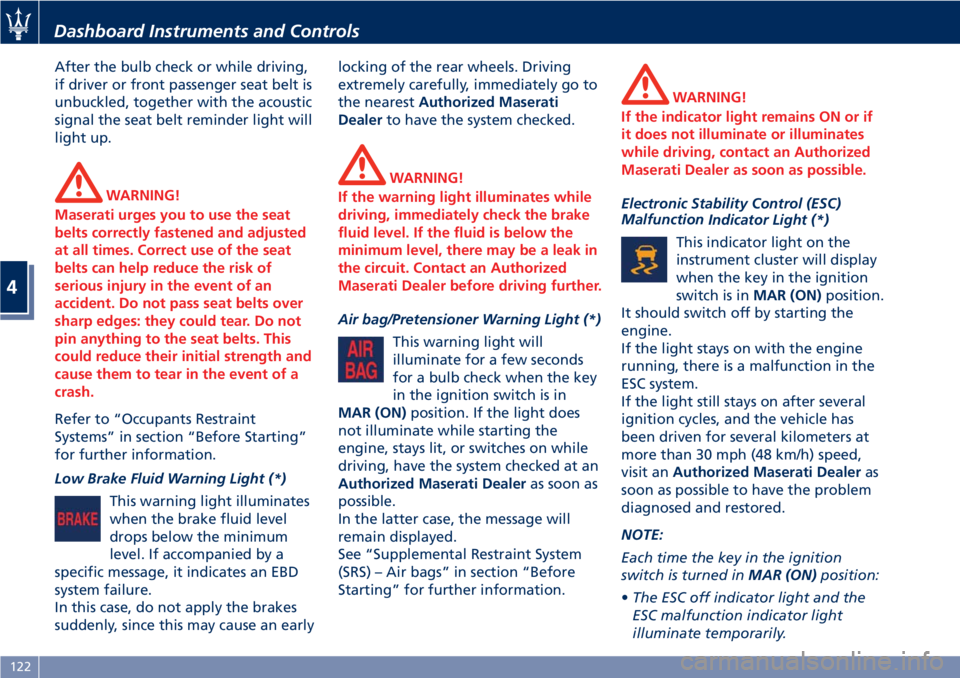
After the bulb check or while driving,
if driver or front passenger seat belt is
unbuckled, together with the acoustic
signal the seat belt reminder light will
light up.
WARNING!
Maserati urges you to use the seat
belts correctly fastened and adjusted
at all times. Correct use of the seat
belts can help reduce the risk of
serious injury in the event of an
accident. Do not pass seat belts over
sharp edges: they could tear. Do not
pin anything to the seat belts. This
could reduce their initial strength and
cause them to tear in the event of a
crash.
Refer to “Occupants Restraint
Systems”
in section “Before Starting”
for further information.
Low Brake Fluid Warning Light (*)
This warning light illuminates
when the brake fluid level
drops below the minimum
level. If accompanied by a
specific message, it indicates an EBD
system failure.
In this case, do not apply the brakes
suddenly, since this may cause an early locking of the rear wheels. Driving
extremely carefully, immediately go to
the nearest Authorized Maserati
Dealer to have the system checked.
WARNING!
If the warning light illuminates while
driving, immediately check the brake
fluid level. If the fluid is below the
minimum level, there may be a leak in
the circuit. Contact an Authorized
Maserati Dealer before driving further.
Air bag/Pretensioner Warning Light (*)
This
warning light will
illuminate for a few seconds
for a bulb check when the key
in the ignition switch is in
MAR (ON) position. If the light does
not illuminate while starting the
engine, stays lit, or switches on while
driving, have the system checked at an
Authorized Maserati Dealer as soon as
possible.
In the latter case, the message will
remain displayed.
See “Supplemental Restraint System
(SRS) – Air bags” in section “Before
Starting” for further information. WARNING!
If the indicator light remains ON or if
it does not illuminate or illuminates
while driving, contact an Authorized
Maserati Dealer as soon as possible.
Electronic Stability Control (ESC)
Malfunction
Indicator Light (*)
This indicator light on the
instrument cluster will display
when the key in the ignition
switch is in MAR (ON) position.
It should switch off by starting the
engine.
If the light stays on with the engine
running, there is a malfunction in the
ESC system.
If the light still stays on after several
ignition cycles, and the vehicle has
been driven for several kilometers at
more than 30 mph (48 km/h) speed,
visit an Authorized Maserati Dealer as
soon as possible to have the problem
diagnosed and restored.
NOTE:
Each time the key in the ignition
switch is turned in MAR (ON) position:
• The ESC off indicator light and the
ESC malfunction indicator light
illuminate temporarily.Dashboard Instruments and Controls
4
122
Page 133 of 296

Adaptive Light Control System Failure
Warning Light
This warning light, and the
related message, indicate a
failure of the automatic
headlight aiming system.
Please contact an Authorized Maserati
Dealer to check the system.
ASR System Failure Warning Light
This warning light indicates
the deactivation or failure of
the ASR system.
In the event of a failure,
contact an Authorized Maserati
Dealer .
Rain Sensor Failure Warning Light
This warning light indicates
that the rain sensor of the
windshield wiper system is
faulty.
Please contact an Authorized Maserati
Dealer to check the system.
Park Assist Sensor Failure Warning
Light
This warning light indicates
that the sensor of the park
assist system is faulty.
Please contact an Authorized
Maserati Dealer to check the system. Suspensions Failure Warning Light
This warning light and the
related message turn on while
driving if there is a failure of
the suspension system.
Please contact an Authorized Maserati
Dealer to check the system.
Ice Hazard Indicator
When the external
temperature falls below 3°C
(38°F), the temperature value
blinks for a few seconds, the
warning light turns on and a message
is displayed to warn the driver of the
risk of icy roadbed.
Under such conditions, we recommend
using the ICE drive mode (see
“Automatic Transmission” in section
“Driving”) drive carefully and slow
down as the grip of the tires may be
significantly reduced.
The warning light switches off when
the temperature reaches 6°C (43°F) or
higher.
EPB Automatic Operation Disabled
Warning Light
This warning light and related
message illuminate when the
EPB automatic activation/
deactivation function is
disabled. The failure could also completely or
partially block the vehicle because the
parking brake could remain on even
after it has been automatically or
manually disengaged though its
controls.
If it is still possible to use the vehicle
(parking brake not engaged) drive to
the nearest Authorized Maserati
Dealer and remember to perform each
operation/command during which the
electric parking brake does not work.
Seat Heating Indicator
It indicates that the heating
function is activated on one or
more seats.
Maintenance Schedule Indicator
Depending on the
accompanying message, this
indicates that service schedule
deadlines are either
approaching or due.
Upon reaching a deadline, contact an
Authorized Maserati Dealer .
Cruise Control (CC) set indicator
This green light indicator will
illuminate when the CC is set.
For further information, check
“Electronic Cruise Control” in
section “Driving”.Dashboard Instruments and Controls
4
129
Page 136 of 296

Manual Controls and Devices SD, AUX and USB Ports
When an SD card is inserted into its
housing, the MTC+ is able to read it
and select multimedia files (music and
images) from the device.
By using the AUX and USB (full) inputs
it is possible to connect external
devices to the MTC+ (see chapter
“Interior features” in section
“Understanding the Vehicle”).
After connecting the device, by using
the MTC+ display softkeys, knobs on
the central console and controls at the
steering wheel, user can navigate
through the content of the connected
device and set its playing mode.
Multimedia Navigation Controls on
Central Console
The manual controls located on the
central console are a further interface
for the driver and nearby passenger,
that adds to the MTC+ display
softkeys. Using the manual controls,
the MTC+ display will work as a
graphic display of the inputs from the
controls.
Volume Control
By working this knob in “Radio”,
“SiriusXM Satellite Radio” (if available)
or “Media” mode, user can adjust the volume of the radio or audio files,
from minimum to maximum and vice
versa. Turn knob clockwise to increase
the volume, anti-clockwise to decrease
it. The volume status will be indicated
in the top part of the MTC+ display.
Tune/Scroll Control
By working this knob in “Radio”,
“SiriusXM Satellite Radio” (if available)
or “Media” mode, user can shift
through the radio stations/channels or
scroll the tracks inside connected
external devices and confirm the
selection by pressing enter button.
In any other mode of the MTC+, use
this knob to scroll the list of available
options or to manage the cursor
movement in the lower bar of the
main menus. Then press enter button
to confirm the function or setting
highlighted on MTC+ display. Browse/Mute Button
After selecting a function, using the
tune/scroll knob or softkeys on MTC+
display, press this button to see the
detail of the items/options of the
selected function. This button is also
used as short cut to display the phone
book, when the “Phone” menu is
selected, or the favorites when the
“Nav (Navigation)” menu is selected.
Press and hold this button for 2-3
seconds to mute the volume of the
radio or media files.
The volume mute status will be
indicated in the top part of the MTC+
display.
Back Button
Press this button to go back to
previous menu or previous screen.
Press this button to shift the
navigation one level backward on
MTC+ screen. If it is pressed and heldDashboard Instruments and Controls
4
132