2019 MASERATI GRANTURISMO CONVERTIBLE lock
[x] Cancel search: lockPage 47 of 296
under “Child Restraint Systems” in this
section.
When the passenger seating position
with ALR is being used for normal
usage, only pull the belt out far
enough to comfortably wrap around
the occupant so as to not activate the
ALR. If the ALR is activated, you will
hear a ratcheting sound as the belt
retracts. In this case, allow the belt to
retract completely and then carefully
pull out only the amount of belt
necessary to comfortably wrap around
the seat occupant.
Slide the latch plate into the buckle
until you hear a "click".
WARNING!
• Remember that, in the event of a
violent impact, the passengers in the
rear seats that are not wearing the
seat belts are not only subject to
personal injury but they also
represent a danger for passengers
sitting in the front seats.
• Always fasten the seat belts.
• Traveling without the seat belts
fastened significantly increases the
risk of serious injury in the event of
a collision, even with the air bags. • In the event of a collision, the seat
belts help reduce the possibility of
the vehicle’s occupants being
thrown against the structures of the
passenger compartment or out of
the vehicle.
• The air bags are designed to work
together with the seat belts, not to
substitute them. The front air bags
only deploy in the event of certain
head-on collisions of sufficient
intensity. They may not be activated
if the vehicle rolls over, or in the
event of rear bumps or minor frontal
collisions, or non-frontal collisions.
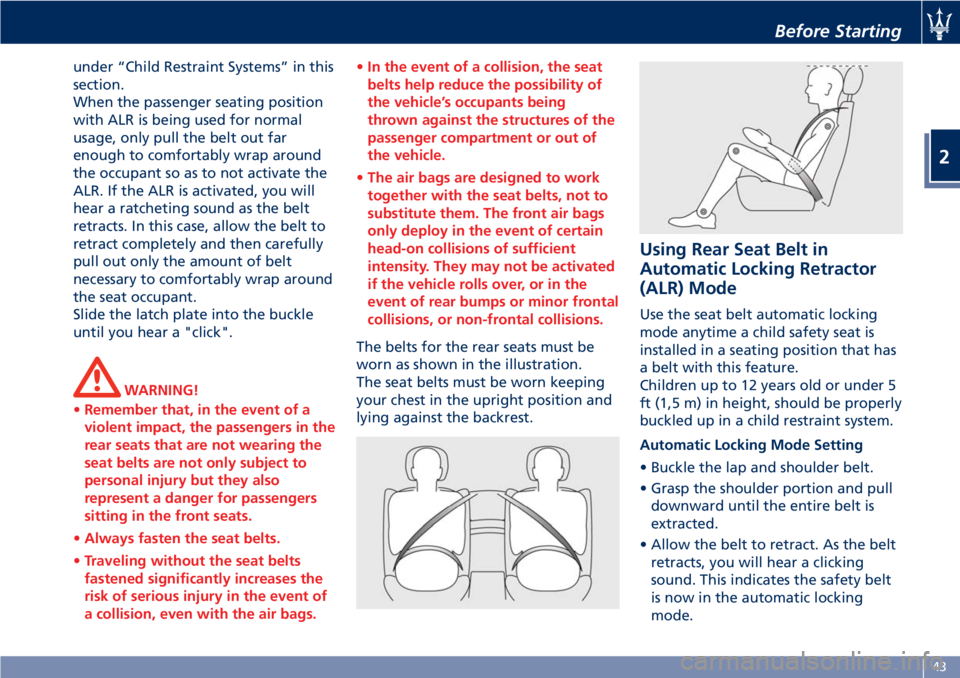
The belts for the rear seats must be
worn
as shown in the illustration.
The seat belts must be worn keeping
your chest in the upright position and
lying against the backrest. Using Rear Seat Belt in
Automatic Locking Retractor
(ALR) Mode Use the seat belt automatic locking
mode anytime a child safety seat is
installed in a seating position that has
a belt with this feature.
Children up to 12 years old or under 5
ft (1,5 m) in height, should be properly
buckled up in a child restraint system.
Automatic Locking Mode Setting
• Buckle the lap and shoulder belt.
• Grasp the shoulder portion and pull
downward until the entire belt is
extracted.
• Allow the belt to retract. As the belt
retracts, you will hear a clicking
sound. This indicates the safety belt
is now in the automatic locking
mode.Before Starting
2
43
Page 48 of 296

Automatic Locking Mode Unsetting
Unbuckle the three point seat belt and
allow it to retract completely to
disengage the automatic locking mode
and activate the vehicle emergency
locking mode.
WARNING!
• The belt and retractor assembly must
be checked by an Authorized
Maserati Dealer and must be
replaced if the Automatic Locking
Retractor (ALR) feature or any other
seat belt function is not working
properly.
• Failure to replace the belt and
retractor assembly could increase the
risk of injury in collisions.
Seat Belt Pretensioners To further enhance the seat belt
efficiency, the vehicle front seat belts
are equipped with ETD (Emergency
Tensioning Device) pretensioners.
These devices “detect”, by means of a
sensor, that a violent crash is occurring
and retract the belts by a few
centimeters. This ensures that the belt
properly adheres to the occupants’ bodies before its restraining action
starts.
The seat belt locking indicates that the
device has activated; a small amount
of smoke may be released. The smoke
is not toxic and does not indicate the
presence of a fire.
The pretensioners are activated in the
event of an impact of a certain
severity.
The pretensioner only activates when
the seat belt is fastened.
After a pretensioner activation, the
seat belt can be unfastened as usual,
by pressing the button on the buckle.
The pretensioner does not require any
maintenance or lubrication.
Any change to its original condition
invalidates its efficiency. If, in the
event of exceptional natural events
(e.g. floods, heavy storms, etc.), the
device has been in contact with water
and sludge, it is mandatory to replace
it.
To help ensure the best protection
from the pretensioners, wear the belt
in such a way that it fits snugly against
your chest and pelvis.
WARNING!
• The pretensioners can be deployed
only once and activate only when the seat belts are fastened. After
activation, contact an Authorized
Maserati Dealer to have the
pretensioners replaced and for
properly discarding the old
components.
• Do not tamper with the pretensioner
components. Any operation must be
performed only by qualified and
authorized personnel. Always
contact an Authorized Maserati
Dealer.
CAUTION!
Work on the vehicle which involves,
vibrations or localized heating (over
212°F/100°C for 6 hours max.) in the
area of the pretensioners may damage
or activate them: vibrations due to
uneven road surfaces or small
obstacles, such as impacts with curbs,
do not affect the units. Please contact
an Authorized Maserati Dealer if any
interventions must be carried out.
Load Limiting Devices
To enhance passive safety, the front
seat belt retractors are equipped with
load limiting devices which control the
seat belt reeling out so as to adjust theBefore Starting
2
44
Page 57 of 296

• how far (if at all) the driver was
depressing the accelerator and/or
brake pedal; and
• how fast the vehicle was traveling.
These data can help provide a better
understanding of the circumstances in
which crashes and injuries occur.
NOTE:
EDR data are recorded by your vehicle
only if a non-trivial crash situation
occurs; no data are recorded by the
EDR under normal driving conditions
and no personal data (e.g., name,
gender, age, and crash location) are
recorded. However, other parties, such
as law enforcement, could combine
the EDR data with the type of
personally identifying data routinely
acquired during a crash investigation.
To read data recorded by an EDR,
special equipment is required, and
access to the vehicle or the EDR is
needed.
In addition to the vehicle
manufacturer, other parties, such as
law enforcement, that have the
special equipment, can read the
information if they have access to
vehicle or the EDR. Active Roll Bars The active roll bars that equip the
vehicle have been designed for
protecting passengers in the event of
a vehicle rollover.
They are fitted behind the rear seat
headrests, usually in a hidden position,
and are activated by a specific ECU
which, only in the case of high-severity
rollover, deploys them in a few tenths
of a second. A cross member then
locks them in this position.
The roll bars have been designed in
such a way that they can be fully
deployed also with the soft top closed.
This is ensured by a device which
breaks the rear window when it comes
in contact with it.
In combination with the windshield
outer frame, they help creating an
anti-intrusion safety cell. In addition to being deployed in the
case of rollovers around the vehicle
longitudinal axis (as shown in the
figure) the active roll bars activate as a
precautionary measure in the event of
sufficiently severe side and rear
collisions, and in all cases where the
battery might be disconnected. They
do not activate in the event of
spinning.
WARNING!
• The active roll bars do not prevent
the risk of the occupants being
thrown out of the vehicle or hitting
against its internal structures. Only
the seat belts are designed for these
purposes and must always be
properly fastened when traveling.
(Continued)Before Starting
2
53
Page 61 of 296
Installing Child Restraint
Systems using the Vehicle Seat
Belt equipped with ALR All the passenger seat belts are
equipped with an Automatic Locking
Retractor (ALR) to secure child
protection through a Child Restraint
System (CRS). These types of seat belts
are designed to keep the lap portion
of the seat belt tight around the child
restraint seat avoiding to use a locking
clip.
The ALR will make a ratcheting noise
if the entire belt is pulled out of the
retractor in order to enable the belt to
retract subsequently. For additional
information on ALR, see “Using Seat
Belt in Automatic Locking Retractor
(ALR) Mode” in “Occupants Restraint
Systems” in this section.
To install a Child Restraint System with
ALR, pull enough of the belt out of
the retractor leading it through the
belt path of the protection device.
Slide the latch into the buckle until it
clicks, then remove the entire safety
belt from the retractor in order to
rewound. While rewinding a click will
indicate the safety belt is now in
Automatic Locking mode.
Exert then a traction on the exceeded
lap section of the belt in order to tighten it around the child restraint
seat. All seat belts will loosen over
time, it is therefore necessary to check
them periodically and set them
properly.
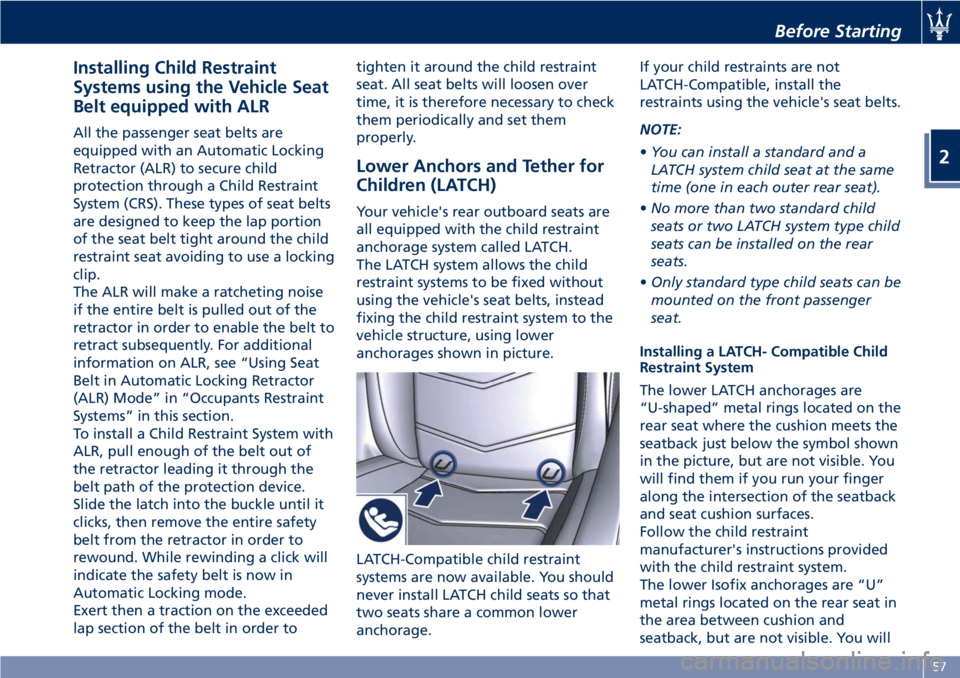
Lower Anchors and Tether for
Children (LATCH) Your vehicle's rear outboard seats are
all equipped with the child restraint
anchorage system called LATCH.
The LATCH system allows the child
restraint systems to be fixed without
using the vehicle's seat belts, instead
fixing the child restraint system to the
vehicle structure, using lower
anchorages shown in picture.
LATCH-Compatible child restraint
systems are now available. You should
never install LATCH child seats so that
two seats share a common lower
anchorage. If your child restraints are not
LATCH-Compatible, install the
restraints using the vehicle's seat belts.
NOTE:
• You can install a standard and a
LATCH system child seat at the same
time (one in each outer rear seat).
• No more than two standard child
seats or two LATCH system type child
seats can be installed on the rear
seats.
• Only standard type child seats can be
mounted on the front passenger
seat.
Installing a LATCH- Compatible Child
Restraint System
The lower LATCH anchorages are
“U-shaped” metal rings located on the
rear seat where the cushion meets the
seatback just below the symbol shown
in the picture, but are not visible. You
will find them if you run your finger
along the intersection of the seatback
and seat cushion surfaces.
Follow the child restraint
manufacturer's instructions provided
with the child restraint system.
The lower Isofix anchorages are “U”
metal rings located on the rear seat in
the area between cushion and
seatback, but are not visible. You willBefore Starting
2
57
Page 62 of 296
easily feel them if you run your finger
along the intersection of the seatback
and seat cushion surfaces.
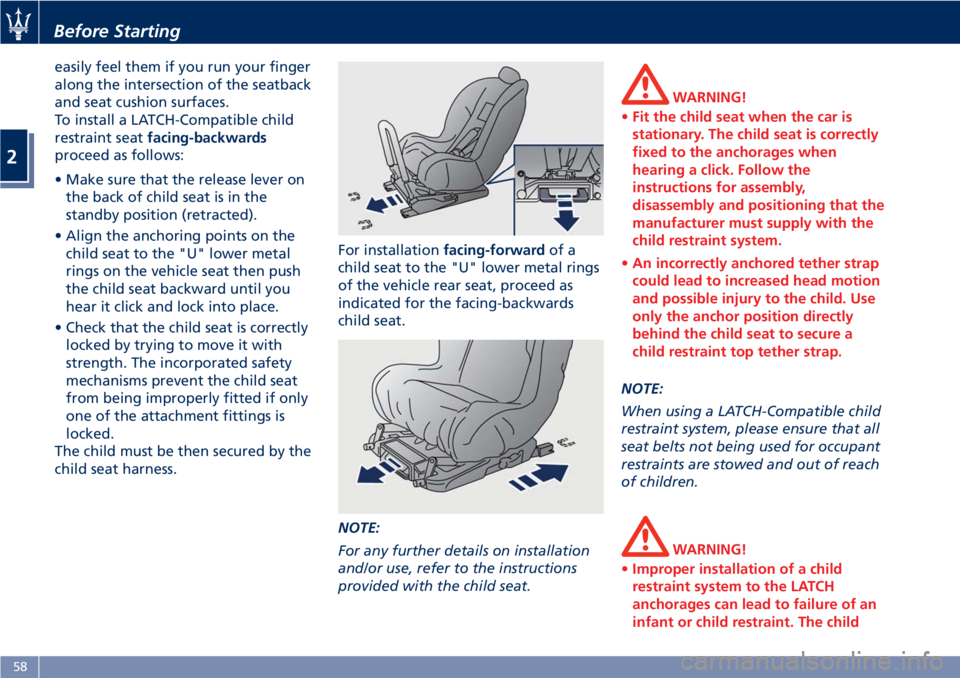
To install a LATCH-Compatible child
restraint seat facing-backwards
proceed as follows:
• Make sure that the release lever on
the back of child seat is in the
standby position (retracted).
• Align the anchoring points on the
child seat to the "U" lower metal
rings on the vehicle seat then push
the child seat backward until you
hear it click and lock into place.
• Check that the child seat is correctly
locked by trying to move it with
strength. The incorporated safety
mechanisms prevent the child seat
from being improperly fitted if only
one of the attachment fittings is
locked.
The child must be then secured by the
child seat harness. For installation facing-forward of a
child seat to the "U" lower metal rings
of the vehicle rear seat, proceed as
indicated for the facing-backwards
child seat.
NOTE:
For any further details on installation
and/or use, refer to the instructions
provided with the child seat. WARNING!
• Fit the child seat when the car is
stationary. The child seat is correctly
fixed to the anchorages when
hearing a click. Follow the
instructions for assembly,
disassembly and positioning that the
manufacturer must supply with the
child restraint system.
• An incorrectly anchored tether strap
could lead to increased head motion
and possible injury to the child. Use
only the anchor position directly
behind the child seat to secure a
child restraint top tether strap.
NOTE:
When
using a LATCH-Compatible child
restraint system, please ensure that all
seat belts not being used for occupant
restraints are stowed and out of reach
of children.
WARNING!
• Improper installation of a child
restraint system to the LATCH
anchorages can lead to failure of an
infant or child restraint. The childBefore Starting
2
58
Page 71 of 296
• Mounting posts must be properly
installed, if not equipped from the
factory. Failure to properly follow
floor mat installation or mounting
can cause interference with the
brake pedal and accelerator pedal
operation causing loss of control of
the vehicle.
Tires
•
Examine tires for excessive tread
wear and uneven wear patterns.
• Check for stones, nails, glass, or
other objects lodged in the tread or
sidewall.
• Inspect the tread for cuts and cracks.
• Inspect sidewalls for cuts, cracks and
bulges.
• Check the wheel nuts for tightness.
• Check the tires (see “Tire Inflation
Pressure” chapter in section
“Features and Specifications”) for
proper cold inflation pressure.
Lights and Indicator Lights
• Have someone observe the
operation of exterior lights while
you operate the controls (see
“Lights” chapter in section
“Understanding the Vehicle”).
• Check turn signal and high beam
indicator lights on the instrument cluster (see “Instrument Cluster”
chapter in section “Dashboard
Instruments and Controls”).
Door Latches
• Check for positive closing, latching,
and locking of doors and trunk lid
(see chapter “Doors” and “Open and
Close the Trunk Lid” in this section).
Fluid Leaks
• Check area under vehicle after
overnight parking for recent fluid
leaks (oil, fuel, etc.).
• If gasoline fumes are detected or
fluid leaks are suspected, contact an
Authorized Maserati Dealer .
WARNING!
California Proposition 65
Operating, servicing and maintaining
a passenger vehicle or off-road vehicle
can expose you to chemicals including
such as, engine exhaust, carbon
monoxide, phthalates and lead, that
which are know to the State of
California to cause cancer and birth
defects or other reproductive harm. To
minimize exposure, avoid breathing
exhaust, do not idle the engine except
as necessary, service your vehicle in a
well-ventilated area and wear gloves or wash your hands frequently when
servicing your vehicle. For more
information go to:
www.P65Warnings.ca.gov/passenger-
vehicle
Before Starting
2
67
Page 75 of 296

1 Adjustable side air vents.
2 Hood lid opening lever.
3 Headlight and fog light switch.
4 "Mode" and adjust "+" and
"–" buttons.
5 Front parking sensors
disabling/enabling.
6 Trunk lid opening button.
7 Fuel tank door opening button
(see "Refueling" in section
"Driving" for operation).
8 Multifunction lever (Cruise
Control, turn signals, headlight
washer and headlight
selection).
9 Lower gearshift paddle
"DOWN".
10 Instrument cluster.
11 Steering wheel height and
depth adjustment lever.
12 Upper air vent.
13 Sun radiation sensor.
14 Horn control.
15 Multimedia controls repeated
on the steering wheel.
16 Windshield/headlight
wiper/washer control lever. 17 Upper gearshift paddle "UP".
18 Ignition switch.
19 Clock.
20 Central adjustable air vents.
21 MTC+ display.
22 Glove compartment.
23 Side window vents.
Front Dome Console
Components
1 Reading lights control button.
2 Central light control button.
3 Reading lights.
4 Central light. 5 Anti-lift and anti-intrusion
alarm system deactivation
button.
6 Paired phone hands-free
microphone.Understanding the Vehicle
3
71
Page 76 of 296
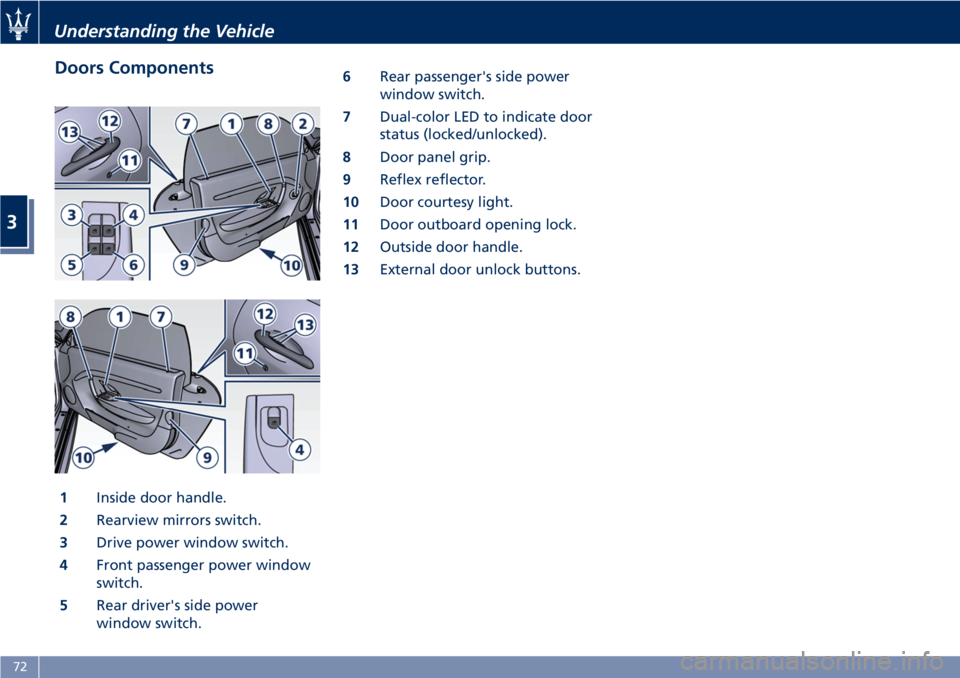
Doors Components
1 Inside door handle.
2 Rearview mirrors switch.
3 Drive power window switch.
4 Front passenger power window
switch.
5 Rear driver's side power
window switch. 6 Rear passenger's side power
window switch.
7 Dual-color LED to indicate door
status (locked/unlocked).
8 Door panel grip.
9 Reflex reflector.
10 Door courtesy light.
11 Door outboard opening lock.
12 Outside door handle.
13 External door unlock buttons.Understanding the Vehicle
3
72