Page 293 of 627

REPORTING SAFETY DEFECTS
(U.S. ONLY)
If you believe that your vehicle has a
defect which could cause a crash or
could cause injury or death, you should
immediately inform the National
Highway Traffic Safety Administration
(NHTSA) in addition to notifying Ford
Motor Company.
If NHTSA receives similar complaints, it
may open an investigation, and if it finds
that a safety defect exists in a group of
vehicles, it may order a recall and
remedy campaign. However, NHTSA
cannot become involved in individual
problems between you, your dealer, or
Ford Motor Company.
To contact NHTSA, you may call the
Vehicle Safety Hotline toll-free at
1-888-327-4236 (TTY: 1-800-424-9153);
go to http://www.safercar.gov; or write
to:
Administrator1200 New Jersey Avenue, Southeast
Washington, D.C. 20590
You can also obtain other information
about motor vehicle safety from
http://www.safercar.gov.
REPORTING SAFETY DEFECTS
(CANADA ONLY)
If you believe that your vehicle has a defect
which could cause a crash or could cause
injury or death, you should immediately
inform Transport Canada and Ford of
Canada. Transport Canada Contact Information
http://www.tc.gc.ca/eng/motorvehiclesafety/reporting-defects-motor-vehicles.html (Englis\
h)
Website
http://www.tc.gc.ca/fra/securiteautomobile/signaler-defauts-vehicules-automobiles.html (\
French)
Website
1–800–333–0510
Phone
290
Continental (CPL) Canada/United States of America, enUSA, Edition date: 201807, Second-Printing Customer Assistance
Page 306 of 627
Protected Component
Fuse Rating
Fuse or Relay Number
Not used.
—
1
Driver seat switch.
7.5A 1
2
Passenger seat switch.
Driver unlock relay.
20A 1
3
Not used (spare).
5A 1
4
Subwoofer amplifier.
20A 1
5
Revel digital signal processing amplifier.
Not used.
—
6
Not used.
—
7
Security horn.
10A 1
8
Not used.
10A 1
9
Telematics module.
5A 2
10
Power decklid module.
Keypad.
5A 2
11
Outside lock switch.
Combined security sensor module.
303
Continental (CPL) Canada/United States of America, enUSA, Edition date: 201807, Second-Printing Fuses
Page 333 of 627

For turbocharged equipped vehicles: When
servicing the air cleaner, it is important that
no foreign material enter the air induction
system. The engine and turbocharger are
susceptible to damage from even small
particles.
Change the air filter element at the proper
interval. See Scheduled Maintenance (page
528).
Note: Failure to use the correct air filter
element may result in severe engine
damage. The customer warranty may be
void for any damage to the engine if the
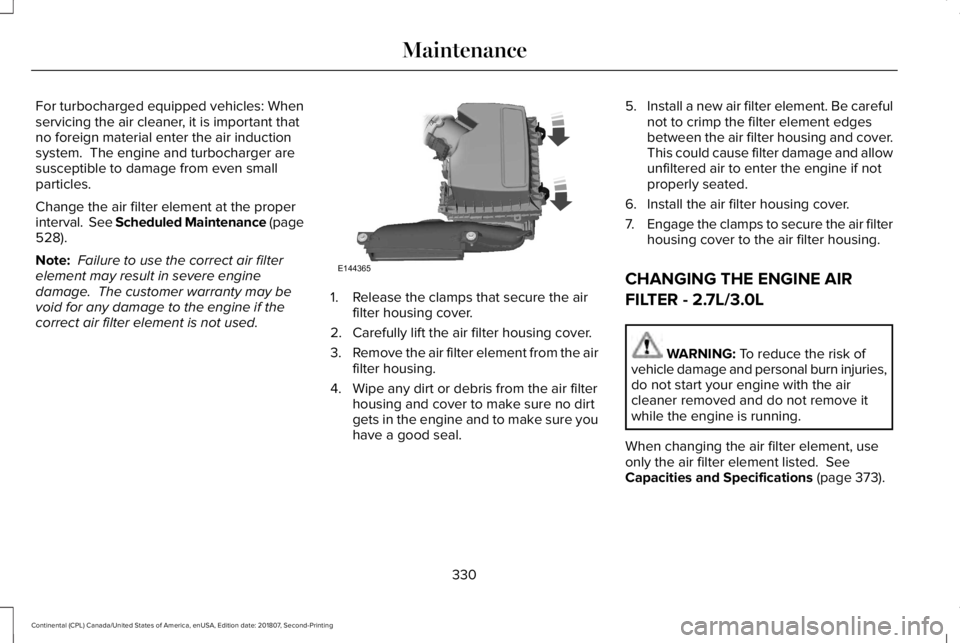
correct air filter element is not used. 1. Release the clamps that secure the air
filter housing cover.
2. Carefully lift the air filter housing cover.
3. Remove the air filter element from the air
filter housing.
4. Wipe any dirt or debris from the air filter housing and cover to make sure no dirt
gets in the engine and to make sure you
have a good seal. 5.
Install a new air filter element. Be careful
not to crimp the filter element edges
between the air filter housing and cover.
This could cause filter damage and allow
unfiltered air to enter the engine if not
properly seated.
6. Install the air filter housing cover.
7. Engage the clamps to secure the air filter
housing cover to the air filter housing.
CHANGING THE ENGINE AIR
FILTER - 2.7L/3.0L WARNING:
To reduce the risk of
vehicle damage and personal burn injuries,
do not start your engine with the air
cleaner removed and do not remove it
while the engine is running.
When changing the air filter element, use
only the air filter element listed.
See
Capacities and Specifications (page 373).
330
Continental (CPL) Canada/United States of America, enUSA, Edition date: 201807, Second-Printing MaintenanceE144365
Page 334 of 627

For Turbocharged equipped vehicles: When
servicing the air cleaner, it is important that
no foreign material enter the air induction
system. The engine and turbocharger are
susceptible to damage from even small
particles.
Change the air filter element at the proper
interval. See Scheduled Maintenance (page
528).
Note: Failure to use the correct air filter
element may result in severe engine
damage. The customer warranty may be
void for any damage to the engine if the
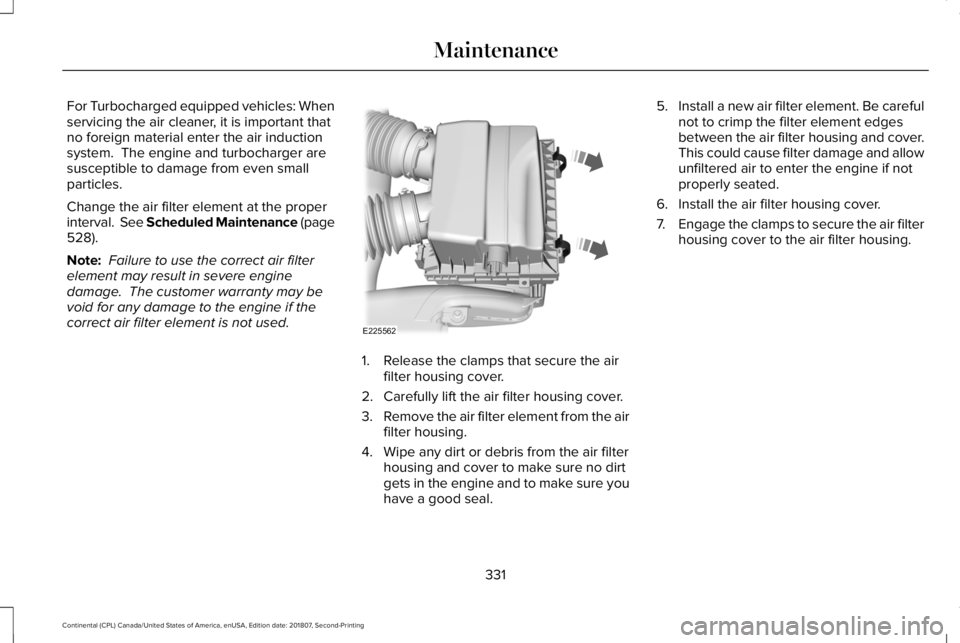
correct air filter element is not used. 1. Release the clamps that secure the air
filter housing cover.
2. Carefully lift the air filter housing cover.
3. Remove the air filter element from the air
filter housing.
4. Wipe any dirt or debris from the air filter housing and cover to make sure no dirt
gets in the engine and to make sure you
have a good seal. 5.
Install a new air filter element. Be careful
not to crimp the filter element edges
between the air filter housing and cover.
This could cause filter damage and allow
unfiltered air to enter the engine if not
properly seated.
6. Install the air filter housing cover.
7. Engage the clamps to secure the air filter
housing cover to the air filter housing.
331
Continental (CPL) Canada/United States of America, enUSA, Edition date: 201807, Second-Printing MaintenanceE225562
Page 369 of 627

WARNING: To help prevent your
vehicle from moving when changing a
wheel, shift the transmission into park (P),
set the parking brake and use an
appropriate block or wheel chock to
secure the wheel diagonally opposite to
the wheel being changed. For example,
when changing the front left wheel, place
an appropriate block or wheel chock on
the right rear wheel. WARNING:
When one of the front
wheels is off the ground, the transmission
alone will not prevent the vehicle from
moving or slipping off the jack, even if the
transmission is in park (P). WARNING:
Do not get under a
vehicle that is only supported by a vehicle
jack. WARNING:
Always use the jack
provided as original equipment with your
vehicle. If using a jack other than the one
provided, make sure the jack capacity is
adequate for the vehicle weight, including
any vehicle cargo or modifications. If you
are unsure if the jack capacity is adequate,
contact the authorized dealer.
Note: The jack does not require
maintenance or additional lubrication over
the service life of your vehicle.
Note: Passengers should not remain in your
vehicle when the vehicle is being jacked.
1. Park on a level firm surface, shift the transmission into park (P), set the parking
brake and switch the ignition off. Activate
the hazard flashers and set up the
warning triangle. 2.
Block both the front and rear of the wheel
diagonally opposite the flat tire. For
example, if the left front tire is flat, block
the right rear wheel.
3. Lift the carpeted load floor panel and slide it forward.
Note: The wheel trim tool in the following
illustration is optional.
366
Continental (CPL) Canada/United States of America, enUSA, Edition date: 201807, Second-Printing Wheels and TiresE175447
Page 370 of 627
4. Remove the steel winged washer nut
securing the spare tire by turning it
counterclockwise.
5. Remove the spare tire from the spare tire
compartment. 6. Remove plastic wing nut and jack and
lug wrench assembly. Remove the strap
from the jack. Turn the jack hex nut drive
screw counterclockwise and detach lug
wrench from the jack. 7. If your vehicle has a wheel trim that
covers the lug nuts, use the tool stored
on the spare tire wing nut to remove the
wheel trim for access to the lug nuts.
Feed the wire end of the tool through the
small hole on the wheel trim to hook
behind it and pull to remove the wheel
trim. 8.
Loosen each wheel lug nut one-half turn
counterclockwise, but do not remove
them until the wheel is raised off the
ground.
367
Continental (CPL) Canada/United States of America, enUSA, Edition date: 201807, Second-Printing Wheels and TiresE224481 E273682 E181744 1
E181745
2
Page 372 of 627

14.
Fold up the wrench and re-attach to the
jack. Re-position the jack and wrench
assembly into the original vehicle
position and secure with the plastic
wing nut. Securely fasten the jack
before you drive.
15. Unblock the wheel and pick up the warning triangle.
Stowing the flat tire
You cannot store the full-sized road wheel
in the temporary spare tire well.
1. Find the flat tire retainer strap tucked inside the jack channel. Slide the
carpeted load floor into position. 2.
Stow the flat tire in the cargo area on the
load floor with the wheel facing up.
Secure the flat tire with the retainer strap
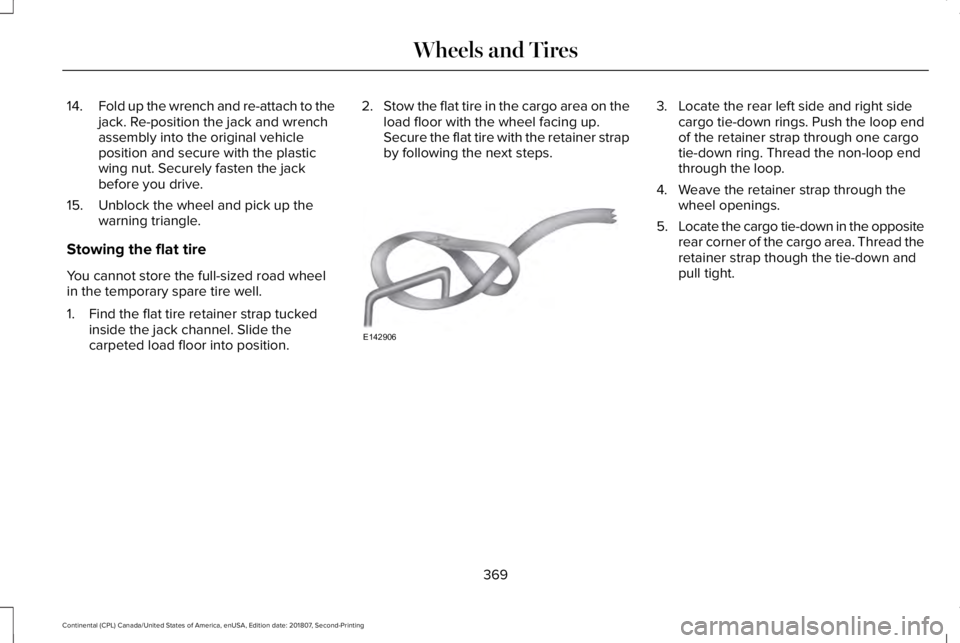
by following the next steps. 3. Locate the rear left side and right side
cargo tie-down rings. Push the loop end
of the retainer strap through one cargo
tie-down ring. Thread the non-loop end
through the loop.
4. Weave the retainer strap through the wheel openings.
5. Locate the cargo tie-down in the opposite
rear corner of the cargo area. Thread the
retainer strap though the tie-down and
pull tight.
369
Continental (CPL) Canada/United States of America, enUSA, Edition date: 201807, Second-Printing Wheels and TiresE142906
Page 373 of 627
6.
Secure the flat tire by tying a 2-half hitch
knot. 7.
After having your tire serviced, make sure
that you stow the retention strap back in
its original location on the jack.
370
Continental (CPL) Canada/United States of America, enUSA, Edition date: 201807, Second-Printing Wheels and TiresE143746