2019 LINCOLN CONTINENTAL warning lights
[x] Cancel search: warning lightsPage 105 of 627

Loose Mirror
If you manually fold the power-folding
mirrors, they may not work properly even
after you re-position them. You need to reset
them if:
•
The mirrors vibrate when you drive.
• The mirrors feel loose.
• The mirrors do not stay in the folded or
unfolded position.
• One of the mirrors is not in its normal
driving position.
To reset the power-fold feature, use the
power-folding mirror control to fold and
unfold the mirrors. You may hear a loud noise
as you reset the power-folding mirrors. This
sound is normal. Repeat this process as
needed each time you manually fold the
mirrors.
Heated Exterior Mirrors
See Heated Exterior Mirrors (page 148). Memory Mirrors
You can save and recall the mirror positions
through the memory function. See Memory
Function
(page 160).
Auto-Dimming Feature
The driver’ s exterior mirror automatically
dims when the interior auto-dimming mirror
turns on.
Signal Indicator Mirrors
The outer portion of the appropriate mirror
housing blinks when you activate the
direction indicator.
Lincoln Welcome Mat
Projection lights, on the bottom of the mirror
housings, project an image onto the ground
a short distance from the vehicle.
360-Degree Camera
(If Equipped)
See
360 Degree Camera (page 231). Integrated Blind Spot Mirrors
(If Equipped) WARNING: Objects in the mirror are
closer than they appear.
The blind spot mirror has a wide-angle mirror
inside the exterior mirror that can increase
visibility along the side of your vehicle.
Check the main mirror first before a lane
change, then check the blind spot mirror. If
no vehicles are present in the blind spot
mirror and the traffic in the adjacent lane is
at a safe distance, signal that you intend to
change lanes. Glance over your shoulder to
verify traffic is clear and carefully change
lanes.
102
Continental (CPL) Canada/United States of America, enUSA, Edition date: 201807, Second-Printing Windows and Mirrors
Page 106 of 627
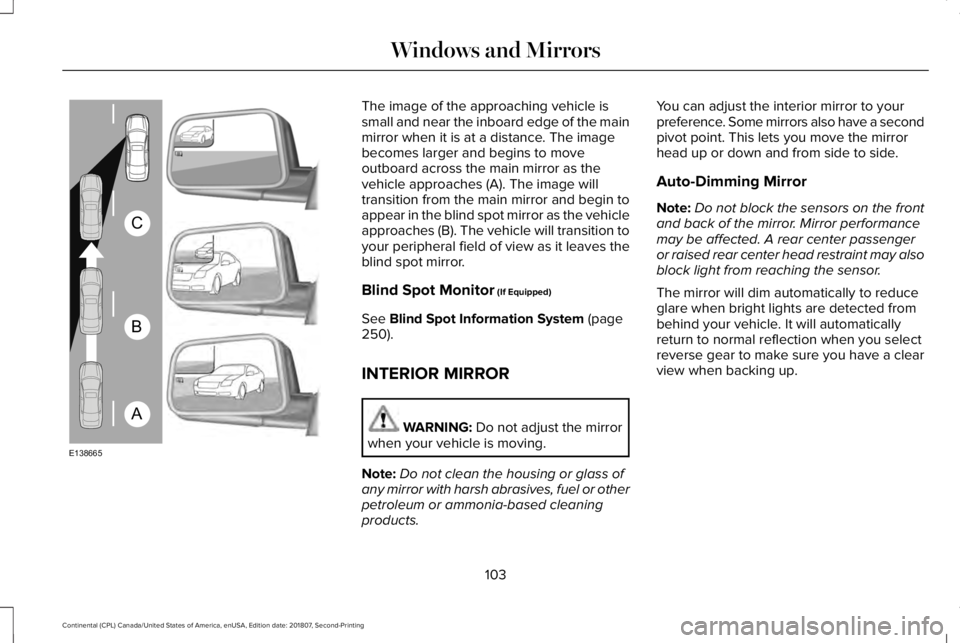
The image of the approaching vehicle is
small and near the inboard edge of the main
mirror when it is at a distance. The image
becomes larger and begins to move
outboard across the main mirror as the
vehicle approaches (A). The image will
transition from the main mirror and begin to
appear in the blind spot mirror as the vehicle
approaches (B). The vehicle will transition to
your peripheral field of view as it leaves the
blind spot mirror.
Blind Spot Monitor (If Equipped)
See
Blind Spot Information System (page
250).
INTERIOR MIRROR WARNING:
Do not adjust the mirror
when your vehicle is moving.
Note: Do not clean the housing or glass of
any mirror with harsh abrasives, fuel or other
petroleum or ammonia-based cleaning
products. You can adjust the interior mirror to your
preference. Some mirrors also have a second
pivot point. This lets you move the mirror
head up or down and from side to side.
Auto-Dimming Mirror
Note:
Do not block the sensors on the front
and back of the mirror. Mirror performance
may be affected. A rear center passenger
or raised rear center head restraint may also
block light from reaching the sensor.
The mirror will dim automatically to reduce
glare when bright lights are detected from
behind your vehicle. It will automatically
return to normal reflection when you select
reverse gear to make sure you have a clear
view when backing up.
103
Continental (CPL) Canada/United States of America, enUSA, Edition date: 201807, Second-Printing Windows and MirrorsA
B
C
E138665
Page 167 of 627
even at low temperatures, especially if
used for long periods of time. Do not place
anything on the seat that insulates against
heat, such as a blanket or cushion. This
may cause the heated seat to overheat.
Do not puncture the seat with pins,
needles or other pointed objects. This may
damage the heating element which may
cause the heated seat to overheat. An
overheated seat may cause serious
personal injury.
Do not do the following:
• Place heavy objects on the seat.
• Operate the heated seat if water or any
other liquid spills on the seat. Allow the
seat to dry thoroughly.
• Operate the heated seats unless the
engine is running. Doing so can cause
the battery to lose charge. Press the heated seat symbol to cycle
through the various heat settings and off.
More indicator lights indicate warmer
settings.
Rear Seats
WARNING: Persons who are unable
to feel pain to the skin because of
advanced age, chronic illness, diabetes,
spinal cord injury, medication, alcohol use,
exhaustion, or other physical conditions,
must exercise care when using the seat
heater. The seat heater may cause burns
even at low temperatures, especially if
used for long periods of time. Do not place
anything on the seat that insulates against
heat, such as a blanket or cushion, because this may cause the seat heater to
overheat. Do not puncture the seat with
pins, needles, or other pointed objects
because this may damage the heating
element which may cause the seat heater
to overheat. An overheated seat may
cause serious personal injury.
Do not do the following:
• Place heavy objects on the seat.
• Operate the seat heater if water or any
other liquid is spilled on the seat. Allow
the seat to dry thoroughly.
• Operate the heated seats unless the
engine is running. Doing so can cause
the battery to lose charge.
The rear seat heat controls are located on
the rear of the center console.
164
Continental (CPL) Canada/United States of America, enUSA, Edition date: 201807, Second-Printing SeatsE146322
Page 168 of 627
Press the heated seat symbol to cycle
through the various heat settings and off.
More indicator lights indicate warmer
settings.
The heated seat module resets at every
ignition run cycle. While the ignition is on,
press the high or low heated seat switch to
enable heating mode. When activated, they
will turn off automatically when you turn the
engine off.
CLIMATE CONTROLLED SEATS (IF
EQUIPPED)
Heated Seats WARNING:
People who are unable
to feel pain to their skin because of
advanced age, chronic illness, diabetes,
spinal cord injury, medication, alcohol use,
exhaustion or other physical conditions,
must use caution when using the heated
seat. The heated seat may cause burns
even at low temperatures, especially if
used for long periods of time. Do not place
anything on the seat that may block the
heat, such as a blanket or cushion. This
can cause the heated seat to overheat. Do
not puncture the seat with pins, needles
or other pointed objects. This damages the
heating element and can cause the heated
seat to overheat. An overheated seat may
cause serious personal injury.
Note: The heated seats switch on during a
remote start if they are enabled through the
information displays.
See General
Information (page 112).
Note: The heated seats may also switch on
when you start your vehicle if they were on
when you previously switched your vehicle
off. Note:
Do not do the following:
• Place heavy objects on the seat.
• Operate the seat heater if water or any
other liquid spills on the seat. Allow the
seat to dry thoroughly. Press this symbol to cycle through the
various heat settings and off. More indicator
lights indicate warmer settings.
Ventilated Seats
Note:
The ventilated seats switch on during
a remote start if they are enabled through
the information displays. See General
Information (page 112).
165
Continental (CPL) Canada/United States of America, enUSA, Edition date: 201807, Second-Printing SeatsE146322 E146322
Page 212 of 627
HILL START ASSIST
WARNING: The system does not
replace the parking brake. When you leave
your vehicle, always apply the parking
brake and shift the transmission into park
(P) for automatic transmission or first gear
for manual transmission. WARNING: You must remain in your
vehicle when the system turns on. At all
times, you are responsible for controlling
your vehicle, supervising the system and
intervening, if required. Failure to take care
may result in the loss of control of your
vehicle, serious personal injury or death. WARNING:
The system turns off if
there is a malfunction or if you excessively
rev the engine.
The system makes it easier to pull away
when your vehicle is on a slope without the
need to use the parking brake. When the system activates, your vehicle
remains stationary on a slope for a few
seconds after you release the brake pedal.
This allows you time to move your foot from
the brake to the accelerator pedal. The
brakes release when the engine has
developed sufficient torque to prevent your
vehicle from rolling down the slope. This is
an advantage when pulling away on a slope,
for example from a car park ramp, traffic
lights or when reversing uphill into a parking
space.
The system activates on any slope that
causes your vehicle to roll.
Note:
There is no warning lamp to indicate
the system is either on or off.
Using Hill Start Assist
1. Press the brake pedal to bring your vehicle to a complete standstill. Keep the
brake pedal pressed and shift into first
gear when facing uphill or reverse (R)
when facing downhill.
2. The system activates if the sensors detect that your vehicle is on a slope. 3. When you remove your foot from the
brake pedal, your vehicle remains on the
slope without rolling away for a few
seconds. This hold time increases if you
are in the process of driving off.
4. Pull away in the normal manner.
Switching the System On and Off
Vehicles with Manual Transmission
You can switch this feature on or off in the
information display. The system remembers
the last setting when you start your vehicle.
Vehicles with Automatic Transmission
The system turns on when you switch the
ignition on and you cannot switch the system
off.
209
Continental (CPL) Canada/United States of America, enUSA, Edition date: 201807, Second-Printing Brakes
Page 213 of 627
AUTO HOLD
WARNING: The system does not
replace the parking brake. When you leave
your vehicle, always apply the parking
brake. WARNING: You must remain in your
vehicle when the system turns on. At all
times, you are responsible for controlling
your vehicle, supervising the system and
intervening, if required. Failure to take care
may result in the loss of control of your
vehicle, serious personal injury or death. WARNING:
The system will turn off
if a malfunction is apparent or if you rev
the engine excessively. Failure to take care
may result in the loss of control of your
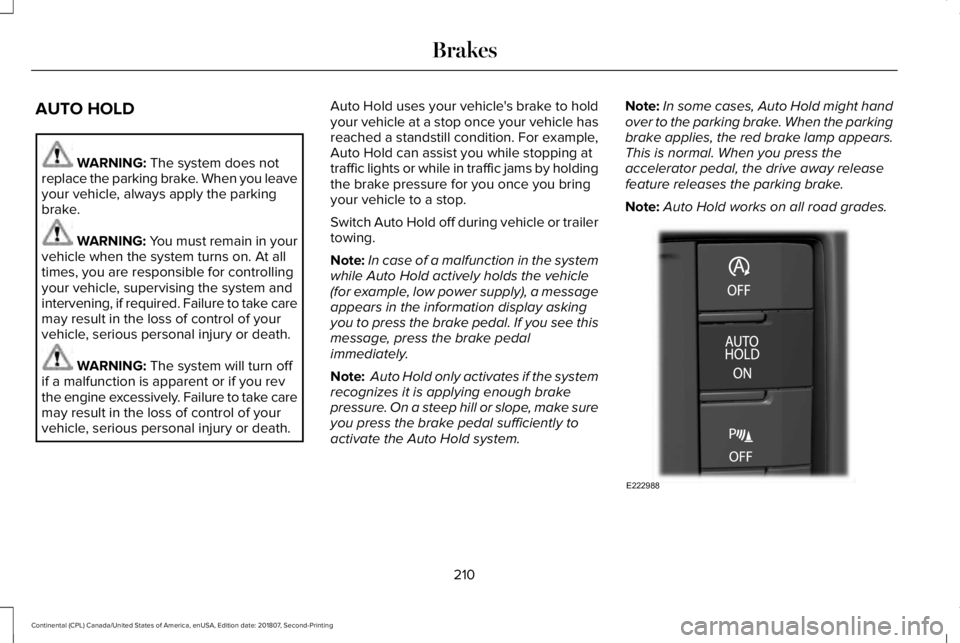
vehicle, serious personal injury or death. Auto Hold uses your vehicle's brake to hold
your vehicle at a stop once your vehicle has
reached a standstill condition. For example,
Auto Hold can assist you while stopping at
traffic lights or while in traffic jams by holding
the brake pressure for you once you bring
your vehicle to a stop.
Switch Auto Hold off during vehicle or trailer
towing.
Note:
In case of a malfunction in the system
while Auto Hold actively holds the vehicle
(for example, low power supply), a message
appears in the information display asking
you to press the brake pedal. If you see this
message, press the brake pedal
immediately.
Note: Auto Hold only activates if the system
recognizes it is applying enough brake
pressure. On a steep hill or slope, make sure
you press the brake pedal sufficiently to
activate the Auto Hold system. Note:
In some cases, Auto Hold might hand
over to the parking brake. When the parking
brake applies, the red brake lamp appears.
This is normal. When you press the
accelerator pedal, the drive away release
feature releases the parking brake.
Note: Auto Hold works on all road grades. 210
Continental (CPL) Canada/United States of America, enUSA, Edition date: 201807, Second-Printing BrakesE222988
Page 215 of 627
PRINCIPLE OF OPERATION
The traction control system helps avoid drive
wheel spin and loss of traction.
If your vehicle begins to slide, the system
applies the brakes to individual wheels and,
when needed, reduces engine power at the
same time. If the wheels spin when
accelerating on slippery or loose surfaces,
the system reduces engine power in order
to increase traction.
USING TRACTION CONTROL
WARNING: The stability and traction
control light illuminates steadily if the
system detects a failure. Make sure you
did not manually disable the traction
control system using the information
display controls or the switch. If the stability
control and traction control light is still illuminating steadily, have the system
serviced by an authorized dealer
immediately. Operating your vehicle with
the traction control disabled could lead to
an increased risk of loss of vehicle control,
vehicle rollover, personal injury and death.
The system automatically turns on each time
you switch the ignition on.
If your vehicle is stuck in mud or snow,
switching traction control off may be
beneficial as this allows the wheels to spin.
Note: When you switch traction control off,
stability control remains fully active.
Switching the System Off
When you switch the system off or on, a
message appears in the information display
showing system status.
You can switch the system off by either using
the information display controls or the switch. Using the Information Display Controls
You can switch this feature off or on in the
information display. See General Information
(page
112).
Using a Switch
(If Equipped)
Use the traction control switch on the
instrument panel to switch the system off or
on.
System Indicator Lights and Messages The stability and traction control
light:
• Temporarily illuminates on engine
start-up.
• Flashes when a driving condition
activates either of the systems.
• Illuminates if a problem occurs in either
of the systems. The stability and traction control
off light temporarily illuminates on
engine start-up and stays on when
you switch the traction control system off.
212
Continental (CPL) Canada/United States of America, enUSA, Edition date: 201807, Second-Printing Traction ControlE138639 E130458
Page 233 of 627
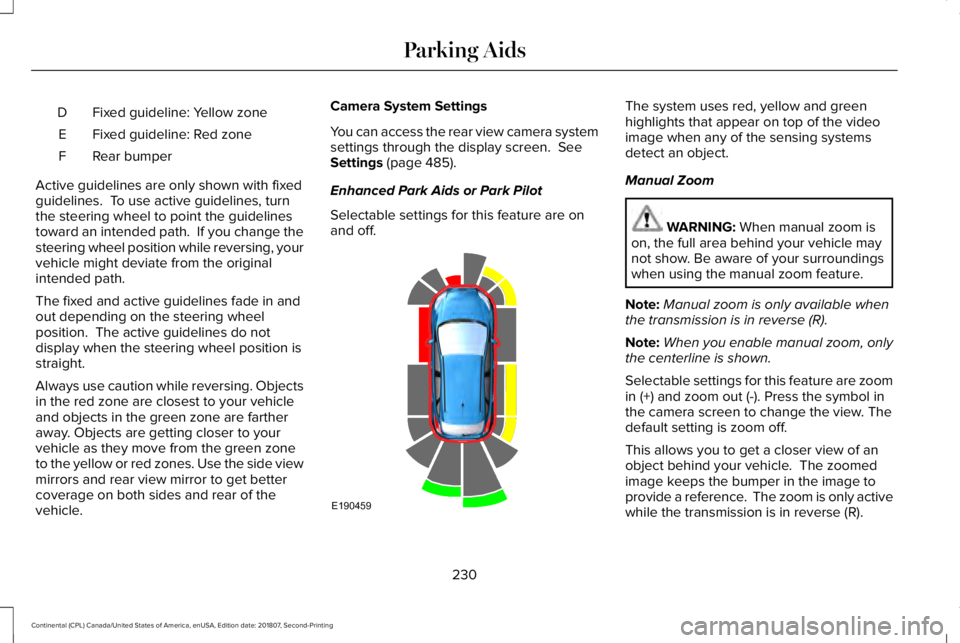
Fixed guideline: Yellow zone
D
Fixed guideline: Red zone
E
Rear bumper
F
Active guidelines are only shown with fixed
guidelines. To use active guidelines, turn
the steering wheel to point the guidelines
toward an intended path. If you change the
steering wheel position while reversing, your
vehicle might deviate from the original
intended path.
The fixed and active guidelines fade in and
out depending on the steering wheel
position. The active guidelines do not
display when the steering wheel position is
straight.
Always use caution while reversing. Objects
in the red zone are closest to your vehicle
and objects in the green zone are farther
away. Objects are getting closer to your
vehicle as they move from the green zone
to the yellow or red zones. Use the side view
mirrors and rear view mirror to get better
coverage on both sides and rear of the
vehicle. Camera System Settings
You can access the rear view camera system
settings through the display screen. See
Settings (page 485).
Enhanced Park Aids or Park Pilot
Selectable settings for this feature are on
and off. The system uses red, yellow and green
highlights that appear on top of the video
image when any of the sensing systems
detect an object.
Manual Zoom
WARNING:
When manual zoom is
on, the full area behind your vehicle may
not show. Be aware of your surroundings
when using the manual zoom feature.
Note: Manual zoom is only available when
the transmission is in reverse (R).
Note: When you enable manual zoom, only
the centerline is shown.
Selectable settings for this feature are zoom
in (+) and zoom out (-). Press the symbol in
the camera screen to change the view. The
default setting is zoom off.
This allows you to get a closer view of an
object behind your vehicle. The zoomed
image keeps the bumper in the image to
provide a reference. The zoom is only active
while the transmission is in reverse (R).
230
Continental (CPL) Canada/United States of America, enUSA, Edition date: 201807, Second-Printing Parking AidsE190459