2019 LINCOLN CONTINENTAL battery location
[x] Cancel search: battery locationPage 174 of 627

12 VDC Power Point
WARNING:
Do not plug optional
electrical accessories into the cigar lighter
socket. Incorrect use of the cigar lighter
can cause damage not covered by the
vehicle warranty, and can result in fire or
serious injury.
Note: When you switch the ignition on, you
can use the socket to power 12 V appliances
with a maximum current rating of
15 A.
Note: Do not hang any accessory from the
accessory plug.
Note: Do not use the power point over the
vehicle capacity of
12 V DC 15 A or a fuse
may blow.
Note: Always keep the power point caps
closed when not in use.
Do not insert objects other than an accessory
plug into the power point. This damages the
power point and may blow the fuse. Run the
vehicle for full capacity use of the power
point. To prevent the battery from running out of
charge:
•
Do not use the power point longer than
necessary when the vehicle is not
running.
• Do not leave devices plugged in
overnight or when you park your vehicle
for extended periods.
Locations
Power points may be in the following
locations:
• On the instrument panel.
• Inside the center console.
• On the rear of the center console. 110 V
AC Power Point WARNING:
Do not keep electrical
devices plugged in the power point
whenever the device is not in use. Do not
use any extension cord with the 110 volt
AC power point, since it will defeat the
safety protection design. Doing so may
cause the power point to overload due to
powering multiple devices that can reach
beyond the 150 watt load limit and could
result in fire or serious injury.
Note: The power point turns off when you
switch the ignition off, or when the battery
voltage drops below 11 volts.
You can use the power point for electric
devices that require up to 150 watts. It is on
the rear of the center console.
171
Continental (CPL) Canada/United States of America, enUSA, Edition date: 201807, Second-Printing Auxiliary Power Points
Page 279 of 627

ROADSIDE ASSISTANCE
Vehicles Sold in the United States:
Getting Roadside Assistance
To fully assist you should you have a vehicle
concern, Lincoln Motor Company offers a
complimentary roadside assistance program.
This program is separate from the New
Vehicle Limited Warranty.
The service is available:
•
Throughout the life of the vehicle for
original owners.
• For six years or 70,000 mi (110,000 km)
(whichever comes first) for subsequent
owners.
Roadside Assistance covers:
• A flat tire change with a good spare
(except vehicles supplied with a tire
inflation kit).
• Battery jump start.
• Lock-out assistance (key replacement
cost is the client's responsibility). •
Fuel delivery — independent service
contractors, if not prohibited by state,
local or municipal law shall deliver up to
2 gal (8 L)
of gasoline or 5 gal (20 L) of
diesel fuel to a disabled vehicle.
Roadside Assistance limits fuel delivery
service to two no-charge occurrences
within a 12-month period.
• Winch out — available within 100 ft (30 m)
of a paved or county maintained road,
no recoveries. •
Towing — independent service
contractors, if not prohibited by state,
local or municipal law shall tow Lincoln
eligible vehicles to the client's selling or
preferred dealer within 100 mi (160 km)
of the disablement location or to the
nearest Lincoln dealer. If a client requests
a tow to a selling or preferred dealer that
is more than
100 mi (160 km) from the
disablement location, the client is
responsible for any mileage costs in
excess of
100 mi (160 km).
• Roadside Assistance includes up to $200
for a towed trailer if the disabled eligible
vehicle requires service at the nearest
authorized dealer. If the towing vehicle
is operational but the trailer is not, then
the trailer does not qualify for any
roadside services.
Vehicles Sold in the United States:
Using Roadside Assistance
United States clients who require roadside
assistance, call 1-800-521-4140.
276
Continental (CPL) Canada/United States of America, enUSA, Edition date: 201807, Second-Printing Roadside Emergencies
Page 283 of 627

2.
Connect the other end of the positive (+)
cable to the positive (+) terminal of the
booster vehicle battery.
3. Connect the negative (-) cable to the negative (-) terminal of the booster
vehicle battery.
4. Make the final connection of the negative
(-) cable to an exposed metal part of the
stalled vehicle's engine, away from the
battery and the fuel injection system, or
connect the negative (-) cable to a ground
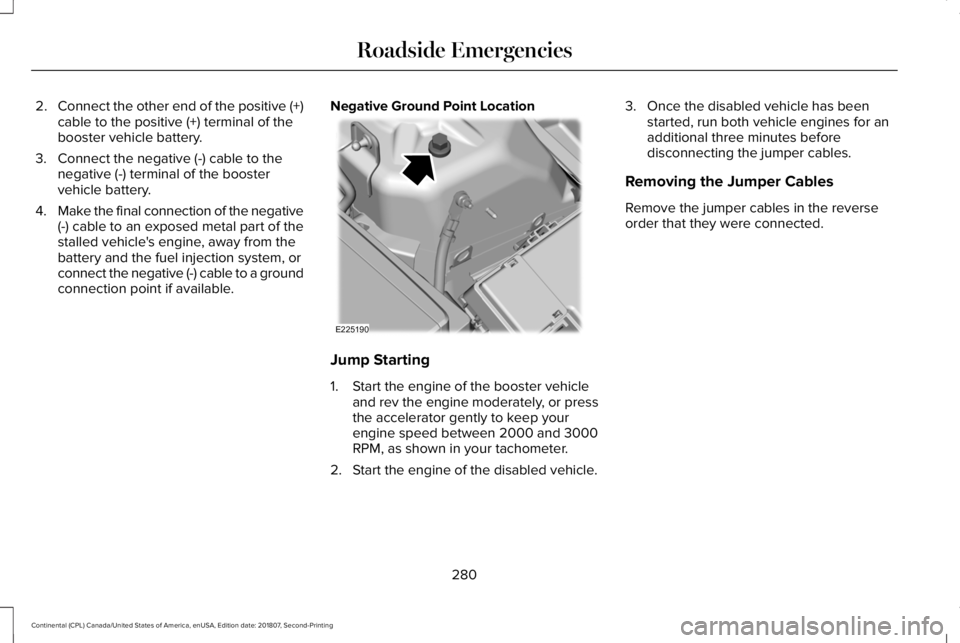
connection point if available. Negative Ground Point Location Jump Starting
1. Start the engine of the booster vehicle
and rev the engine moderately, or press
the accelerator gently to keep your
engine speed between 2000 and 3000
RPM, as shown in your tachometer.
2. Start the engine of the disabled vehicle. 3. Once the disabled vehicle has been
started, run both vehicle engines for an
additional three minutes before
disconnecting the jumper cables.
Removing the Jumper Cables
Remove the jumper cables in the reverse
order that they were connected.
280
Continental (CPL) Canada/United States of America, enUSA, Edition date: 201807, Second-Printing Roadside EmergenciesE225190
Page 338 of 627

•
Do not allow wax to come in contact with
any non-body (low-gloss black) colored
trim. The wax will discolor or stain the
parts over time.
•Roof racks.
• Bumpers.
• Grained door handles.
• Side moldings.
• Mirror housings.
• Windshield cowl area.
• Do not apply wax to glass areas.
• After waxing, your car's paint should feel
smooth, and be free of streaks and
smudges.
CLEANING THE ENGINE
Engines are more efficient when they are
clean because grease and dirt buildup keep
the engine warmer than normal. When washing:
•
Take care when using a power washer
to clean the engine. The high-pressure
fluid could penetrate the sealed parts
and cause damage.
• Do not spray a hot engine with cold water
to avoid cracking the engine block or
other engine components.
• Spray Motorcraft Engine Shampoo and
Degreaser on all parts that require
cleaning and pressure rinse clean. In
Canada, use Motorcraft Engine Shampoo.
Note: If your vehicle has an engine cover
remove the cover before application of
Motorcraft Engine Shampoo and Degreaser.
Immediately rinse away any over spray.
• Never wash or rinse the engine while it
is hot or running; water in the running
engine may cause internal damage.
• Never wash or rinse any ignition coil,
spark plug wire or spark plug well, or the
area in and around these locations.
• Cover the battery, power distribution box,
and air filter assembly to prevent water
damage when cleaning the engine. CLEANING THE WINDOWS AND
WIPER BLADES
Car wash chemicals and environmental
fallout can result in windshield and wiper
blade contamination. Dirty windshield and
wipers will result in poor windshield wiper
operation. Keep the windshield and wiper
blades clean to maintain windshield wiper
performance.
To clean the windshield and wiper blades:
•
Clean the windshield with a non-abrasive
glass cleaner. When cleaning the interior
of the windshield, avoid getting any glass
cleaner on the instrument panel or door
panels. Wipe any glass cleaner off these
surfaces immediately.
• For windshields contaminated with tree
sap, chemicals, wax or bugs, clean the
entire windshield using steel wool (no
greater than 0000 grade) in a circular
motion and rinse with water.
• Clean the wiper blades with isopropyl
rubbing alcohol or windshield washer
concentrate.
335
Continental (CPL) Canada/United States of America, enUSA, Edition date: 201807, Second-Printing Vehicle Care
Page 431 of 627

To make sure that 911 Assist works correctly:
•
SYNC must be powered and working
properly at the time of the incident and
throughout feature activation and use.
• The 911 Assist feature must be set on
before the incident.
• You must pair and connect a Bluetooth
enabled and compatible cell phone to
SYNC.
• A connected Bluetooth enabled phone
must have the ability to make and
maintain an outgoing call at the time of
the incident.
• A connected Bluetooth enabled phone
must have adequate network coverage,
battery power and signal strength.
• The vehicle must have battery power and
be located in the U.S., Canada or in a
territory in which 911 is the emergency
number. In the Event of a Crash
Not all crashes will deploy an airbag or
activate the fuel pump shut-off (the triggers
for 911 Assist). If a connected cell phone
sustains damage or loses its connection to
SYNC during a crash, SYNC will search for
and try to connect to a previously paired cell
phone; SYNC will then attempt to call the
emergency services.
Before making the call:
•
SYNC provides a short window of time
(about 10 seconds) to cancel the call. If
you fail to cancel the call, SYNC attempts
to dial 911.
• SYNC says the following, or a similar
message: "SYNC will attempt to call 911,
to cancel the call, press Cancel on your
screen or press and hold the phone
button on your steering wheel." If you do not cancel the call, and SYNC
makes a successful call, a pre-recorded
message plays for the 911 operator, and then
the occupant(s) in your vehicle is able to talk
with the operator. Be prepared to provide
your name, phone number and location
immediately, because not all 911 systems are
capable of receiving this information
electronically.
911 Assist May Not Work If
•
Your cellular phone or 911 Assist
hardware sustains damage in a crash.
• The vehicle's battery or the SYNC system
has no power.
• The phone(s) thrown from your vehicle
are the ones paired and connected to
the system.
911 Assist Privacy Notice
When you switch on 911 Assist, it may
disclose to emergency services that your
vehicle has been in a crash involving the
deployment of an airbag or activation of the
fuel pump shut-off. Certain versions or
updates to 911 Assist may also be capable
428
Continental (CPL) Canada/United States of America, enUSA, Edition date: 201807, Second-Printing SYNC™ 3
Page 438 of 627

Home screen display
Tile
Item
Shows the active media source.
Audio
A
If your vehicle does not have navigation, this space contains the compas\
s.
The name of the connected phone appears on the screen. The status of the\
phone
features also appear. This includes signal strength, battery charge, 911 assist setting
state (On or Off ), text messaging and roaming.
Phone
B
This map displays your current location or current route in real time.
Navigation 1
C
When you have navigation active, you also see the next turn and the length of time
and distance to your destination.
If your vehicle does not have navigation, this space contains the audio \
information.
1 If equipped.
You can touch any of the feature displays to
access that feature.
Anytime you select the home button, the
system returns you to this screen. USING VOICE RECOGNITION
The SYNC 3 system allows you to use voice
commands, to control features like audio and
climate controls. By using voice commands,
you can keep your hands on the wheel and
your eyes on the road.
You can access each feature controlled by
SYNC 3 through a variety of commands. To activate the SYNC 3 voice
commands push the voice button
on the steering wheel and wait for
the prompt.
___ is a dynamic listing, meaning that it can
be the name of anything, such as artist, the
name of contact or number. The context and
the description of the command tell you what
to say for this dynamic option.
There are some commands that work for
every feature, these commands are:
435
Continental (CPL) Canada/United States of America, enUSA, Edition date: 201807, Second-Printing SYNC™ 3E142599
Page 615 of 627

Directing Air to the Instrument Panel Air
Vents..................................................................143
Setting the Blower Motor Speed.....................143
Setting the Temperature....................................143
Switching Auto Mode On and Off...................143
Switching Defrost On and Off..........................144
Switching Maximum Air Conditioning On and Off
.......................................................................144
Switching Maximum Defrost On and Off.......144
Switching Recirculated Air On and Off..........144
Switching the Air Conditioning On and Off.......................................................................144
Switching the Climate Control On and Off.......................................................................144
Switching the Heated Seats On and Off.......144
Switching the V
entilated Seats On and
Off.......................................................................145
Automatic High Beam Control
....................94
Automatic High Beam Indicator........................95
Switching the S
ystem On and Off....................95
Automatic Transmission...............................191 Automatic Transmission Adaptive
Learning............................................................196
Brake-Shift Interlock Override.........................195
If Your Vehicle Gets Stuck In Mud or Snow..................................................................196
Push Button Shift Transmission........................191
SelectShift™
Automatic Transmission.............193 Understanding the Shift Positions of your
Automatic Transmission.................................191
Automatic Transmission Fluid Check............................................................323
Autowipers
.......................................................89
Autowipers Settings.............................................89
Low Temperature Wipe Inhibit..........................89
Auxiliary Power Points
...................................171
AC Power Point.....................................................171
DC Power Point.....................................................171
Locations.................................................................171
AWD See: All-Wheel Drive...........................................197
B
Battery See: Changing the 12V Battery.......................325
Blind Spot Information System.................250 Switching the System Off and On...................251
System Errors.......................................................251
Using the Blind Spot Information
System..............................................................250
BLIS See: Blind Spot Information System.............250
Body Styling Kits
............................................341
Bonnet Lock See: Opening and Closing the Hood.............310 Booster Seats...................................................31
Types of Booster Seats.......................................32
Brake Fluid Check........................................323
Brakes.............................................................206 General Information..........................................206
Breaking-In.....................................................273
Bulb Specification Chart.............................403
C
Cabin Air Filter
...............................................148
Capacities and Specifications - 2.7L.......382 Alternative Engine Oil for Extremely Cold
Climates............................................................388
Specifications......................................................383
Capacities and Specifications - 3.0L.......389 Alternative Engine Oil for Extremely Cold
Climates............................................................394
Specifications......................................................390
Capacities and Specifications - 3.7L
.......396
Alternative Engine Oil for Extremely Cold
Climates...........................................................402
Specifications......................................................397
Capacities and Specifications...................373
Car Wash See: Cleaning the Exterior...............................333
Catalytic Converter
.......................................188
On-Board Diagnostics (OBD-II)........................189
612
Continental (CPL) Canada/United States of America, enUSA, Edition date: 201807, Second-Printing Index