2019 LEXUS UX250H remove
[x] Cancel search: removePage 240 of 476

2404-5. Using the driving support systems
■Outside rear view mirror indicator visi-
bility
In strong sunlight, the outside rear view mir-
ror indicator may be difficult to see.
■Hearing the RCTA buzzer
The RCTA buzzer may be difficult to hear
over loud noises, such as if the audio system
volume is high.
■When “Rear Cross Traffic Alert
Unavailable” is shown on the multi-
information display
Ice, water, snow, mud, etc., may be attached
to the rear bumper around the sensors.
( P.228) Remove the ice, snow, mud, etc.,
attached to the rear bumper around the
sensors to return the function to normal.
Additionally, the function may not operate
normally when used in extremely hot or
cold environments.
■Rear side radar sensors
P.228
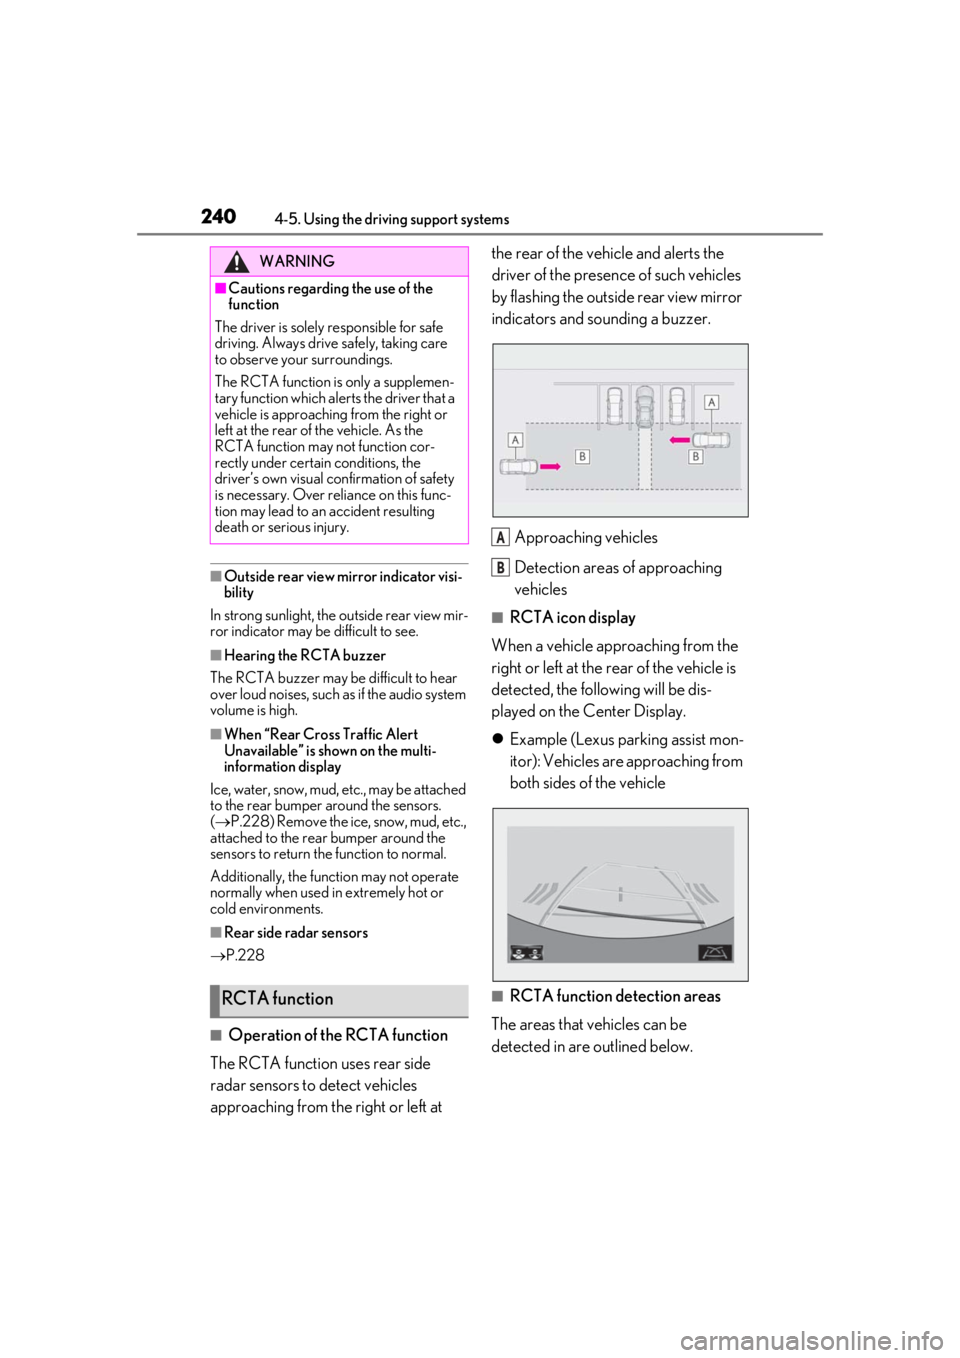
■Operation of the RCTA function
The RCTA function uses rear side
radar sensors to detect vehicles
approaching from the right or left at the rear of the vehicle and alerts the
driver of the presence of such vehicles
by flashing the outside rear view mirror
indicators and sounding a buzzer.
Approaching vehicles
Detection areas of approaching
vehicles
■RCTA icon display
When a vehicle approaching from the
right or left at the rear of the vehicle is
detected, the following will be dis-
played on the Center Display.
Example (Lexus parking assist mon-
itor): Vehicles are approaching from
both sides of the vehicle
■RCTA function detection areas
The areas that vehicles can be
detected in are outlined below.
WARNING
■Cautions regarding the use of the
function
The driver is solely responsible for safe
driving. Always driv e safely, taking care
to observe your surroundings.
The RCTA function is only a supplemen-
tary function which alerts the driver that a
vehicle is approaching from the right or
left at the rear of the vehicle. As the
RCTA function may not function cor-
rectly under certain conditions, the
driver’s own visual confirmation of safety
is necessary. Over reli ance on this func-
tion may lead to an accident resulting
death or serious injury.
RCTA function
A
B
Page 246 of 476

2464-5. Using the driving support systems
Hybrid system output
Braking force
Time
Hybrid system output restriction
control begins operating (The sys-
tem determines that possibility of
collision with detected object is
high)
“BRAKE!” is displayed on the multi-infor-
mation display.
Hybrid system output reduced
Brake control begins operating (the
system determines that possibility
of collision with detected object is
extremely high)
Brake control strength increased
“Switch to Brake” is displayed on
the multi-information display
■If the Parking Support Brake has oper-
ated
If the vehicle is stopped due to operation of
the Parking Support Brake, the Parking
Support Brake will be disabled and the
PKSB OFF indicator will illuminate. If the
Parking Support Brake operates unneces-
sarily, brake control can be canceled by
depressing the brake pedal or waiting for
approximately 2 seconds for it to automati-
cally be canceled. Then, the vehicle can be
operated by depressing the accelerator pedal.
■Re-enabling the Parking Support Brake
To re-enable the Parking Support Brake
when it is disabled due to operation of the
Parking Support Brake, either enable the
system again ( P.244), or turn the power
switch off and then back to ON. Addition-
ally, if the object becomes no longer in the
traveling direction of the vehicle or if the
traveling direction of the vehicle changes
(such as changing from moving forward to
backing up, or from backing up to moving
forward), the system will be re-enabled
automatically.
■If “Parking Support Brake Unavailable”
is displayed on th e multi-information
display and the PKSB OFF indicator is
flashing
If the vehicle is stopped due to operation of
the Parking Support Brake, the Parking
Support Brake will be disabled and the
PKSB OFF indicator will illuminate.
●A sensor may be cove red with ice, snow,
dirt, etc. Remove the ice, snow, dirt, etc.,
from the sensor to return the system to
normal.
Also, due to ice forming on a sensor at
low temperatures, a warning message
may be displayed or the sensor may not
be able to detect an object. Once the ice
melts, the system wi ll return to normal.
●The surrounding area of the sensors on
the bumper may be dirty, or a sensor may
be covered with ice, snow, dirt, etc. In this
case, remove the ice, snow, dirt, etc. from
the sensor or its surrounding area on the
bumper to return the system to a normal
state. At a low temperature, a warning
message may be displayed or an object
may not be detected due to freezing of
the sensor. Once the ice melts, the sys-
tem will return to normal.
●If this message continues to be displayed
even after cleaning the sensor, or is dis-
played even though the sensor is clean,
have the vehicle inspected by your Lexus
dealer.
●Initialization may not have been per-
formed after a 12-volt battery terminal
was disconnected and reconnected. Ini-
tialize the system. ( P.247)
A
B
C
D
E
F
G
H
Page 264 of 476

2644-6. Driving tips
freezing.
To ensure proper operation of the
climate control system fan, remove
any snow that has accumulated on
the air inlet vents in front of the
windshield.
Check for and remove any excess
ice or snow that may have accumu-
lated on the exterior lights, vehicle’s
roof, chassis, around the tires or on
the brakes.
Remove any snow or mud from the
bottom of your shoes before getting
in the vehicle.
Accelerate the vehicle slowly, keep a
safe distance between you and the
vehicle ahead, and drive at a reduced
speed suitable to road conditions.
Park the vehicle and move the shift
lever to P without setting the park-
ing brake. The parking brake may
freeze up, preventing it from being
released. If the vehicle is parked
without setting the parking brake,
make sure to block the wheels.
Failure to do so may be dangerous
because it may cause the vehicle to
move unexpectedly, possibly lead-
ing to an accident.
When the parking brake is in automatic
mode, release the parking brake after shift-
ing the shift lever to P. ( P.172)
If the vehicle is left parked with the brakes damp in cold temperatures,
there is a possibility of the brakes
freezing.
If the vehicle is parked without set-
ting the parking brake, confirm that
the shift lever cannot be moved out
of P
*.
*: The shift lever will be locked if it is
attempted to be shifted from P to any
other position with out depressing the
brake pedal. If the shift lever can be
shifted from P, there may be a problem
with the shift lock system. Have the vehi-
cle inspected by your Lexus dealer
immediately.
Use the correct tire chain size when
mounting the tire chains. Chain size is
regulated for each tire size.
Side chain:
0.12 in. (3 mm) in diameter
0.39 in. (10 mm) in width
When driving the vehicle
When parking the vehicle
WARNING
■When parking the vehicle
When parking the vehicle without apply-
ing the parking brake, make sure to
chock the wheels. If you do not chock the
wheels, the vehicle may move unexpect-
edly, possibly result ing in an accident.
Selecting tire chains
A
B
Page 265 of 476

2654-6. Driving tips
4
Driving
0.98 in. (25 mm) in length
Cross chain:
0.16 in. (4 mm) in diameter
0.55 in. (14 mm) in width
0.98 in. (25 mm) in length
Regulations regarding the use of tire
chains vary depending on location and
type of road. Always check local regu-
lations before installing chains.
■Tire chain installation
Observe the following precautions when
installing and removing chains:
●Install and remove tire chains in a safe
location.
●Install tire chains on the front tires only.
Do not install tire chains on the rear tires.
●Install tire chains on fr ont tires as tightly as
possible. Retighten chains after driving
1/4 - 1/2 mile (0.5 - 1.0 km).
●Install tire chains following the instruc-
tions provided with the tire chains.
To enable the windshield wipers to be
lifted when heavy snow or icy condi-
tions are expected, change the rest
position of the windshield wipers from
the retracted position below the hood to the service position using the wiper
lever.(
P.186)
Regulations on the use of tire
chains
NOTICE
■Fitting tire chains
The tire pressure warning valves and
transmitters may not function correctly
when tire chains are fitted.
Windshield wipers
C
D
E
F
Page 277 of 476

2775-3. Using the air conditioning system and defogger
5
Interior features
Right-hand side temperature control switch
■Adjusting the temperature setting
Operate the temperature control
switch upwards to increase the tem-
perature and downwards to decrease
the temperature.
■Adjusting the fan speed setting
Operate the fan speed control switch
upwards to increase the fan speed and
downwards to decrease the fan speed.
Press the off switch to turn the fan off.
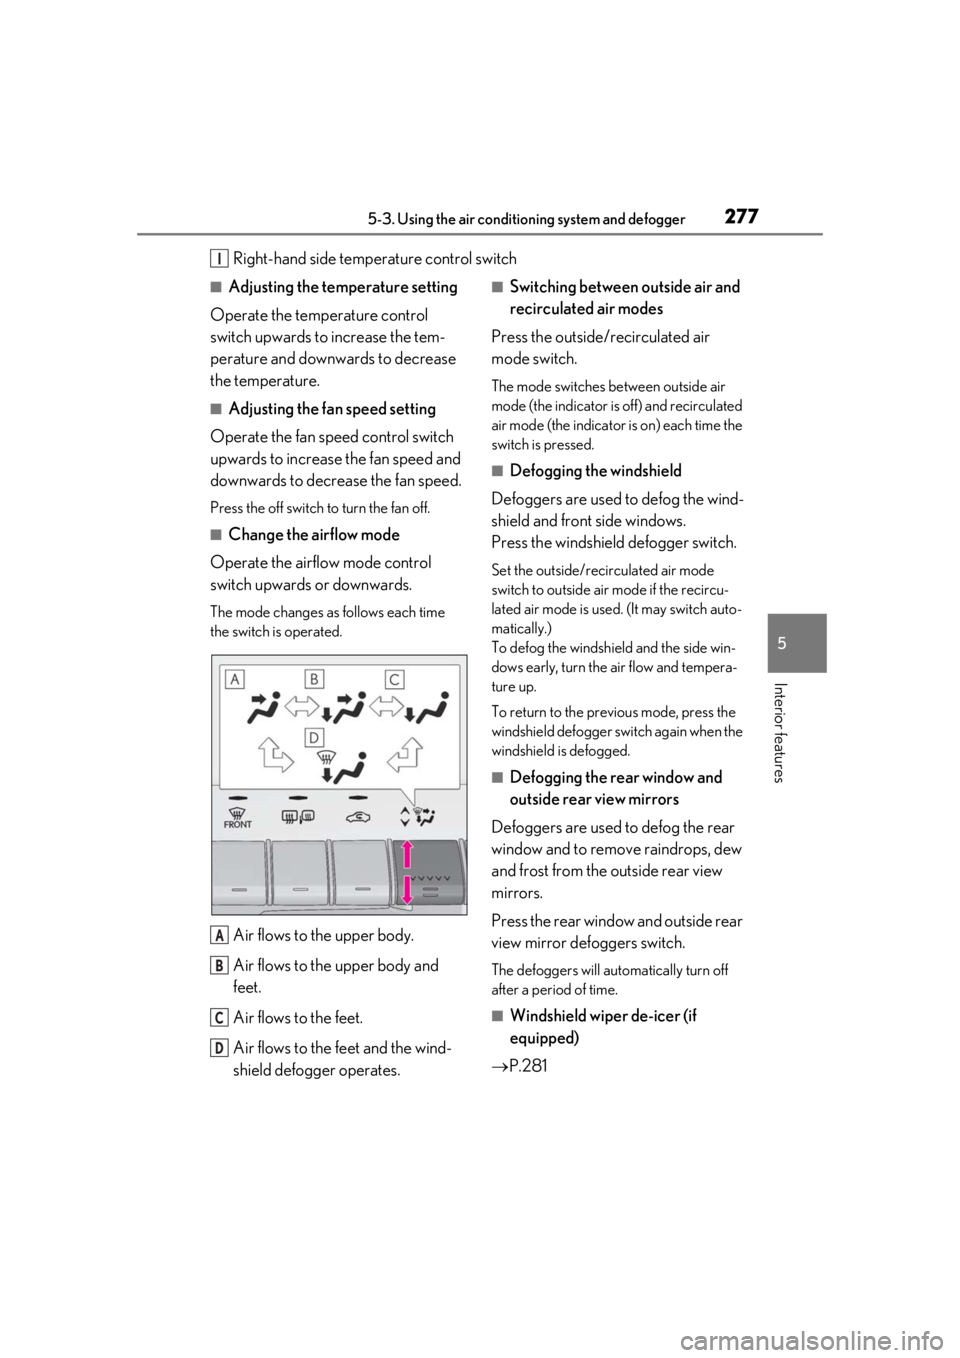
■Change the airflow mode
Operate the airflow mode control
switch upwards or downwards.
The mode changes as follows each time
the switch is operated.
Air flows to the upper body.
Air flows to the upper body and
feet.
Air flows to the feet.
Air flows to the feet and the wind-
shield defogger operates.
■Switching between outside air and
recirculated air modes
Press the outside/recirculated air
mode switch.
The mode switches between outside air
mode (the indicator is off) and recirculated
air mode (the indicator is on) each time the
switch is pressed.
■Defogging the windshield
Defoggers are used to defog the wind-
shield and front side windows.
Press the windshield defogger switch.
Set the outside/recirculated air mode
switch to outside air mode if the recircu-
lated air mode is used. (It may switch auto-
matically.)
To defog the windshield and the side win-
dows early, turn the air flow and tempera-
ture up.
To return to the previous mode, press the
windshield defogger sw itch again when the
windshield is defogged.
■Defogging the rear window and
outside rear view mirrors
Defoggers are used to defog the rear
window and to remove raindrops, dew
and frost from the outside rear view
mirrors.
Press the rear window and outside rear
view mirror defoggers switch.
The defoggers will automatically turn off
after a period of time.
■Windshield wiper de-icer (if
equipped)
P.281
I
A
B
C
D
Page 291 of 476

2915-4. Using the interior lights
5
Interior features
■Automatic turning on of the interior
lights
If any of the SRS airbags deploy (inflate) or
in the event of a strong rear impact, the inte-
rior lights will turn on automatically. The
interior lights will turn off automatically after
approximately 20 minutes. The interior
lights can be turned off manually. However,
in order to help prevent further collisions, it
is recommended that th ey be left on until
safety can be ensured. (The interior lights
may not turn on automatically depending
on the force of the impact and conditions of
the collision.)
■Customization
Setting (e.g. the time elapsed before lights
turn off) can be changed. (Customizable
features: P.444)
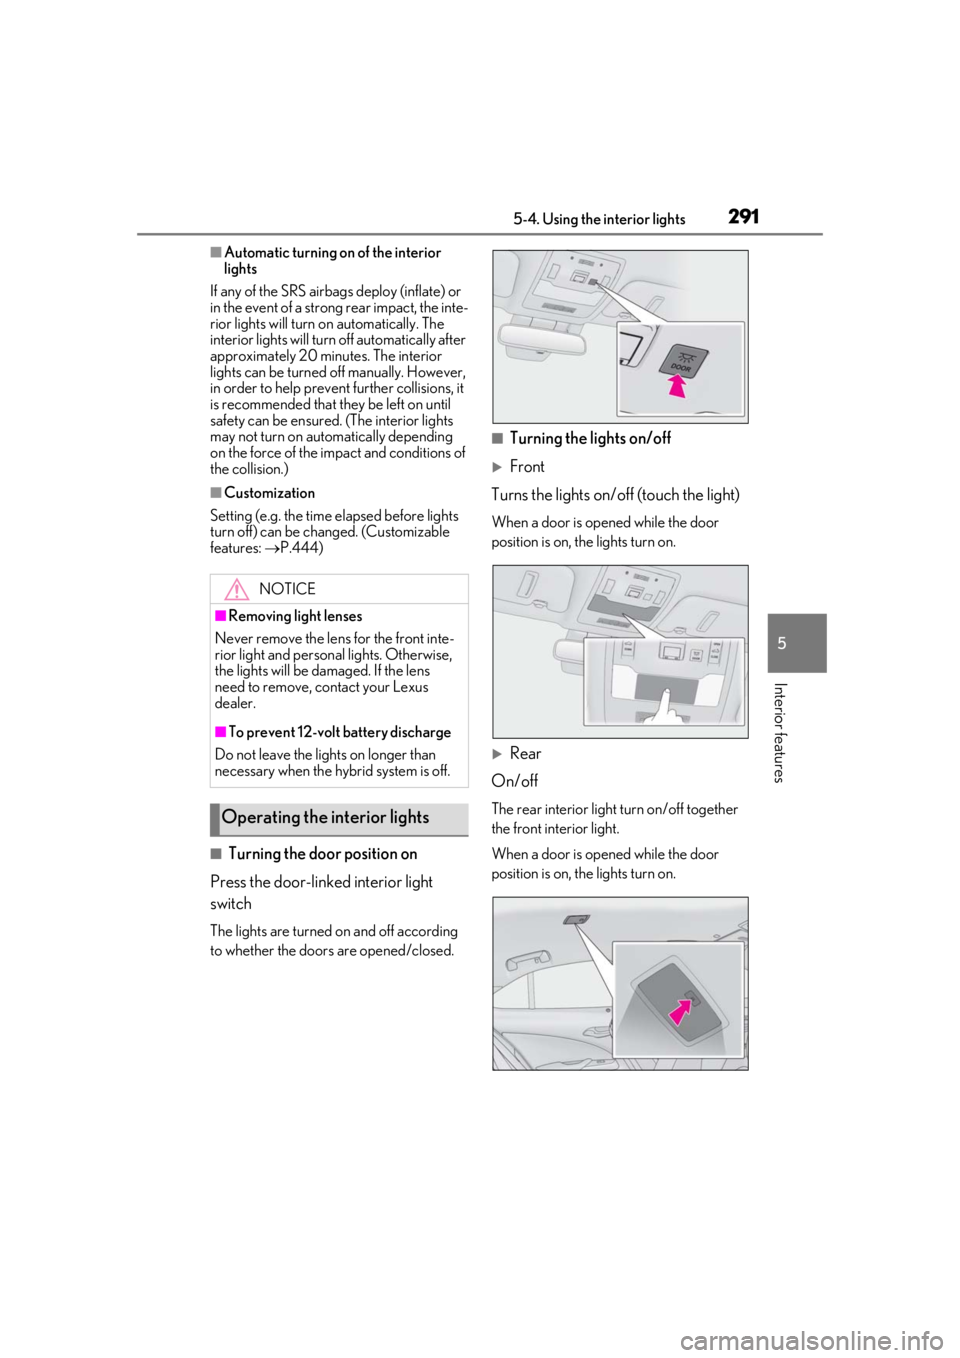
■Turning the door position on
Press the door-linked interior light
switch
The lights are turned on and off according
to whether the doors are opened/closed.
■Turning the lights on/off
Front
Turns the lights on/off (touch the light)
When a door is opened while the door
position is on, the lights turn on.
Rear
On/off
The rear interior light turn on/off together
the front interior light.
When a door is opened while the door
position is on, the lights turn on.
NOTICE
■Removing light lenses
Never remove the lens for the front inte-
rior light and personal lights. Otherwise,
the lights will be damaged. If the lens
need to remove, contact your Lexus
dealer.
■To prevent 12-volt battery discharge
Do not leave the lights on longer than
necessary when the hy brid system is off.
Operating the interior lights
Page 294 of 476

2945-5. Using the storage features
1Open (press the button)
2
Unlock with the mechanical key
3
Lock with the mechanical key
■Glove box light
The glove box light turns on when the tail
lights are on.
■Removing the partition
The partition inside the glove box can be
removed by pulling it.
Lift the lid while pushing the button to release the lock.
The console box can be opened from
either side.
■Front
■Rear
Pull down the armrest.
WARNING
■When storage compartments are not
in use
When driving or when the glove box and
the console box are not in use, keep it
closed.
In the event of sudden braking or sudden
swerving, an accident may occur due to
an occupant being struck by an open lid
or the items stored inside.
Glove box
Console box
Cup holders
Page 298 of 476

2985-5. Using the storage features
4Attach the string to the luggage
cover hook on the back door.
Left side
Pull the strap upwards to lift the side
deck board and remove it.
Right side
Pull the strap and fold the side deck
board.
■When installing the side deck board (left
side)
Insert the claw of the side deck board and
install it.
■Installing the luggage cover
1
Take out the luggage cover from
the bag.
2
Slowly unfold the luggage cover.
3
Attach the strings to the luggage
cover hooks.
Make sure that the side the strings are
WARNING
■If the deck boards are opened or
removed
Return them to their original positions
before driving. In the event of sudden
braking, an accident may occur due to an
occupant being struck by the deck
boards or the items stored in the deck
under tray.
NOTICE
■To prevent damage to the deck board
When closing the back door, do not
leave the deck board string attached to
the hook.
Luggage cover