2019 JEEP GRAND CHEROKEE LIMITED height
[x] Cancel search: heightPage 52 of 626
Adjusting The Seat Up Or Down
The height of the seats can be adjusted up or down. Pull
upward or push downward on the seat switch; the seat will
move in the direction of the switch. Release the switch
when the desired position has been reached.
Tilting The Seat Up Or Down
The angle of the seat cushion can be adjusted up or down.
Pull upward or push downward on the front of the seat
switch. The front of the seat cushion will move in the
direction of the switch. Release the switch when the
desired position has been reached.
Reclining The Seatback
The angle of the seatback can be adjusted forward or
rearward. Push the seatback switch forward or rearward,
the seat will move in the direction of the switch. Release the
switch when the desired position is reached.CAUTION!
Do not place any article under a power seat or impede
its ability to move as it may cause damage to the seat
controls. Seat travel may become limited if movement
is stopped by an obstruction in the seat’s path.
50 GETTING TO KNOW YOUR VEHICLE
Page 63 of 626
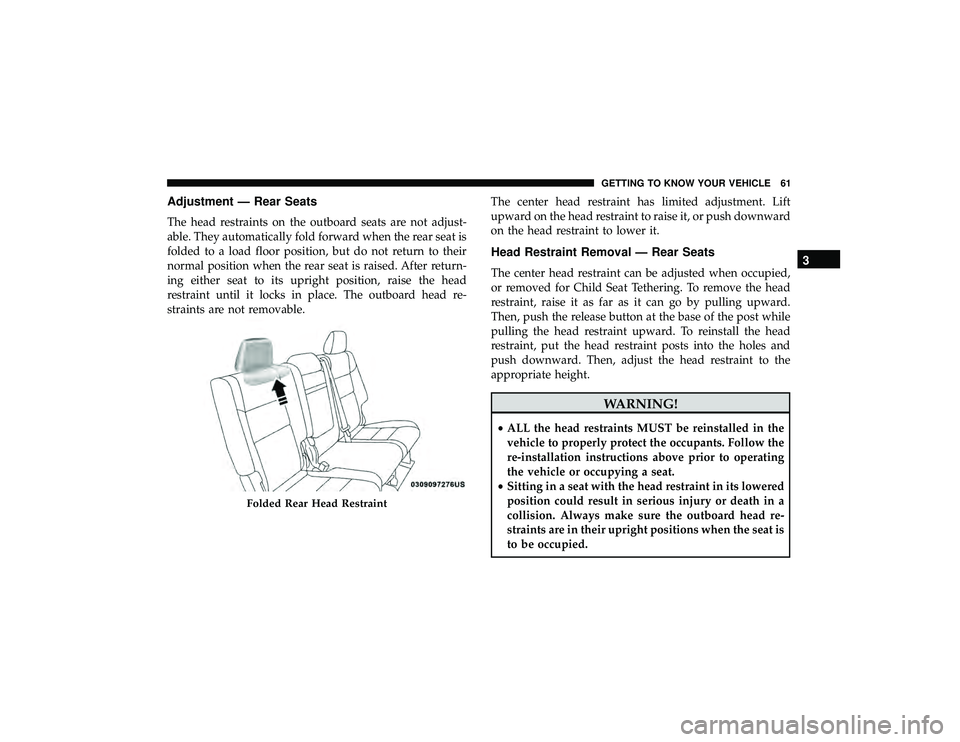
Adjustment — Rear Seats
The head restraints on the outboard seats are not adjust-
able. They automatically fold forward when the rear seat is
folded to a load floor position, but do not return to their
normal position when the rear seat is raised. After return-
ing either seat to its upright position, raise the head
restraint until it locks in place. The outboard head re-
straints are not removable.The center head restraint has limited adjustment. Lift
upward on the head restraint to raise it, or push downward
on the head restraint to lower it.
Head Restraint Removal — Rear Seats
The center head restraint can be adjusted when occupied,
or removed for Child Seat Tethering. To remove the head
restraint, raise it as far as it can go by pulling upward.
Then, push the release button at the base of the post while
pulling the head restraint upward. To reinstall the head
restraint, put the head restraint posts into the holes and
push downward. Then, adjust the head restraint to the
appropriate height.
Folded Rear Head Restraint
3
GETTING TO KNOW YOUR VEHICLE 61
Page 142 of 626
•Right Front Turn Signal Light Out
• Right Rear Turn Signal Light Out
• Left Front Turn Signal Light Out
• Left Rear Turn Signal Light Out
• Ignition Or Accessory On
• Vehicle Not In Park
• Remote Start Active Push Start Button — If Equipped
• Remote Start Canceled Fuel Low — If Equipped
• Remote Start Canceled Too Cold — If Equipped
• Remote Start Canceled Door Open — If Equipped
• Remote Start Canceled Hood Open — If Equipped
• Remote Start Canceled Liftgate Open — If Equipped
• Remote Start Canceled Time Expired — If Equipped
• Remote Start Disabled Start To Reset — If Equipped
• Service Air Bag System
• Service Air Bag Warning Light
• Door Open
• Doors Open •
Liftgate Open
• Hood Open
• Shift Not Allowed
• Vehicle Speed Is Too High To Shift To D
• Vehicle Speed Is Too High To Shift To R
• Vehicle Speed Is Too High To Shift To P
• Service Transmission
• Service Shifter
• Service Air Suspension System
• Normal Ride Height Achieved
• Aerodynamic Ride Height Achieved
• Off Road 1 Ride Height Achieved
• Off Road 2 Ride Height Achieved
• Entry/Exit Ride Height Achieved
• Selected Ride Height Not Permitted
• Service Air Suspension System Immediately
• Reduce Speed To Maintain Selected Ride Height
• Air Suspension System Cooling Down Please Wait
140 GETTING TO KNOW YOUR INSTRUMENT PANEL
Page 143 of 626
•Vehicle Cannot Be Lowered Door Open
• Air Suspension Temporarily Disabled
• Battery Low Start Engine To Change Ride Height
For further information on the color warning and indicator
lights in the instrument cluster, refer to “Warning Lights
And Messages” in “Getting To Know Your Instrument
Panel”.
Instrument Cluster Display Menu Items
The instrument cluster display can be used to view the
main menu items for several features. Use the upand
down arrow buttons to scroll through the driver interactive
display menu options until the desired menu is reached.
NOTE: Depending on the vehicle’s options, feature set-
tings may vary.
Speedometer
Push and release the upordown arrow button until the
main gauge menu icon is displayed in the instrument
cluster display. Push and release the leftorright arrow
button to select the analog or digital type speedometer
display. Push and release the OKbutton to toggle units
(mph or km/h) of the speedometer.
Accessibility — If Equipped
Accessibility is a feature of the DVD/Blu-ray system that
announces a function prior to performing the action. For
further information refer to “Uconnect Settings” in “Mul-
timedia.”
Vehicle Info
Push and release the upordown arrow button until the
Vehicle Info menu icon is displayed in the instrument
cluster display. Push and release the leftorright arrow
button to scroll through the information submenus and
push and release the OKbutton to select or reset the
resettable submenus.
Page 228 of 626
Before buying any restraint system, make sure that it has a
label certifying that it meets all applicable Safety Stan-
dards. You should also make sure that you can install it in
the vehicle where you will use it.
NOTE:
•For additional information, refer to http://
www.nhtsa.gov/parents-and-caregivers or call: 1–888–
327–4236 •
Canadian residents should refer to Transport Canada’s
website for additional information: http://
www.tc.gc.ca/eng/motorvehiclesafety/safedrivers-
childsafety-index-53.htm
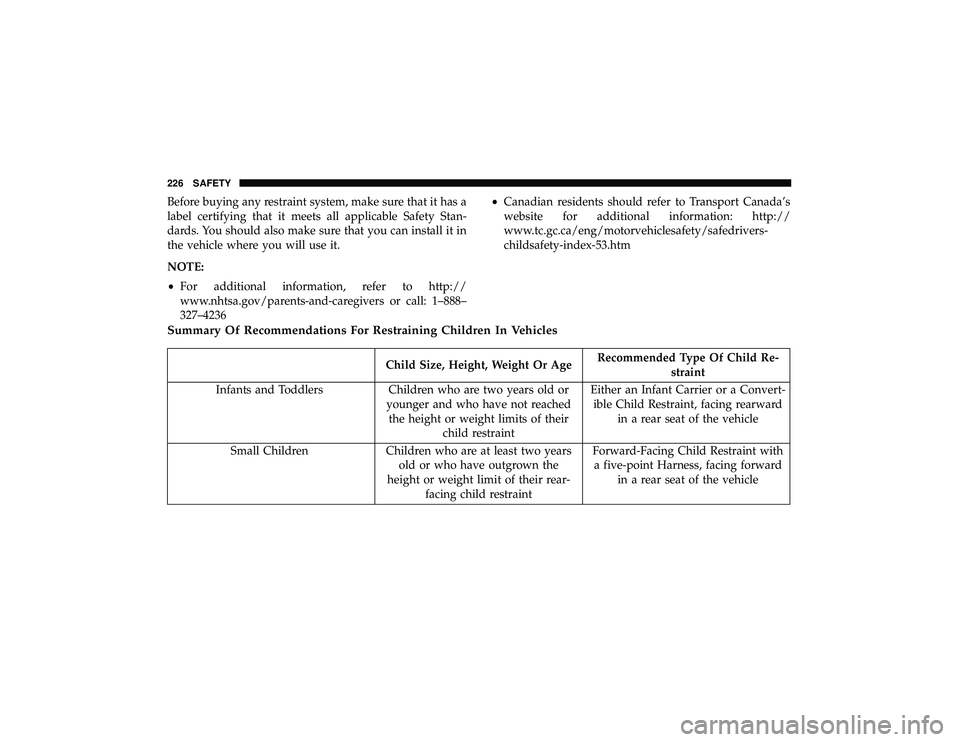
Summary Of Recommendations For Restraining Children In Vehicles
Child Size, Height, Weight Or Age Recommended Type Of Child Re-
straint
Infants and Toddlers Children who are two years old or younger and who have not reachedthe height or weight limits of their child restraint Either an Infant Carrier or a Convert-
ible Child Restraint, facing rearward in a rear seat of the vehicle
Small Children Children who are at least two years old or who have outgrown the
height or weight limit of their rear- facing child restraint Forward-Facing Child Restraint with
a five-point Harness, facing forward in a rear seat of the vehicle
226 SAFETY
Page 229 of 626
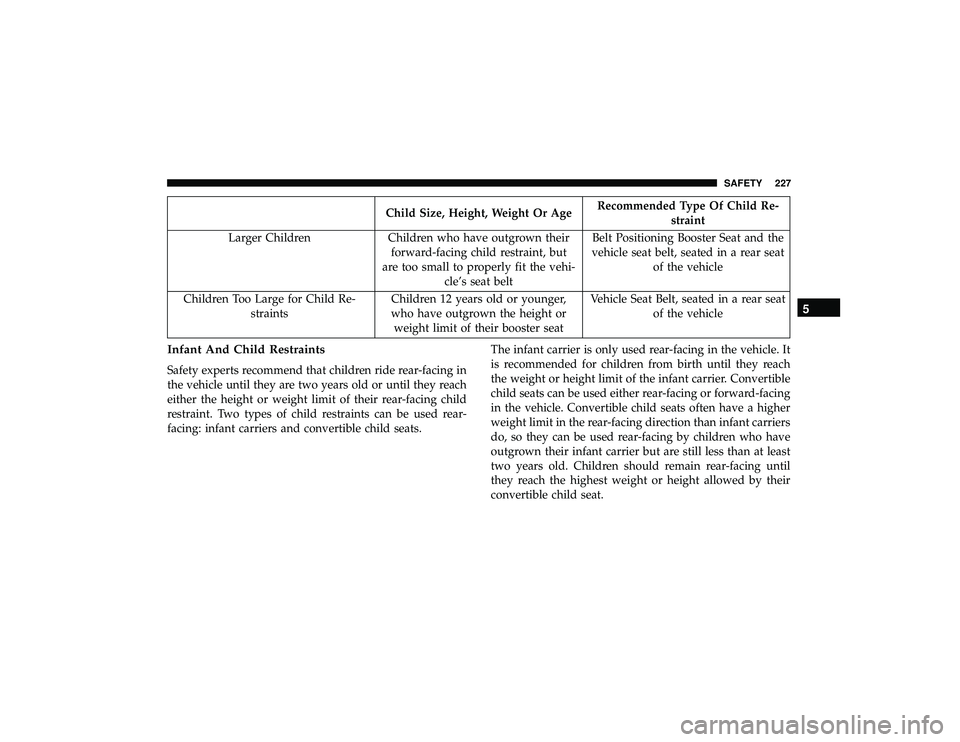
Child Size, Height, Weight Or AgeRecommended Type Of Child Re-
straint
Larger Children Children who have outgrown their forward-facing child restraint, but
are too small to properly fit the vehi- cle’s seat belt Belt Positioning Booster Seat and the
vehicle seat belt, seated in a rear seat of the vehicle
Children Too Large for Child Re- straints Children 12 years old or younger,
who have outgrown the height or weight limit of their booster seat Vehicle Seat Belt, seated in a rear seat
of the vehicle
Infant And Child Restraints
Safety experts recommend that children ride rear-facing in
the vehicle until they are two years old or until they reach
either the height or weight limit of their rear-facing child
restraint. Two types of child restraints can be used rear-
facing: infant carriers and convertible child seats. The infant carrier is only used rear-facing in the vehicle. It
is recommended for children from birth until they reach
the weight or height limit of the infant carrier. Convertible
child seats can be used either rear-facing or forward-facing
in the vehicle. Convertible child seats often have a higher
weight limit in the rear-facing direction than infant carriers
do, so they can be used rear-facing by children who have
outgrown their infant carrier but are still less than at least
two years old. Children should remain rear-facing until
they reach the highest weight or height allowed by their
convertible child seat.
5
SAFETY 227
Page 230 of 626
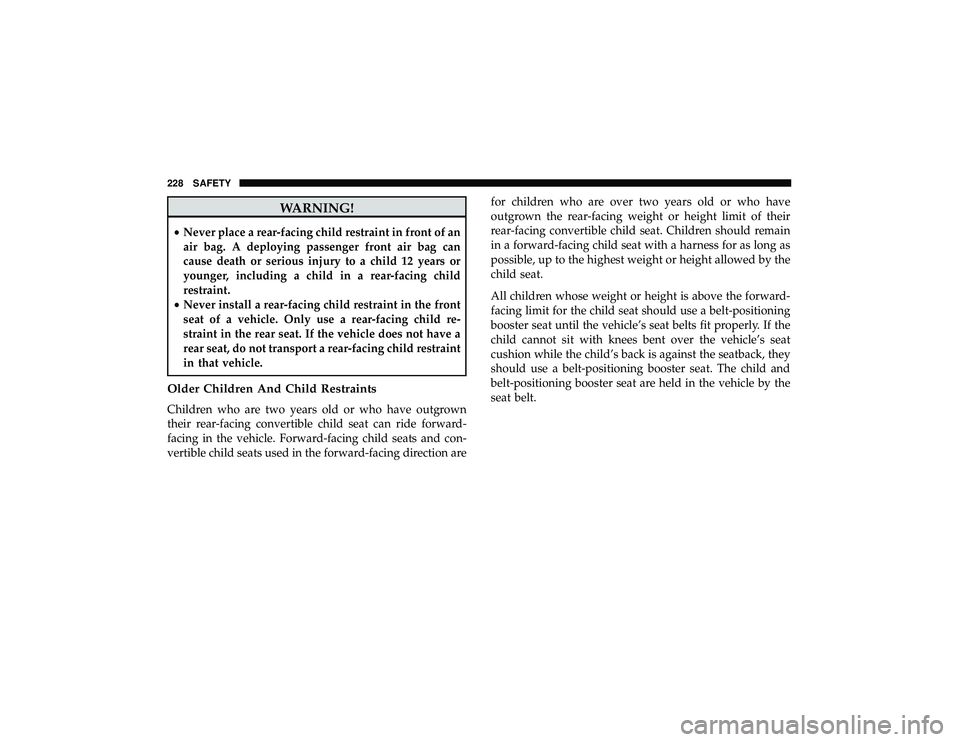
WARNING!
•Never place a rear-facing child restraint in front of an
air bag. A deploying passenger front air bag can
cause death or serious injury to a child 12 years or
younger, including a child in a rear-facing child
restraint.
• Never install a rear-facing child restraint in the front
seat of a vehicle. Only use a rear-facing child re-
straint in the rear seat. If the vehicle does not have a
rear seat, do not transport a rear-facing child restraint
in that vehicle.
Older Children And Child Restraints
Children who are two years old or who have outgrown
their rear-facing convertible child seat can ride forward-
facing in the vehicle. Forward-facing child seats and con-
vertible child seats used in the forward-facing direction are for children who are over two years old or who have
outgrown the rear-facing weight or height limit of their
rear-facing convertible child seat. Children should remain
in a forward-facing child seat with a harness for as long as
possible, up to the highest weight or height allowed by the
child seat.
All children whose weight or height is above the forward-
facing limit for the child seat should use a belt-positioning
booster seat until the vehicle’s seat belts fit properly. If the
child cannot sit with knees bent over the vehicle’s seat
cushion while the child’s back is against the seatback, they
should use a belt-positioning booster seat. The child and
belt-positioning booster seat are held in the vehicle by the
seat belt.
228 SAFETY
Page 278 of 626
NOTE:
•If shift conditions/interlocks are not met, or a transfer
case motor temperature protection condition exists, a
“For 4x4 High Slow Below 3 mph (5 km/h) Put Trans in
N push 4 Low” message will flash from the instrument
cluster display. Refer to “Instrument Cluster Display” in
“Getting To Know Your Instrument Panel” for further
information.
• Shifting into or out of 4WD LOW is possible with the
vehicle completely stopped; however, difficulty may
occur due to the mating clutch teeth not being properly
aligned. Several attempts may be required for clutch
teeth alignment and shift completion to occur. The
preferred method is with the vehicle rolling 0 to 3 mph
(0 to 5 km/h). If the vehicle is moving faster than 3 mph
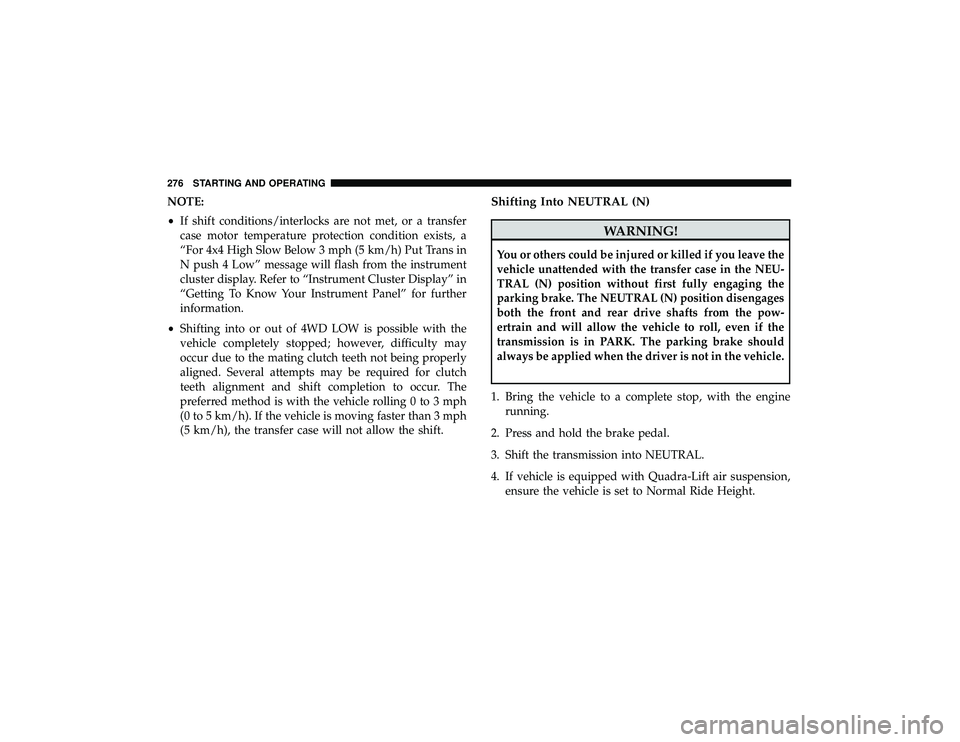
(5 km/h), the transfer case will not allow the shift.Shifting Into NEUTRAL (N)
WARNING!
You or others could be injured or killed if you leave the
vehicle unattended with the transfer case in the NEU-
TRAL (N) position without first fully engaging the
parking brake. The NEUTRAL (N) position disengages
both the front and rear drive shafts from the pow-
ertrain and will allow the vehicle to roll, even if the
transmission is in PARK. The parking brake should
always be applied when the driver is not in the vehicle.
1. Bring the vehicle to a complete stop, with the engine running.
2. Press and hold the brake pedal.
3. Shift the transmission into NEUTRAL.
4. If vehicle is equipped with Quadra-Lift air suspension, ensure the vehicle is set to Normal Ride Height.
276 STARTING AND OPERATING