Page 129 of 344
WARNING!
• Use the seat belt to install a child seat in
the center seating position.
• Never use the same lower anchorage to
attach more than one child restraint.
Please refer to “To Install An ISOFIX
Child Restraint” for typical installation
instructions.
Suitability Of Passenger Seats For ISOFIX
Child Restraint System Use
The table below shows the various installa-
tion possibilities for ISOFIX child restraint
systems on seats fitted with ISOFIX anchor-
ages in accordance with European standard
ECE 16.
Vehicle ISOFIX Positions Table
Mass Group Size Class FixtureFront Passen-
gerRear Outboard
Rt./Lt.Rear CenterIntermediate
OutboardIntermediate
CenterOther Sites
CarrycotF ISO/L1 X X X N/A N/A N/A
G ISO/L2 X X X N/A N/A N/A
(1) X N/A X N/A N/A N/A
0—upto
10 kgE ISO/R1 X IUF/IUF X N/A N/A N/A
(1) X N/A X N/A N/A N/A
0+—upto
13 kgE ISO/R1 X IUF/IUF X N/A N/A N/A
D ISO/R2 X IUF/IUF X N/A N/A N/A
C ISO/R3 X IUF/IUF X N/A N/A N/A
(1) X X X N/A N/A N/A
127
Page 130 of 344

Mass Group Size Class FixtureFront Passen-
gerRear Outboard
Rt./Lt.Rear CenterIntermediate
OutboardIntermediate
CenterOther Sites
I–9to18kgD ISO/R2 X IUF/IUF X N/A N/A N/A
C ISO/R3 X IUF/IUF X N/A N/A N/A
B ISO/F2 X IUF/IUF X N/A N/A N/A
B1 ISO/F2X X IUF/IUF X N/A N/A N/A
A ISO/F3 X IUF/IUF X N/A N/A N/A
(1) X N/A X N/A N/A N/A
II–15to
25 kg(1) X N/A X N/A N/A N/A
III–22to
36 kg(1) X N/A X N/A N/A N/A
Key of letters used in the tables above:
• (1) = For the CRS which do not carry the
ISO/XX size class identification (A to G), for
the applicable mass group, the car manu-
facturer shall indicate the vehicle specific
ISOFIX child restraint system(s) recom-
mended for each position.
• IUF = Suitable for ISOFIX forward child
restraint systems of universal category ap-
proved for use in the mass group.
• X = ISOFIX position not suitable for ISOFIX
child restraint systems in this mass group
and/or this size class.Always follow the directions of the child re-
straint manufacturer when installing your child
restraint. Not all child restraint systems will be
installed as described here. When using a Uni-
versal ISOFIX child restraint system, you can
only use approved child restraint systems with
the marking ECE R44 (release R44/03 or supe-
rior) “Universal ISOFIX”.
To Install An ISOFIX Child Restraint
If the selected seating position has a Switch-
able Automatic Locking Retractor (ALR) seat
belt, stow the seat belt, following the instruc-tions below. See the section “Installing Child
Restraints Using the Vehicle Seat Belt” to
check what type of seat belt each seating
position has.
1. Loosen the adjusters on the lower connec-
tors and on the tether strap of the child
seat so that you can more easily attach the
connectors to the vehicle anchorages.
2. Place the child seat between the lower
anchorages for that seating position. For
some second row seats, you may need to
recline the seat and / or raise the head
restraint to get a better fit. If the rear seat
SAFETY
128
Page 131 of 344

can be moved forward and rearward in the
vehicle, you may wish to move it to its
rear-most position to make room for the
child seat. You may also move the front
seat forward to allow more room for the
child seat.
3. Attach the connectors of the child re-
straint to the lower anchorages in the
selected seating position.
4. If the child restraint has a tether strap,
connect it to the top tether anchorage.
See the section “Installing Child Re-
straints Using the Top Tether Anchorage”
for directions to attach a tether anchor.
5. Tighten all of the straps as you push the
child restraint rearward and downward
into the seat. Remove slack in the straps
according to the child restraint manufac-
turer’s instructions.
6. Test that the child restraint is installed
tightly by pulling back and forth on the
child seat at the belt path. It should not
move more than 25 mm in any direction.WARNING!
• Improper installation of a child restraint
to the ISOFIX anchorages can lead to
failure of the restraint. The child could
be badly injured or killed. Follow the
child restraint manufacturer’s directions
exactly when installing an infant or child
restraint.
• Child restraint anchorages are designed
to withstand only those loads imposed
by correctly-fitted child restraints. Un-
der no circumstances are they to be used
for adult seat belts, harnesses, or for
attaching other items or equipment to
the vehicle.
• Install the child restraint system when
the vehicle is stationary. The ISOFIX
child restraint system is correctly fixed
to the brackets when you hear the click.
Installing Child Restraints Using The Top
Tether Anchorage
1. Look behind the seating position where
you plan to install the child restraint to
find the tether anchorage. You may need
to move the seat forward to provide better
access to the tether anchorage. If there is
no top tether anchorage for that seating
position, move the child restraint to an-
other position in the vehicle if one is
available.
2. Route the tether strap to provide the most
direct path for the strap between the an-
chor and the child seat. If your vehicle is
equipped with adjustable rear head re-
straints, raise the head restraint, and
where possible, route the tether strap un-
der the head restraint and between the
two posts. If not possible, lower the head
restraint and pass the tether strap around
the outboard side of the head restraint.
129
Page 132 of 344

3. Attach the tether strap hook of the child
restraint to the top tether anchorage as
shown in the diagram.
4. Remove slack in the tether strap accord-
ing to the child restraint manufacturer’s
instructions.
WARNING!
• An incorrectly anchored tether strap
could lead to increased head motion and
possible injury to the child. Use only the
anchorage position directly behind the
child seat to secure a child restraint top
tether strap.
• If your vehicle is equipped with a split
rear seat, make sure the tether strap
does not slip into the opening between
the seatbacks as you remove slack in the
strap.
How To Stow An Unused Switchable-ALR
(ALR) Seat Belt:
When using the ISOFIX attaching system to
install a child restraint, stow all ALR seat
belts that are not being used by other occu-
pants or being used to secure child restraints.
An unused belt could injure a child if they
play with it and accidentally lock the seat belt
retractor. Before installing a child restraint
using the ISOFIX system, buckle the seat belt
behind the child restraint and out of the
child’s reach. If the buckled seat belt inter-
feres with the child restraint installation,instead of buckling it behind the child re-
straint, route the seat belt through the child
restraint belt path and then buckle it. Do not
lock the seat belt. Remind all children in the
vehicle that the seat belts are not toys and
that they should not play with them.
Installing Child Restraints Using The Ve-
hicle Seat Belt
Child restraint systems are designed to be
secured in vehicle seats by lap belts or the
lap belt portion of a lap/shoulder belt.
WARNING!
• Improper installation or failure to prop-
erly secure a child restraint can lead to
failure of the restraint. The child could
be badly injured or killed.
• Follow the child restraint manufactur-
er’s directions exactly when installing an
infant or child restraint.
The seat belts in the rear passenger seating
positions are equipped with a Switchable
Automatic Locking Retractor (ALR) that is
designed to keep the lap portion of the seat
belt tight around the child restraint. The ALRTether Anchorage Locations
SAFETY
130
Page 133 of 344

retractor can be “switched” into a locked
mode by pulling all of the webbing out of the
retractor and then letting the webbing retract
back into the retractor. If it is locked, the ALR
will make a clicking noise while the webbing
is pulled back into the retractor. Refer to the
“Automatic Locking Mode” description in
“Switchable Automatic Locking Retractors
(ALR)” under “Occupant Restraint Systems”
for additional information on ALR.
Installing A Child Restraint With A Switch-
able Automatic Locking Retractor (ALR)
Child restraint systems are designed to be
secured in vehicle seats by lap belts or the lap
belt portion of a lap/shoulder belt.
WARNING!
• Improper installation or failure to prop-
erly secure a child restraint can lead to
failure of the restraint. The child could
be badly injured or killed.
WARNING!
• Follow the child restraint manufacturer’s
directions exactly when installing an in-
fant or child restraint.
1. Place the child seat in the center of the
seating position. For some second row
seats, you may need to recline the seat
and/or raise the head restraint to get a
better fit. If the rear seat can be moved
forward and rearward in the vehicle, you
may wish to move it to its rear-most posi-
tion to make room for the child seat. You
may also move the front seat forward to
allow more room for the child seat.
2. Pull enough of the seat belt webbing from
the retractor to pass it through the belt
path of the child restraint. Do not twist the
belt webbing in the belt path.
3. Slide the latch plate into the buckle until
you hear a “click.”
4. Pull on the webbing to make the lap
portion tight against the child seat.5. To lock the seat belt, pull down on the
shoulder part of the belt until you have
pulled all the seat belt webbing out of the
retractor. Then, allow the webbing to re-
tract back into the retractor. As the web-
bing retracts, you will hear a clicking
sound. This means the seat belt is now in
the Automatic Locking mode.
6. Try to pull the webbing out of the retractor.
If it is locked, you should not be able to
pull out any webbing. If the retractor is not
locked, repeat step 5.
7. Finally, pull up on any excess webbing to
tighten the lap portion around the child
restraint while you push the child restraint
rearward and downward into the vehicle
seat.
8. Test that the child restraint is installed
tightly by pulling back and forth on the
child seat at the belt path. It should not
move more than 25 mm in any direction.
Any seat belt system will loosen with time, so
check the belt occasionally, and pull it tight if
necessary.
131
Page 134 of 344

Suitability of Passenger Seats for i-Size
Child Restraint System Use
The rear outboard seats of the vehicle are
type-approved to house the state-of-the-art
i-Size child restraint systems.
These child restraint systems, built and type-
approved according to the i-Size (ECE R129)
standard, ensure better safety conditions to
carry children on board a vehicle:
• The child must be transported rearward
facing until 15 months:
• Child restraint system protection is in-
creased in the event of a side collision:
• The use of the ISOFIX system is promoted
to avoid faulty installation of the child re-
straint system:
• Efficiency in the choice of the child re-
straint system, which isn't made according
to weight anymore but according to the
child's height, is increased:• Compatibility between the vehicle seats
and the child restraint systems is better:
the i-Size child restraint systems can be
considered as "Super ISOFIX"; this means
that they can be perfectly fitted in type-
approved i-Size seats, but can also be fitted
in ISOFIX (ECE R44) type-approved seats.
NOTE:
The vehicle seats, i-Size type-approved, are
marked by the symbol shown in Figure XX.
The following table, according to
European standard ECE 129, in-
dicates the possibility of i-Size
child restraint system installa-
tion.
i-Size Child Seat Position Table
DeviceFront
Passen-
gerRear
Out-
boardRear
Center
i-Size
Child
Re-
straint
Sys-
temsISO/R2 X i-U X
ISO/F2 X i-U X
Key of letters used in the table above:
• i-U = Suitable for Universal i-Size child
restraint systems, both rearward facing and
forward facing.
• X = Seat not suitable for Universal i-Size
child restraint systems.
Child Restraint Systems Recommended By
FCA For Your Vehicle
Lineaccessori includes a complete range of
child restraint systems to be fixed using the
seat belt with three anchorage points or the
ISOFIX anchorages.
Figure XX
SAFETY
132
Page 135 of 344
Weight Group Child Restraint SystemType Of Child Restraint
SystemChild restraint System
Installation
Group 0+ : from birth to 13 kg
from 40 cm to 80 cm
Peg Pérego Primo Viaggio
SL
Universal/ISOFIX child
restraint system. It must
be installed facing rear-
wards, using the vehicle
seat belts only, or the
dedicated ISOFIX base
(which can be purchased
separately) and the ve-
hicle ISOFIX anchorages.
It must be fitted on the
rear outer seats.
Peg Pérego ISOFIX 0+1 K
Base
133
Page 136 of 344
Weight Group Child Restraint SystemType Of Child Restraint
SystemChild restraint System
Installation
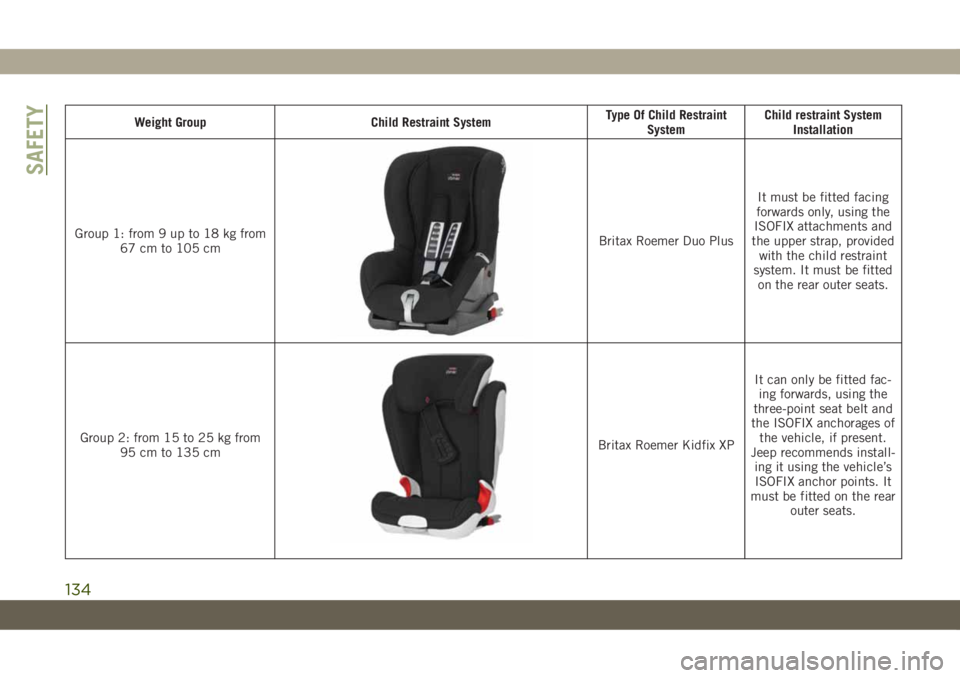
Group 1: from 9 up to 18 kg from
67 cm to 105 cm
Britax Roemer Duo PlusIt must be fitted facing
forwards only, using the
ISOFIX attachments and
the upper strap, provided
with the child restraint
system. It must be fitted
on the rear outer seats.
Group 2: from 15 to 25 kg from
95 cm to 135 cm
Britax Roemer Kidfix XPIt can only be fitted fac-
ing forwards, using the
three-point seat belt and
the ISOFIX anchorages of
the vehicle, if present.
Jeep recommends install-
ing it using the vehicle’s
ISOFIX anchor points. It
must be fitted on the rear
outer seats.
SAFETY
134