2019 JEEP CHEROKEE pairing phone
[x] Cancel search: pairing phonePage 11 of 344

RAISING THE VEHICLE................. 239
TIRES.......................... 239
Tires — General Information......... 239
Tire Types..................... 244
Spare Tires — If Equipped........... 244
Wheel And Wheel Trim Care.......... 246
Tire Chains (Traction Devices)......... 247
Tire Rotation Recommendations........ 248
STORING THE VEHICLE................ 249
BODYWORK....................... 250
Preserving The Bodywork............ 250
INTERIORS....................... 251Seats And Fabric Parts............. 251
Plastic And Coated Parts............ 251
Leather Parts................... 252
Glass Surfaces.................. 252
TECHNICAL SPECIFICATIONS
VEHICLE IDENTIFICATION NUMBER.......... 253
WHEEL AND TIRE TORQUE SPECIFICATIONS.... 253
Torque Specifications.............. 254
FUEL REQUIREMENTS — GASOLINE ENGINE.... 254Methanol..................... 255
Ethanol....................... 255
Clean Air Gasoline................ 255
CNG And LP Fuel System Modifications . . . 255
MMT In Gasoline................. 256
Materials Added To Fuel............ 256
Fuel Icon Identification Compliant To
EN16942..................... 256
FUEL REQUIREMENTS — DIESEL ENGINE...... 258Fuel Icon Identification Compliant To
EN16942..................... 259
FLUID CAPACITIES................... 260
FLUIDS AND LUBRICANTS............... 262
Engine....................... 262
Chassis....................... 265
FUEL CONSUMPTION AND CO2EMISSIONS..... 265
MOPAR ACCESSORIES................. 265
Authentic Accessories By Mopar........ 265
MULTIMEDIA
CYBERSECURITY................... 267
UCONNECT 3 WITH 5–INCH DISPLAY — IF
EQUIPPED....................... 268
Uconnect 3 With 5–inch Display At A
Glance....................... 268
Clock Setting................... 269
Audio Setting................... 269
Radio Operation................. 270
Voice Text Reply
(Not Compatible With iPhone)........ 270
Apps — If Equipped............... 271
UCONNECT 4 WITH 7-INCH DISPLAY......... 272Uconnect 4 At A Glance............ 272
Drag & Drop Menu Bar............. 273
Radio....................... 274
Android Auto — If Equipped.......... 275
Apple CarPlay Integration — If Equipped . . 276
Apps — If Equipped............... 277
UCONNECT 4C/4C NAV WITH 8.4-INCH DISPLAY . . 278Uconnect 4C/4C NAV At A Glance...... 278
Drag & Drop Menu Bar............. 279
Radio....................... 280
Android Auto — If Equipped.......... 281
Apple CarPlay Integration — If Equipped . . 285
Apps — If Equipped............... 287
UCONNECT SETTINGS................ 288
TIPS CONTROLS AND GENERAL INFORMATION . . . 288
Steering Wheel Audio Controls........ 288
AUX/USB/MP3 CONTROL — IF EQUIPPED...... 289
NAVIGATION — IF EQUIPPED............. 290
Changing The Navigation Voice Prompt
Volume....................... 290
Finding Points Of Interest........... 292
Finding A Place By Spelling The Name . . . 292
One-Step Voice Destination Entry....... 292
Setting Your Home Location.......... 292
Home........................ 292
Adding A Stop.................. 294
Taking A Detour.................. 294
Map Update.................... 294
UCONNECT PHONE.................. 295Uconnect Phone (Bluetooth Hands Free
Calling)...................... 295
Pairing (Wirelessly Connecting) Your Mobile
Phone To The Uconnect System....... 298
Common Phone Commands (Examples) . . . 301
Mute (Or Unmute) Microphone During Call . 302
Transfer Ongoing Call Between Handset And
Vehicle...................... 302
Phonebook.................... 302
Voice Command Tips.............. 302
Changing The Volume.............. 302
Using Do Not Disturb.............. 302
Incoming Text Messages............ 303
Helpful Tips And Common Questions To Improve
Bluetooth Performance With Your Uconnect
System...................... 304
9
Page 299 of 344

Uconnect 4C/4C NAV With 8.4–inch Display Radio Phone Menu
1 — Currently Paired Mobile Phone
2 — Mobile Phone Signal Strength
3 — Do Not Disturb
4 — Reply with Text Message**
5 — Current Phone Contact’s Name
6 — Conference Call*
7 — Phone Pairing
8 — Text Messaging Menu**
9 — Direct Dial Pad
10 — Contact Menu11 — Recent Call Log
12 — Favorite Contacts
13 — Mute Microphone
14 — Decline Incoming Call
15 — Answer/Redial/Hold
16 — Mobile Phone Battery Life
17 — Transfer To/From Uconnect System
* — Conference call feature only available on GSM mobile devices
** — Text messaging feature not available on all mobile phones (requires
Bluetooth MAP profile)
297
Page 300 of 344
The Uconnect Phone feature enables you to
place and receive hands-free mobile phone
calls. Drivers can also place mobile phone
calls using their voice or by using the buttons
on the touchscreen (see Voice Command sec-
tion).
The hands-free calling feature is made pos-
sible through Bluetooth technology — the
global standard that enables different elec-
tronic devices to connect to each other wire-
lessly.
If the Uconnect Phone Button
exists on
your steering wheel, you then have the
Uconnect Phone features.
NOTE:
• The Uconnect Phone requires a mobile
phone equipped with the Bluetooth Hands-
Free Profile, Version 1.0 or higher.
• Most mobile phones/devices are compat-
ible with the Uconnect system, however
some mobile phones/devices may not be
equipped with all of the required features
to utilize all of the Uconnect system fea-
tures.• For Uconnect Customer Care:
• Visit: DriveUconnect.eu
• Or visit an authorized dealer
Pairing (Wirelessly Connecting) Your
Mobile Phone To The Uconnect System
Mobile phone pairing is the process of estab-
lishing a wireless connection between a cel-
lular phone and the Uconnect system.
NOTE:
• To use the Uconnect Phone feature, you
first must determine if your mobile phone
and software are compatible with the
Uconnect system. Please visit
www.DriveUconnect.eu or an authorized
dealer for complete mobile phone compat-
ibility information.
• Mobile phone pairing is not available while
the vehicle is in motion.
• A maximum of ten mobile phones can be
paired to the Uconnect system.Start Pairing Procedure On The Radio
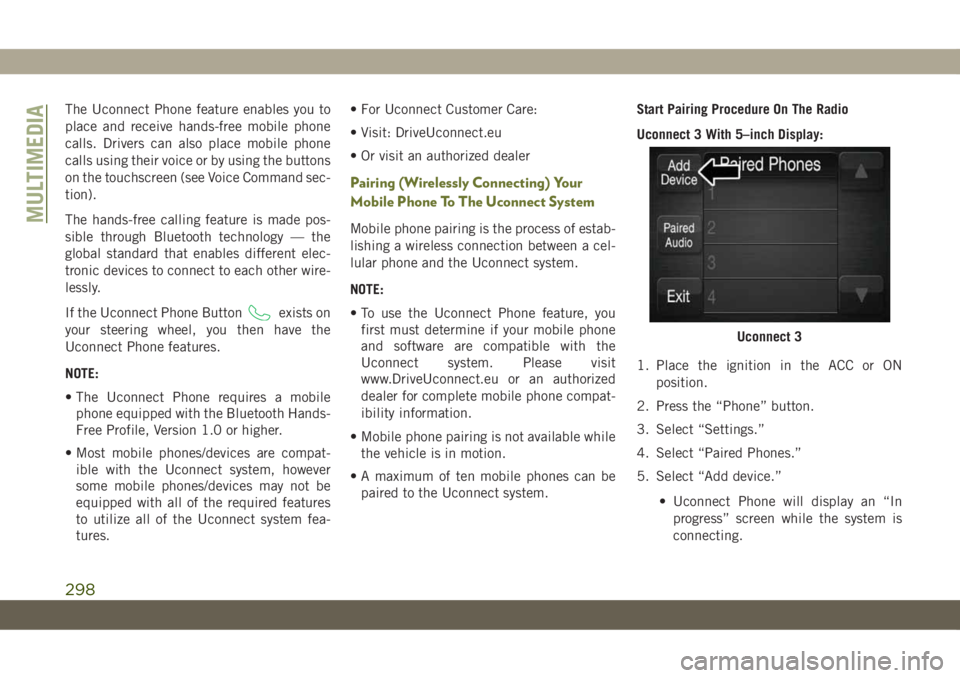
Uconnect 3 With 5–inch Display:
1. Place the ignition in the ACC or ON
position.
2. Press the “Phone” button.
3. Select “Settings.”
4. Select “Paired Phones.”
5. Select “Add device.”
• Uconnect Phone will display an “In
progress” screen while the system is
connecting.
Uconnect 3
MULTIMEDIA
298
Page 301 of 344
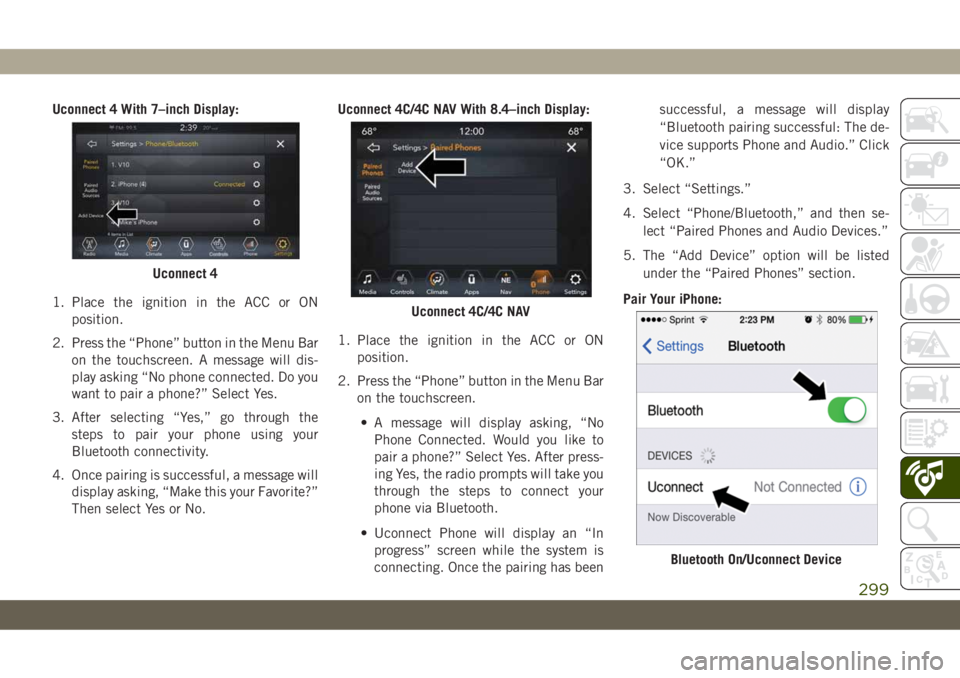
Uconnect 4 With 7–inch Display:
1. Place the ignition in the ACC or ON
position.
2. Press the “Phone” button in the Menu Bar
on the touchscreen. A message will dis-
play asking “No phone connected. Do you
want to pair a phone?” Select Yes.
3. After selecting “Yes,” go through the
steps to pair your phone using your
Bluetooth connectivity.
4. Once pairing is successful, a message will
display asking, “Make this your Favorite?”
Then select Yes or No.Uconnect 4C/4C NAV With 8.4–inch Display:
1. Place the ignition in the ACC or ON
position.
2. Press the “Phone” button in the Menu Bar
on the touchscreen.
• A message will display asking, “No
Phone Connected. Would you like to
pair a phone?” Select Yes. After press-
ing Yes, the radio prompts will take you
through the steps to connect your
phone via Bluetooth.
• Uconnect Phone will display an “In
progress” screen while the system is
connecting. Once the pairing has beensuccessful, a message will display
“Bluetooth pairing successful: The de-
vice supports Phone and Audio.” Click
“OK.”
3. Select “Settings.”
4. Select “Phone/Bluetooth,” and then se-
lect “Paired Phones and Audio Devices.”
5. The “Add Device” option will be listed
under the “Paired Phones” section.
Pair Your iPhone:
Uconnect 4
Uconnect 4C/4C NAV
Bluetooth On/Uconnect Device
299
Page 302 of 344
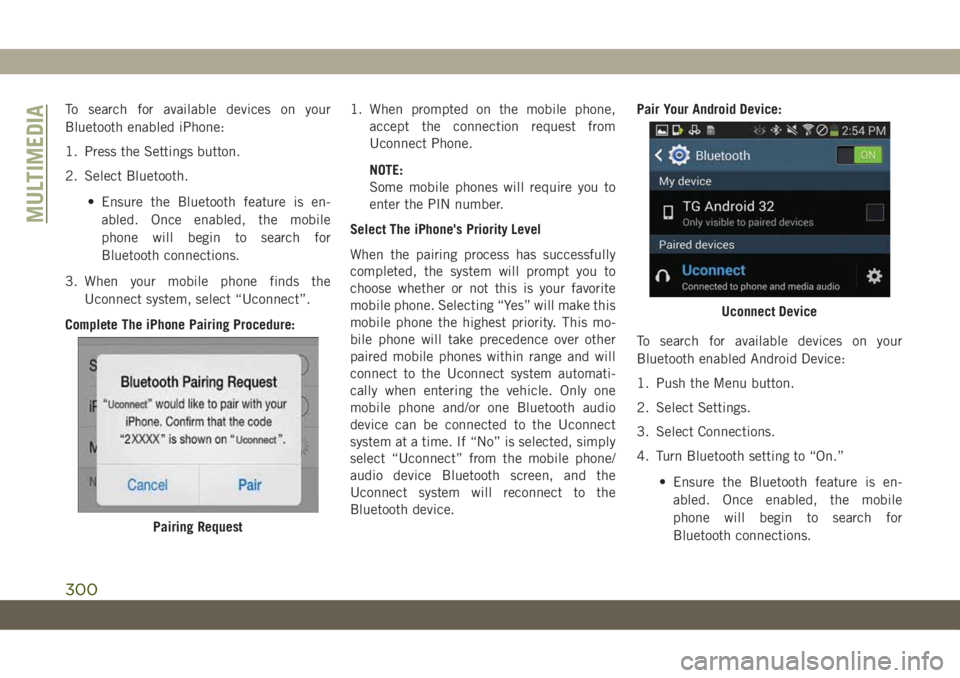
To search for available devices on your
Bluetooth enabled iPhone:
1. Press the Settings button.
2. Select Bluetooth.
• Ensure the Bluetooth feature is en-
abled. Once enabled, the mobile
phone will begin to search for
Bluetooth connections.
3. When your mobile phone finds the
Uconnect system, select “Uconnect”.
Complete The iPhone Pairing Procedure:1. When prompted on the mobile phone,
accept the connection request from
Uconnect Phone.
NOTE:
Some mobile phones will require you to
enter the PIN number.
Select The iPhone's Priority Level
When the pairing process has successfully
completed, the system will prompt you to
choose whether or not this is your favorite
mobile phone. Selecting “Yes” will make this
mobile phone the highest priority. This mo-
bile phone will take precedence over other
paired mobile phones within range and will
connect to the Uconnect system automati-
cally when entering the vehicle. Only one
mobile phone and/or one Bluetooth audio
device can be connected to the Uconnect
system at a time. If “No” is selected, simply
select “Uconnect” from the mobile phone/
audio device Bluetooth screen, and the
Uconnect system will reconnect to the
Bluetooth device.Pair Your Android Device:
To search for available devices on your
Bluetooth enabled Android Device:
1. Push the Menu button.
2. Select Settings.
3. Select Connections.
4. Turn Bluetooth setting to “On.”
• Ensure the Bluetooth feature is en-
abled. Once enabled, the mobile
phone will begin to search for
Bluetooth connections.
Pairing Request
Uconnect Device
MULTIMEDIA
300
Page 303 of 344
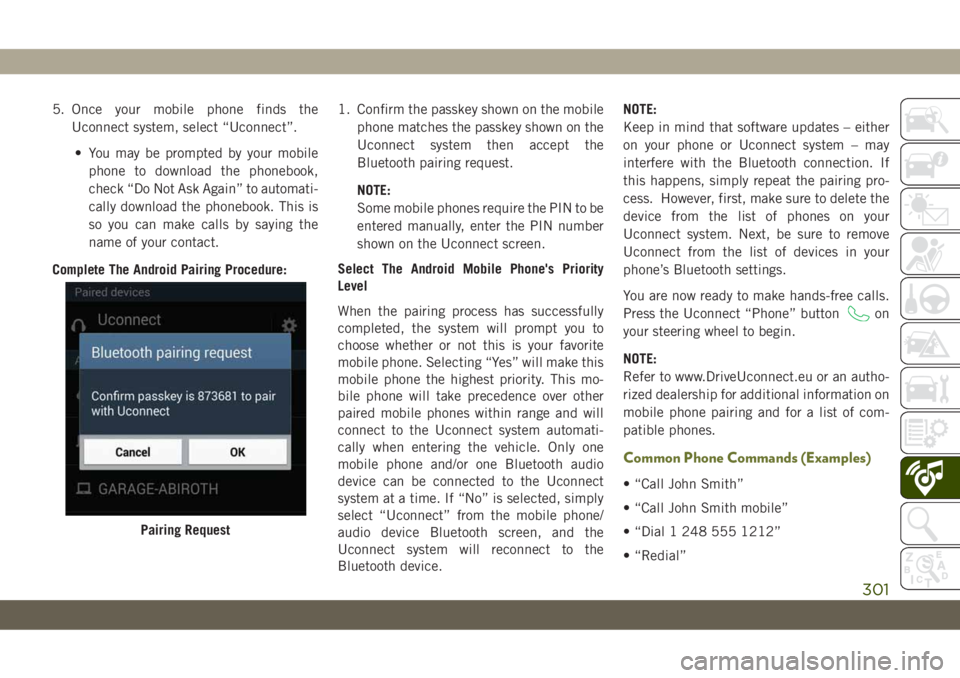
5. Once your mobile phone finds the
Uconnect system, select “Uconnect”.
• You may be prompted by your mobile
phone to download the phonebook,
check “Do Not Ask Again” to automati-
cally download the phonebook. This is
so you can make calls by saying the
name of your contact.
Complete The Android Pairing Procedure:1. Confirm the passkey shown on the mobile
phone matches the passkey shown on the
Uconnect system then accept the
Bluetooth pairing request.
NOTE:
Some mobile phones require the PIN to be
entered manually, enter the PIN number
shown on the Uconnect screen.
Select The Android Mobile Phone's Priority
Level
When the pairing process has successfully
completed, the system will prompt you to
choose whether or not this is your favorite
mobile phone. Selecting “Yes” will make this
mobile phone the highest priority. This mo-
bile phone will take precedence over other
paired mobile phones within range and will
connect to the Uconnect system automati-
cally when entering the vehicle. Only one
mobile phone and/or one Bluetooth audio
device can be connected to the Uconnect
system at a time. If “No” is selected, simply
select “Uconnect” from the mobile phone/
audio device Bluetooth screen, and the
Uconnect system will reconnect to the
Bluetooth device.NOTE:
Keep in mind that software updates – either
on your phone or Uconnect system – may
interfere with the Bluetooth connection. If
this happens, simply repeat the pairing pro-
cess. However, first, make sure to delete the
device from the list of phones on your
Uconnect system. Next, be sure to remove
Uconnect from the list of devices in your
phone’s Bluetooth settings.
You are now ready to make hands-free calls.
Press the Uconnect “Phone” button
on
your steering wheel to begin.
NOTE:
Refer to www.DriveUconnect.eu or an autho-
rized dealership for additional information on
mobile phone pairing and for a list of com-
patible phones.
Common Phone Commands (Examples)
• “Call John Smith”
• “Call John Smith mobile”
• “Dial 1 248 555 1212”
• “Redial”
Pairing Request
301
Page 305 of 344
To activate Do Not Disturb, select “Pairing”
on the phone menu bar, and select “Do Not
Disturb” from the Settings menu. You can
also activate it using the “Do Not Disturb”
button at the top of every Phone screen.
Do Not Disturb can automatically reply with a
text message, a call or both, when declining
an incoming call and send it to voicemail.
Automatic reply messages can be:
• “I am driving right now, I will get back to
you shortly.”
• Create a custom auto reply message up to
160 characters.
While in Do Not Disturb, Conference Call can
be selected so you can still place a second
call without being interrupted by incoming
calls.
NOTE:
• Only the beginning of your custom message
will be seen on the touchscreen.
• Reply with text message is not compatible
with iPhones.• Auto reply with text message is only avail-
able on phones that supporting Bluetooth
MAP.
Incoming Text Messages
After pairing your Uconnect system with a
Bluetooth enabled mobile device with the
Message Access Profile (MAP), the Uconnect
system can announce a new incoming text
message and read it to you over the vehicle’s
audio system.
To listen to incoming text messages, or any
messages currently on the mobile phone,
select the “Messages” menu and press the
“Listen” button next to the message you want
to listen to.
NOTE:
Only incoming text messages received during
the current ignition cycle can be viewed/read.
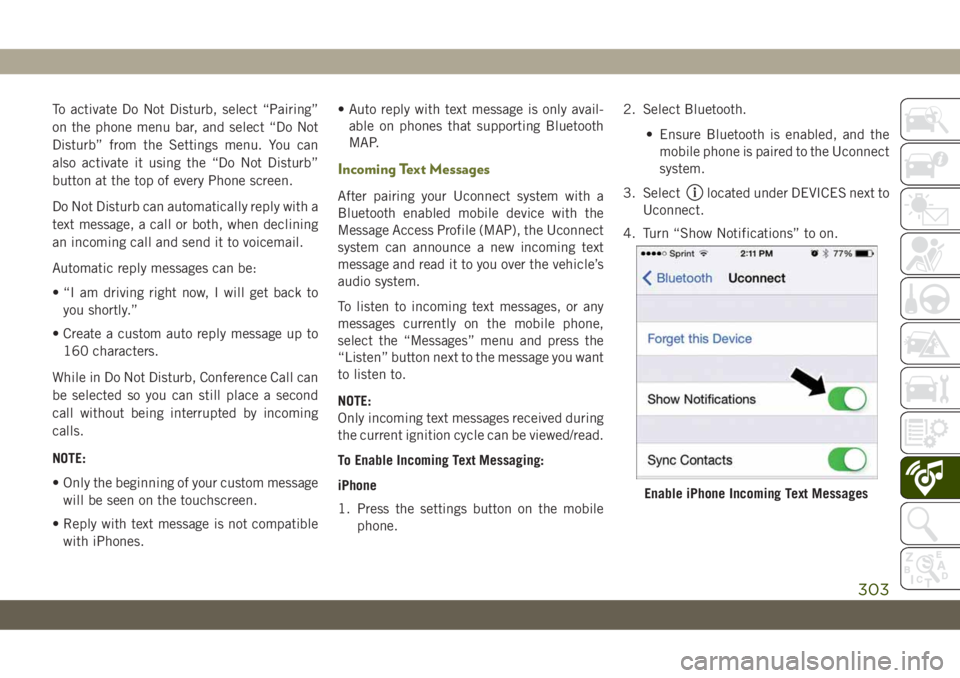
To Enable Incoming Text Messaging:
iPhone
1. Press the settings button on the mobile
phone.2. Select Bluetooth.
• Ensure Bluetooth is enabled, and the
mobile phone is paired to the Uconnect
system.
3. Selectlocated under DEVICES next to
Uconnect.
4. Turn “Show Notifications” to on.
Enable iPhone Incoming Text Messages
303
Page 306 of 344
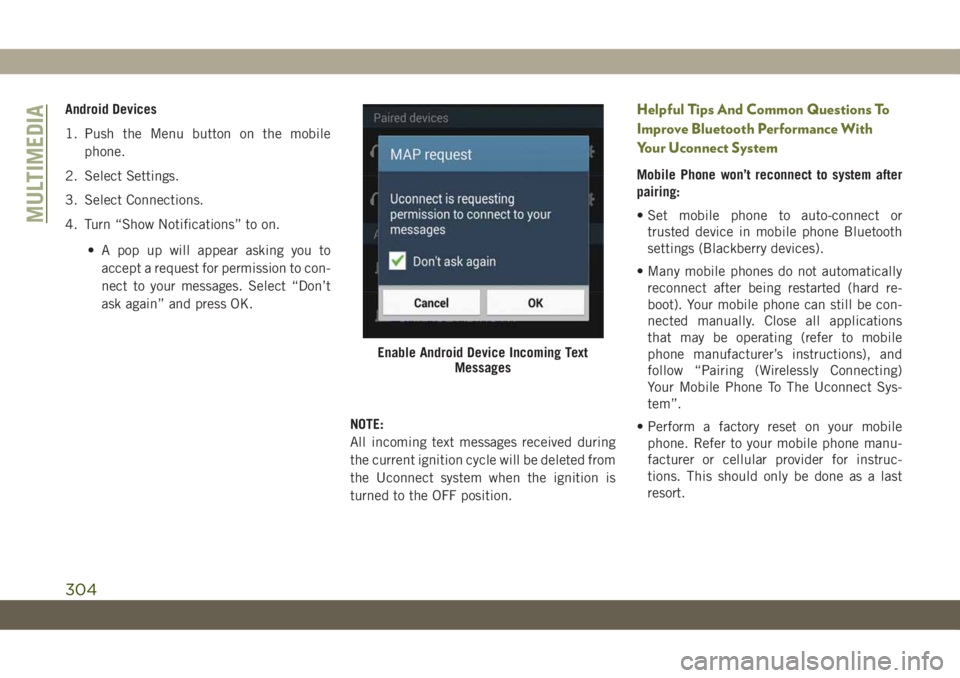
Android Devices
1. Push the Menu button on the mobile
phone.
2. Select Settings.
3. Select Connections.
4. Turn “Show Notifications” to on.
• A pop up will appear asking you to
accept a request for permission to con-
nect to your messages. Select “Don’t
ask again” and press OK.
NOTE:
All incoming text messages received during
the current ignition cycle will be deleted from
the Uconnect system when the ignition is
turned to the OFF position.Helpful Tips And Common Questions To
Improve Bluetooth Performance With
Your Uconnect System
Mobile Phone won’t reconnect to system after
pairing:
• Set mobile phone to auto-connect or
trusted device in mobile phone Bluetooth
settings (Blackberry devices).
• Many mobile phones do not automatically
reconnect after being restarted (hard re-
boot). Your mobile phone can still be con-
nected manually. Close all applications
that may be operating (refer to mobile
phone manufacturer’s instructions), and
follow “Pairing (Wirelessly Connecting)
Your Mobile Phone To The Uconnect Sys-
tem”.
• Perform a factory reset on your mobile
phone. Refer to your mobile phone manu-
facturer or cellular provider for instruc-
tions. This should only be done as a last
resort.
Enable Android Device Incoming Text
Messages
MULTIMEDIA
304