2019 Hyundai Santa Fe battery
[x] Cancel search: batteryPage 213 of 682
3-122
Interior lights
Do not use the interior lights for
extended periods when the engine
is turned off otherwise the battery
will discharge.
Interior lamp AUTO cut
The interior lamps will automatically
go off approximately 20 minutes after
the engine is turned off and the
doors are closed. If a door is opened,
the lamp will go off 40 minutes after
the engine is turned off. If the doors
are locked and the vehicle enters the
armed stage of the theft alarm sys-
tem, the lamps will go off five sec-
onds later.
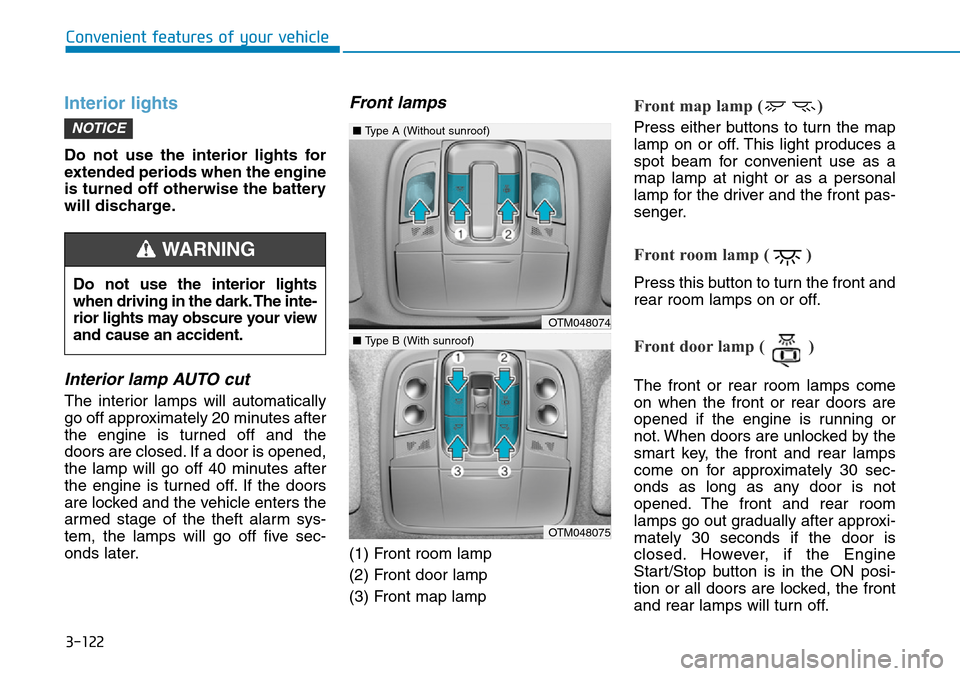
Front lamps
(1) Front room lamp
(2) Front door lamp
(3) Front map lamp
Front map lamp ( )
Press either buttons to turn the map
lamp on or off. This light produces a
spot beam for convenient use as a
map lamp at night or as a personal
lamp for the driver and the front pas-
senger.
Front room lamp ( )
Press this button to turn the front and
rear room lamps on or off.
Front door lamp ( )
The front or rear room lamps come
on when the front or rear doors are
opened if the engine is running or
not. When doors are unlocked by the
smart key, the front and rear lamps
come on for approximately 30 sec-
onds as long as any door is not
opened. The front and rear room
lamps go out gradually after approxi-
mately 30 seconds if the door is
closed. However, if the Engine
Start/Stop button is in the ON posi-
tion or all doors are locked, the front
and rear lamps will turn off.
NOTICE
Convenient features of your vehicle
Do not use the interior lights
when driving in the dark. The inte-
rior lights may obscure your view
and cause an accident.
WARNING
OTM048074
OTM048075
■Type A (Without sunroof)
■Type B (With sunroof)
Page 215 of 682
3-124
Convenient features of your vehicle
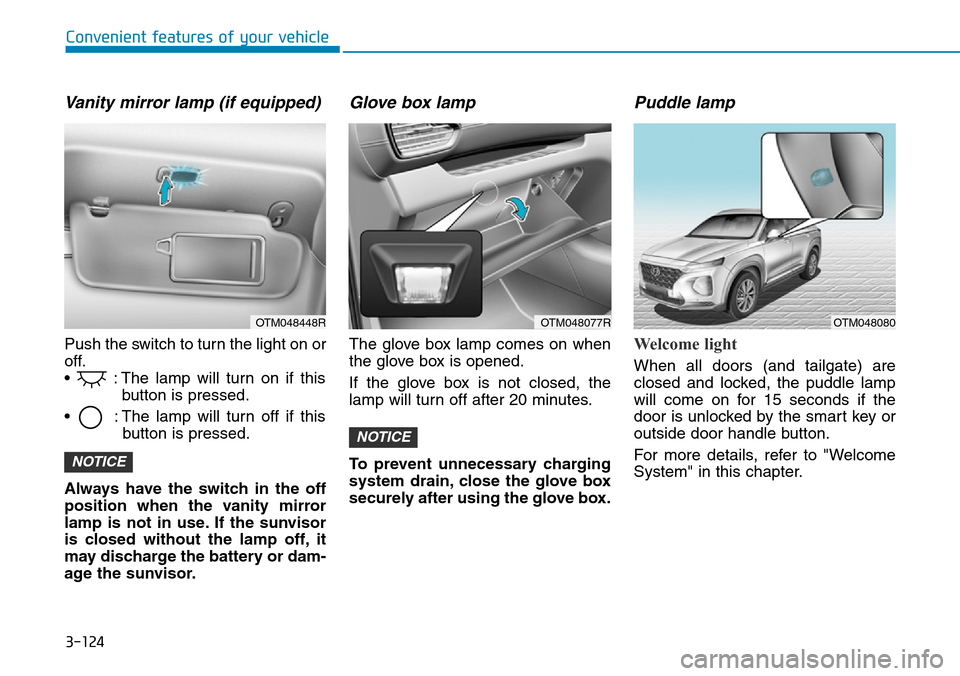
Vanity mirror lamp (if equipped)
Push the switch to turn the light on or
off.
• : The lamp will turn on if this
button is pressed.
• : The lamp will turn off if this
button is pressed.
Always have the switch in the off
position when the vanity mirror
lamp is not in use. If the sunvisor
is closed without the lamp off, it
may discharge the battery or dam-
age the sunvisor.
Glove box lamp
The glove box lamp comes on when
the glove box is opened.
If the glove box is not closed, the
lamp will turn off after 20 minutes.
To prevent unnecessary charging
system drain, close the glove box
securely after using the glove box.
Puddle lamp
Welcome light
When all doors (and tailgate) are
closed and locked, the puddle lamp
will come on for 15 seconds if the
door is unlocked by the smart key or
outside door handle button.
For more details, refer to "Welcome
System" in this chapter.
NOTICE
NOTICE
OTM048448ROTM048077ROTM048080
Page 257 of 682
3-166
Convenient features of your vehicle
Fan speed control (1)
Turn the knob to the right to increase
the fan speed and airflow. Turn the
knob to the left to decrease fan
speed and airflow.
Setting the fan speed control knob to
the “0” position turns off the fan.
Operating the fan speed when the
ignition switch is in the ON posi-
tion could cause the battery to
discharge. Operate the fan speed
when the engine is running.
Air conditioning (A/C) (6)
(if equipped)
Press the A/C button to turn the air
conditioning system on (indicator
light will illuminate). Press the button
again to turn the air conditioning sys-
tem off.
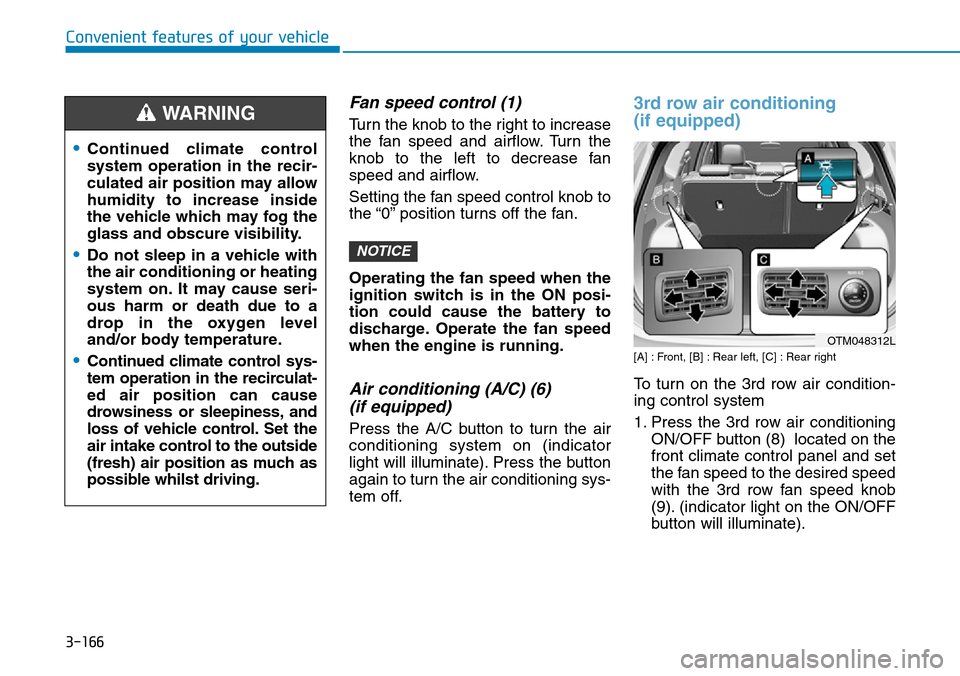
3rd row air conditioning
(if equipped)
[A] : Front, [B] : Rear left, [C] : Rear right
To turn on the 3rd row air condition-
ing control system
1. Press the 3rd row air conditioning
ON/OFF button (8) located on the
front climate control panel and set
the fan speed to the desired speed
with the 3rd row fan speed knob
(9). (indicator light on the ON/OFF
button will illuminate).
NOTICE
•Continued climate control
system operation in the recir-
culated air position may allow
humidity to increase inside
the vehicle which may fog the
glass and obscure visibility.
•Do not sleep in a vehicle with
the air conditioning or heating
system on. It may cause seri-
ous harm or death due to a
drop in the oxygen level
and/or body temperature.
•Continued climate control sys-
tem operation in the recirculat-
ed air position can cause
drowsiness or sleepiness, and
loss of vehicle control. Set the
air intake control to the outside
(fresh) air position as much as
possible whilst driving.
WARNING
OTM048312L
Page 266 of 682
3-175
Convenient features of your vehicle
3
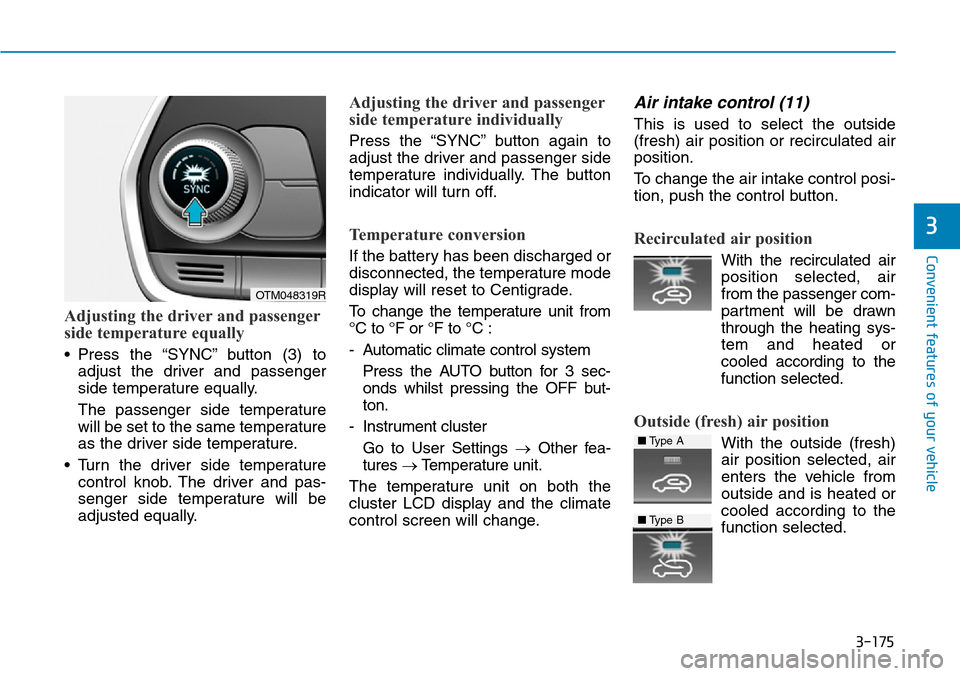
Adjusting the driver and passenger
side temperature equally
• Press the “SYNC” button (3) to
adjust the driver and passenger
side temperature equally.
The passenger side temperature
will be set to the same temperature
as the driver side temperature.
• Turn the driver side temperature
control knob. The driver and pas-
senger side temperature will be
adjusted equally.
Adjusting the driver and passenger
side temperature individually
Press the “SYNC” button again to
adjust the driver and passenger side
temperature individually. The button
indicator will turn off.
Temperature conversion
If the battery has been discharged or
disconnected, the temperature mode
display will reset to Centigrade.
To change the temperature unit from
°C to °F or °F to °C :
- Automatic climate control system
Press the AUTO button for 3 sec-
onds whilst pressing the OFF but-
ton.
- Instrument cluster
Go to User Settings →Other fea-
tures →Temperature unit.
The temperature unit on both the
cluster LCD display and the climate
control screen will change.
Air intake control (11)
This is used to select the outside
(fresh) air position or recirculated air
position.
To change the air intake control posi-
tion, push the control button.
Recirculated air position
With the recirculated air
position selected, air
from the passenger com-
partment will be drawn
through the heating sys-
tem and heated or
cooled according to the
function selected.
Outside (fresh) air position
With the outside (fresh)
air position selected, air
enters the vehicle from
outside and is heated or
cooled according to the
function selected.
OTM048319R
■Type A
■Type B
Page 267 of 682
3-176
Convenient features of your vehicle
Information
Using the system in the fresh air posi-
tion is recommended.
Prolonged operation of the heater in
the recirculated air position (without
air conditioning selected) can cause
fogging of the windscreen and side
windows and the air within the passen-
ger compartment will become stale.
In addition, prolonged use of the air
conditioning with the recirculated air
position selected will result in exces-
sively dry air in the passenger com-
partment.
Fan speed control (8)
The fan speed can be set as desired
by pushing the fan speed control but-
ton.
More air is delivered with higher fan
speeds.
Pressing the OFF button turns off the
fan.
Operating the fan when the ignition
switch is in the ON position could
cause the battery to discharge.
Operate the fan when the engine is
running.
Air conditioning (6)
Push the A/C button to turn the air
conditioning system on (indicator
light will illuminate).
Push the button again to turn the air
conditioning system off.
OFF mode (5)
Push the OFF button to turn the cli-
mate control system off. However,
you can still operate the mode and air
intake buttons as long as the ignition
switch is in the ON position.
NOTICE
i
•Continued climate control
system operation in the recir-
culated air position may allow
humidity to increase inside
the vehicle which may fog the
glass and obscure visibility.
•Do not sleep in a vehicle with
the air conditioning or heating
system on. It may cause seri-
ous harm or death due to a
drop in the oxygen level
and/or body temperature.
•Continued climate control sys-
tem operation in the recirculat-
ed air position can cause
drowsiness or sleepiness, and
loss of vehicle control. Set the
air intake control to the outside
(fresh) air position as much as
possible whilst driving.
WARNING
Page 274 of 682
![Hyundai Santa Fe 2019 Owners Manual - RHD (UK, Australia) 3-183
Convenient features of your vehicle
3
To defrost outside windscreen
[A] : Type A, [B] : Type B
1. Set fan speed to the highest posi-
tion.
2. Set temperature to the extreme
hot (HI) position.
Hyundai Santa Fe 2019 Owners Manual - RHD (UK, Australia) 3-183
Convenient features of your vehicle
3
To defrost outside windscreen
[A] : Type A, [B] : Type B
1. Set fan speed to the highest posi-
tion.
2. Set temperature to the extreme
hot (HI) position.](/manual-img/35/16317/w960_16317-273.png)
3-183
Convenient features of your vehicle
3
To defrost outside windscreen
[A] : Type A, [B] : Type B
1. Set fan speed to the highest posi-
tion.
2. Set temperature to the extreme
hot (HI) position.
3. Press the defroster button ( ).
4. The air-conditioning will turn on
according to the detected ambient
temperature and outside (fresh)
air position will be selected auto-
matically.
If the position is selected, lower
fan speed is controlled to higher fan
speed.
Auto defogging system
(only for automatic climate
control system, if equipped)
Auto defogging reduces the possibili-
ty of fogging up the inside of the wind-
screen by automatically sensing the
moisture on inside the windscreen.
The auto defogging system operates
when the heater or air conditioning is
on.
Information
The auto defogging system may not
operate normally, when the outside
temperature is below -10 °C.
To cancel or set the Auto Defogging
System, keep the front defroster but-
ton pressed for 3 seconds. The “ADS
OFF” symbol will be shown in the cli-
mate display to inform you that the
system is deactivated. To re-activate
the auto defogging system, follow the
procedure mentioned above and the
“ADS OFF” symbol will disappear.
If the battery has been disconnected
or discharged, it resets to the auto
defogging status.
Information
For efficiency, do not select recirculat-
ed air position whilst the Auto defog-
ging system is operating.
Do not remove the sensor cover
located on the top of the wind-
screen glass.
Damage to system parts could
occur and may not be covered by
your vehicle warranty.
NOTICE
i
iOTM048328
Page 282 of 682
3-191
Convenient features of your vehicle
3
To prevent damage to the Power
Outlets :
• Use the power outlet only when
the engine is running and
remove the accessory plug after
use. Using the accessory plug
for prolonged periods of time
with the engine off could cause
the battery to discharge.
• Only use 12V electric acces-
sories which are less than 180
W(Watt) in electric capacity.
• Adjust the air-conditioner or
heater to the lowest operating
level when using the power out-
let.• Close the cover when not in use.
• Some electronic devices can
cause electronic interference
when plugged into a vehicle’s
power outlet. These devices may
cause excessive audio static
and malfunctions in other elec-
tronic systems or devices used
in your vehicle.
• Push the plug in as far as it will
go. If good contact is not made,
the plug may overheat and the
fuse may open.
• Plug in battery equipped electri-
cal/ electronic devices with
reverse current protection. The
current from the battery may
flow into the vehicle's electri-
cal/electronic system and cause
system malfunction.
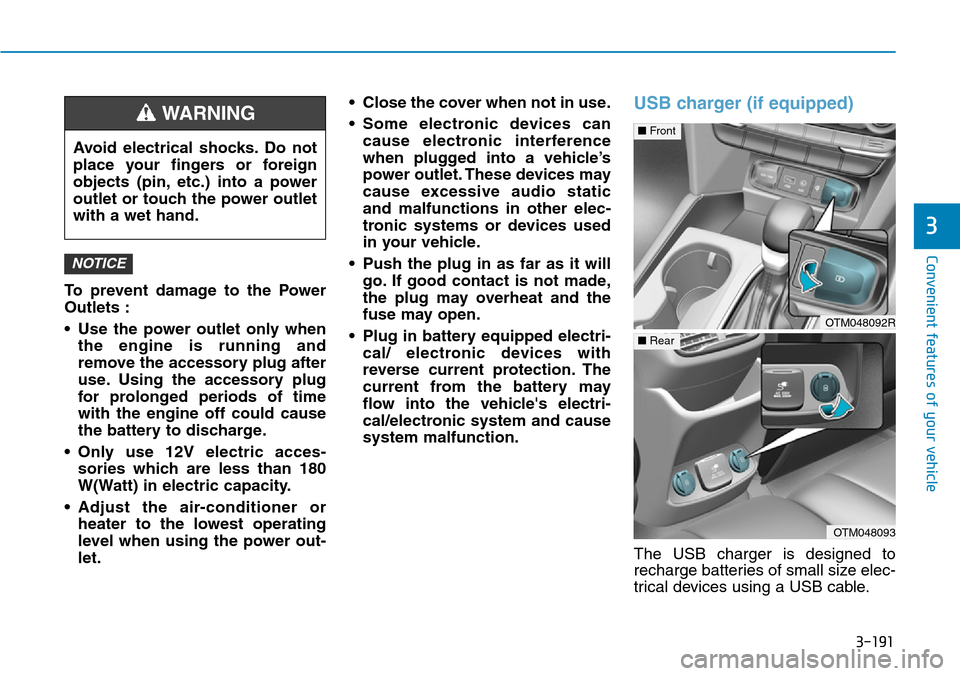
USB charger (if equipped)
The USB charger is designed to
recharge batteries of small size elec-
trical devices using a USB cable.
NOTICE
Avoid electrical shocks. Do not
place your fingers or foreign
objects (pin, etc.) into a power
outlet or touch the power outlet
with a wet hand.
WARNING
OTM048092R
■Front
OTM048093
■Rear
Page 283 of 682
3-192
The electrical devices can be
recharged when the ignition switch
or the Engine Start/Stop button is in
the ACC, ON or START position.
The battery charging state may be
monitored on the electrical device.
Disconnect the USB cable from the
USB port after use.
• A smart phone or a tablet PC may
get warmer during the re-charging
process. It does not indicate any
malfunction with the charging sys-
tem.
• A smart phone or a tablet PC,
which adopts a different re-charg-
ing method, may not be properly
re-charged. In this case, use an
exclusive charger of your device.
• The charging terminal is only to
recharge a device. Do not use the
charging terminal either to turn ON
an audio or to play media on the
AVN.AC inverter (if equipped)
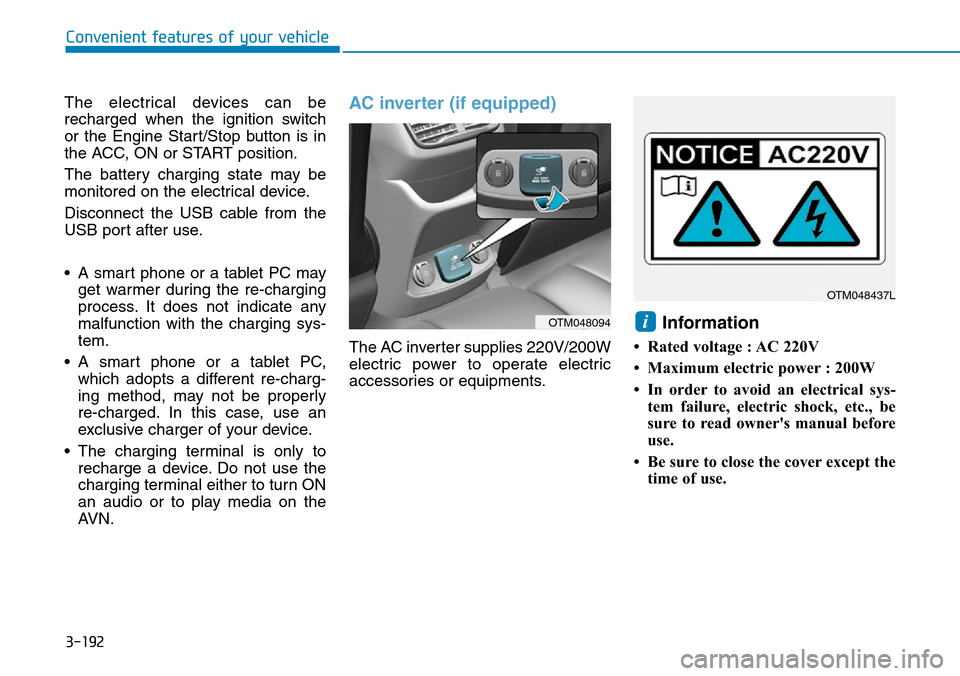
The AC inverter supplies 220V/200W
electric power to operate electric
accessories or equipments.
Information
• Rated voltage : AC 220V
• Maximum electric power : 200W
• In order to avoid an electrical sys-
tem failure, electric shock, etc., be
sure to read owner's manual before
use.
• Be sure to close the cover except the
time of use.
i
Convenient features of your vehicle
OTM048094
OTM048437L