2019 Hyundai Ioniq Electric sensor
[x] Cancel search: sensorPage 436 of 526
6-13
What to do in an emergency
6
The TPMS Malfunction Indicator
may illuminate after blinking for
one minute if the vehicle is near
electric power supply cables or
radio transmitters such as police
stations, government and public
offices, broadcasting stations,
military installations, airports,
transmitting towers, etc.
Additionally, the TPMS Malfunction
Indicator may illuminate if snow
chains are used or electronic
devices such as computers, charg-
ers, remote starters, navigation,
etc. This may interfere with normal
operation of the TPMS.
Changing a tyre with TPMS
If you have a flat tyre, the Low Tyre
Pressure and Position telltales will
come on. We recommend that the
flat tyre be repaired by a HYUNDAI
authorised repairer as soon as pos-
sible or replace the flat tyre with the
spare tyre.Once the original tyre equipped with
a tyre pressure monitoring sensor is
reinflated to the recommended pres-
sure and reinstalled on the vehicle,
the Low Tyre Pressure Telltale and
TPMS Malfunction Indicator will go
off within a few minutes of driving.
If the indicators do not extinguish
after a few minutes, please visit a
HYUNDAI authorised repairer.
Each wheel is equipped with a tyre
pressure sensor mounted inside the
tyre behind the valve stem. You must
use TPMS specific wheels. It is rec-
ommended that you always have
your tyres serviced by a HYUNDAI
authorised repairer.You may not be able to identify a tyre
with low pressure by simply looking
at it. Always use a good quality tyre
pressure gauge to measure. Please
note that a tyre that is hot (from
being driven) will have a higher pres-
sure measurement than a tyre that is
cold.
A cold tyre means the vehicle has
been sitting for 3 hours and driven for
less than 1 mile (1.6 km) in that 3
hour period.
Allow the tyre to cool before measur-
ing the inflation pressure. Always be
sure the tyre is cold before inflating
to the recommended pressure.
NOTICE
It is recommended that you do
not use a puncture-repairing
agent not approved by a
HYUNDAI dealer to repair and/or
inflate a low pressure tyre. Tyre
sealant not approved by a
HYUNDAI dealer may damage
the tyre pressure sensor.
CAUTION
Page 437 of 526
6-14
What to do in an emergency
The TPMS cannot alert you to
severe and sudden tyre dam-
age caused by external fac-
tors such as nails or road
debris.
If you feel any vehicle instabil-
ity, immediately take your foot
off the accelerator, apply the
brakes gradually with light
force, and slowly move to a
safe position off the road.
WARNING
Tampering with, modifying, or
disabling the Tyre Pressure
Monitoring System (TPMS) com-
ponents may interfere with the
system's ability to warn the driv-
er of low tyre pressure condi-
tions and/or TPMS malfunctions.
Tampering with, modifying, or
disabling the Tyre Pressure
Monitoring System (TPMS) com-
ponents may void the warranty
for that portion of the vehicle.
WARNING
For EUROPE
Do not modify the vehicle; it
may interfere with the TPMS
function.
The wheels on the market do
not have a TPMS sensor.
For your safety, we recom-
mend that you use parts for
replacement from a HYUNDAI
authorised repairer.
If you use the wheels on the
market, use a TPMS sensor
approved by a HYUNDAI de
aler.
If your vehicle is not equipped
with a TPMS sensor or TPMS
does not work properly, you
may fail the periodic vehicle
inspection conducted in your
country.
❈ ❈ All vehicles sold in the
EUROPE market during below
period must be equipped with
TPMS.
- New model vehicle :
Nov. 1, 2012 ~
- Current model vehicle : Nov. 1, 2014~ (Based on vehi-
cle registrations)
WARNING
Page 444 of 526
6-21
What to do in an emergency
6
Checking the tyre inflation pres-
sure
1. After driving approximately 4~6miles (7~10 km or about 10 min-
utes), stop at a safe location.
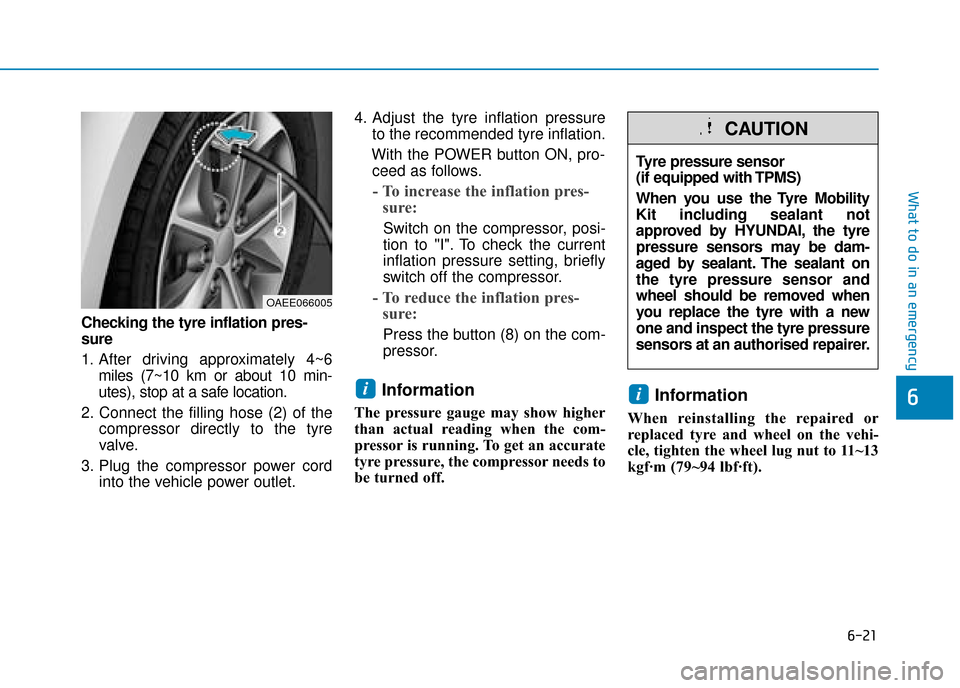
2. Connect the filling hose (2) of the compressor directly to the tyre
valve.
3. Plug the compressor power cord into the vehicle power outlet. 4. Adjust the tyre inflation pressure
to the recommended tyre inflation.
With the POWER button ON, pro- ceed as follows.
- To increase the inflation pres- sure:
Switch on the compressor, posi-
tion to "I". To check the current
inflation pressure setting, briefly
switch off the compressor.
- To reduce the inflation pres- sure:
Press the button (8) on the com-
pressor.
Information
The pressure gauge may show higher
than actual reading when the com-
pressor is running. To get an accurate
tyre pressure, the compressor needs to
be turned off.
Information
When reinstalling the repaired or
replaced tyre and wheel on the vehi-
cle, tighten the wheel lug nut to 11~13
kgf·m (79~94 lbf·ft).
ii
OAEE066005
Tyre pressure sensor
(if equipped with TPMS)
When you use the Tyre Mobility
Kit including sealant not
approved by HYUNDAI, the tyre
pressure sensors may be dam-
aged by sealant. The sealant on
the tyre pressure sensor and
wheel should be removed when
you replace the tyre with a new
one and inspect the tyre pressure
sensors at an authorised repairer.
CAUTION
Page 487 of 526
7-39
7
Maintenance
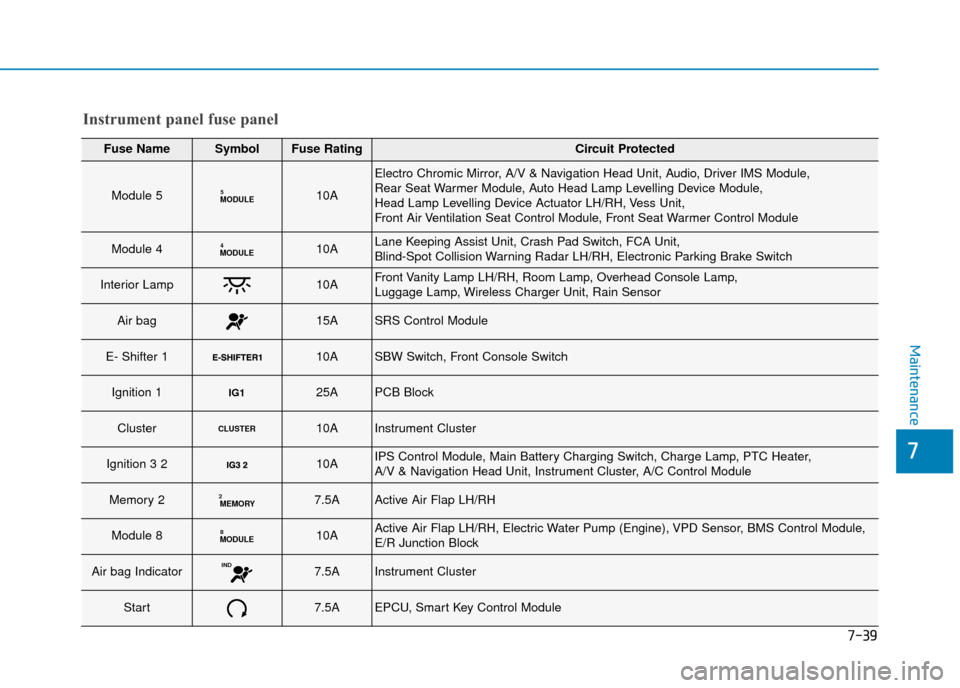
Instrument panel fuse panel
Fuse NameSymbolFuse RatingCircuit Protected
Module 5MODULE510A
Electro Chromic Mirror, A/V & Navigation Head Unit, Audio, Driver IMS Module,
Rear Seat Warmer Module, Auto Head Lamp Levelling Device Module,
Head Lamp Levelling Device Actuator LH/RH, Vess Unit,
Front Air Ventilation Seat Control Module, Front Seat Warmer Control Module
Module 4MODULE410ALane Keeping Assist Unit, Crash Pad Switch, FCA Unit,
Blind-Spot Collision Warning Radar LH/RH, Electronic Parking Brake Switch
Interior Lamp10AFront Vanity Lamp LH/RH, Room Lamp, Overhead Console Lamp,
Luggage Lamp, Wireless Charger Unit, Rain Sensor
Air bag15ASRS Control Module
E- Shifter 1 10ASBW Switch, Front Console Switch
Ignition 1IG125APCB Block
ClusterCLUSTER10AInstrument Cluster
Ignition 3 2 10AIPS Control Module, Main Battery Charging Switch, Charge Lamp, PTC Heater,
A/V & Navigation Head Unit, Instrument Cluster, A/C Control Module
Memory 2MEMORY27.5AActive Air Flap LH/RH
Module 8MODULE810AActive Air Flap LH/RH, Electric Water Pump (Engine), VPD Sensor, BMS Control Module,
E/R Junction Block
Air bag IndicatorIND7.5AInstrument Cluster
Start7.5AEPCU, Smart Key Control Module
Page 488 of 526
7-40
Maintenance
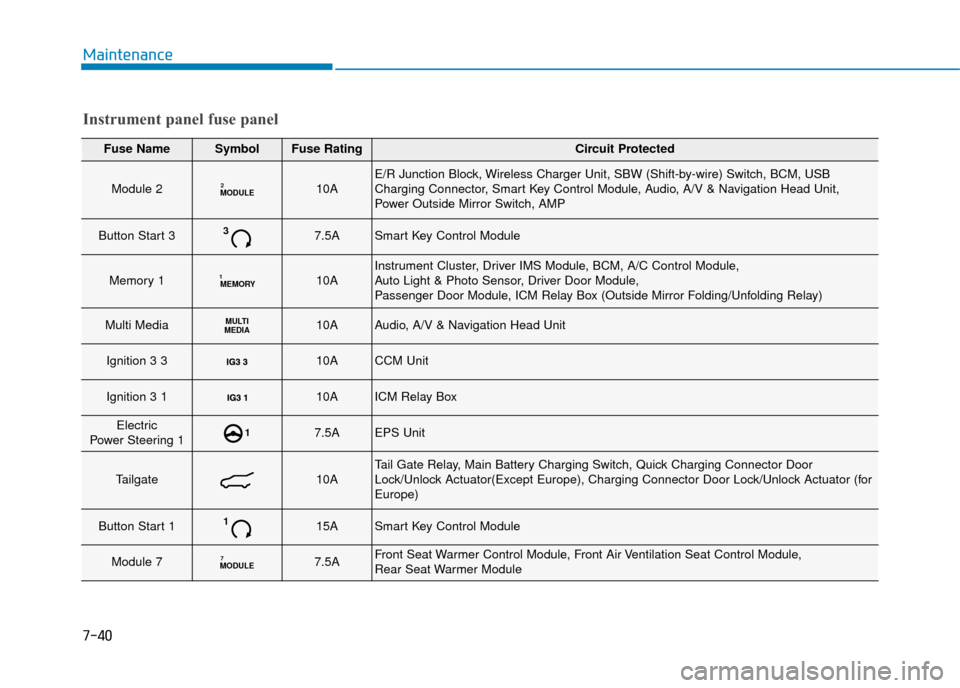
Fuse NameSymbolFuse RatingCircuit Protected
Module 2MODULE210AE/R Junction Block, Wireless Charger Unit, SBW (Shift-by-wire) Switch, BCM, USB
Charging Connector, Smart Key Control Module, Audio, A/V & Navigation Head Unit,
Power Outside Mirror Switch, AMP
Button Start 337.5ASmart Key Control Module
Memory 1MEMORY110AInstrument Cluster, Driver IMS Module, BCM, A/C Control Module,
Auto Light & Photo Sensor, Driver Door Module,
Passenger Door Module, ICM Relay Box (Outside Mirror Folding/Unfolding Relay)
Multi MediaMULTI
MEDIA10AAudio, A/V & Navigation Head Unit
Ignition 3 3 10ACCM Unit
Ignition 3 1 10AICM Relay Box
Electric
Power Steering 117.5AEPS Unit
Tailgate10ATail Gate Relay, Main Battery Charging Switch, Quick Charging Connector Door
Lock/Unlock Actuator(Except Europe), Charging Connector Door Lock/Unlock Actuator (for
Europe)
Button Start 1115ASmart Key Control Module
Module 7MODULE77.5AFront Seat Warmer Control Module, Front Air Ventilation Seat Control Module,
Rear Seat Warmer Module
Instrument panel fuse panel
Page 510 of 526
7-62
Maintenance
A
AP
PP
PE
EA
A R
RA
A N
N C
CE
E
C
C A
A R
RE
E
Exterior care
Exterior general caution
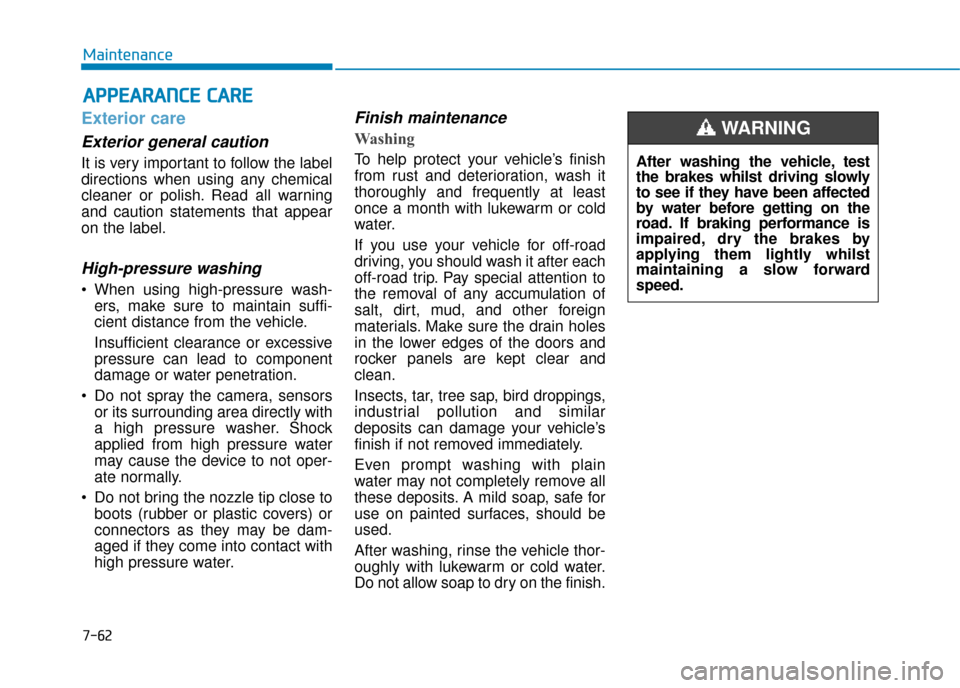
It is very important to follow the label
directions when using any chemical
cleaner or polish. Read all warning
and caution statements that appear
on the label.
High-pressure washing
When using high-pressure wash-
ers, make sure to maintain suffi-
cient distance from the vehicle.
Insufficient clearance or excessive
pressure can lead to component
damage or water penetration.
Do not spray the camera, sensors or its surrounding area directly with
a high pressure washer. Shock
applied from high pressure water
may cause the device to not oper-
ate normally.
Do not bring the nozzle tip close to boots (rubber or plastic covers) or
connectors as they may be dam-
aged if they come into contact with
high pressure water.
Finish maintenance
Washing
To help protect your vehicle’s finish
from rust and deterioration, wash it
thoroughly and frequently at least
once a month with lukewarm or cold
water.
If you use your vehicle for off-road
driving, you should wash it after each
off-road trip. Pay special attention to
the removal of any accumulation of
salt, dirt, mud, and other foreign
materials. Make sure the drain holes
in the lower edges of the doors and
rocker panels are kept clear and
clean.
Insects, tar, tree sap, bird droppings,
industrial pollution and similar
deposits can damage your vehicle’s
finish if not removed immediately.
Even prompt washing with plain
water may not completely remove all
these deposits. A mild soap, safe for
use on painted surfaces, should be
used.
After washing, rinse the vehicle thor-
oughly with lukewarm or cold water.
Do not allow soap to dry on the finish. After washing the vehicle, test
the brakes whilst driving slowly
to see if they have been affected
by water before getting on the
road. If braking performance is
impaired, dry the brakes by
applying them lightly whilst
maintaining a slow forward
speed.
WARNING