2019 Hyundai Ioniq Electric window
[x] Cancel search: windowPage 32 of 526
H32
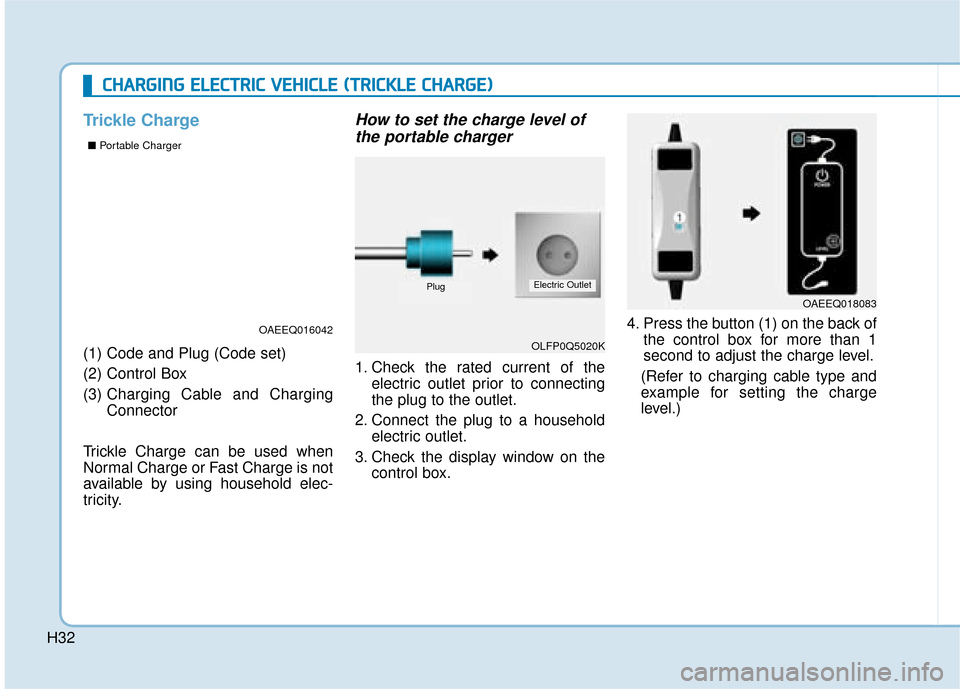
Trickle Charge
(1) Code and Plug (Code set)
(2) Control Box
(3) Charging Cable and Charging
Connector
Trickle Charge can be used when
Normal Charge or Fast Charge is not
available by using household elec-
tricity.
How to set the charge level of the portable charger
1. Check the rated current of the
electric outlet prior to connecting
the plug to the outlet.
2. Connect the plug to a household electric outlet.
3. Check the display window on the control box. 4. Press the button (1) on the back of
the control box for more than 1
second to adjust the charge level.
(Refer to charging cable type and
example for setting the charge
level.)
C C H
H A
AR
RG
G I
IN
N G
G
E
E L
LE
E C
CT
T R
R I
IC
C
V
V E
EH
H I
IC
C L
LE
E
(
( T
T R
R I
IC
C K
K L
LE
E
C
C H
H A
AR
RG
G E
E)
)
OAEEQ016042
■
Portable Charger
OAEEQ018083
OLFP0Q5020K
PlugElectric Outlet
Page 33 of 526
H33
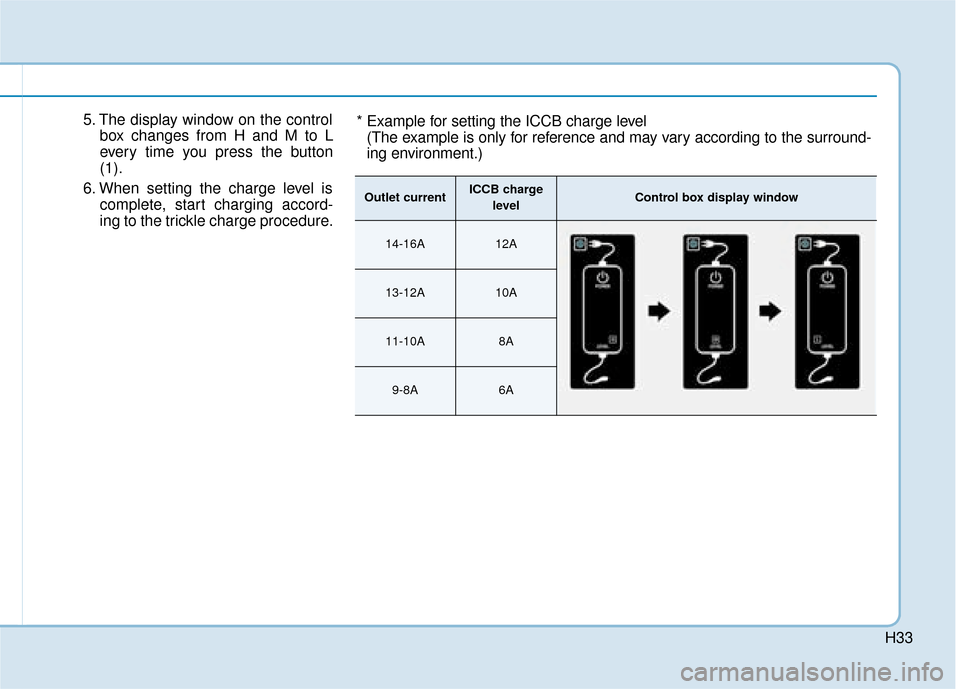
5. The display window on the controlbox changes from H and M to L
every time you press the button
(1).
6. When setting the charge level is complete, start charging accord-
ing to the trickle charge procedure.* Example for setting the ICCB charge level(The example is only for reference and may vary according to the surround-
ing environment.)
Outlet currentICCB charge
levelControl box display window
14-16A12A
13-12A10A
11-10A8A
9-8A6A
Page 74 of 526
1-2
Your vehicle at a glance
E
EX
X T
TE
ER
R I
IO
O R
R
O
O V
VE
ER
R V
V I
IE
E W
W
(
( F
F R
R O
O N
NT
T
V
V I
IE
E W
W )
)
OAEE016001L
The actual shape may differ from the illustration.
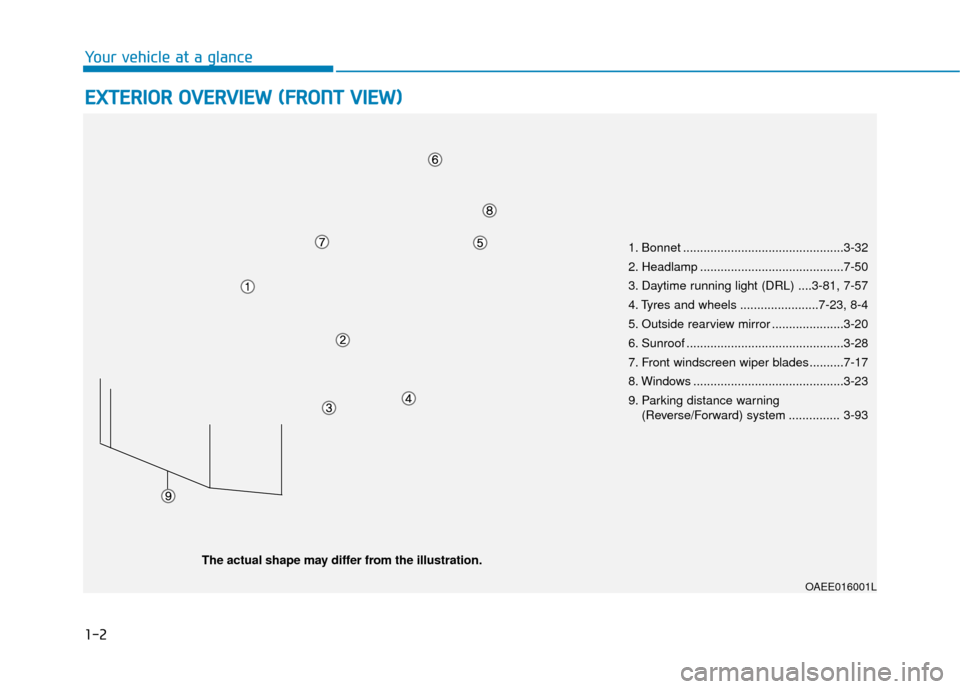
1. Bonnet ...............................................3-32
2. Headlamp ..........................................7-50
3. Daytime running light (DRL) ....3-81, 7-57
4. Tyres and wheels .......................7-23, 8-4
5. Outside rearview mirror .....................3-20
6. Sunroof ..............................................3-28
7. Front windscreen wiper blades ..........7-17
8. Windows ............................................3-23
9. Parking distance warning
(Reverse/Forward) system ............... 3-93
Page 76 of 526

1-4
Your vehicle at a glance
I
IN
N T
TE
ER
R I
IO
O R
R
O
O V
VE
ER
R V
V I
IE
E W
W
1. Door lock/unlock button ......................3-9
2. Driver position memory system ........3-14
3. Outside rearview mirror folding
switch ................................................3-22
4. Outside rearview mirror control switch ................................................3-21
5. Central door lock switch ....................3-10
6. Power window switches ....................3-23
7. Power window lock switch ................3-26
8. Headlight levelling device ..................3-82
9. Instrument panel illumination control switch ......................................3-36
10. Blind-Spot Collision Warning (BCW) system................................................5-41
11. Lane keeping assist (LKA) system....5-60
12. ESC OFF button ..............................5-31
13. VESS (Vehicle Engine Sound System) button ............................................H-47
14. Charging door opener ..H-20, H27, H34
15. AUTO/LOCK mode selection buttonH-15
16. Scheduled charging deactivation button
17. Bonnet release lever ......................3-32
18. Fuse box ..........................................7-35
19. Steering wheel ................................3-16
20. Seat ..................................................2-4
OAEE016003RThe actual shape may differ from the illustration.
Page 132 of 526
2-54
Safety system of your vehicle
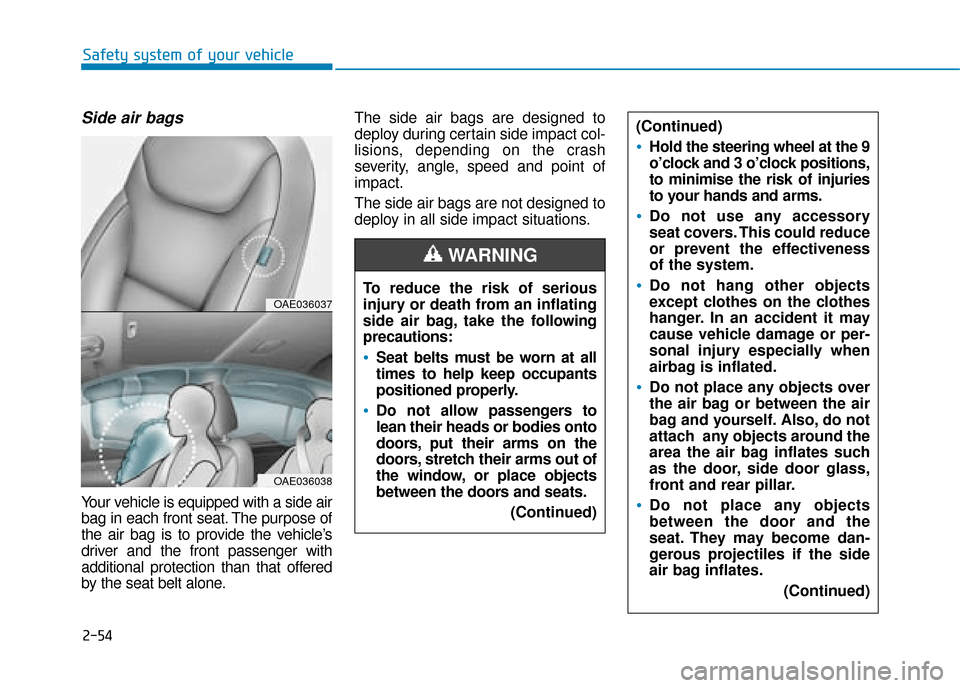
Side air bags
Your vehicle is equipped with a side air
bag in each front seat. The purpose of
the air bag is to provide the vehicle’s
driver and the front passenger with
additional protection than that offered
by the seat belt alone.The side air bags are designed to
deploy during certain side impact col-
lisions, depending on the crash
severity, angle, speed and point of
impact.
The side air bags are not designed to
deploy in all side impact situations.
To reduce the risk of serious
injury or death from an inflating
side air bag, take the follo wing
precautions:
Seat belts must be worn at all
times to help keep occupants
positioned properly.
Do not allow passengers to
lean their heads or bodies onto
doors, put their arms on the
doors, stretch their arms out of
the window, or place objects
between the doors and seats.
(Continued)
WARNING
OAE036037
OAE036038
(Continued)
Hold the steering wheel at the 9
o’clock and 3 o’clock positions,
to minimise the risk of injuries
to your hands and arms.
Do not use any accessory
seat covers. This could reduce
or prevent the effectiveness
of the system.
Do not hang other objects
except clothes on the clothes
hanger. In an accident it may
cause vehicle damage or per-
sonal injury especially when
airbag is inflated.
Do not place any objects over
the air bag or between the air
bag and yourself. Also, do not
attach any objects around the
area the air bag inflates such
as the door, side door glass,
front and rear pillar.
Do not place any objects
between the door and the
seat. They may become dan-
gerous projectiles if the side
air bag inflates.(Continued)
Page 134 of 526
2-56
Safety system of your vehicle
How does the air bags system
operate?
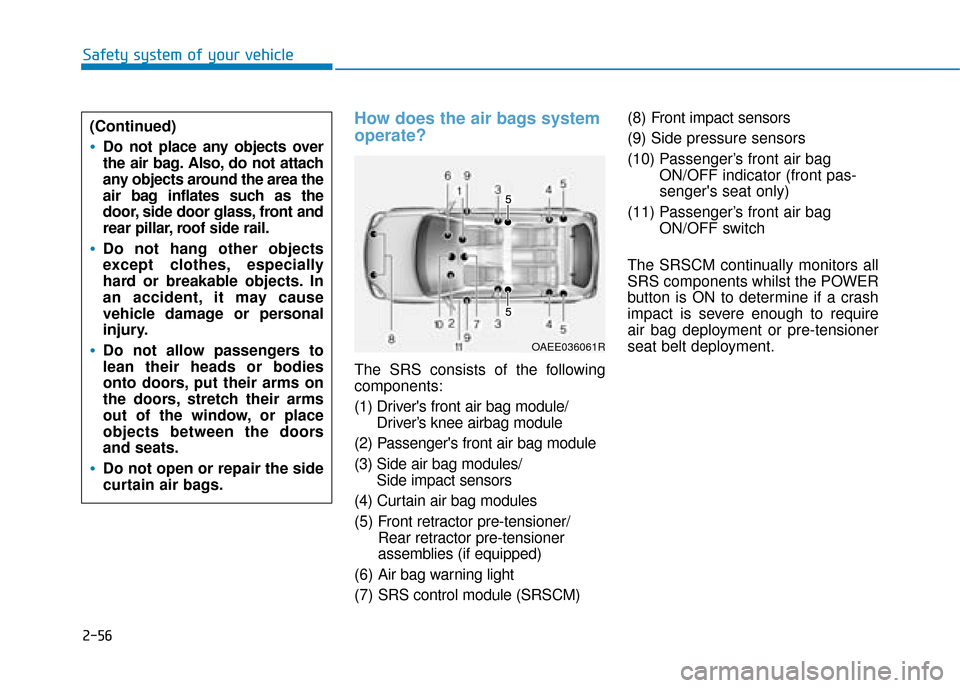
The SRS consists of the following
components:
(1) Driver's front air bag module/Driver’s knee airbag module
(2) Passenger's front air bag module
(3) Side air bag modules/ Side impact sensors
(4) Curtain air bag modules
(5) F ront retractor pre-tensioner/
Rear retractor pre-tensioner
assemblies (if equipped)
(6) Air bag warning light
(7) SRS control module (SRSCM) (8) Front impact sensors
(9) Side pressure sensors
(10) Passenger’s front air bag
ON/OFF indicator (front pas-
senger's seat only)
(11) Passenger’s front air bag ON/OFF switch
The SRSCM continually monitors all
SRS components whilst the POWER
button is ON to determine if a crash
impact is severe enough to require
air bag deployment or pre-tensioner
seat belt deployment.
(Continued)
Do not place any objects over
the air bag. Also, do not attach
any objects around the area the
air bag inflates such as the
door, side door glass, front and
rear pillar, roof side rail.
Do not hang other objects
except clothes, especially
hard or breakable objects. In
an accident, it may cause
vehicle damage or personal
injury.
Do not allow passengers to
lean their heads or bodies
onto doors, put their arms on
the doors, stretch their arms
out of the window, or place
objects between the doors
and seats.
Do not open or repair the side
curtain air bags.
OAEE036061R
Page 138 of 526
2-60
Safety system of your vehicle
What to expect after an air bag
inflates
After a frontal or side air bag inflates,
it will deflate very quickly. Air bag
inflation will not prevent the driver
from seeing out of the windscreen or
being able to steer. Curtain air bags
may remain partially inflated for
some time after they deploy.After an air bag inflates, take
the following precautions:
Open your windows and doors
as soon as possible after
impact to reduce prolonged
exposure to the smoke and
powder released by the inflat-
ing air bag.
Do not touch the air bag stor-
age area’s internal compo-
nents immediately after an air
bag has inflated. The parts
that come into contact with an
inflating air bag may be very
hot.
Always wash exposed skin
areas thoroughly with cold
water and mild soap.
We recommend that a
HYUNDAI authorised repairer
replace the air bag immediately
after deployment. Air bags are
designed to be used only once.
WARNING
To prevent objects from becom-
ing dangerous projectiles when
the passenger's air bag inflates:
Do not install or place any
objects (drink holder, CD hold-
er, stickers, etc.) on the front
passenger's panel above the
glove box where the passen-
ger's air bag is located.
Do not install a container of
liquid air freshener near the
instrument cluster or on the
instrument panel surface.
WARNING
Page 148 of 526
Convenient features of your vehicle
Accessing your vehicle .........................................3-3
Smart key ........................................................................\
....3-3
Immobiliser system............................................................3-7
Door locks ...............................................................3-8
Operating door locks from outside the vehicle.........3-8
Operating door locks from inside the vehicle ...........3-9
Deadlocks ........................................................................\
..3-11
Auto door lock/unlock features..................................3-11
Child-protector rear door locks ..................................3-12
Theft-alarm system.............................................3-13
Driver position memory system .........................3-14
Storing memory positions .............................................3-14
Easy access function .....................................................3-15
Steering wheel......................................................3-16
Electric power steering (EPS) ......................................3-16
Tilt steering / Telescope steering...............................3-17
Heated steering wheel ...................................................3-17
Horn ........................................................................\
............3-18
Mirrors ...................................................................3-18
Inside rearview mirror....................................................3-18
Outside rearview mirror ................................................3-20
Windows ................................................................3-23
Power windows................................................................3-23
Sunroof..................................................................3-28
Sunroof opening and closing .......................................3-29
Sliding the sunroof .........................................................3-29
Tilting the sunroof ..........................................................3-30
Sunshade ........................................................................\
...3-30
Resetting the sunroof ....................................................3-31
Exterior features .................................................3-32
Bonnet........................................................................\
........3-32
Tailgate.....................................................................\
..........3-33
Instrument cluster................................................3-35
Instrument cluster control ............................................3-36
Gauges and meters .........................................................3-37
Warning and indicator lights ........................................3-41
LCD display messages ..................................................3-52
LCD display ...........................................................3-65
LCD display control.........................................................3-65
LCD display modes ........................................................3-66
Trip computer .......................................................3-73
Light .......................................................................3\
-77
Exterior lights ..................................................................3-77
Welcome system..............................................................3-83
Interior lights ....................................................................3-84\
3