2019 FORD EXPLORER transmission
[x] Cancel search: transmissionPage 131 of 571
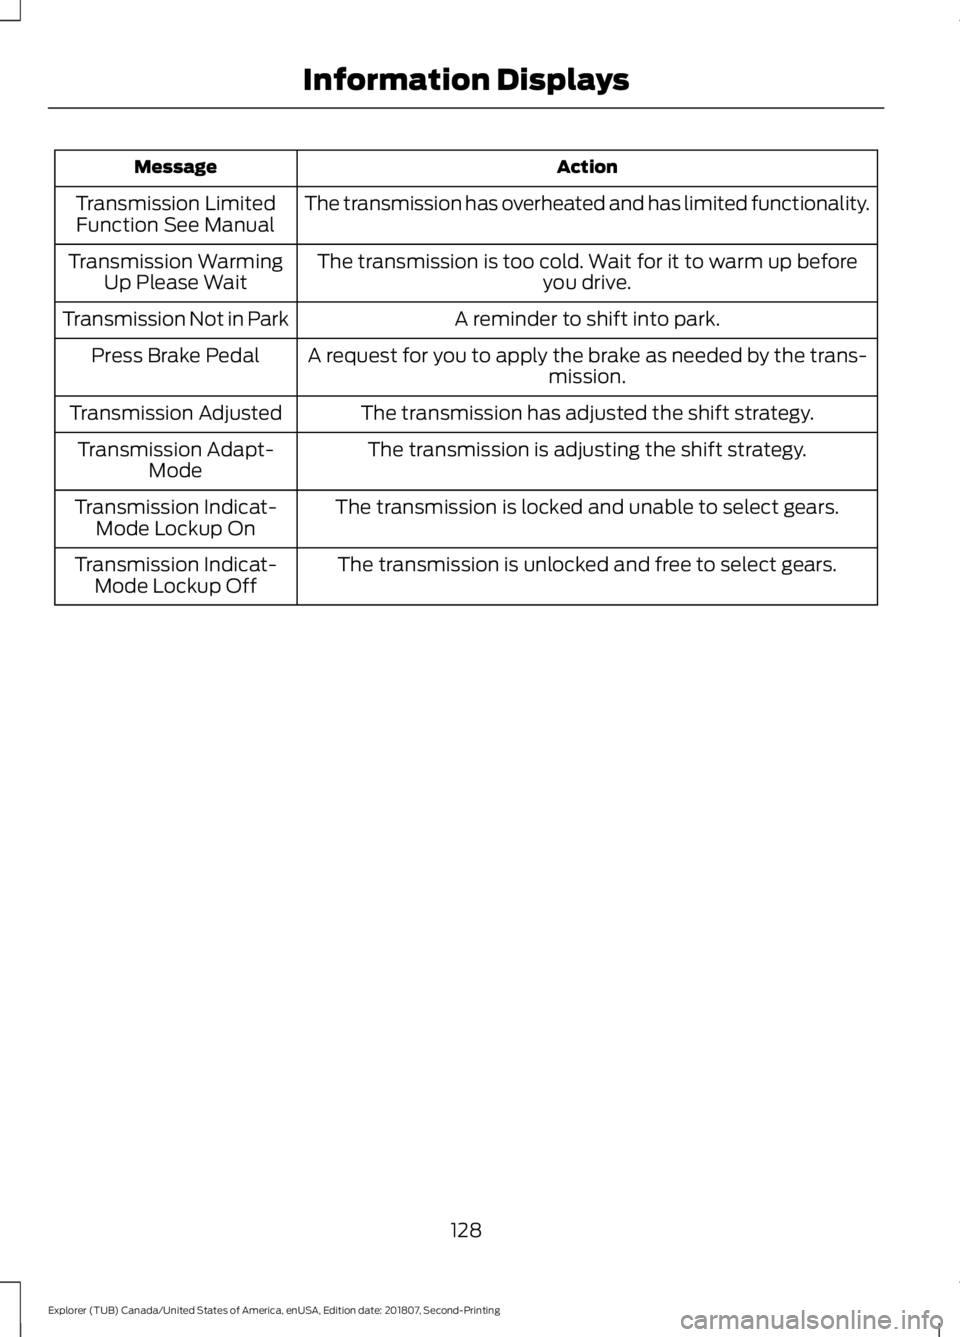
Action
Message
The transmission has overheated and has limited functionality.
Transmission Limited
Function See Manual
The transmission is too cold. Wait for it to warm up beforeyou drive.
Transmission Warming
Up Please Wait
A reminder to shift into park.
Transmission Not in Park
A request for you to apply the brake as needed by the trans-mission.
Press Brake Pedal
The transmission has adjusted the shift strategy.
Transmission Adjusted
The transmission is adjusting the shift strategy.
Transmission Adapt-
Mode
The transmission is locked and unable to select gears.
Transmission Indicat-
Mode Lockup On
The transmission is unlocked and free to select gears.
Transmission Indicat-
Mode Lockup Off
128
Explorer (TUB) Canada/United States of America, enUSA, Edition date: 201807, Second-Printing Information Displays
Page 149 of 571
MEMORY FUNCTION (IF EQUIPPED)
WARNING:
Before activating the
memory seat, make sure that the area
immediately surrounding the seat is clear
of obstructions and that all occupants
are clear of moving parts. WARNING:
Do not use the
memory function when your vehicle is
moving.
This feature automatically recalls the
position of the following:
• Driver seat.
• Power mirrors.
• Optional power adjustable foot pedals.
• Optional power steering column.
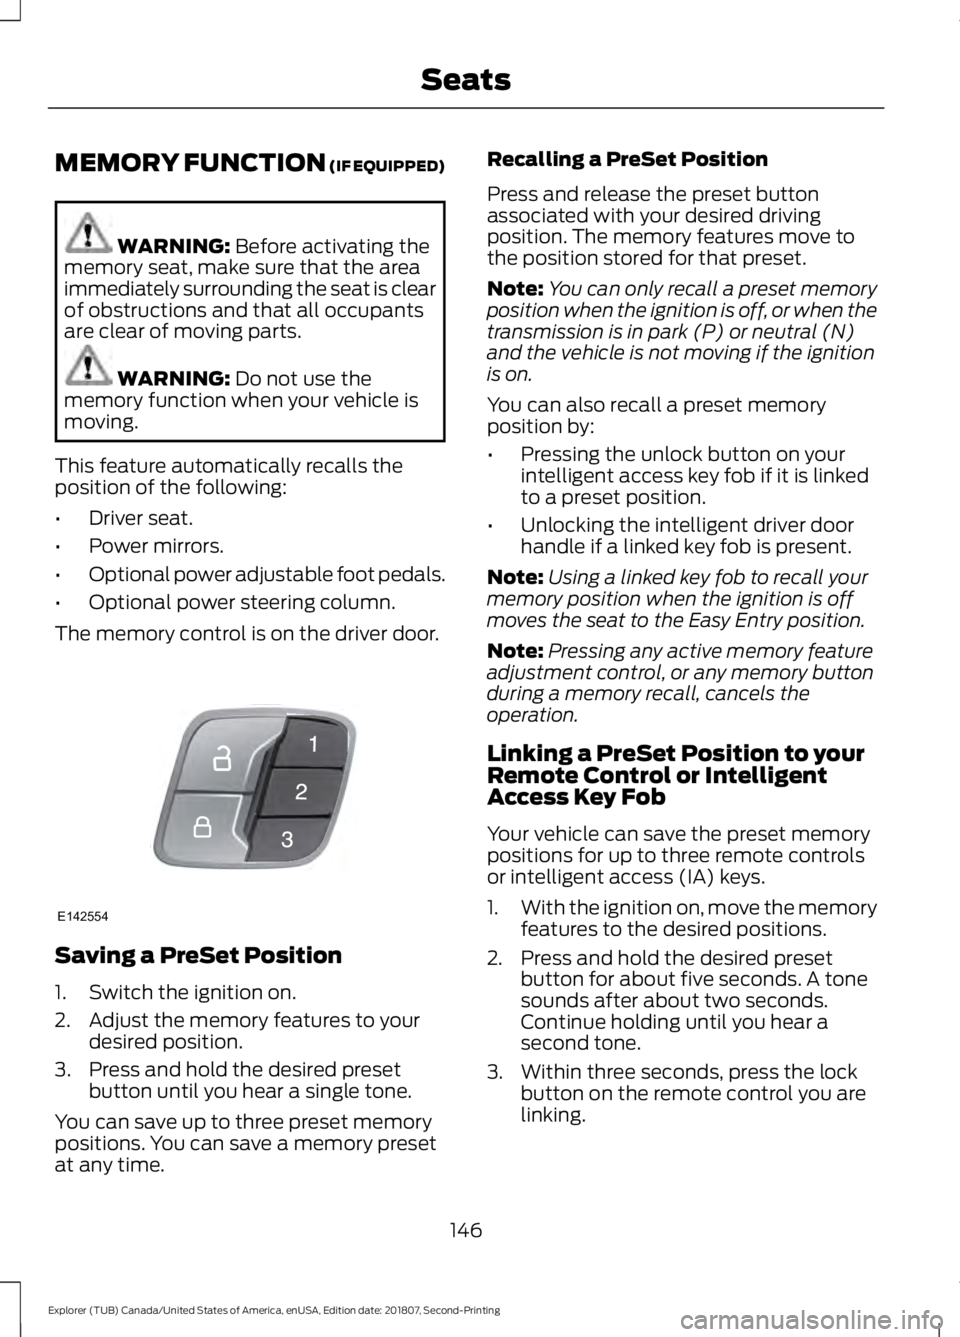
The memory control is on the driver door. Saving a PreSet Position
1. Switch the ignition on.
2. Adjust the memory features to your
desired position.
3. Press and hold the desired preset button until you hear a single tone.
You can save up to three preset memory
positions. You can save a memory preset
at any time. Recalling a PreSet Position
Press and release the preset button
associated with your desired driving
position. The memory features move to
the position stored for that preset.
Note:
You can only recall a preset memory
position when the ignition is off, or when the
transmission is in park (P) or neutral (N)
and the vehicle is not moving if the ignition
is on.
You can also recall a preset memory
position by:
• Pressing the unlock button on your
intelligent access key fob if it is linked
to a preset position.
• Unlocking the intelligent driver door
handle if a linked key fob is present.
Note: Using a linked key fob to recall your
memory position when the ignition is off
moves the seat to the Easy Entry position.
Note: Pressing any active memory feature
adjustment control, or any memory button
during a memory recall, cancels the
operation.
Linking a PreSet Position to your
Remote Control or Intelligent
Access Key Fob
Your vehicle can save the preset memory
positions for up to three remote controls
or intelligent access (IA) keys.
1. With the ignition on, move the memory
features to the desired positions.
2. Press and hold the desired preset button for about five seconds. A tone
sounds after about two seconds.
Continue holding until you hear a
second tone.
3. Within three seconds, press the lock button on the remote control you are
linking.
146
Explorer (TUB) Canada/United States of America, enUSA, Edition date: 201807, Second-Printing SeatsE142554
Page 157 of 571
FOLD: Press to fold down the
seatback.
C
RH / BOTH / LH: Press to select
the normal, stow and fold modes
to activate the right-hand seat,
the left-hand seat or both.
D
Note: The third row seat includes obstacle
detection that allows the seat to stop and
reverse direction if it hits an obstacle so that
the obstacle can be removed.
Note: Pressing a different button while the
power seat feature is already being
performed may cause the first selected seat
movement to be cancelled. Allow the first
seat movement to be completed before
pressing a button for another function.
Note: Make sure that there are no objects
such as books, purses or briefcases on the
load floor before unstowing the seat. Failure
to remove all objects from the top of the
load floor prior to unstowing it may cause
damage to the seat.
Note: In order to allow the seat to complete
the stowed position, do not place objects
under the seat before stowing. Remove all
objects from the seat and stowage tub.
Note: In the unlikely event that the third
row power seat stops prematurely or travels
to an unexpected position, press the FOLD
button (C) to reset the seat and return it to
a normal position.
These seats feature a power one-touch
operation that allows you fold and stow
the seats.
• The power fold seats work only when
the transmission is in park (P) and the
liftgate is open.
• If the ignition is off and the feature is
still running, the battery saver turns it
off after 10 minutes. Press unlock on
the remote entry key transmitter to
reactivate the power seats or unlock it
with the keyless entry keypad. See
Remote Control (page 53). HEATED SEATS
(IF EQUIPPED)
Front Seats WARNING: People who are unable
to feel pain to their skin because of
advanced age, chronic illness, diabetes,
spinal cord injury, medication, alcohol
use, exhaustion or other physical
conditions, must exercise care when
using the heated seat. The heated seat
may cause burns even at low
temperatures, especially if used for long
periods of time. Do not place anything
on the seat that insulates against heat,
such as a blanket or cushion. This may
cause the heated seat to overheat. Do
not puncture the seat with pins, needles
or other pointed objects. This may
damage the heating element which may
cause the heated seat to overheat. An
overheated seat may cause serious
personal injury.
Do not do the following:
• Place heavy objects on the seat.
• Operate the heated seat if water or any
other liquid spills on the seat. Allow the
seat to dry thoroughly.
Note: The engine must be running to use
this feature. Press the heated seat symbol to cycle
through the various heat settings and off.
More indicator lights indicate warmer
settings.
154
Explorer (TUB) Canada/United States of America, enUSA, Edition date: 201807, Second-Printing SeatsE146322
Page 160 of 571
UNIVERSAL GARAGE DOOR
OPENER
HomeLink Wireless Control
System
WARNING: Do not use the system
with any garage door opener that does
not have the safety stop and reverse
feature as required by U.S. Federal
Safety Standards (this includes any
garage door opener manufactured
before April 1, 1982). A garage door
opener which cannot detect an object,
signaling the door to stop and reverse,
does not meet current federal safety
standards. Using a garage door opener
without these features increases the risk
of serious injury or death.
Note: Make sure that the garage door and
security device are free from obstruction
when you are programming. Do not program
the system with the vehicle in the garage.
Note: Make sure you keep the original
remote control transmitter for use in other
vehicles as well as for future system
programming.
Note: We recommend that upon the sale
or lease termination of your vehicle, you
erase the programmed function buttons for
security reasons. See Erasing the Function
Button Codes
.
Note: You can program a maximum of
three devices. To change or replace any of
the three devices after it has been initially
programmed, you must first erase the
current settings. See Erasing the Function
Button Codes
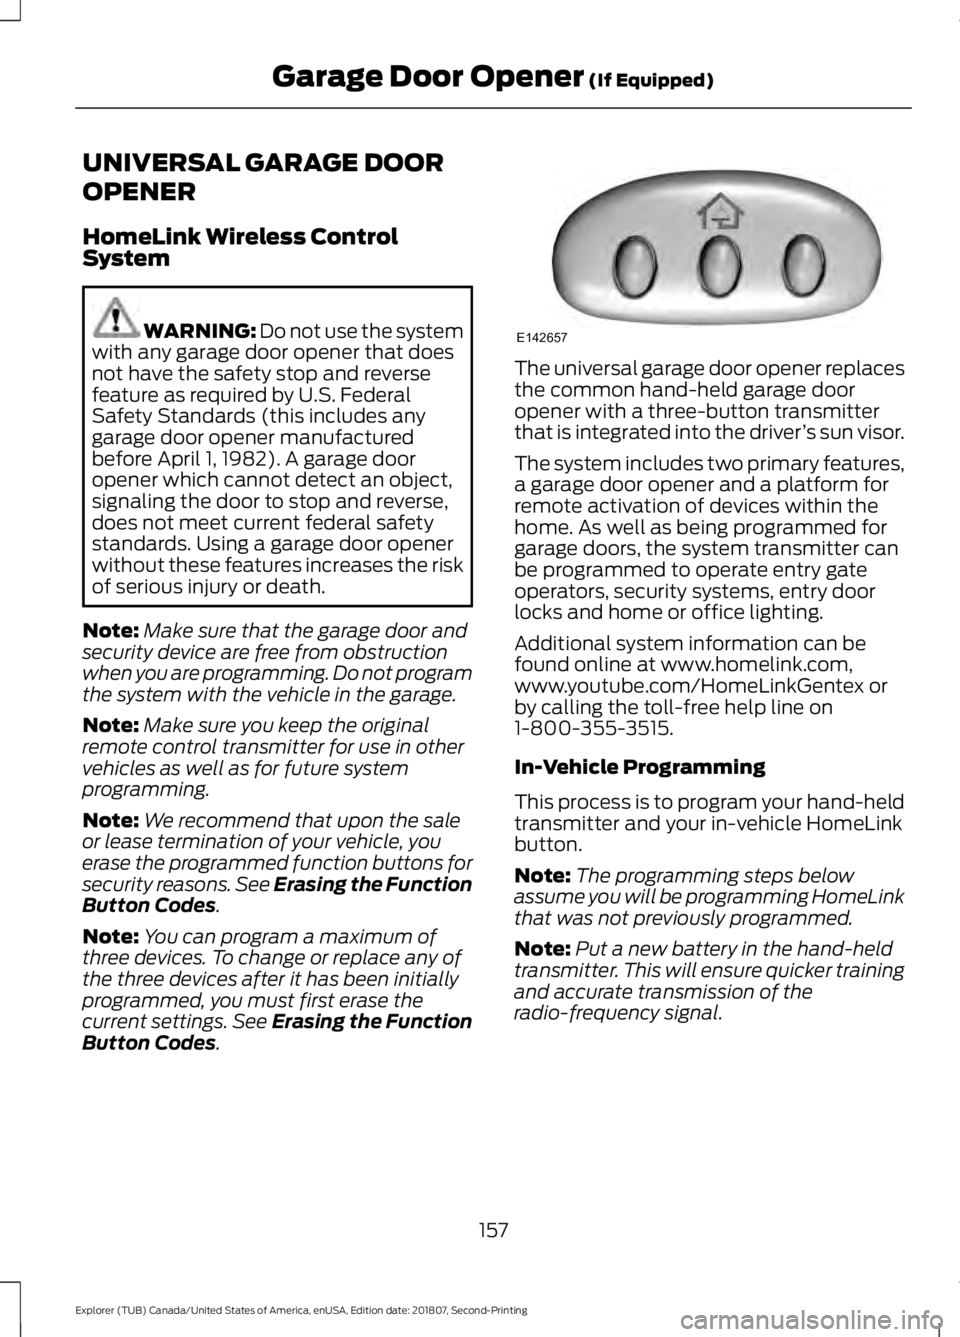
. The universal garage door opener replaces
the common hand-held garage door
opener with a three-button transmitter
that is integrated into the driver
’s sun visor.
The system includes two primary features,
a garage door opener and a platform for
remote activation of devices within the
home. As well as being programmed for
garage doors, the system transmitter can
be programmed to operate entry gate
operators, security systems, entry door
locks and home or office lighting.
Additional system information can be
found online at www.homelink.com,
www.youtube.com/HomeLinkGentex or
by calling the toll-free help line on
1-800-355-3515.
In-Vehicle Programming
This process is to program your hand-held
transmitter and your in-vehicle HomeLink
button.
Note: The programming steps below
assume you will be programming HomeLink
that was not previously programmed.
Note: Put a new battery in the hand-held
transmitter. This will ensure quicker training
and accurate transmission of the
radio-frequency signal.
157
Explorer (TUB) Canada/United States of America, enUSA, Edition date: 201807, Second-Printing Garage Door Opener
(If Equipped)E142657
Page 162 of 571
Gate Operator / Canadian
Programming
Canadian radio-frequency laws require
transmitter signals to
“time-out” (or quit)
after several seconds of transmission –
which may not be long enough for
HomeLink to pick up the signal during
programming. Similar to this Canadian law,
some U.S. gate operators are designed to
“time-out” in the same manner.
Note: If programming a garage door opener
or gate operator, it is advised to unplug the
device during the “cycling” process to
prevent possible overheating.
1. Press and hold the HomeLink button while you press and release, every two
seconds, your hand-held transmitter
until the HomeLink indicator light
changes from a slow to a rapidly
blinking light.
2. Release both the HomeLink and hand-held transmitter buttons.
3. Continue programing HomeLink. See In-Vehicle Programming
.
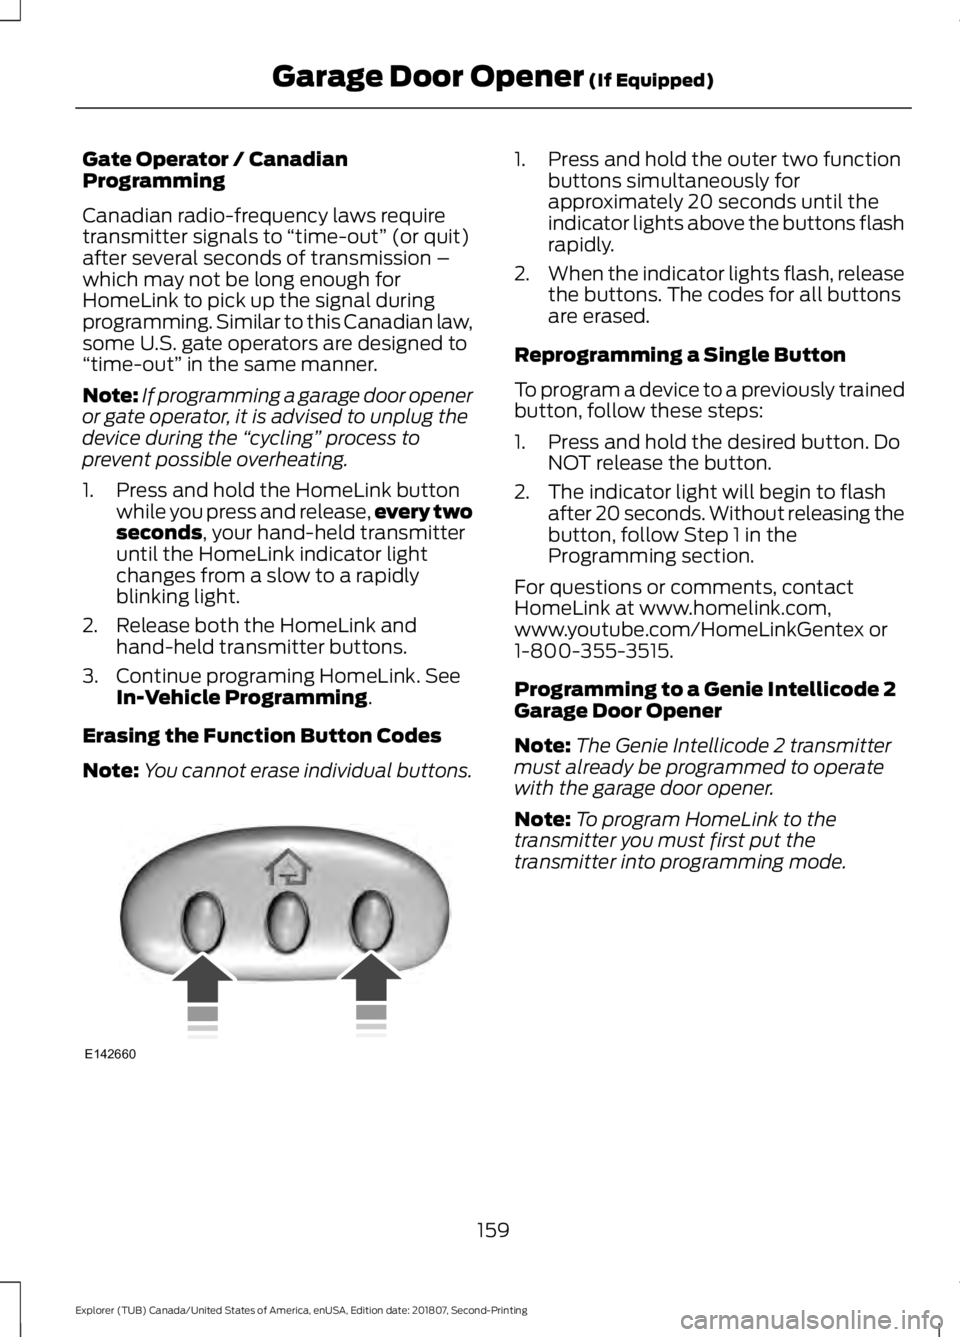
Erasing the Function Button Codes
Note: You cannot erase individual buttons. 1. Press and hold the outer two function
buttons simultaneously for
approximately 20 seconds until the
indicator lights above the buttons flash
rapidly.
2. When the indicator lights flash, release
the buttons. The codes for all buttons
are erased.
Reprogramming a Single Button
To program a device to a previously trained
button, follow these steps:
1. Press and hold the desired button. Do NOT release the button.
2. The indicator light will begin to flash after 20 seconds. Without releasing the
button, follow Step 1 in the
Programming section.
For questions or comments, contact
HomeLink at www.homelink.com,
www.youtube.com/HomeLinkGentex or
1-800-355-3515.
Programming to a Genie Intellicode 2
Garage Door Opener
Note: The Genie Intellicode 2 transmitter
must already be programmed to operate
with the garage door opener.
Note: To program HomeLink to the
transmitter you must first put the
transmitter into programming mode.
159
Explorer (TUB) Canada/United States of America, enUSA, Edition date: 201807, Second-Printing Garage Door Opener
(If Equipped)E142660
Page 170 of 571

Ignition Modes
The keyless starting system has three
modes:
Off: Turns the ignition off.
• Without applying the brake pedal,
press and release the button once
when the ignition is in the on mode, or
when the engine is running but the
vehicle is not moving.
On:
All electrical circuits are operational
and the warning lamps and indicators
illuminate.
• Without applying the brake pedal,
press and release the button once.
Start:
Starts the engine.
• Press the brake pedal, and then press
the button for any length of time. An
indicator light on the button illuminates
when the ignition is on and when the
engine starts.
STARTING A GASOLINE
ENGINE
When you start the engine, the idle speed
increases. This helps to warm up the
engine. If the engine idle speed does not
slow down automatically, have your
vehicle checked by an authorized dealer. Note:
You can crank the engine for a total
of 60 seconds without the engine starting
before the starting system temporarily
disables. The 60 seconds does not have to
be all at once. For example, if you crank the
engine three times for 20 seconds each
time, without the engine starting, you
reached the 60-second time limit. A
message appears in the information display
alerting you that you exceeded the cranking
time. You cannot attempt to start the
engine for at least 15 minutes. After 15
minutes, you are limited to a 15-second
engine cranking time. You need to wait 60
minutes before you can crank the engine for
60 seconds again.
Before starting your vehicle, check the
following:
• Make sure all occupants have fastened
their safety belts.
• Make sure the headlamps and
electrical accessories are off.
• Make sure the parking brake is on.
• Make sure the transmission is in park
(P).
• Switch the ignition on. For vehicles with
a keyless ignition, see the following
instructions.
Vehicles with an Ignition Key
Note: Do not touch the accelerator pedal.
1. Fully depress the brake pedal.
2. Turn the key to the start position to start the engine.
Note: The engine may continue cranking
for up to 15 seconds or until it starts.
Note: If you cannot start the engine on the
first try, wait for a short period and try again.
Vehicles with Keyless Start
Note: Do not touch the accelerator pedal.
167
Explorer (TUB) Canada/United States of America, enUSA, Edition date: 201807, Second-Printing Starting and Stopping the EngineE146431
Page 171 of 571
Note:
You must have your intelligent access
key in your vehicle in order to shift the
transmission out of park (P).
1. Fully depress the brake pedal.
2. Press the push button ignition switch.
The system does not function if:
• The passive key frequencies are
jammed.
• The key battery has no charge.
If you are unable to start your vehicle, do
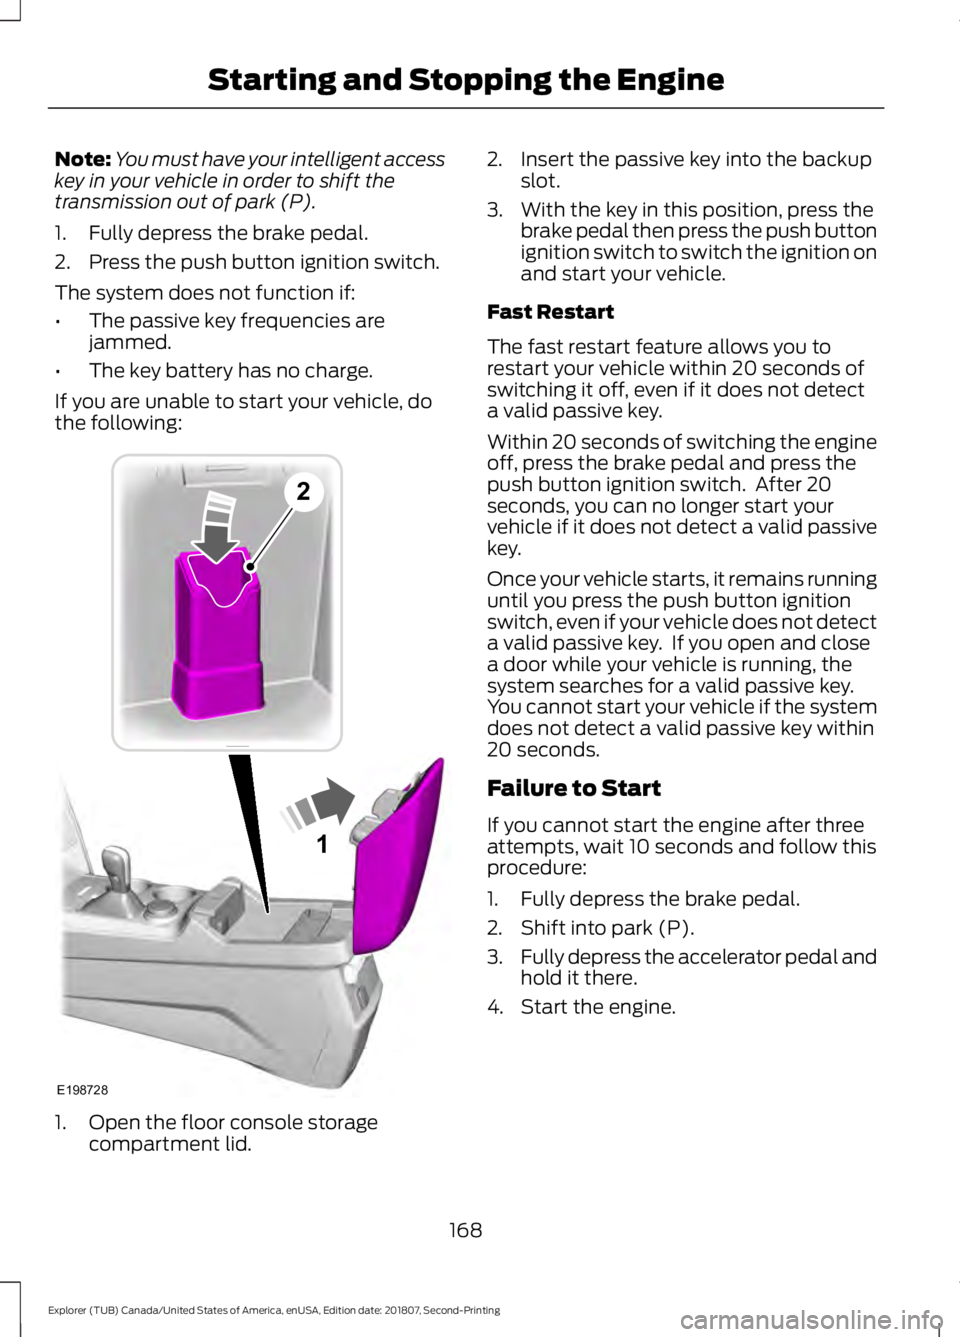
the following: 1. Open the floor console storage
compartment lid. 2. Insert the passive key into the backup
slot.
3. With the key in this position, press the brake pedal then press the push button
ignition switch to switch the ignition on
and start your vehicle.
Fast Restart
The fast restart feature allows you to
restart your vehicle within 20 seconds of
switching it off, even if it does not detect
a valid passive key.
Within 20 seconds of switching the engine
off, press the brake pedal and press the
push button ignition switch. After 20
seconds, you can no longer start your
vehicle if it does not detect a valid passive
key.
Once your vehicle starts, it remains running
until you press the push button ignition
switch, even if your vehicle does not detect
a valid passive key. If you open and close
a door while your vehicle is running, the
system searches for a valid passive key.
You cannot start your vehicle if the system
does not detect a valid passive key within
20 seconds.
Failure to Start
If you cannot start the engine after three
attempts, wait 10 seconds and follow this
procedure:
1. Fully depress the brake pedal.
2. Shift into park (P).
3. Fully depress the accelerator pedal and
hold it there.
4. Start the engine.
168
Explorer (TUB) Canada/United States of America, enUSA, Edition date: 201807, Second-Printing Starting and Stopping the Engine1
E198728
2
Page 185 of 571

Illumination of the service engine soon
indicator, charging system warning light or
the temperature warning light, fluid leaks,
strange odors, smoke or loss of engine
power could indicate that the emission
control system is not working properly.
An improperly operating or damaged
exhaust system may allow exhaust to
enter the vehicle. Have a damaged or
improperly operating exhaust system
inspected and repaired immediately.
Do not make any unauthorized changes to
your vehicle or engine. By law, vehicle
owners and anyone who manufactures,
repairs, services, sells, leases, trades
vehicles, or supervises a fleet of vehicles
are not permitted to intentionally remove
an emission control device or prevent it
from working. Information about your
vehicle
’s emission system is on the Vehicle
Emission Control Information Decal
located on or near the engine. This decal
also lists engine displacement.
Please consult your warranty information
for complete details.
On-Board Diagnostics (OBD-II)
Your vehicle has a computer known as the
on-board diagnostics system (OBD-II) that
monitors the engine ’s emission control
system. The system protects the
environment by making sure that your
vehicle continues to meet government
emission standards. The OBD-II system
also assists a service technician in properly
servicing your vehicle. When the service engine soon
indicator illuminates, the OBD-II
system has detected a
malfunction. Temporary malfunctions may
cause the service engine soon indicator to
illuminate. Examples are: 1. Your vehicle has run out of fuel
—the
engine may misfire or run poorly.
2. Poor fuel quality or water in the fuel —the engine may misfire or run
poorly.
3. The fuel fill inlet may not have closed properly. See Refueling (page 176).
4. Driving through deep water —the
electrical system may be wet.
You can correct these temporary
malfunctions by filling the fuel tank with
good quality fuel, properly closing the fuel
fill inlet or letting the electrical system dry
out. After three driving cycles without these
or any other temporary malfunctions
present, the service engine soon indicator
should stay off the next time you start the
engine. A driving cycle consists of a cold
engine startup followed by mixed city and
highway driving. No additional vehicle
service is required.
If the service engine soon indicator remains
on, have your vehicle serviced at the first
available opportunity. Although some
malfunctions detected by the OBD-II may
not have symptoms that are apparent,
continued driving with the service engine
soon indicator on can result in increased
emissions, lower fuel economy, reduced
engine and transmission smoothness and
lead to more costly repairs.
Readiness for Inspection and
Maintenance (I/M) Testing
Some state and provincial and local
governments may have
Inspection/Maintenance (I/M) programs
to inspect the emission control equipment
on your vehicle. Failure to pass this
inspection could prevent you from getting
a vehicle registration. If the service engine soon
indicator is on or the bulb does
not work, your vehicle may need
service. See On-Board Diagnostics.
182
Explorer (TUB) Canada/United States of America, enUSA, Edition date: 201807, Second-Printing Engine Emission Control