2019 FORD EXPLORER change time
[x] Cancel search: change timePage 2 of 571

The information contained in this publication was correct at the time of going to print. In the interest of
continuous development, we reserve the right to change specifications, design or equipment at any time
without notice or obligation. No part of this publication may be reproduced, transmitted, stored in a
retrieval system or translated into any language in any form by any means without our written permission.
Errors and omissions excepted.
© Ford Motor Company 2018
All rights reserved.
Part Number: 201807 20180822173702
California Proposition 65
WARNING: Operating, servicing and
maintaining a passenger vehicle or off-highway
motor vehicle can expose you to chemicals
including engine exhaust, carbon monoxide,
phthalates, and lead, which are known to the
State of California to cause cancer and birth
defects or other reproductive harm. To minimize
exposure, avoid breathing exhaust, do not idle the
engine except as necessary, service your vehicle
in a well-ventilated area and wear gloves or wash
your hands frequently when servicing your vehicle.
For more information go to
www.P65Warnings.ca.gov/passenger-vehicle. WARNING:
Battery posts, terminals and
related accessories contain lead and lead
compounds, chemicals known to the State of
California to cause cancer and reproductive harm.
Wash your hands after handling
.
Page 63 of 571

PRINCIPLE OF OPERATION
MyKey allows you to program keys with
restricted driving modes to promote good
driving habits. You can program the
restrictions to all keys except one. Any keys
that you did not program are administrator
keys or admin keys.
You can use admin keys to:
•
Create a MyKey with certain vehicle
restrictions.
• Program certain MyKey settings.
• Clear all MyKey restrictions.
After you program a MyKey, you can view
the following information through the
information display:
• The total number of admin keys and
MyKeys for your vehicle.
• The total distance a MyKey driver
traveled with your vehicle.
Note: Every MyKey receives the same
restrictions and settings. You cannot
program them individually.
Note: For vehicles equipped with a
push-button start switch: When both a
MyKey and an admin key are present when
you start your vehicle, the system recognizes
the admin key only. Standard Settings
Not every vehicle includes the features
listed below. If your vehicle has this
equipment, then you cannot change the
following settings when using a MyKey:
•
Seatbelt reminder or Belt-Minder™.
MyKey mutes the audio system until
drivers, and in some instances,
passengers, fasten their seatbelts.
Note: If your vehicle includes an
AM/FM radio or a very basic audio
system, then the radio may not mute.
• Earlier low-fuel warning. The low-fuel
warning activates earlier for MyKey
drivers, giving them more time to refuel.
• Certain driver alerts, stability systems
or parking aids turn on automatically
when you use the MyKey system. For
example, Blind Spot Information
System (BLIS), cross traffic alert, lane
departure warning or forward collision
warning. Note:
MyKey drivers may be
able to turn the lane departure warning
feature off, but this feature turns back
on automatically with every new key
cycle.
• Restricted touchscreen operation in
some markets. For example, MyKey
may prevent manual navigation
destination input while the vehicle is in
any gear other than park (P) or when
the vehicle reaches a certain rate of
speed.
• Satellite radio adult content
restrictions, if this feature is available
in your market.
Optional Settings
You can configure certain vehicle feature
settings when you first create a MyKey. You
can also change the settings afterward
with an admin key.
60
Explorer (TUB) Canada/United States of America, enUSA, Edition date: 201807, Second-Printing MyKey
™
Page 65 of 571

3. Access the main menu in the
information display and then scroll
through the menus to change the
settings of your MyKey. From the
MyKey menu select the option Create
MyKey. See Information Displays
(page 104).
4. When prompted, hold the
OK button
until you see a message informing you
to label this key as a MyKey. The
programmed restrictions apply when
you key off, open and close the driver
door and restart your vehicle with the
programmed key or transmitter.
MyKey is successfully created. Make sure
you label it so you can distinguish it from
the admin keys.
You can also program configurable
settings for the key(s). See
Programming
and Changing Configurable Settings.
Programming and Changing
Configurable Settings
Use the information display to access your
configurable MyKey settings.
1. Switch the ignition on using an admin key or transmitter you want to program.
2. Access the main menu in the information display and then scroll
through the menus to change the
settings of your MyKey. See
Information Displays
(page 104).
3. Follow the instructions in the display.
Note: You can clear or change your MyKey
settings at any time during the same key
cycle as you created the MyKey. Once you
have switched the vehicle off, however, you
will need an admin key to change or clear
your MyKey settings. CLEARING ALL MYKEYS
When you clear your MyKeys, you remove
all restrictions and return all MyKeys to
their original admin key status at once. To
clear all MyKeys of all MyKey settings, use
the information display.
1. Switch the ignition on using an admin
key.
2. Access the main menu in the information display and then scroll
through the menus to begin clearing
your MyKey programming. See
Information Displays
(page 104).
3. Follow the instructions in the display.
4. A confirmation message appears in the
display after you finish clearing your
MyKeys.
Note: When you clear your MyKeys, you
remove all restrictions and return all MyKeys
to their original admin key status. You
cannot remove the MyKey restrictions
individually.
CHECKING MYKEY SYSTEM
STATUS
You can find information about your
programmed MyKeys by using the
information display. See
Information
Displays (page 104).
MyKey Distance
Tracks the distance when drivers use a
MyKey. The only way to delete the
accumulated distance is by using an admin
key to clear all MyKeys. If the distance does
not accumulate as expected, then the
intended user is not using the MyKey, or an
admin key user recently cleared and then
recreated a MyKey.
62
Explorer (TUB) Canada/United States of America, enUSA, Edition date: 201807, Second-Printing MyKey
™
Page 68 of 571
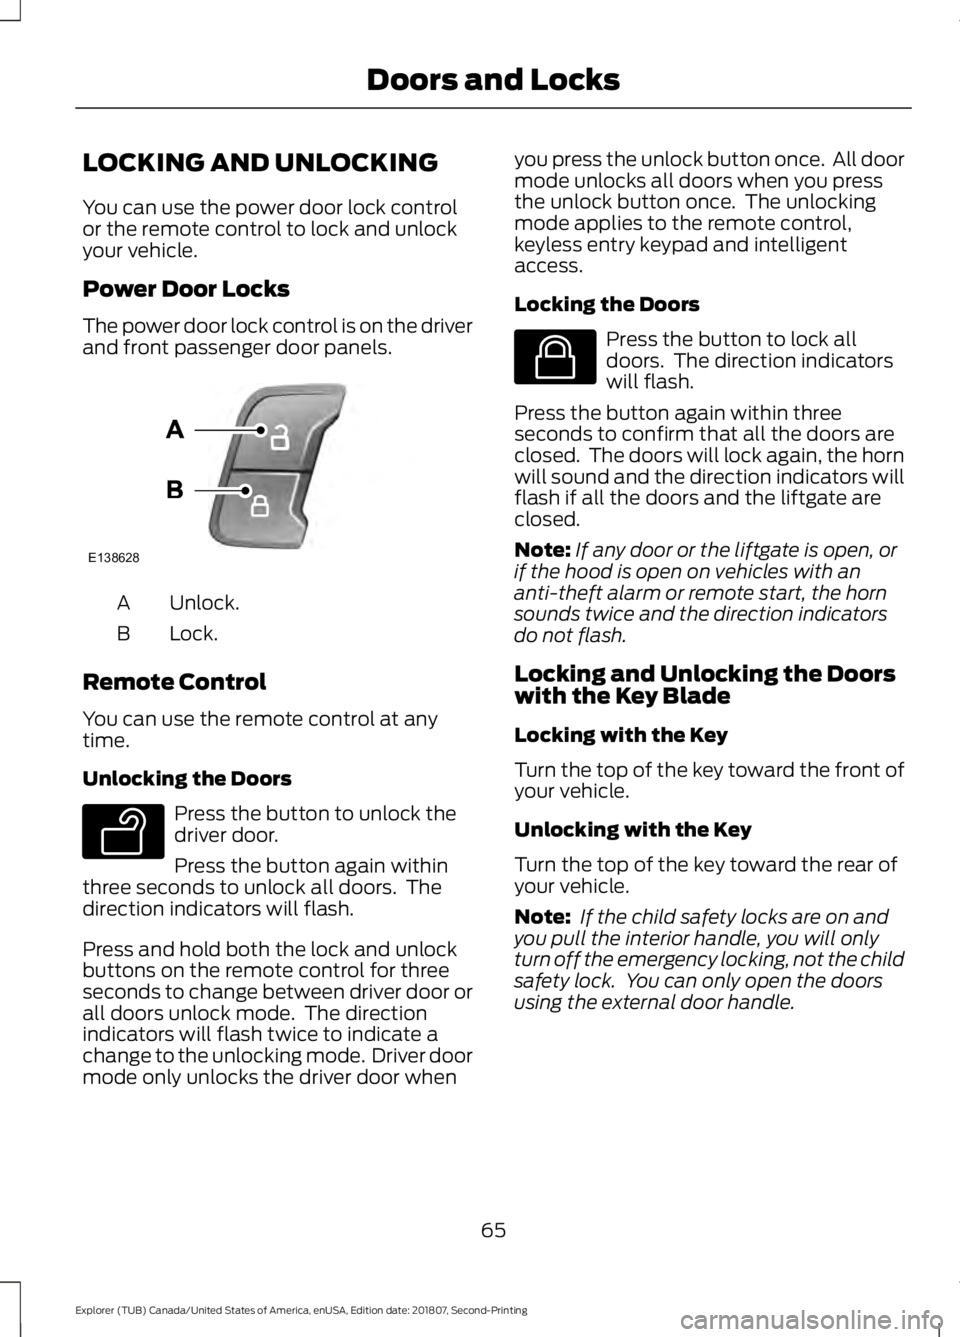
LOCKING AND UNLOCKING
You can use the power door lock control
or the remote control to lock and unlock
your vehicle.
Power Door Locks
The power door lock control is on the driver
and front passenger door panels.
Unlock.
A
Lock.
B
Remote Control
You can use the remote control at any
time.
Unlocking the Doors Press the button to unlock the
driver door.
Press the button again within
three seconds to unlock all doors. The
direction indicators will flash.
Press and hold both the lock and unlock
buttons on the remote control for three
seconds to change between driver door or
all doors unlock mode. The direction
indicators will flash twice to indicate a
change to the unlocking mode. Driver door
mode only unlocks the driver door when you press the unlock button once. All door
mode unlocks all doors when you press
the unlock button once. The unlocking
mode applies to the remote control,
keyless entry keypad and intelligent
access.
Locking the Doors Press the button to lock all
doors. The direction indicators
will flash.
Press the button again within three
seconds to confirm that all the doors are
closed. The doors will lock again, the horn
will sound and the direction indicators will
flash if all the doors and the liftgate are
closed.
Note: If any door or the liftgate is open, or
if the hood is open on vehicles with an
anti-theft alarm or remote start, the horn
sounds twice and the direction indicators
do not flash.
Locking and Unlocking the Doors
with the Key Blade
Locking with the Key
Turn the top of the key toward the front of
your vehicle.
Unlocking with the Key
Turn the top of the key toward the rear of
your vehicle.
Note: If the child safety locks are on and
you pull the interior handle, you will only
turn off the emergency locking, not the child
safety lock. You can only open the doors
using the external door handle.
65
Explorer (TUB) Canada/United States of America, enUSA, Edition date: 201807, Second-Printing Doors and LocksE138628 E138629 E138623
Page 87 of 571
GENERAL INFORMATION
Condensation in the Exterior Front
Lamps and Rear Lamps
Exterior front lamps and rear lamps have
vents to accommodate normal changes
in air pressure.
Condensation can be a natural by-product
of this design. When moist air enters the
lamp assembly through the vents, there is
a possibility that condensation can occur
when the temperature is cold. When
normal condensation occurs, a fine mist
can form on the interior of the lens. The
fine mist eventually clears and exits
through the vents during normal operation.
Clearing time may take as long as 48 hours
under dry weather conditions.
Examples of acceptable condensation are:
•
The presence of a fine mist (no streaks,
drip marks or large droplets).
• A fine mist covers less than 50% of the
lens.
Examples of unacceptable condensation
are:
• A water puddle inside the lamp.
• Streaks, drip marks or large droplets
present on the interior of the lens.
If you see any unacceptable condensation,
have your vehicle checked by an authorized
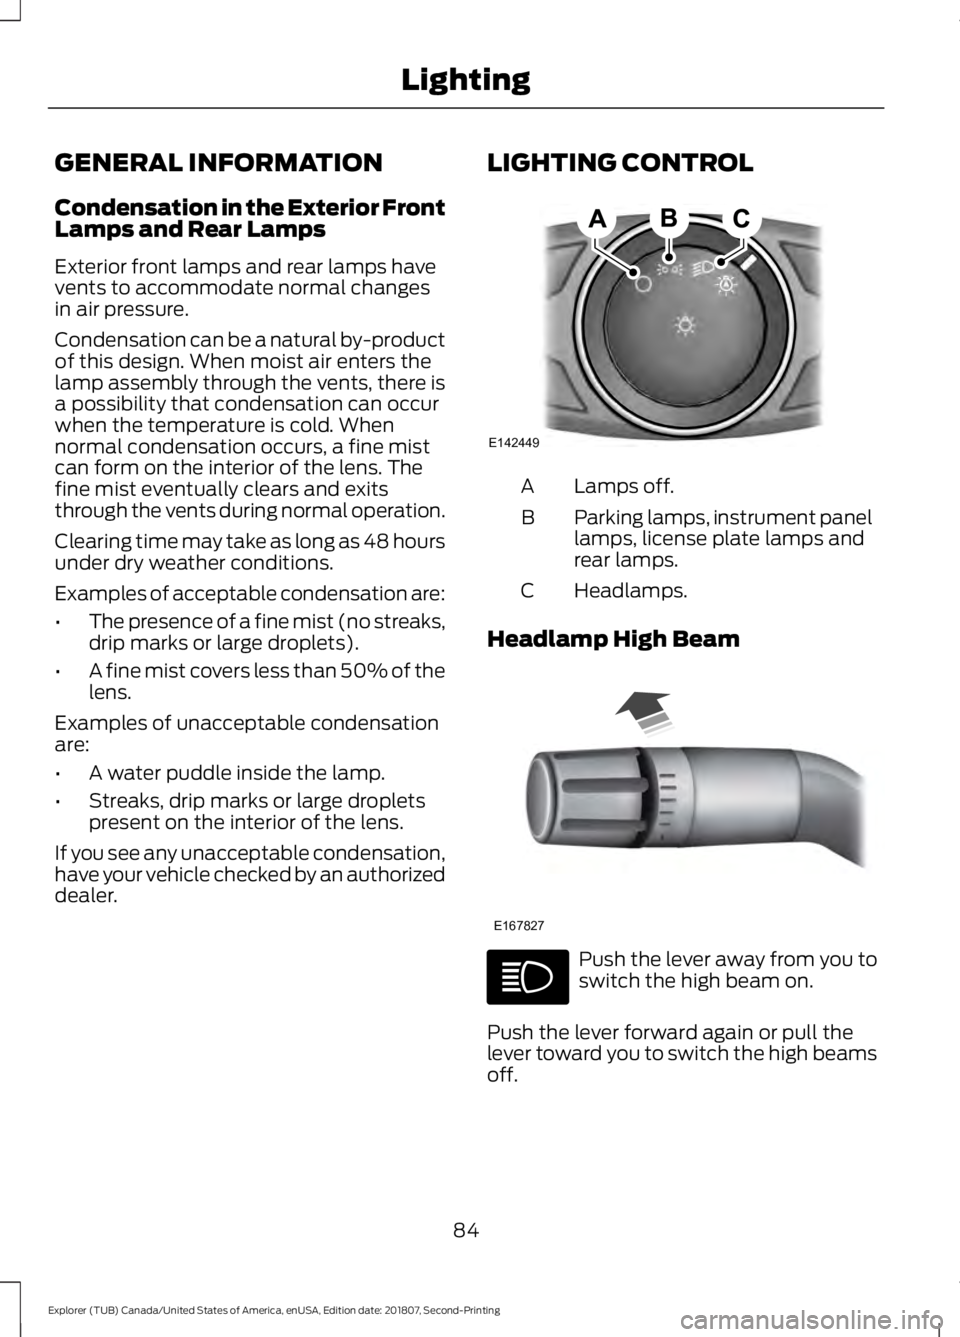
dealer. LIGHTING CONTROL Lamps off.
A
Parking lamps, instrument panel
lamps, license plate lamps and
rear lamps.
B
Headlamps.
C
Headlamp High Beam Push the lever away from you to
switch the high beam on.
Push the lever forward again or pull the
lever toward you to switch the high beams
off.
84
Explorer (TUB) Canada/United States of America, enUSA, Edition date: 201807, Second-Printing LightingE142449 E167827
Page 89 of 571
Press repeatedly or press and hold until
you reach the desired level.
HEADLAMP EXIT DELAY
Set the delay time to keep the headlamps
on for up to three minutes after switching
off the ignition.
Follow the steps below to change the
delay time:
Note:
Complete steps 1 through 6 within 10
seconds.
1. Switch the ignition off.
2. Select the autolamp position on the lighting control.
3. Switch the lighting control to the off position.
4. Switch the ignition on.
5. Switch the ignition off.
6. Select the autolamp position on the lighting control. The headlamps and
parking lamps turn on.
7. Switch the lighting control to the off position when reaching the required
delay time. The headlamps and parking
lamps turn off.
Set the headlamp exit delay to one of the
following settings:
• Off.
• 10 seconds.
• 20 seconds.
• 120 seconds.
Note: Adjust the time delay using the
display controls in the information display.
See Information Displays (page 104). DAYTIME RUNNING LAMPS
(IF
EQUIPPED) WARNING:
The daytime running
lamps system does not activate the rear
lamps and may not provide adequate
lighting during low visibility driving
conditions. Make sure you switch the
headlamps on, as appropriate, during all
low visibility conditions. Failure to do so
may result in a crash.
Type One - Conventional (Non-
Configurable)
The daytime running lamps turn on when:
1. Switching the ignition on.
2. The transmission is not in park (P) for vehicles with automatic transmissions,
or releasing the parking brake for
vehicles with manual transmissions.
3. The lighting control is in the off, parking
lamp or autolamps positions.
4. The headlamps are off.
Type Two - Configurable
Switch the daytime running lamps on or
off using the information display. See
Information Displays
(page 104).
The daytime running lamps turn on when:
1. The lamps are on in the information display.
2. Switching the ignition on.
3. The transmission is not in park (P) for vehicles with automatic transmissions,
or releasing the parking brake for
vehicles with manual transmissions.
4. The lighting control is in the autolamps
position.
5. The headlamps are off.
86
Explorer (TUB) Canada/United States of America, enUSA, Edition date: 201807, Second-Printing Lighting
Page 130 of 571
Action
Message
Displays terrain management sand mode is currently active.
Sand Mode Active
Displays when the terrain management system detects an error.
Terrain Management
System Fault
Displayed when terrain management mode cannot bechanged at the time of your request.
Mode Change Not
Accepted, Retry
Traction Control Action
Message
Displays the status of the traction control system. See UsingTraction Control (page 196).
Traction Control Off
Displays the status of the traction control system. See UsingTraction Control
(page 196).
Traction Control On
Trailer Action
Message
Displays when the trailer sway control has detected a trailersway. See
Trailer Sway Control (page 248).
Trailer Sway Reduce
Speed
Transmission Action
Message
Contact an authorized dealer.
Transmission Malfunc-
tion Service Now
The transmission is overheating and needs to cool. Stop in asafe place as soon as possible.
Transmission Overtem-
perature Stop Safely
The transmission is overheating and needs to cool. Stop in asafe place as soon as possible.
Transmission Over-
heating Stop Safely
Contact an authorized dealer.
Transmission Service
Required
The transmission is getting hot. Stop to let it cool.
Transmission Too Hot
Press Brake
127
Explorer (TUB) Canada/United States of America, enUSA, Edition date: 201807, Second-Printing Information Displays
Page 162 of 571
Gate Operator / Canadian
Programming
Canadian radio-frequency laws require
transmitter signals to
“time-out” (or quit)
after several seconds of transmission –
which may not be long enough for
HomeLink to pick up the signal during
programming. Similar to this Canadian law,
some U.S. gate operators are designed to
“time-out” in the same manner.
Note: If programming a garage door opener
or gate operator, it is advised to unplug the
device during the “cycling” process to
prevent possible overheating.
1. Press and hold the HomeLink button while you press and release, every two
seconds, your hand-held transmitter
until the HomeLink indicator light
changes from a slow to a rapidly
blinking light.
2. Release both the HomeLink and hand-held transmitter buttons.
3. Continue programing HomeLink. See In-Vehicle Programming
.
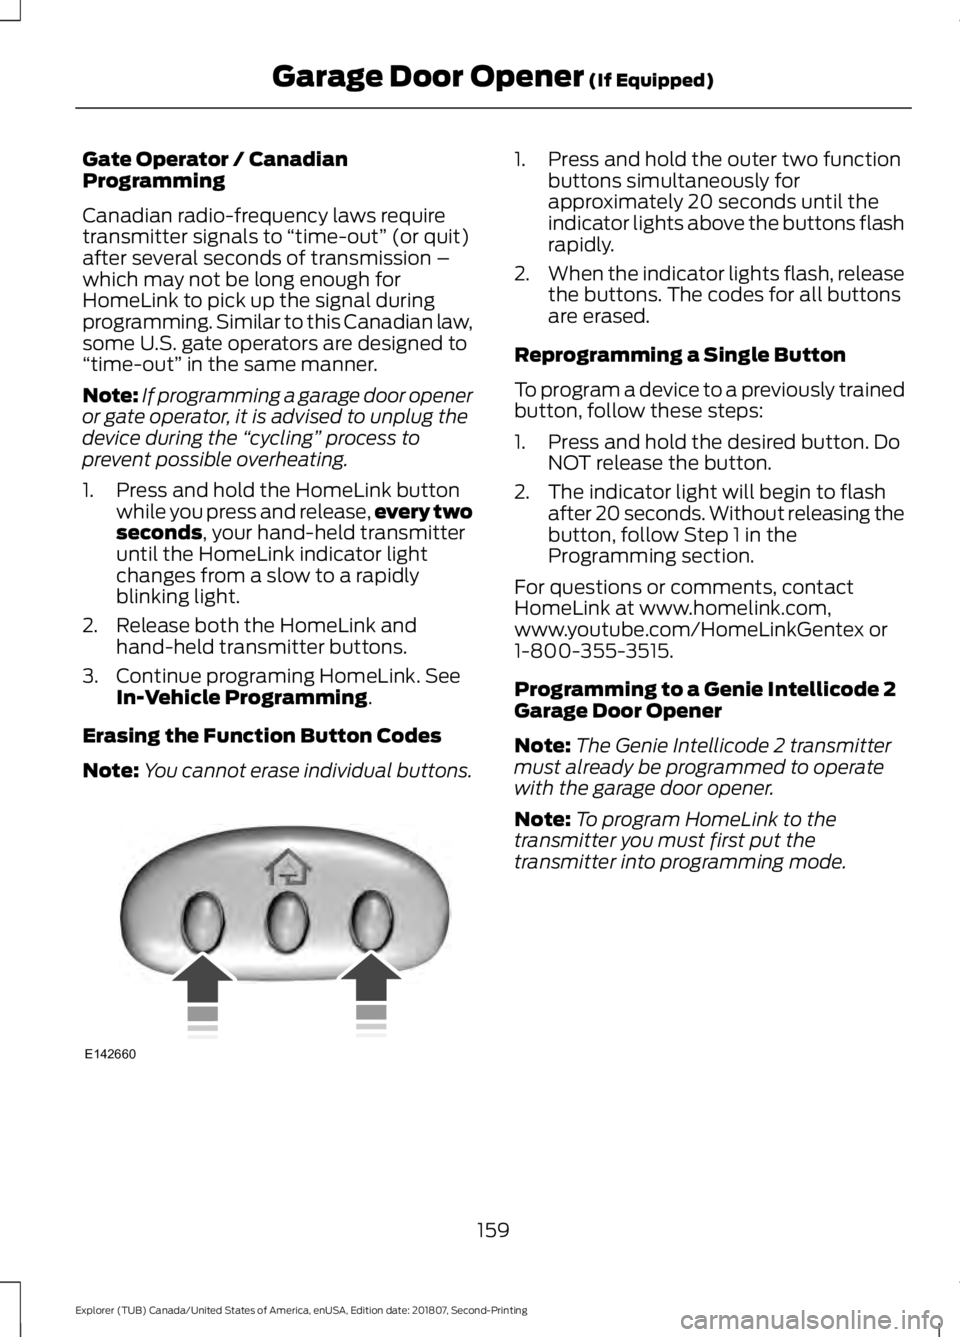
Erasing the Function Button Codes
Note: You cannot erase individual buttons. 1. Press and hold the outer two function
buttons simultaneously for
approximately 20 seconds until the
indicator lights above the buttons flash
rapidly.
2. When the indicator lights flash, release
the buttons. The codes for all buttons
are erased.
Reprogramming a Single Button
To program a device to a previously trained
button, follow these steps:
1. Press and hold the desired button. Do NOT release the button.
2. The indicator light will begin to flash after 20 seconds. Without releasing the
button, follow Step 1 in the
Programming section.
For questions or comments, contact
HomeLink at www.homelink.com,
www.youtube.com/HomeLinkGentex or
1-800-355-3515.
Programming to a Genie Intellicode 2
Garage Door Opener
Note: The Genie Intellicode 2 transmitter
must already be programmed to operate
with the garage door opener.
Note: To program HomeLink to the
transmitter you must first put the
transmitter into programming mode.
159
Explorer (TUB) Canada/United States of America, enUSA, Edition date: 201807, Second-Printing Garage Door Opener
(If Equipped)E142660