2019 FORD EXPEDITION Drive mode
[x] Cancel search: Drive modePage 331 of 583
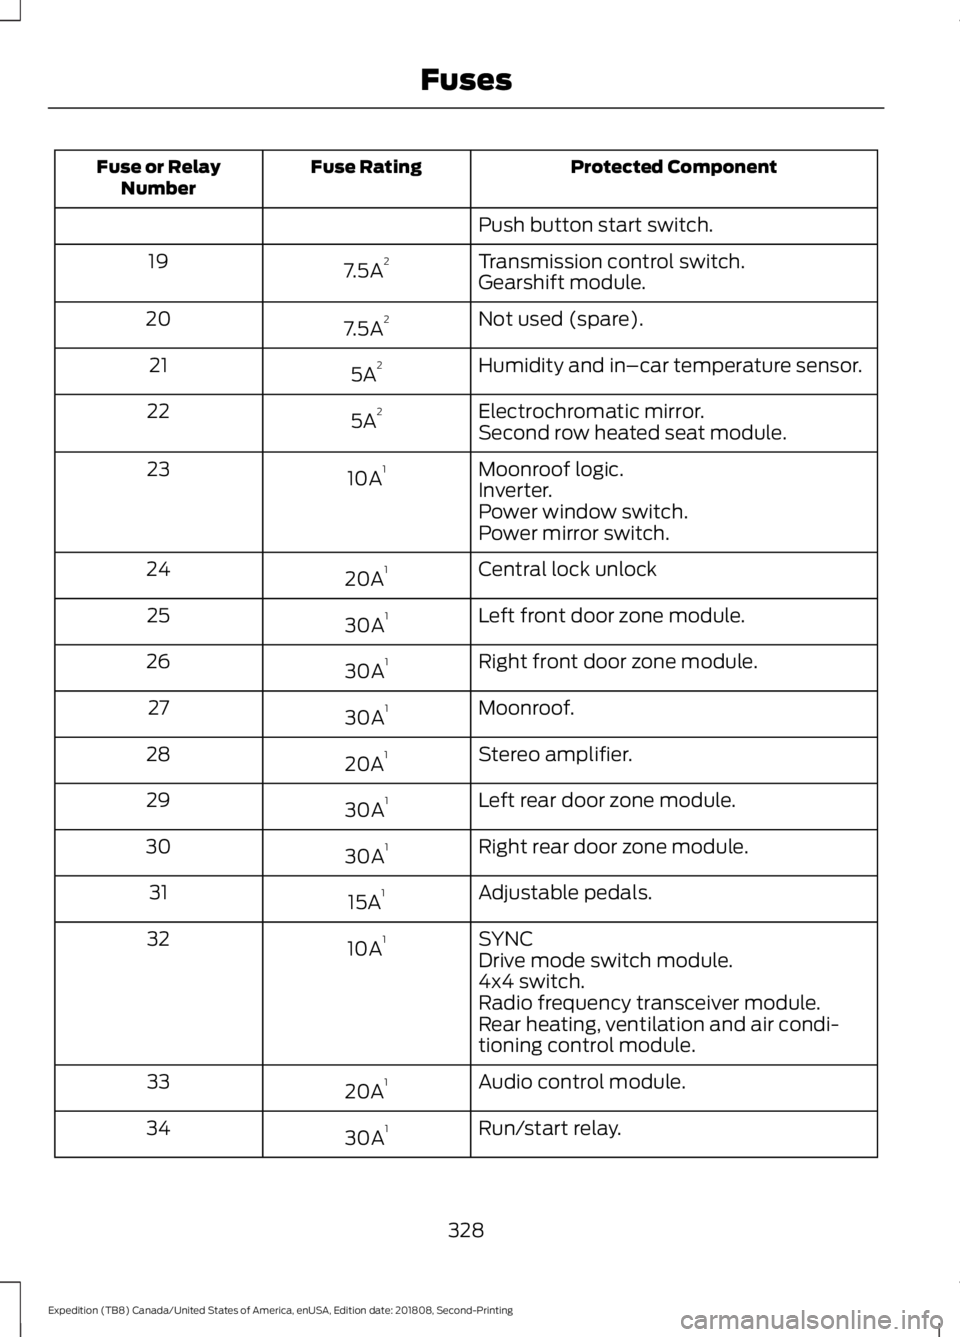
Protected Component
Fuse Rating
Fuse or Relay
Number
Push button start switch.
Transmission control switch.
7.5A 2
19
Gearshift module.
Not used (spare).
7.5A 2
20
Humidity and in–car temperature sensor.
5A 2
21
Electrochromatic mirror.
5A 2
22
Second row heated seat module.
Moonroof logic.
10A 1
23
Inverter.
Power window switch.
Power mirror switch.
Central lock unlock
20A 1
24
Left front door zone module.
30A 1
25
Right front door zone module.
30A 1
26
Moonroof.
30A 1
27
Stereo amplifier.
20A 1
28
Left rear door zone module.
30A 1
29
Right rear door zone module.
30A 1
30
Adjustable pedals.
15A 1
31
SYNC
10A 1
32
Drive mode switch module.
4x4 switch.
Radio frequency transceiver module.
Rear heating, ventilation and air condi-
tioning control module.
Audio control module.
20A 1
33
Run/start relay.
30A 1
34
328
Expedition (TB8) Canada/United States of America, enUSA, Edition date: 201808, Second-Printing Fuses
Page 339 of 583
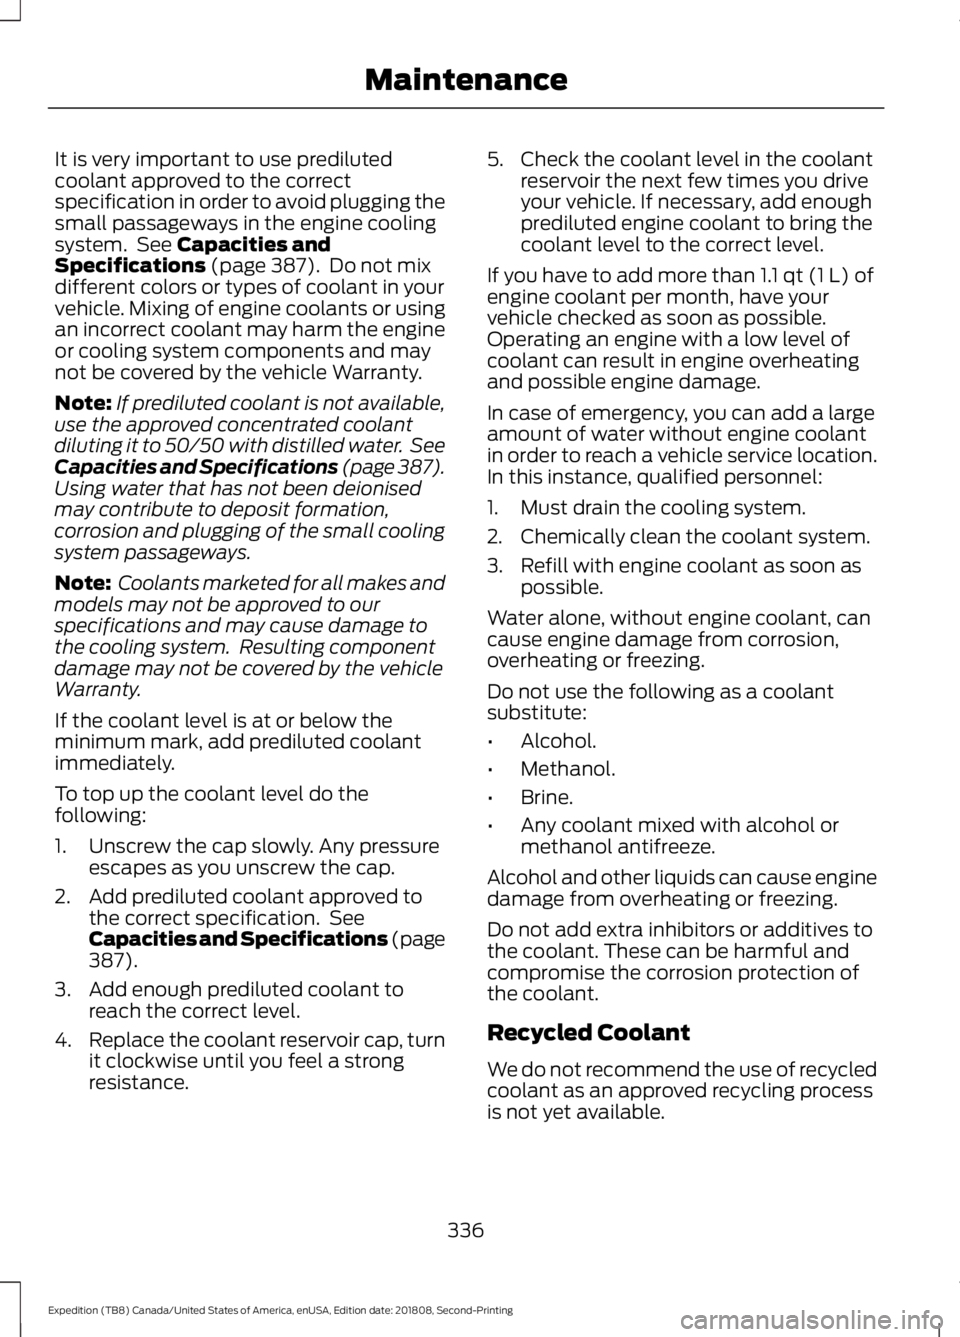
It is very important to use prediluted
coolant approved to the correct
specification in order to avoid plugging the
small passageways in the engine cooling
system. See Capacities and
Specifications (page 387). Do not mix
different colors or types of coolant in your
vehicle. Mixing of engine coolants or using
an incorrect coolant may harm the engine
or cooling system components and may
not be covered by the vehicle Warranty.
Note: If prediluted coolant is not available,
use the approved concentrated coolant
diluting it to 50/50 with distilled water. See
Capacities and Specifications
(page 387).
Using water that has not been deionised
may contribute to deposit formation,
corrosion and plugging of the small cooling
system passageways.
Note: Coolants marketed for all makes and
models may not be approved to our
specifications and may cause damage to
the cooling system. Resulting component
damage may not be covered by the vehicle
Warranty.
If the coolant level is at or below the
minimum mark, add prediluted coolant
immediately.
To top up the coolant level do the
following:
1. Unscrew the cap slowly. Any pressure escapes as you unscrew the cap.
2. Add prediluted coolant approved to the correct specification. See
Capacities and Specifications (page
387
).
3. Add enough prediluted coolant to reach the correct level.
4. Replace the coolant reservoir cap, turn
it clockwise until you feel a strong
resistance. 5. Check the coolant level in the coolant
reservoir the next few times you drive
your vehicle. If necessary, add enough
prediluted engine coolant to bring the
coolant level to the correct level.
If you have to add more than
1.1 qt (1 L) of
engine coolant per month, have your
vehicle checked as soon as possible.
Operating an engine with a low level of
coolant can result in engine overheating
and possible engine damage.
In case of emergency, you can add a large
amount of water without engine coolant
in order to reach a vehicle service location.
In this instance, qualified personnel:
1. Must drain the cooling system.
2. Chemically clean the coolant system.
3. Refill with engine coolant as soon as possible.
Water alone, without engine coolant, can
cause engine damage from corrosion,
overheating or freezing.
Do not use the following as a coolant
substitute:
• Alcohol.
• Methanol.
• Brine.
• Any coolant mixed with alcohol or
methanol antifreeze.
Alcohol and other liquids can cause engine
damage from overheating or freezing.
Do not add extra inhibitors or additives to
the coolant. These can be harmful and
compromise the corrosion protection of
the coolant.
Recycled Coolant
We do not recommend the use of recycled
coolant as an approved recycling process
is not yet available.
336
Expedition (TB8) Canada/United States of America, enUSA, Edition date: 201808, Second-Printing Maintenance
Page 340 of 583
Dispose of used engine coolant in an
appropriate manner. Follow your
community's regulations and standards
for recycling and disposing of automotive
fluids.
Severe Climates
If you drive in extremely cold climates:
•
It may be necessary to increase the
coolant concentration above 50%.
• A coolant concentration of 60%
provides improved freeze point
protection. Coolant concentrations
above 60% decrease the overheat
protection characteristics of the
coolant and may cause engine
damage.
If you drive in extremely hot climates:
• You can decrease the coolant
concentration to 40%.
• Coolant concentrations below 40%
decrease the freeze and corrosion
protection characteristics of the
coolant and may cause engine
damage.
Vehicles driven year-round in non-extreme
climates should use prediluted coolant for
optimum cooling system and engine
protection.
Coolant Change
At specific mileage intervals, as listed in
the scheduled maintenance information,
the coolant should be changed. Add
prediluted coolant approved to the correct
specification. See Capacities and
Specifications (page 387).
Fail-Safe Cooling
Fail-safe cooling allows you to temporarily
drive your vehicle before any incremental
component damage occurs. The fail-safe
distance depends on ambient
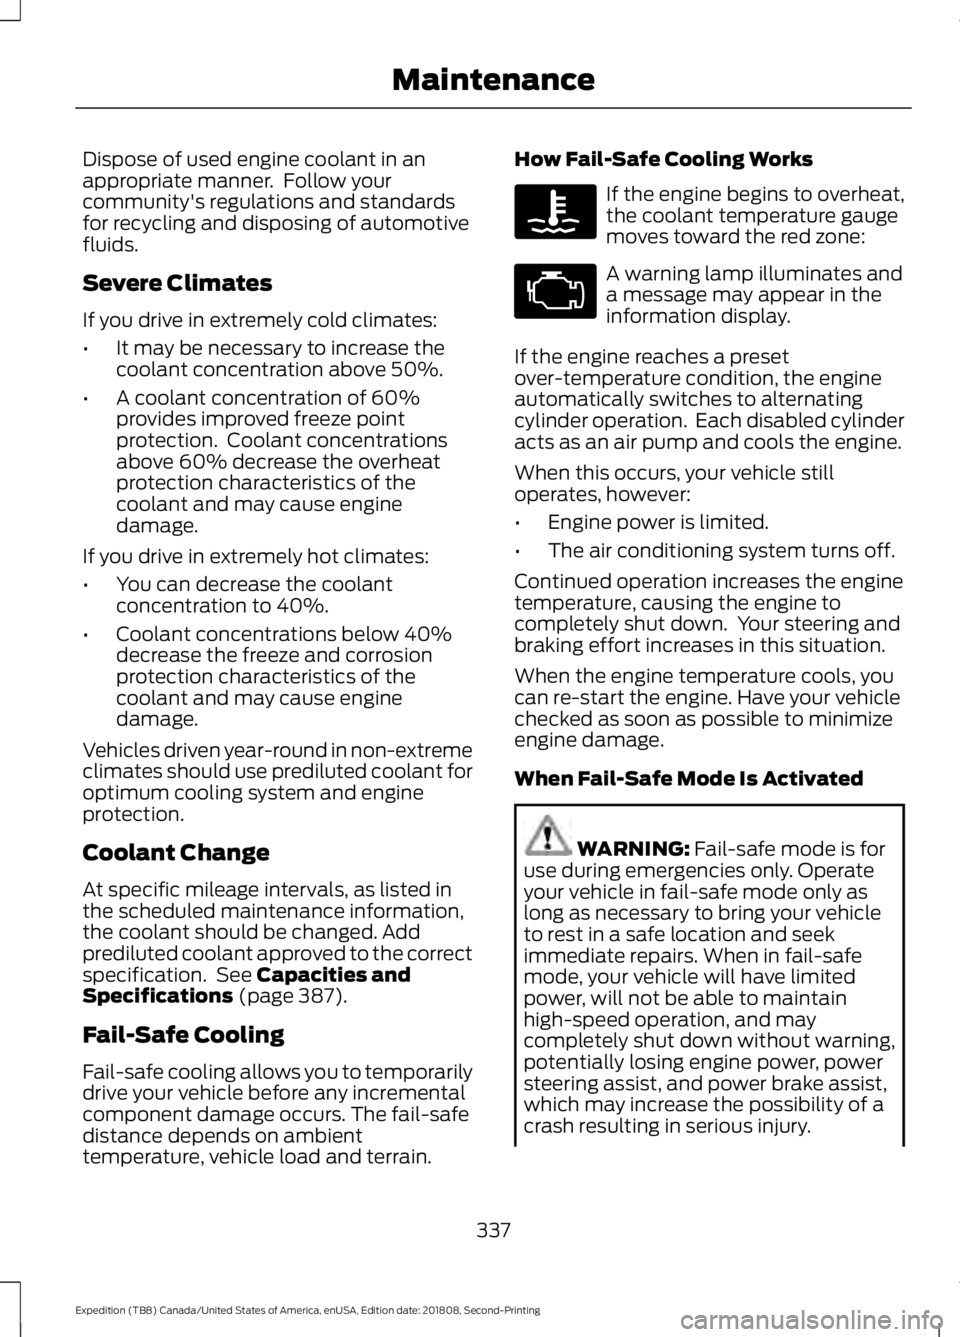
temperature, vehicle load and terrain. How Fail-Safe Cooling Works If the engine begins to overheat,
the coolant temperature gauge
moves toward the red zone:
A warning lamp illuminates and
a message may appear in the
information display.
If the engine reaches a preset
over-temperature condition, the engine
automatically switches to alternating
cylinder operation. Each disabled cylinder
acts as an air pump and cools the engine.
When this occurs, your vehicle still
operates, however:
• Engine power is limited.
• The air conditioning system turns off.
Continued operation increases the engine
temperature, causing the engine to
completely shut down. Your steering and
braking effort increases in this situation.
When the engine temperature cools, you
can re-start the engine. Have your vehicle
checked as soon as possible to minimize
engine damage.
When Fail-Safe Mode Is Activated WARNING:
Fail-safe mode is for
use during emergencies only. Operate
your vehicle in fail-safe mode only as
long as necessary to bring your vehicle
to rest in a safe location and seek
immediate repairs. When in fail-safe
mode, your vehicle will have limited
power, will not be able to maintain
high-speed operation, and may
completely shut down without warning,
potentially losing engine power, power
steering assist, and power brake assist,
which may increase the possibility of a
crash resulting in serious injury.
337
Expedition (TB8) Canada/United States of America, enUSA, Edition date: 201808, Second-Printing Maintenance
Page 341 of 583
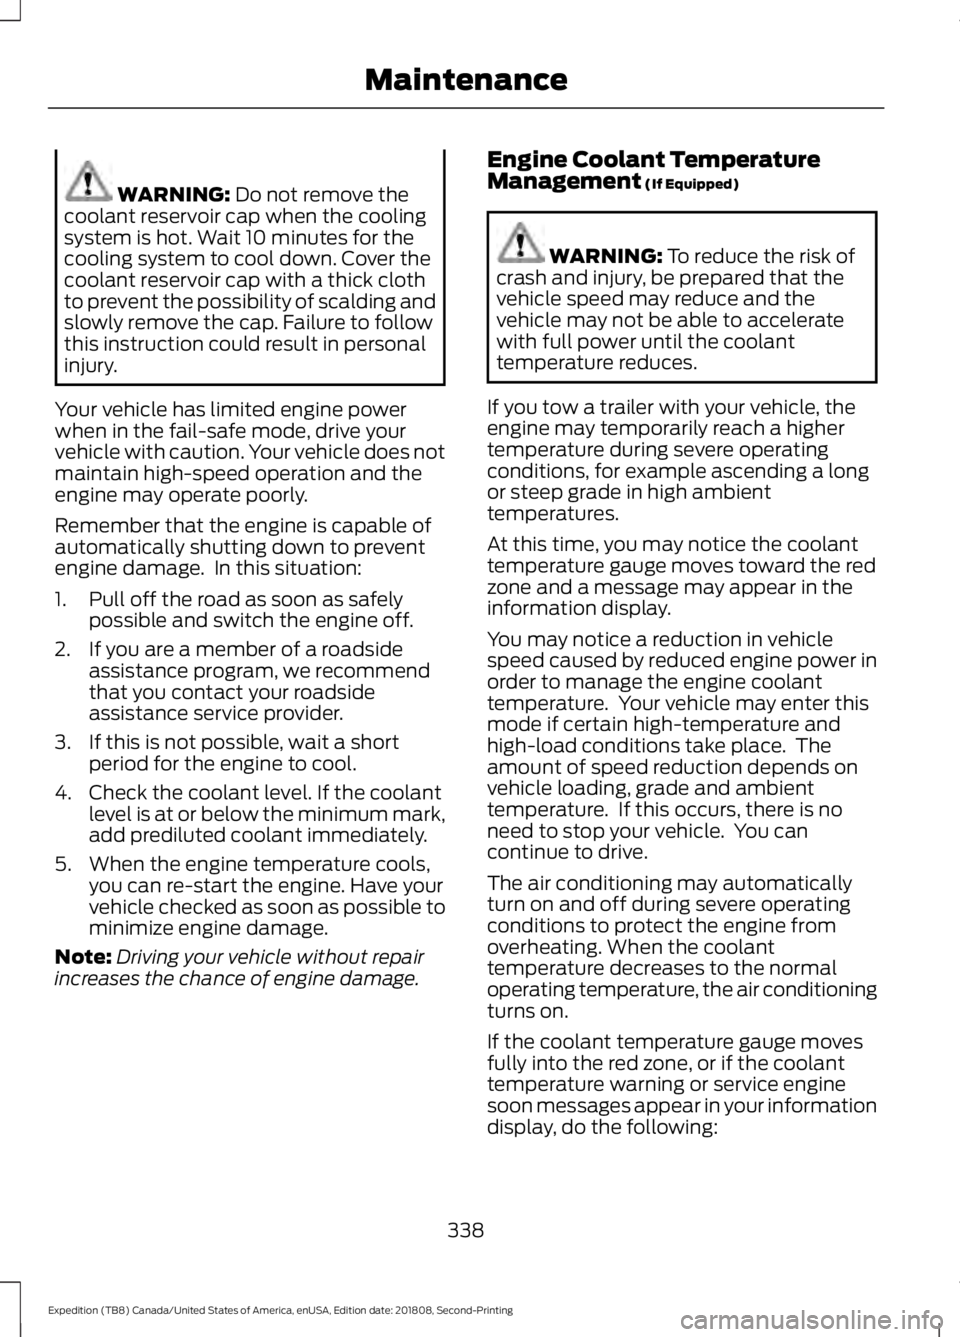
WARNING: Do not remove the
coolant reservoir cap when the cooling
system is hot. Wait 10 minutes for the
cooling system to cool down. Cover the
coolant reservoir cap with a thick cloth
to prevent the possibility of scalding and
slowly remove the cap. Failure to follow
this instruction could result in personal
injury.
Your vehicle has limited engine power
when in the fail-safe mode, drive your
vehicle with caution. Your vehicle does not
maintain high-speed operation and the
engine may operate poorly.
Remember that the engine is capable of
automatically shutting down to prevent
engine damage. In this situation:
1. Pull off the road as soon as safely possible and switch the engine off.
2. If you are a member of a roadside assistance program, we recommend
that you contact your roadside
assistance service provider.
3. If this is not possible, wait a short period for the engine to cool.
4. Check the coolant level. If the coolant level is at or below the minimum mark,
add prediluted coolant immediately.
5. When the engine temperature cools, you can re-start the engine. Have your
vehicle checked as soon as possible to
minimize engine damage.
Note: Driving your vehicle without repair
increases the chance of engine damage. Engine Coolant Temperature
Management (If Equipped) WARNING:
To reduce the risk of
crash and injury, be prepared that the
vehicle speed may reduce and the
vehicle may not be able to accelerate
with full power until the coolant
temperature reduces.
If you tow a trailer with your vehicle, the
engine may temporarily reach a higher
temperature during severe operating
conditions, for example ascending a long
or steep grade in high ambient
temperatures.
At this time, you may notice the coolant
temperature gauge moves toward the red
zone and a message may appear in the
information display.
You may notice a reduction in vehicle
speed caused by reduced engine power in
order to manage the engine coolant
temperature. Your vehicle may enter this
mode if certain high-temperature and
high-load conditions take place. The
amount of speed reduction depends on
vehicle loading, grade and ambient
temperature. If this occurs, there is no
need to stop your vehicle. You can
continue to drive.
The air conditioning may automatically
turn on and off during severe operating
conditions to protect the engine from
overheating. When the coolant
temperature decreases to the normal
operating temperature, the air conditioning
turns on.
If the coolant temperature gauge moves
fully into the red zone, or if the coolant
temperature warning or service engine
soon messages appear in your information
display, do the following:
338
Expedition (TB8) Canada/United States of America, enUSA, Edition date: 201808, Second-Printing Maintenance
Page 361 of 583

Study your owner's manual and any
supplements for specific information about
equipment features, instructions for safe
driving and additional precautions to
reduce the risk of an accident or serious
injury.
Four-wheel drive system (If Equipped)
WARNING:
Do not become
overconfident in the ability of four-wheel
drive vehicles. Although a four-wheel
drive vehicle may accelerate better than
a two-wheel drive vehicle in low traction
situations, it won't stop any faster than
two-wheel drive vehicles. Always drive
at a safe speed.
A vehicle equipped with four-wheel drive,
when selected, has the ability to use all
four wheels to power itself. This increases
traction which may enable you to safely
drive over terrain and road conditions that
a conventional two-wheel drive vehicle
cannot.
Power is supplied to all four wheels
through a transfer case or power transfer
unit. Four-wheel drive vehicles allow you
to select different modes as necessary. For
information on transfer case operation and
shifting procedures, See
Four-Wheel
Drive (page 206). For information on
transfer case maintenance, See
Maintenance (page 331). You should
become thoroughly familiar with this
information before you operate your
vehicle.
On some four-wheel drive vehicles, the
initial shift from two-wheel to four-wheel
drive when the vehicle is moving can cause
a momentary clunk and ratcheting sound.
These sounds are normal and are not
cause for concern. In four-wheel drive vehicles, the size of the
spare tire relative to the remaining tires can
have an effect on the 4x4 system. If there
is a significant difference between the size
of a spare and the remaining tires,
four-wheel drive functionality may be
limited.
See Using Four-Wheel Drive
(page 206).
How your vehicle differs from
other vehicles
Sport utility vehicles and trucks can differ
from some other vehicles in a few
noticeable ways. Your vehicle may be:
• Higher - to allow higher load carrying
capacity and to allow it to travel over
rough terrain without getting hung up
or damaging underbody components.
• Shorter - to give it the capability to
approach inclines and drive over the
crest of a hill without getting hung up
or damaging underbody components.
All other things held equal, a shorter
wheelbase may make your vehicle
quicker to respond to steering inputs
than a vehicle with a longer wheelbase.
• Narrower - to provide greater
maneuverability in tight spaces,
particularly in off-road use.
As a result of the above dimensional
differences, Sport utility vehicles and
trucks often have a higher center of gravity
and a greater difference in center of gravity
between the loaded and unloaded
condition. These differences that make
your vehicle so versatile also make it
handle differently than an ordinary
passenger car.
358
Expedition (TB8) Canada/United States of America, enUSA, Edition date: 201808, Second-Printing Wheels and Tires
Page 374 of 583
WARNING: To reduce the
risk of serious injury, when
mounting replacement tires and
wheels, you should not exceed
the maximum pressure indicated
on the sidewall of the tire to set
the beads without additional
precautions listed below. If the
beads do not seat at the
maximum pressure indicated,
re-lubricate and try again. WARNING: When inflating
the tire for mounting pressures
up to
20 psi (1.38 bar) greater
than the maximum pressure on
the tire sidewall, the following
precautions must be taken to
protect the person mounting the
tire:
• Make sure that you have the
correct tire and wheel size.
• Lubricate the tire bead and
wheel bead seat area again.
• Stand at a minimum of
12 ft
(3.66 m) away from the wheel
and tire assembly.
• Use both eye and ear
protection. WARNING: For a mounting
pressure more than
20 psi
(1.38 bar) greater than the
maximum pressure, a Ford
dealer or other tire service
professional should do the
mounting. WARNING:
Always inflate
steel carcass tires with a remote
air fill with the person inflating
standing at a minimum of
12 ft
(3.66 m) away from the wheel
and tire assembly.
Important: Remember to replace
the wheel valve stems when the
road tires are replaced on your
vehicle.
The two front tires or two rear tires
should generally be replaced as a
pair, except if the vehicle is
equipped with four wheel drive.
Vehicles equipped with four wheel
drive should have all four tires
replaced simultaneously.
Unevenly worn tires, mismatched
makes, models or brands can be
different in size, resulting in
potential damage to the four
wheel drive system.
The tire pressure sensors mounted
in the wheels are not designed to
be used in aftermarket wheels.
The use of wheels or tires not
recommended by us may affect
the operation of your tire pressure
monitoring system.
If the tire pressure monitoring
system indicator is flashing, the
system is malfunctioning. Your
replacement tire might be
incompatible with your tire
pressure monitoring system, or
some component of the system
may be damaged.
371
Expedition (TB8) Canada/United States of America, enUSA, Edition date: 201808, Second-Printing Wheels and Tires
Page 382 of 583

•
To reduce the chances of interference
from another vehicle, perform the
system reset procedure at least 3 ft
(1 m) away from another Ford Motor
Company vehicle undergoing the
system reset procedure at the same
time.
• Do not wait more than two minutes
between resetting each tire sensor or
the system can time-out and you have
to repeat the entire procedure on all
four wheels.
• A double horn sounds indicating the
need to repeat the procedure.
Performing the System Reset Procedure
Read the entire procedure before
attempting.
1. Drive the vehicle above
20 mph
(32 km/h) for at least two minutes,
then park in a safe location where you
can easily get to all four tires and have
access to an air pump.
2. Place the ignition in the off position and
keep the key in the ignition.
3. Cycle the ignition to the on position with the engine off.
4. Turn the hazard flashers on then off three times. You must accomplish this
within 10 seconds. If you successfully
enter the reset mode, the horn sounds
once, the system indicator flashes and
a message shows in the information
display. If this does not occur, please
try again starting at step 2. If after
repeated attempts to enter the reset
mode, the horn does not sound, the
system indicator does not flash and no
message shows in the information
display, seek service from your
authorized dealer. 5. Train the tire pressure monitoring
system sensors in the tires using the
following system reset sequence
starting with the left front tire in the
following clockwise order: Left front -
driver side front tire, Right front -
passenger side front tire, Right rear -
passenger side rear tire, Left rear -
driver side rear tire.
6. Remove the valve cap from the valve stem on the left front tire. Decrease the
air pressure until the horn sounds.
Note: The single horn tone confirms that
the sensor identification code has been
learned by the module for this position. If a
double horn is heard, the reset procedure
was unsuccessful, and you must repeat it.
7. Remove the valve cap from the valve stem on the right front tire. Decrease
the air pressure until the horn sounds.
8. Remove the valve cap from the valve stem on the right rear tire. Decrease the
air pressure until the horn sounds.
9. Remove the valve cap from the valve stem on the left rear tire. Decrease the
air pressure until the horn sounds.
Training is complete after the horn
sounds for the last tire trained, driver
side rear tire, the system indicator
stops flashing, and a message shows
in the information display.
10. Turn the ignition off. If two short horn
beeps are heard, the reset procedure
was unsuccessful and you must
repeat it. If after repeating the
procedure and two short beeps are
heard when the ignition is turned to
off, seek assistance from your
authorized dealer.
379
Expedition (TB8) Canada/United States of America, enUSA, Edition date: 201808, Second-Printing Wheels and Tires
Page 459 of 583
Supported USB file systems include: FAT,
exFAT, and NTFS.
SYNC 3 is also able to organize the media
from your USB device by metadata tags.
Metadata tags, which are descriptive
software identifiers embedded in the
media files, provide information about the
file.
If your indexed media files contain no
information embedded in these metadata
tags, SYNC 3 may classify the empty
metadata tags as unknown.
SYNC 3 is capable of indexing up to
50,000 songs per USB device, for up to 10
devices.
CLIMATE
Touch the climate button on the
touchscreen to access your climate control
features.
Note:
You can switch temperature units
between Fahrenheit and Celsius. See
Settings (page 475).
Accessing the Climate Control
Menu Touch the button to access
additional controls for the front
climate system.
Directing the Airflow Touch the button to direct
airflow to the windshield air
vents and de-mister.
Touch the button to direct
airflow to the instrument panel
air vents.
Touch the button to direct
airflow to the footwell air vents. You can direct air through any combination
of these air vents.
Setting the Blower Motor Speed Touch up or down to increase or
decrease the volume of air that
circulates in your vehicle.
Setting the Temperature
Touch up or down on the left-hand
temperature control to set the left-hand
temperature.
Note: This control also adjusts the
right-hand side temperature when you
switch off dual zone mode.
Touch up or down on the right-hand
temperature control to set the right-hand
temperature.
Switching Auto Mode On and Off Touch the button to switch on
automatic operation, then set
the temperature.
The system adjusts the blower motor
speed, air distribution, air conditioning
operation, and outside or recirculated air
to reach and maintain the temperature you
have set.
Switching the Air Conditioning On
and Off A pop-up appears on the screen
to display the air conditioning
options.
MAX A/C:
Touch the button to activate
and maximize cooling. The driver and
passenger temperatures are set to LO,
recirculated air flows through the
instrument panel vents, air conditioning
automatically turns on and the fan
automatically adjusts to the highest speed.
456
Expedition (TB8) Canada/United States of America, enUSA, Edition date: 201808, Second-Printing SYNC™ 3E265038