2019 FORD EXPEDITION Drive mode
[x] Cancel search: Drive modePage 211 of 583
You can change between 2H to 4A or 4H
at a stop or when driving. The information
display may show a message indicating a
4X4 shift is in progress and the LED light
for the selected mode flashes. Once the
shift is complete the information display
shows the system mode selected and the
LED light for the selected mode turns solid.
Shifting To or From 4L - 4X4 LOW
Note:
4L mode is not intended for use on
dry pavement.
1. Bring the vehicle to a rolling speed of 3 mph (5 km/h) or less.
2. Place the gearshift in neutral (N).
3. Move the 4WD switch to the desired mode.
The information display shows a message
indicating a 4X4 shift is in progress. The
information display then shows the
selected system mode. If any of the
previous shift conditions are not present,
the shift does not occur and the
information display shows information
guiding you through the proper shifting
procedures. If the above conditions are not
satisfied in 30 seconds, the system reverts
back to the previous 4WD mode or drive
mode.
If Shift Delayed Pull Forward is displayed
in the information display, transfer case
gear tooth blockage is present. To alleviate
this condition, place the transmission in a
forward gear, move the vehicle forward
approximately
5 ft (2 m), and shift the
transmission back to neutral (N) to allow
the transfer case to complete the range
shift. Operating 4WD Vehicles With
Spare or Mismatched Tires
On four-wheel drive vehicles, the size of
the spare tire can affect the 4X4 system.
If there is a significant difference between
the size of the spare tire and the remaining
tires, you may have limited four-wheel
drive functionality.
When driving with the full-size dissimilar
spare wheel and tire assembly, it is
recommended that you do not:
•
Exceed
50 mph (80 km/h) with a 4WD
mode turned on.
• Turn on a 4WD mode unless the
vehicle is stationary.
• Use a 4WD mode on dry pavement.
Use of a dissimilar spare wheel and tire
assembly may lead to impairment of the
following:
• Comfort and noise.
• Winter weather driving capability.
• Wet driving capability.
• Four-wheel drive capability.
How Your Vehicle Differs From
Other Vehicles WARNING: Vehicles with a higher
center of gravity (utility and four-wheel
drive vehicles) handle differently than
vehicles with a lower center of gravity
(passenger cars). Avoid sharp turns,
excessive speed and abrupt steering in
these vehicles. Failure to drive cautiously
increases the risk of losing control of your
vehicle, vehicle rollover, personal injury
and death.
208
Expedition (TB8) Canada/United States of America, enUSA, Edition date: 201808, Second-Printing Four-Wheel Drive
(If Equipped)
Page 212 of 583
Truck and utility vehicles can differ from
some other vehicles. Your vehicle may be
higher to allow it to travel over rough
terrain without getting hung up or
damaging underbody components.
The differences that make your vehicle so
versatile also make it handle differently
than an ordinary passenger car.
Maintain steering wheel control at all
times, especially in rough terrain. Since
sudden changes in terrain can result in
abrupt steering wheel motion, make sure
you grip the steering wheel from the
outside. Do not grip the spokes.
Drive cautiously to avoid vehicle damage
from concealed objects such as rocks and
stumps.
You should either know the terrain or
examine maps of the area before driving.
Map out your route before driving in the
area. To maintain steering and braking
control of your vehicle, you must have all
four wheels on the ground and they must
be rolling, not sliding or spinning.
Driving Off-Road With Truck and
Utility Vehicles
Note:
On some models, the initial shift from
two-wheel drive to four-wheel drive when
your vehicle is moving can cause some
momentary clunk and ratcheting sounds.
This is the front drivetrain coming up to
speed and the automatic locking hubs
engaging and is not cause for concern.
Note: Your vehicle may have a front air dam
that can become damaged, due to reduced
ground clearance, when taking your vehicle
off-road. You may remove this air dam by
removing eight bolts.
Four-wheel drive vehicles are specially
equipped for driving on sand, snow, mud
and rough terrain and have operating
characteristics that are somewhat
different from conventional vehicles, both
on and off the road. The transfer case supples power to all four
wheels. On four-wheel drive vehicles, the
transfer case allows you to select different
4WD modes when necessary. You can find
information on transfer case operation and
shifting procedures in this chapter. You can
find information on transfer case
maintenance in the Maintenance chapter.
You should become thoroughly familiar
with this information before you operate
your vehicle.
Four-wheel drive, when you select a 4WD
mode, uses all four wheels to power your
vehicle. This increases traction, enabling
you to drive over terrain and road
conditions that a conventional two-wheel
drive vehicle cannot.
Basic Operating Principles
•
Drive slower in strong crosswinds which
can affect the normal steering
characteristics of your vehicle.
• When driving your vehicle on surfaces
made slippery by loose sand, water,
gravel, snow or ice proceed with care.
• Do not use 4H or 4L on dry, hard
surfaced roads. Doing so can produce
excessive noise, increase tire wear and
may damage drive components. 4H or
4L modes are only for consistently
slippery or loose surfaces.
If Your Vehicle leaves the Road
If your vehicle leaves the road, reduce your
vehicle speed and avoid severe braking.
When your vehicle speed decreases, ease
your vehicle back onto the road. Do not
turn the steering wheel sharply when
returning your vehicle to the road.
It may be safer to stay on the shoulder of
the road and slow down gradually before
returning to the road. You may lose control
if you do not slow down or if you turn the
steering wheel too sharply or abruptly.
209
Expedition (TB8) Canada/United States of America, enUSA, Edition date: 201808, Second-Printing Four-Wheel Drive (If Equipped)
Page 217 of 583
LIMITED SLIP DIFFERENTIAL
(IF EQUIPPED)
The Electronic Limited Slip Differential
(eLSD) system directs torque, enabling the
vehicle to drive over terrain and road
conditions that a conventional axle cannot.
The system is active at all times and
requires no input from the driver.
Note:
If your vehicle is not at optimal
operating conditions or a system fault is
present, a warning may be displayed in the
instrument cluster. Depending on the
warning, your vehicle may need to be
serviced. For more information regarding the
system information messages, See
Information Messages (page 125).
Locking Function
(If Equipped) The lock button engages
‘locker
mode ’.
With the locker engaged, the system
electronically locks the differential causing
both half shafts to turn at the same rate.
This increases traction during off road
events.
The locker mode may automatically
disengage based on certain conditions
such as vehicle speed. When engaged, a
telltale in the instrument cluster will
illuminate amber and the switch button
will be illuminated. When the speed is
exceeded the telltale will turn gray, the
locker will be disengaged and be in
standby mode until the speed conditions
are met. If the eLSD system is faulted and
the locker cannot engage, a warning
message will be displayed in the
instrument cluster and the switch button
will flash. Spare Tire
If your vehicle is equipped with an
Electronic Limited Slip Differential, a spare
tire of a different size than the tire
provided, should not be used. If a spare tire
is installed, a message may appear,
indicating the system has disabled
automatically or reduced function to
prevent system overheat and damage. It
is recommended to reinstall the repaired
or replaced road tire as soon as possible.
When the road tire is replaced, the system
will resume normal operation on the next
key cycle.
Trailer Towing
The Electronic Limited Slip Differential
enhances vehicle stability during trailer tow
operation. During high demand trailering
events (such as steep grades, high speeds
or with a spare tire), the system may
provide a warning in the instrument cluster
and reduce function or enter a temporarily
disabled state. To resume normal function,
stop the vehicle in a safe location and
allow the unit to adequately cool. Once
the system has reached normal operating
temperatures, system function will be
restored and the Electronic Limited Slip
Differential Restored message will be
displayed.
214
Expedition (TB8) Canada/United States of America, enUSA, Edition date: 201808, Second-Printing Rear AxleE163170
Page 222 of 583
PRINCIPLE OF OPERATION
The traction control system helps avoid
drive wheel spin and loss of traction.
If your vehicle begins to slide, the system
applies the brakes to individual wheels
and, when needed, reduces engine power
at the same time. If the wheels spin when
accelerating on slippery or loose surfaces,
the system reduces engine power in order
to increase traction.
USING TRACTION CONTROL
WARNING: The stability and
traction control light illuminates steadily
if the system detects a failure. Make sure
you did not manually disable the traction
control system using the information
display controls or the switch. If the
stability control and traction control light
is still illuminating steadily, have the
system serviced by an authorized dealer
immediately. Operating your vehicle with
the traction control disabled could lead
to an increased risk of loss of vehicle
control, vehicle rollover, personal injury
and death.
The system automatically turns on each
time you switch the ignition on.
If your vehicle is stuck in mud or snow,
switching traction control off may be
beneficial as this allows the wheels to spin.
Note: When you switch traction control off,
stability control remains fully active. Switching the System Off The switch for the stability and traction
control system is on the instrument panel.
When you switch the system off, a
message and an illuminated icon appear
on the instrument cluster.
Use the switch again to return the traction
control system to normal operation.
Your vehicle may have MyKey restrictions
regarding this feature. See
Principle of
Operation (page 64).
System Indicator Lights and
Messages The stability and traction control
light temporarily illuminates on
engine start-up and flashes:
• When a driving condition activates
either of the systems.
• If a problem occurs in either of the
systems. The stability and traction control
off light temporarily illuminates
on engine start-up and stays on:
• When you switch the traction control
system off.
• When you select an alternative stability
control mode.
219
Expedition (TB8) Canada/United States of America, enUSA, Edition date: 201808, Second-Printing Traction ControlE166706 E138639 E130458
Page 226 of 583
PRINCIPLE OF OPERATION
WARNING: Hill descent control
cannot control descent in all surface
conditions and circumstances, such as
ice or extremely steep grades. Hill
descent control is a driver assist system
and cannot substitute for good judgment
by the driver. Failure to do so may result
in loss of vehicle control, crash or serious
injury. WARNING:
Hill descent control
does not provide hill hold at zero miles
per hour (0 kilometers per hour). When
stopped, you must apply the parking
brake or place the vehicle in P (Park), or
it may roll away.
Hill descent control allows you to set and
maintain vehicle speed while descending
steep grades in various surface conditions.
Hill descent control can maintain vehicle
speeds on downhill grades between 2 mph
(3 km/h) and 12 mph (20 km/h). Above 20
mph (32 km/h), the system remains
armed, but you cannot use the system to
set or maintain the descent speed.
Hill descent control requires a cooling
down interval after a period of sustained
use. The amount of time that the feature
can remain active before cooling varies
with conditions. The system provides a
warning in the message center and a tone
sounds when the system is about to
disengage for cooling. At this time,
manually apply the brakes as needed to
maintain descent speed. USING HILL DESCENT
CONTROL Press and release the hill
descent button on the
instrument panel. The button
illuminates and a chime sounds when you
switch this feature on.
To increase descent speed, press the
accelerator pedal until you reach the
desired speed. To decrease descent
speed, press the brake pedal until you
reach the desired speed.
Whether accelerating or decelerating, once
you reach the desired descent speed,
remove your feet from the pedals and hill
descent control maintains the chosen
vehicle speed.
Note: You may observe noise from the ABS
pump motor during hill descent control
operation. This is a normal characteristic of
the ABS and should be no reason for
concern.
Hill Descent Modes
• At speeds between
2 mph (3 km/h)
and 20 mph (32 km/h): When you
press this button, the light flashes
indicating this feature is active. Your
vehicle maintains the speed you desire
while in this mode.
• At speeds between
20 mph (32 km/h)
and 40 mph (64 km/h): When you
press this button, the light is solid and
a message appears in the information
display indicating this feature is active.
Your vehicle does not maintain the
speed you desire and you cannot set
your descent speed.
223
Expedition (TB8) Canada/United States of America, enUSA, Edition date: 201808, Second-Printing Hill Descent Control
(If Equipped)
Page 233 of 583
The system may not correctly operate in
any of the following conditions:
•
You use a spare tire or a tire that is
significantly worn more than the other
tires.
• One or more tires are incorrectly
inflated.
• You try to park on a tight curve.
• Something passes between the front
bumper and the parking space. For
example, a pedestrian or cyclist.
• The edge of the neighboring parked
vehicle is high off the ground. For
example, a bus, tow truck or flatbed
truck.
• The weather conditions are poor. For
example, during heavy rain, snow, fog,
high humidity and high temperatures.
Do not use the system if:
• You have attached an add-on
accessory close to the sensors on the
front or rear of your vehicle. For
example, a bike rack or trailer.
• You have attached an overhanging
object to the roof. For example, a
surfboard.
• The front bumper, rear bumper or the
side sensors are damaged.
• The correct tire size is not in use on your
vehicle. For example, a mini-spare tire.
Using Active Park Assist
Selecting an Active Park Assist Mode Press the button once to
activate parallel parking. Press
the button a second time to
activate perpendicular parking. If you press
the button again the system switches off. If your vehicle is parked and after you
switch the ignition on, you can use the
information display to toggle through the
modes. Press the button to switch the
system on and open the system menu in
the information display.
Note:
If your vehicle is parked, the default
mode is parallel park out assist. However,
if you did not use active park assist to
parallel park your vehicle, use the
information display to select park out assist.
Note: You can repeatedly press the active
park assist button to toggle through the
modes only after moving your vehicle
approximately 33 ft (10 m).
To toggle through the modes, use the
buttons on the information display to
select the following:
• Parallel parking.
• Perpendicular parking.
• Parallel park out assist.
• Switch the system off.
Note: There is no time limit for toggling
through the modes.
Parallel Parking
The system detects available parallel
parking spaces and steers your vehicle into
the space. You control the accelerator,
gearshift and brakes. The system visually
and audibly guides you into a parallel
parking space. Press the button once to search
for a parking space.
Note: You can also switch the system on
after you have already driven partially or
completely past a parking space. Press the
active park assist button and the system
informs you if you have recently passed a
suitable parking space.
230
Expedition (TB8) Canada/United States of America, enUSA, Edition date: 201808, Second-Printing Parking AidsE146186 E146186
Page 253 of 583
The warning system is in two stages. At
first the system issues a temporary warning
that you need to take a rest. This message
will only appear for a short time. If the
system detects further reduction in driving
alertness, another warning may be issued
which will remain in the information display
for a longer time. Press OK on the steering
wheel control to clear the warning. When
active the system will run automatically in
the background and only issue a warning
if required.
Resetting the System
You can reset the system by either:
•
Switching the ignition off and on.
• Stopping your vehicle and then opening
and closing the driver ’s door.
LANE KEEPING SYSTEM (IF
EQUIPPED) WARNING:
You are responsible
for controlling your vehicle at all times.
The system is designed to be an aid and
does not relieve you of your responsibility
to drive with due care and attention.
Failure to follow this instruction could
result in the loss of control of your
vehicle, personal injury or death. WARNING:
Always drive with due
care and attention when using and
operating the controls and features on
your vehicle. WARNING:
In cold and severe
weather conditions the system may not
function. Rain, snow and spray can all
limit sensor performance. WARNING:
The system will not
operate if the sensor cannot track the
road lane markings. WARNING:
The sensor may
incorrectly track lane markings as other
structures or objects. This can result in
a false or missed warning. WARNING:
The system may not
operate properly if the sensor is blocked.
Keep the windshield free from
obstruction. WARNING:
If damage occurs in
the immediate area surrounding the
sensor, have your vehicle checked as
soon as possible. WARNING:
The system may not
correctly operate if your vehicle is fitted
with a suspension kit not approved by
us.
Note: The system works above
40 mph
(64 km/h).
Note: The system works as long as the
camera can detect one lane marking.
Note: When you select aid or alert and aid
mode and the system detects no steering
activity for a short period, the system alerts
you to put your hands on the steering wheel.
The system may detect a light grip or touch
on the steering wheel as hands off driving.
Note: The system may not function if the
camera is blocked, or if the windshield is
damaged or dirty.
250
Expedition (TB8) Canada/United States of America, enUSA, Edition date: 201808, Second-Printing Driving Aids
Page 257 of 583
Why is the feature not available (line markings are gray) when I can see the lane markings
on the road?
Lane width is too narrow or too wide.
The camera has not been calibrated after a windshield replacement.
Driving on tight roads or on uneven roads. Why does the vehicle not come back toward the middle of the lane, as expected, in the
Aid or Aid + Alert mode?
High cross winds are present.
There is a large road crown.
Rough roads, grooves or shoulder drop-offs.
Heavy uneven loading of the vehicle or improper tire inflation pressure.
The tires have been changed, or the suspension has been modified.
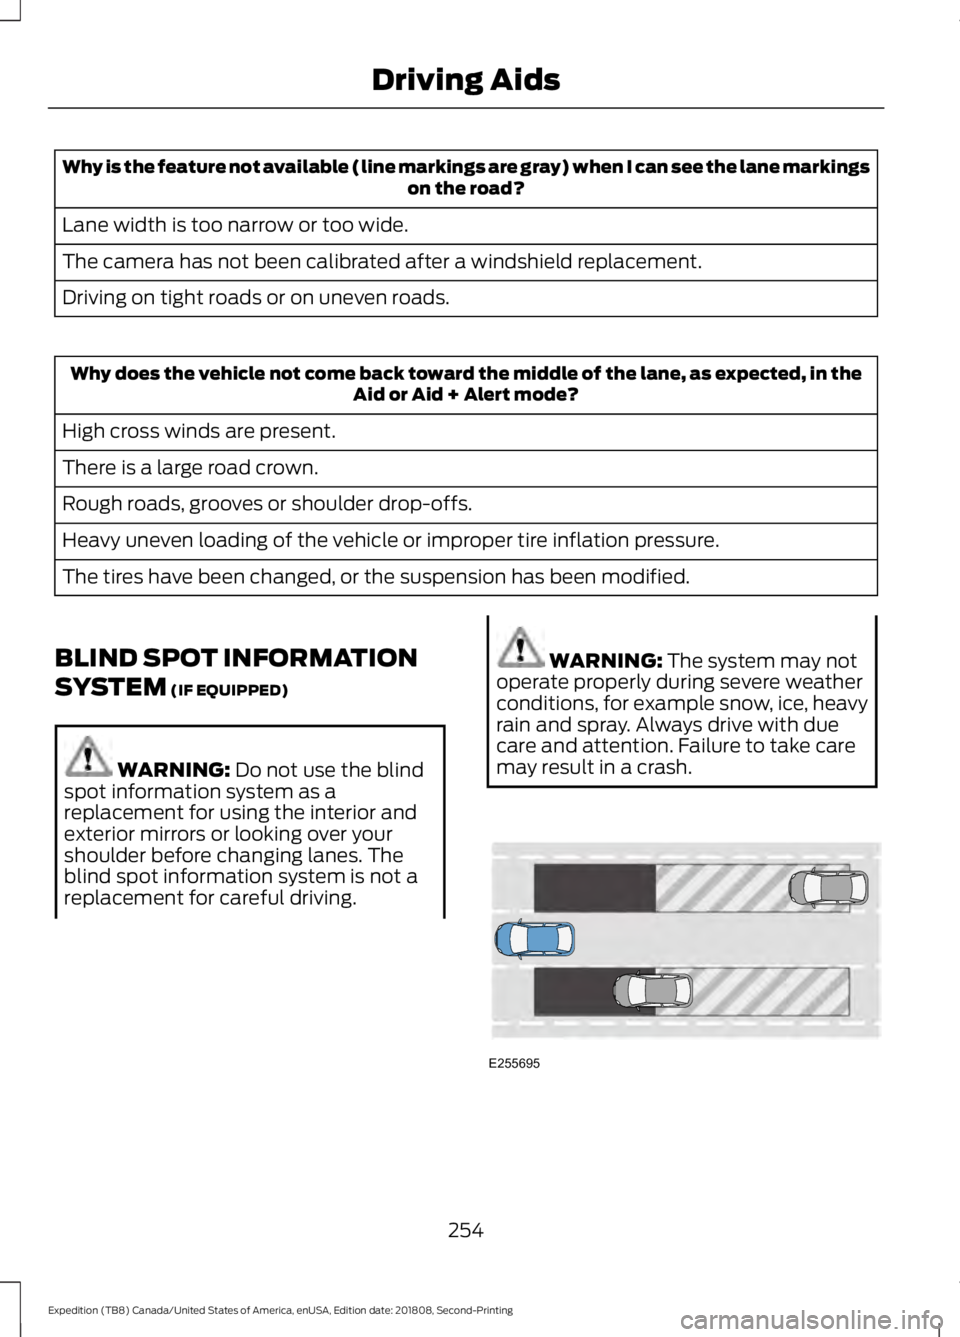
BLIND SPOT INFORMATION
SYSTEM (IF EQUIPPED) WARNING:
Do not use the blind
spot information system as a
replacement for using the interior and
exterior mirrors or looking over your
shoulder before changing lanes. The
blind spot information system is not a
replacement for careful driving. WARNING:
The system may not
operate properly during severe weather
conditions, for example snow, ice, heavy
rain and spray. Always drive with due
care and attention. Failure to take care
may result in a crash. 254
Expedition (TB8) Canada/United States of America, enUSA, Edition date: 201808, Second-Printing Driving AidsE255695